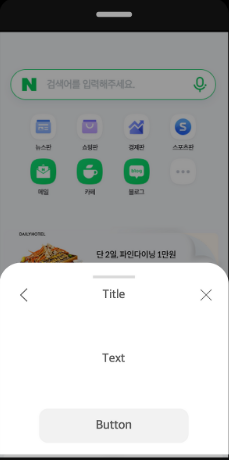
Bottom Sheet 란?
화면 하단에서 위로 올라오는 모달 형태의 UI 컴포넌트이다. 주로 모바일 앱에서 추가 정보나 옵션을 보여줄 때 사용한다. 화면을 완전히 가리지 않으며 드래그로 열고 닫을 수 있고, 상단의 기존 화면을 어둡게 처리해주는 UI이다.
거의 모든 앱에서 사용하는 UI이기에 필수적으로 사용할줄 알아야 한다.
RN에서 Bottom Sheet
RN에서는 기본적으로 제공하는 Bottom Sheet 컴포넌트가 없다. 때문에 라이브러리가 필요하며, 많이 사용되는것이 @gorhom/bottom-sheet 이다. 이 라이브러리의 장점은 다음과 같다.
- 표준으로 사용될 정도로 가장 인기가 많음
- Reanimated 기반의 부드러운 애니메이션
- React Native Gesture Handler 사용
- 고도로 커스터마이징 가능
- 네이티브 드라이버 사용하여 성능이 최적화됨
사용법
1. 설치
pnpm install @gorhom/bottom-sheet
pnpm install react-native-reanimated react-native-gesture-handler
2. 구현
import { useRef, useMemo } from 'react';
import BottomSheet from '@gorhom/bottom-sheet';

function MyScreen() {
  const bottomSheetRef = useRef(null);

  // 스냅 포인트 (화면의 몇 %까지 올라올지)
  const snapPoints = useMemo(() => ['25%', '50%', '90%'], []);

  return (
    <GestureHandlerRootView >
      <View style={{ flex: 1 }}>
        {/* 메인 콘텐츠 */}
        <Button
          title="필터 열기"
          onPress={() => bottomSheetRef.current?.expand()}
        />

        {/* Bottom Sheet */}
        <BottomSheet
          ref={bottomSheetRef}
          index={-1}  // -1: 닫힌 상태, 0: 첫 번째 스냅포인트, 1: 두 번째...
          snapPoints={snapPoints}
        >
          <View style={{ padding: 20 }}>
            <Text>필터 옵션</Text>
            {/* 내용 */}
          </View>
        </BottomSheet>
      </View>
    </GestureHandlerRootView>
  );
}
1) Snap Point
bottom sheet가 멈추는 높이 단계이다. 사용자가 드래그하면 지정된 가장 가까운 스냅포인트로 자동으로 이동한 뒤 유지된다.
// 3단계: 25% → 50% → 90%
const snapPoints = ['25%', '50%', '90%'];

// 픽셀 단위도 가능
const snapPoints = [200, 400, 600];

// 동적 계산
const snapPoints = useMemo(() => {
  const screenHeight = Dimensions.get('window').height;
  return [screenHeight * 0.3, screenHeight * 0.6];
}, []);
2) 제어 메서드
const bottomSheetRef = useRef(null);

// 열기
bottomSheetRef.current?.expand();  // 마지막 스냅포인트까지 이동

// 특정 위치로 이동
bottomSheetRef.current?.snapToIndex(0);  // 첫 번째 스냅포인트
bottomSheetRef.current?.snapToIndex(1);  // 두 번째 스냅포인트

// 닫기
bottomSheetRef.current?.close();

// 특정 위치로 (px)
bottomSheetRef.current?.snapToPosition(300);
3) 상단 화면 어둡게 Backdrop
import { BottomSheetBackdrop } from '@gorhom/bottom-sheet';

<BottomSheet
  ref={bottomSheetRef}
  snapPoints={snapPoints}
  backdropComponent={(props) => (
    <BottomSheetBackdrop
      {...props}
      disappearsOnIndex={-1}  // 닫히면 사라짐
      appearsOnIndex={0}      // 첫 스냅포인트부터 나타남
      opacity={0.5}           // 투명도
    />
  )}
>
4) 스크롤 가능한 콘텐츠
BottomSheet 내에선 일반 ScrollView나 FlatList를 쓰면 제스처가 충돌할수도 있기에, 호환이 가능한 전용 컴포넌트를 사용해야한다.
import { BottomSheetScrollView, BottomSheetFlatList } from '@gorhom/bottom-sheet';

<BottomSheet ref={bottomSheetRef} snapPoints={snapPoints}>
  {/* 일반 스크롤 */}
  <BottomSheetScrollView>
    {/* 긴 내용 */}
  </BottomSheetScrollView>

  {/* 또는 리스트 */}
  <BottomSheetFlatList
    data={items}
    renderItem={({ item }) => <Item {...item} />}
  />
</BottomSheet>
5) 실무예제 Bottom Sheet
function OptionsBottomSheet({ ref, post }) {
  const snapPoints = useMemo(() => ['30%'], []);

  const options = [
    { icon: 'share', label: '공유하기', onPress: handleShare },
    { icon: 'bookmark', label: '저장하기', onPress: handleSave },
    { icon: 'flag', label: '신고하기', onPress: handleReport },
  ];

  return (
    <BottomSheet
      ref={ref}
      index={-1}
      snapPoints={snapPoints}
      enablePanDownToClose={true} // 아래로 드래그하면 완전히 닫힐 수 있는지
    >
      <View>
        {options.map((option, index) => (
          <TouchableOpacity
            key={index}
            style={styles.option}
            onPress={() => {
              option.onPress();
              ref.current?.close();
            }}
          >
            <Icon name={option.icon} />
            <Text>{option.label}</Text>
          </TouchableOpacity>
        ))}
      </View>
    </BottomSheet>
  );
}
여기서, RN의 전용 FlatList를 쓰지 않고 <BottomSheetFlatList /> 를 쓰는 이유는 제스처 충돌 때문이다. Bottom Sheet는 드래그 제스처로 동작하는데, 일반 FlatList도 스크롤 제스처를 사용한다. 두 제스처가 충돌하면서 아래의 문제가 발생한다.
- FlatList를 스크롤 했는데 Bottom Sheet를 닫아버릴 수 있음. 반대의 경우도 있음
- 스크롤 끝에서 예상치 못한 동작이 발생할 수 있음
BottomSheetFlatList의 성능 최적화 자체는 FlatList와 동일하다. 일반 FlatList를 래핑한것이고, 추가 로직은 제스처 처리 뿐이다. 이외에도 BottomSheet 전용 컴포넌트가 아래처럼 존재한다.
BottomSheetScrollView
BottomSheetSectionList
BottomSheetTextInput
BottomSheetModal?
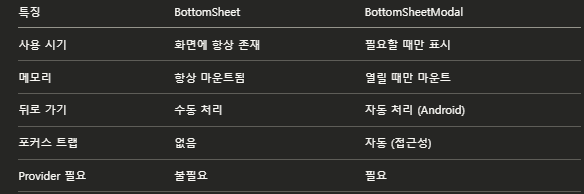
하지만, 실무에서는 일반 BottomSheet 보다 BottomSheetModal 을 더 많이 사용한다. 다음의 차이점을 보자.
import BottomSheet, {
  BottomSheetModal,
  BottomSheetModalProvider
} from '@gorhom/bottom-sheet';

function App() {
  return (
    <GestureHandlerRootView style={{ flex: 1 }}>
      <BottomSheetModalProvider>  {/* Modal 사용 시 필수 */}
        <MyScreen />
      </BottomSheetModalProvider>
    </GestureHandlerRootView>
  );
}

function MyScreen() {
  const bottomSheetModalRef = useRef<BottomSheetModal>(null);
  const snapPoints = useMemo(() => ['25%', '50%'], []);

  return (
    <View style={{ flex: 1 }}>
      <Button
        title="열기"
        onPress={() => bottomSheetModalRef.current?.present()}
      />

      <BottomSheetModal  {/* Modal 사용 */}
        ref={bottomSheetModalRef}
        snapPoints={snapPoints}
      >
        <View style={{ padding: 20 }}>
          <Text>Modal 내용</Text>
        </View>
      </BottomSheetModal>
    </View>
  );
}
그렇다면 언제 어떤 것을 사용할까?
- BottomSheet : 항상 보이는 UI (지도 앱의 하단 정보창)
- BottomSheetModal : 버튼 클릭 시 나타나는 UI (예: 필터, 옵션 메뉴) ← 대부분의 경우
바텀시트를 제어하는 커스텀 훅
다음과 같이 커스텀 훅을 구현하여 바텀시트를 호출할 때, 공통으로 사용하면 효율적으로 제어할 수 있다.
import type { BottomSheetModal } from '@gorhom/bottom-sheet';
import { useCallback, useEffect, useRef } from 'react';
import { BackHandler } from 'react-native';

interface IParams {
  initialSnapPoints?: (string | number)[];
  disableBackButtonDismiss?: boolean;
}

const useCommonBottomSheetModal = (params?: IParams) => {
  const ref = useRef<BottomSheetModal>(null);
  const snapPoints = params?.initialSnapPoints;

  const isOpenedRef = useRef<boolean>(false);

  const backAction = useCallback((): boolean | null | undefined => {
    if (isOpenedRef.current) {
      setTimeout(() => {
        ref.current?.dismiss();
      }, 0);
      isOpenedRef.current = false;
      return true;
    }
    return false;
  }, []);

  useEffect(() => {

    const backHandler = !params?.disableBackButtonDismiss
      ? BackHandler.addEventListener('hardwareBackPress', backAction)
      : undefined;
    return () => {
      backHandler?.remove?.();
    };
  }, [backAction, params?.disableBackButtonDismiss]);

  const onPresent = useCallback((): void => {
    isOpenedRef.current = true;
    setTimeout(() => {
      ref.current?.present();
    }, 0);
  }, []);

  const onDismiss = useCallback((): void => {
    if (!isOpenedRef.current) return;
    isOpenedRef.current = false;
    setTimeout(() => {
      ref.current?.dismiss();
    }, 0);
  }, []);

  return {
    ref,
    snapPoints,
    onPresent,
    onDismiss,
  };
};

export default useCommonBottomSheetModal;-
파라미터
initialSnapPoints: 모달이 화면에 표시될 때의 높이 값 배열이다. (예: ['25%', '50%'])disableBackButtonDismiss: true로 설정할 경우, 안드로이드 기기의 뒤로가기 버튼을 눌렀을 때 모달이 닫히는 기능을 비활성화한다.
-
참조 및 상태 관리 (Refs)
- React의 렌더링 주기에 영향을 주지 않고 값을 추적하기 위해 useRef를 사용
- ref : BottomSheetModal 컴포넌트 인스턴스에 직접 접근하여 열기(present) 및 닫기(dismiss) 메서드를 실행하기 위한 참조
- isOpenedRef : 모달의 현재 표시 여부를 boolean 값으로 저장한다. 모달의 열림 & 닫힘의 중복 동작을 방어하기 위한 변수
-
하드웨어 뒤로가기 버튼 제어
안드로이드 기기에서 뒤로가기 버튼을 눌렀을 때 앱이 종료되는 대신 모달만 닫히도록 제어.- backAction 함수 :
isOpenedRef.current가 true(모달이 열린 상태)일 때 모달을 닫고 true를 반환한다. true 반환은 React Native 시스템에 "뒤로가기 이벤트를 여기서 처리했으므로 기본 동작(앱 종료 등)을 실행하지 말라"는 명령이다. - useEffect 훅 :
disableBackButtonDismiss값이 비활성화(false 또는 undefined) 상태일 때 기기의hardwareBackPress이벤트에backAction함수를 연결한다. 컴포넌트가 화면에서 사라질 때(Unmount) remove()를 호출하여 이벤트 리스너를 해제한다.
- backAction 함수 :
-
모달 열기 및 닫기 함수
- onPresent :
isOpenedRef.current를 true로 설정하고 모달을 연다. 사용자가 제스처로 바텀시트를 내릴 때 isOpendRef.current 는 false로 변하지 않고 남아있기에 방어 조건을 걸지 않는다. - onDismiss :
isOpenedRef.current가 true일 때만 상태를 false로 변경하고 모달을 닫는다. 중복 호출을 방지하기 위해 조건을 건다.
- onPresent :
이때, 모달 동작의 함수에 setTimeout(() => {}, 0) 을 사용한다. 함수의 동작을 이벤트 루프의 다음 틱으로 지연시켜 React의 다른 렌더링 작업이나 다른 동기적인 UI 스레드 작업이 완료된 후 모달 애니메이션이 실행되도록 보장한다. 이 덕분에 프레임 드롭이나 상태 충돌 오류를 방지한다.