Vite를 이용하여 프로젝트 구성하기
프론트엔드 개발 환경을 제공하는 Vite(비트)와, React를 이용하여 프로젝트 구조를 알아보자.
먼저, Vite 공식페이지을 참고하여 Vite를 설치한다.
npm을 사용하고 있기 때문에 다음의 명령어를 통해 vite를 이용하여 프로젝트를 생성해준다.
npm create vite@latest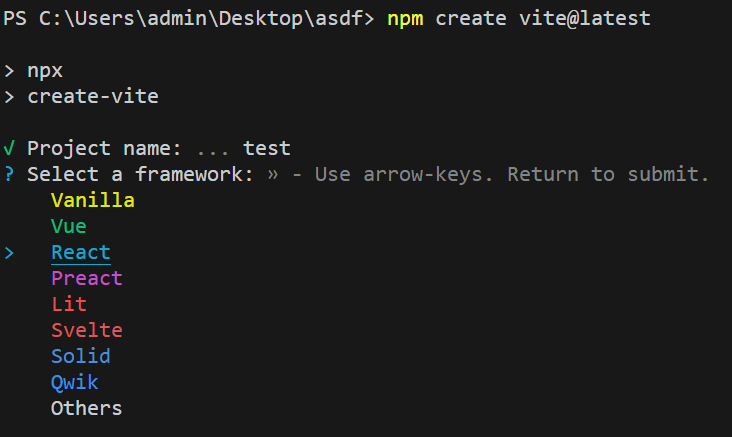
프로젝트 이름과, 사용할 프레임워크를 선택해준다.
React를 사용할 것이므로, React를 선택해준다.
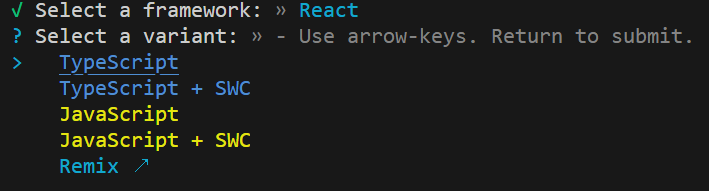
또한, TypeScript를 사용할 것이므로, 선택해준다.
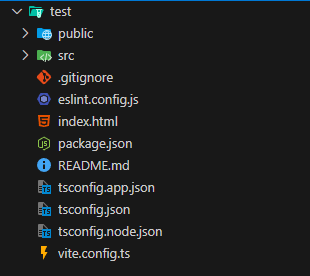
이렇게 선택을 마치면, 다음과 같이 프로젝트 구조가 어느정도 잡힌 상태로 프로젝트가 생성된다.
── test
   ├─ eslint.config.js
   ├─ index.html
   ├─ package.json
   ├─ public
   │  └─ vite.svg
   ├─ README.md
   ├─ src
   │  ├─ App.css
   │  ├─ App.tsx
   │  ├─ assets
   │  │  └─ react.svg
   │  ├─ index.css
   │  ├─ main.tsx
   │  └─ vite-env.d.ts
   ├─ tsconfig.app.json
   ├─ tsconfig.json
   ├─ tsconfig.node.json
   └─ vite.config.ts
이제 npm i 를 이용하여 package.json의 라이브러리들의 설치를 수행해주고,
npm run dev를 통해, 기본적인 웹 애플리케이션이 로컬서버에서 구동되게 된다.
vite로 프로젝트를 구성하면 기본적으로 http://localhost:5173/ 로 서버가 열리기 때문에 해당 url로 접속하면 vite + react 앱의 동작을 확인할 수 있다.
프로젝트의 파일들 살펴보기.
자동으로 구성된 파일들 하나하나를 살펴보자.
── Vite 프로젝트
   ├─ eslint.config.js
   ├─ index.html
   ├─ package.json
   ├─ public
   │  └─ vite.svg
   ├─ README.md
   ├─ src
   │  ├─ App.css
   │  ├─ App.tsx
   │  ├─ assets
   │  │  └─ react.svg
   │  ├─ index.css
   │  ├─ main.tsx
   │  └─ vite-env.d.ts
   ├─ tsconfig.app.json
   ├─ tsconfig.json
   ├─ tsconfig.node.json
   └─ vite.config.ts
1. public (디렉토리)
Vite로 프로젝트를 생성하면, 이 public 폴더 안에 vite.svg라는 파일이 생성되어 있다.
index.html에서 <link rel="icon" type="image/svg+xml" href="/vite.svg" /> 에 사용되는 favicon 이미지 파일이다.
이 public 디렉토리에 위치한 파일들은 기본적으로 / 루트에서 제공되고, 빌드 과정에서 파일의 변환없이 정적 파일로 배포된다.
즉, 정적 파일을 모아두는 디렉토리이다.
2. src (디렉토리)
소스 코드, 즉 앱의 핵심 파일들이 위치하는 디렉토리이다.
이 디렉토리에서 apis, pages, styles, stores types, components, contexts, hooks, models 등의 목적에 맞게 폴더를 생성하여 코드들을 관리할 수 있다.
3. src > assets (디렉토리)
애플리케이션에서 사용되는 정적 리소스들을 보관하는 폴더이다.
4. src > App.css
App.tsx의 CSS를 정의한다.
5. src > App.tsx
main.tsx의 파일에서 컴포넌트로써 사용된다.
프로젝트의 핵심 기능을 App.tsx에 작성한다.
즉, 작성한 컴포넌트들을 이 파일에 적절히 배치하면 된다.
6. src > index.css
전역 CSS 스타일을 정의하는 파일이다.
:root {
  font-family: Inter, system-ui, Avenir, Helvetica, Arial, sans-serif;
  line-height: 1.5;
  font-weight: 400;
  }
위처럼 모든 컴포넌트에 공통적으로 적용할 CSS를 지정할 수 있다.
브라우저 간의 css 격차를 줄이기 위해 보통 reset CSS라는 것을 사용하는데,
그러한 공통 css가 이 파일에 설정될 수 있다.
이 파일을 src > styles 폴더에 작성하여 스타일 파일들끼리 모아두는 것도 방법이다.
(이 경우에는 당연히 main.tsx 파일의 import './index.css' 부분을 경로와 파일명에 맞게 변경해줘야 한다.)
7. src > main.tsx
index.html에서 script의 모듈로써 인식되는 js파일이다.
즉, 애플리케이션의 진입점이다.
main.tsx에는 App 컴포넌트가 들어있다.
createRoot(document.getElementById('root')!).render(
  <StrictMode>
    <App />
  </StrictMode>,
)
즉,
App.tsx -> main.tsx -> index.html 로 전달하여 렌더링된다.
8. src > vite-env.d.ts
Vite에서 자동으로 생성된 TypeScript 선언 파일이다.
Vite 관련 전역 타입 정의가 포함되어 있으며, TypeScript가 Vite의 특수한 환경을 이해하고 타입 체크를 수행할 수 있도록 하는 역할이다.
딱히 설정을 건드릴 필요는 없다.
9. eslint.config.js ★★ - prettier
ESLint 설정파일이다. 먼저 ESLint에 대해 간단하게 말하자면, 코드의 문제점을 찾아내고 일관성을 유지하도록 도와주는 도구이다. 예를 들어, 선언은 되었지만 사용되지 않는 변수에 대해 경고를 나타낸다든가, ==대신 ===를 사용한다든가 하는 상황에서 경고를 발생시킨다.
내용은 다음과 같다.
import js from '@eslint/js'
import globals from 'globals'
import reactHooks from 'eslint-plugin-react-hooks'
import reactRefresh from 'eslint-plugin-react-refresh'
import tseslint from 'typescript-eslint'

export default tseslint.config(
  { ignores: ['dist'] },
  {
    extends: [js.configs.recommended, ...tseslint.configs.recommended],
    files: ['**/*.{ts,tsx}'],
    languageOptions: {
      ecmaVersion: 2020,
      globals: globals.browser,
    },
    plugins: {
      'react-hooks': reactHooks,
      'react-refresh': reactRefresh,
    },
    rules: {
      ...reactHooks.configs.recommended.rules,
      'react-refresh/only-export-components': [
        'warn',
        { allowConstantExport: true },
      ],
    },
  },
)
config 파일에 내용을 추가하여 설정을 추가할 수 있다.
특히, prettier를 같이 사용하고자 한다면 추가 설정을 해줘야 하는데, 하단에서 기술하겠다.
10. index.html
애플리케이션이 시작되는 html파일이다.
Vite를 통해 기본 작성된 내용은 다음과 같다.
<!doctype html>
<html lang="en">
  <head>
    <meta charset="UTF-8" />
    <link rel="icon" type="image/svg+xml" href="/vite.svg" />
    <meta name="viewport" content="width=device-width, initial-scale=1.0" />
    <title>Vite + React + TS</title>
  </head>
  <body>
    <div id="root"></div>
    <script type="module" src="/src/main.tsx"></script>
  </body>
</html>
script 태그를 보면 알겠지만, main.tsx 자바스크립트 파일이 삽입되면서 리액트를 통해 작성한 코드가 변환되어 html에 올바르게 렌더링 될 수 있는 것이다.
11. package.json
프로젝트의 dependencies, scripts 등이 정의된 파일이다.
특정 라이브러리를 추가하거나 모듈을 설치하면 이 파일에 추가가 된다.
github를 이용할 때, 모듈들이 설치된 node_modules 폴더는 제외하고 업로드하는데,
package.json이 포함된 프로젝트를 git clone한 뒤, npm i 명령을 수행하면 package.json을 참고하여 필요한 라이브러리들이 설치된다.
12. README.md
프로젝트에 대한 설명을 마크다운 언어로 작성할 수 있는 파일이다.
프로젝트에 대한 소개, 라이선스, 사용 방법 등이 들어갈 수 있다.
13. tsconfig.app.json
TypeScript 설정 파일로, 애플리케이션 코드에 적용되는 TypeScript 컴파일러 옵션을 정의한다.
특정 환경(앱 코드, 테스트 코드 등)에 대한 설정이 포함될 수 있다.
이 파일도 보통은 딱히 설정을 건드릴 필요는 없다.
14. tsconfig.json ★★
TypeScript 컴파일러 옵션을 설정하는 파일이다.
TypeScript 설정을 정의하고, TypeScript 컴파일러가 어떻게 코드를 해석하고 JS파일로 변환할지 지시한다.
비어있는 디렉토리에 tsc --init 명령어를 입력하면, 상세한 tsconfig.json 파일이 생성되는데, 해당 파일을 확인해보면 어떤 옵션들이 있는지 확인할 수 있다.

Vite가 자동생성한 tsconfig.json에는 다음과 같이 작성되어 있다.
{
  "files": [],
  "references": [
    { "path": "./tsconfig.app.json" },
    { "path": "./tsconfig.node.json" }
  ]
}
여기서 주로 추가되는 설정들은 다음과 같다.
{
	"compilerOptions" : {

  		"target" : "esnext", // ECMAScript 버전

      	"module" : "esnext", // 모듈 시스템. esnext-최신 버전

        "strict" : true, // 엄격한 타입 검사 ( true 권장 )

        "esModuleInterop" : true, // CommonJS 모듈을 ES6 모듈처럼 사용 가능
          // import * as fooModule from './commonjs-module'를
          // import foo from './commonjs-module'; 로 사용 가능하게 해줌.
          // 즉, default import, named import 모두 사용 가능
          // 아래의 "allowSyntheticDefaultImports" 옵션과 같이 사용하는 경우가 많음.

        "skipLibCheck" : true, // 라이브러리 파일의 타입 검사를 건너뜀.

        "forceConsistentCasingInFileNames" : true, // 파일 이름의 대소문자 일관성 강제

        "baseUrl" : ".", // 모듈 해석을 위한 기본 디렉토리 지정.
          // 예를 들어, baseUrl : "." 일땐, ./src/abcd.ts 로 입력,
          // 		   baseUrl : "./src" 일땐, ./abcd.ts 로 입력

        "paths" : {
            "@/*" : ["src/*"]
        }, // `@` 는 `/src` 경로를 의미하도록 별칭 설정
"typeRoots" : ["node_modules/@types"] // ["node_modules/@types"] 가 default
// 타입 정의 파일이 위치하는 디렉토리를 지정
// include 옵션에서 이미 .d.ts 파일이 포함된 경우, typeRoots는 type.d.ts 파일을 자동으로 인식되므로 지정하지않아도 됨
// typeRoots를 추가적으로 지정했을 경우, ["node_modules/@types"]는 반드시 작성해야함.
// 외부 모듈을 사용할 때, Could not find a declaration file for module 오류가 발생하면,
// 1. @type/모듈명 을 설치하거나, 2. 직접 정의해서 이 부분에 추가해야함.
"types" : ["node"], // typeRoots의 경로에서 찾은 특정 타입 선언 파일만 포함하도록 제한
"allowSyntheticDefaultImports" : true, // CommonJS 모듈을 ES6 스타일로 import 가능.
// default export를 하지 않아도, default import 문법을 사용 가능
"jsx": "react-jsx" // React 16이하의 버전일때,
// React.createElement을 createElement로 작성해도 알아서 변환이 가능하게 함.
"moduleResolution" : "node" // TypeScript가 모듈을 어떻게 해석할지 결정.
// "node" - Node.js 스타일의 모듈 해석을 사용
// "classic": TypeScript의 오래된 모듈 해석 방식. 레거시 코드에서만 사용
// 예를 들어, "node" 설정 시, src/components/Button.tsx 파일을
// src/components/Button으로 해석
// default값은 "node" 임
}
"include" : ["src/**/*"], // 또는, "include": ["src/**/*.ts", "src/**/*.tsx"]
// 컴파일할 파일이나, 디렉토리 지정
"exclude" : ["node_modules", "dist"], // 컴파일에서 제외할 파일/디렉토리 지정,
"files" : ["src/index.ts"], // 특정 파일만 컴파일. 보통은 사용 X, include 옵션으로.
"references": [
{ "path": "./tsconfig.app.json" },
{ "path": "./tsconfig.node.json" }
] // 다른 파일의 설정들을 참조한다. 사실, 위에서 설명한 옵션들은 대부분
// tsconfig.app.json이나, "tsconfig.node.json"에 명시되어 있다.
// 필요한 부분만 tsconfig.json에 추가하면 되겠다.
}
tsconfig.json의 paths 설정과,
vite.config.ts 의 alias 설정이 헷갈릴 수 있다.
| 파일 | 목적 |
|---|---|
| tsconfig.json - paths |
TS 컴파일러가 모듈의 경로를 해석할 때 사용 TS의 타입검사와 코드 완성 기능에 영향 |
| vite.config.ts - alias | 런타임에서 모듈을 찾는데에 사용 |
특정 경로에 대해 별칭을 설정하고 싶다면, tsconfig.json의 paths 설정과,
vite.config.ts의 alias 설정을 모두 동일하게 설정해주는 편이 좋다.
ex)
// tsconfig.json
{
  "compilerOptions": {
    "paths": {
      "@/*": ["src/*"]
    }
  },
// vite.config.ts
export default defineConfig({
plugins: [react()],
resolve: {
alias: {
"@": path.resolve(__dirname, "./src"),
},
},
});15. tsconfig.node.json
Node.js 관련 TypeScript 설정을 정의하는 파일이다.
vite.config.ts와 같은 Vite의 설정 파일을 컴파일할 때 사용된다.
이 파일도 딱히 설정을 건드릴 필요는 없다.
16. vite.config.ts ★★
Vite의 설정 파일이다.
이 파일에서 Vite의 동작을 커스터마이징 할 수 있다.
플러그인을 추가하거나, ./src 경로를 @로 단축해서 사용할 수 있는 alias 를 설정할 수 있다.
협업 설정
src 폴더 구조
Vite를 이용해서 프로젝트를 생성하면, src폴더에는 asset폴더 외에는 별다른 폴더가 없다.
따라서, 동료들과 상의 후에 목적에 맞는 폴더들을 추가하면 된다.
예를 들면 다음과 같다.
├─ src
   │  ├─ assets // 정적 파일들을 모아두는 폴더
   │  ├─ apis // api들을 모아두는 폴더
   │  ├─ components // 공통 컴포넌트들을 모아두는 폴더
   │  ├─ contexts // context api들을 모아두는 폴더
   │  ├─ hooks // 커스텀 훅을 모아두는 폴더
   │  ├─ models // 모델을 모아두는 폴더
   │  ├─ stores // global state의 store을 모아두는 폴더
   │  ├─ styles // 스타일을 모아두는 폴더
   │  ├─ types // 타입에 대한 정의를 모아두는 폴더
   │  ├─ pages // 페이지들을 모아두는 폴더
라이브러리 설치
동료들과 동일한 개발 환경을 구축하기 위해, 필요한 라이브러리들은 미리 설치해두면 좋다.
Prettier
Prettier는 코드의 줄바꿈, 큰따옴표 작은따옴표 등 일관성을 유지시켜주는 extension이다.
Prettier를 사용하기 위해서는 다음과 같은 셋업이 필요하다.
-
prettier 설치
npm install --save-dev --save-exact prettier
- .prettierrc 파일 작성
프로젝트 루트 디렉토리에.prettierrc파일을 생성한다.
prettier docs를 참고해서, 적용시키고 싶은 스타일을 지정한다.
ex)
{
  "printWidth": 80,
  "tabWidth": 2,
  "semi": true,
  "singleQuote": false,
  "trailingComma": "all",
  "bracketSpacing": true,
  "arrowParens": "avoid",
  "endOfLine": "lf"
}
{
"printWidth": 80,
"tabWidth": 2,
"useTabs": false,
"semi": true,
"singleQuote": true,
"trailingComma": "es5",
"bracketSpacing": true,
"jsxSingleQuote": false,
"jsxBracketSameLine": false,
"arrowParens": "always",
"endOfLine": "auto"
}- package.json 수정
"scripts": {
  "format": "prettier --write ."
}
위와 같이 package.json을 설정해두면, npm run format 명령어가 모든 파일을 일관된 스타일로 포맷팅해준다.
-
vscode extension 설치 -
Prettier - Code formatter -
vscode - 저장 시 코드 포매팅 설정
ctrl + ,로 setting 창을 열고,Default Formatter를 검색한다.- Editor : Default Formatter를
Prettier - Code formatter로 설정한다. Format on save를 검색하고, 체크한다.
ESLint
이제 ESLint 설정에 대해 알아보자.
Vite를 사용하면 eslint.config.ts 파일이 생성되고 작성되지만, 만약 prettier와 함께 사용한다면 수정해야 할 부분이 있다.
-
패키지 설치
npm install eslint-plugin-prettier eslint-config-prettier --save-dev
-
eslint.config.ts 수정
import js from '@eslint/js';
import globals from 'globals';
import reactHooks from 'eslint-plugin-react-hooks';
import reactRefresh from 'eslint-plugin-react-refresh';
import tsParser from '@typescript-eslint/parser'; // TypeScript 파서
import tseslint from '@typescript-eslint/eslint-plugin'; // TypeScript ESLint 플러그인
import prettier from 'eslint-plugin-prettier';
import prettierConfig from 'eslint-config-prettier'; // Prettier 설정

export default tseslint.config(
  {
    ignores: ['dist'],
  },
  {
    parser: tsParser, // TypeScript 파서 지정
    extends: [
      js.configs.recommended,
      ...tseslint.configs.recommended,
      'plugin:prettier/recommended', // Prettier 설정 추가
    ],
    files: ['**/*.{js,jsx,ts,tsx}'], // JavaScript 및 TypeScript 파일 포함
    languageOptions: {
      ecmaVersion: 2020,
      sourceType: 'module',
      globals: globals.browser,
    },
    plugins: [
      '@typescript-eslint', // TypeScript ESLint 플러그인
      'react-hooks',
      'react-refresh',
      'prettier', // Prettier 플러그인 추가
    ],
    rules: {
      ...reactHooks.configs.recommended.rules,
      'react-refresh/only-export-components': [
        'warn',
        { allowConstantExport: true },
      ],
      'prettier/prettier': 'error', // Prettier 포맷팅 오류를 ESLint 오류로 표시
    },
  }
);