Accessing informtation
CPU는 16개의 general-purpose register (64bit)를 가지고 있다.
integer 혹은 pointer 를 저장
%r.. 로 시작하는데, 8086 시절부터 사용되던 고유의 8개의 레지스터는 8086 떄처럼 네이밍을 %rax ~ %rbp 로 명명, 그뒤 8개는 %r8 ~ %r15 로 명명한다.
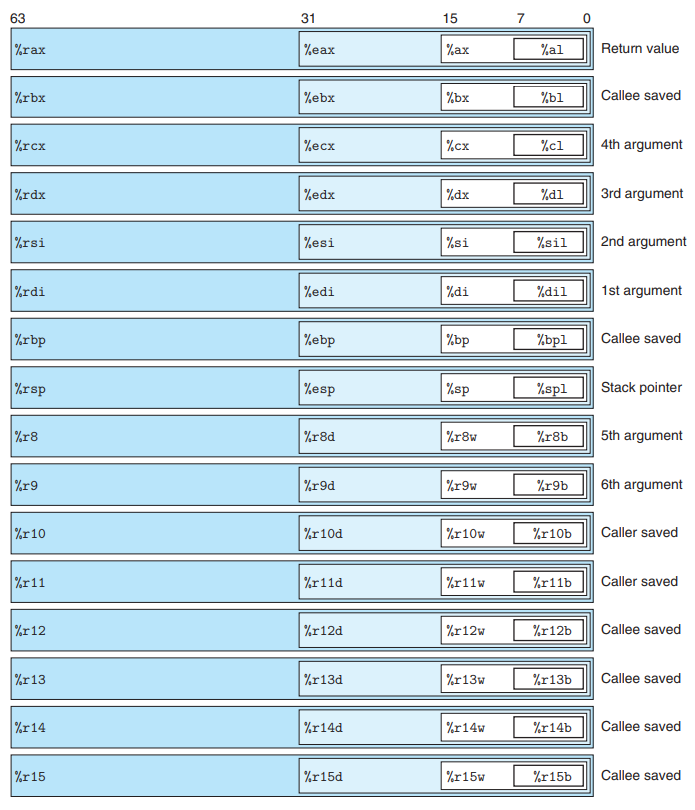
8 bit operation 은 low-order 1 byte 에서 이루어지고 (ex. %al) with suffix "b"
16 bit operation 은 low-order 2 byte 에서 이루어지고 (ex. %ax) with suffix "w"
32 bit operation 은 low-order 4 byte 에서 이루어지고 (ex. %eax) with suffix "l"
64 bit operation 은 레지스터 전체에서 이루어진다. (ex. %rax) with suffix "q"
1,2,4,8 byte 값을 copying/generating 하는 instruction 존재
-> 8 byte 보다 작은 값을 레지스터에 넣을때 남은 바이는 2가지 경우에 따라 처리.
- 1~2 byte: 남은 byte 를 unchanged
- 4 byte: 남은 byte 를 모두 0으로
이러한 레지스터들은 stack 관리, argument 전달, return 값 저장등등을 저장하는데 사용된다.
Operand Specifiers
3가지의 Operand type 이 존재한다.
-
Immediate value: $Imm
source 값은 상수(constant) 이거나 Register, Memory 인데, 이 상수값의 Operands를 immediate type 이라고 한다. ATT asm 포맷으로, $Imm 형태를 띤다. $뒤에 Integer, 정수가 따라온다. -
Register value: r_a
8,4,2,1 byte low-order portion 을 가지는 16개의 register. 위에서 본 그것이다.
r_a 형태로 표현, a = arbitrary register, 레지스터에 저장된 값은 R[r_a] 로 표현
array R, indexed by register identifiers -
memory value: Imm
effective address 라고도 함. 메모리를 하나의 array of bytes로 보기때문에, 해당 메모리에 저장된 값은 M_b[addr] 로 표현, addr 주소부터 시작되는 메모리에 저장된 b byte의 값.
또한 여러개의 addressing mode 존재.
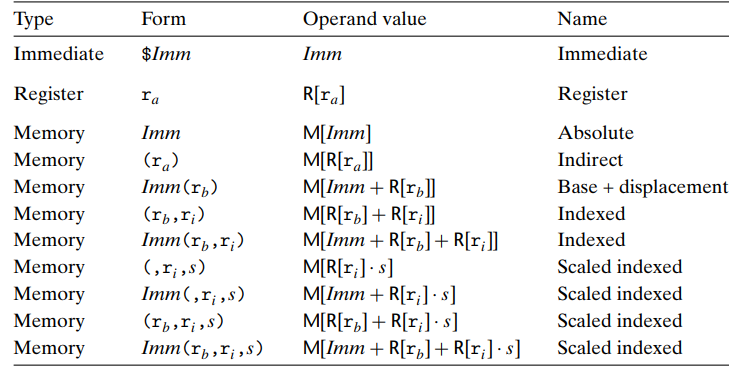
대표적으로 마지막줄, Imm(r_b,r_i,s)는 elements of arrays 를 referencing 할때 자주 사용된다.
r_b는 base Register, r_i 는 index Register, s 는 scale factor(1,2,4,8)
Data movement Instruction
다른 operands 를 가지고 같은 operation 을 수행하는 instruction 의 집합을 instruction classes 이라고 한다.
MOV instruction class는 source data를 dest 로 copying 한다.
movb, movw, movl, movq 각각 1,2,4,8 byte 데이터에서 동작한다.
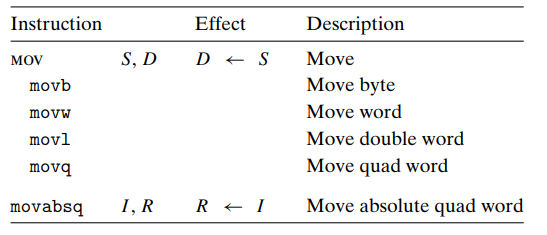
Source는 Register, Memory, Immediate 가능
Dest 는 Register, Memory 만 가능
메모리 Operand 간의 이동(Memory -> Memory)는 불가능하기 때문에 Memory -> Register -> Memory 로 동작해야한다.
일반적인 movq 는 32 bit two's complement number 로 표현가능한 immediate source value 를 가진다. 그 후, destination 의 나머지 32bit는 sign-extended 된다.
movabsq 는 64 bit immediate value 를 source 로 가질 수 있다.
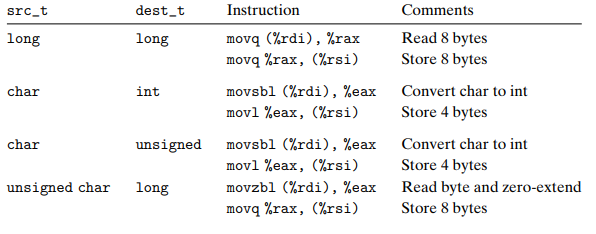
smaller value -> larger destination copy 시에는 2가지의 class가 있다.
size designator는 2가지인데, 첫번째 자리는 source size 이고, 두번째는 destination size 이다.
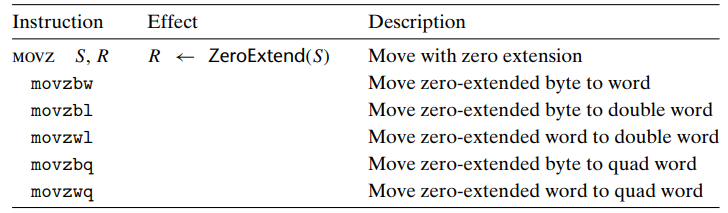
MOVZ class는 dest 의 남은 바이트를 zero-extending, 0으로 fill out 한다.
movz 에는 4 byte -> 8 byte 이동이 없다. 대신 movl instruction 으로 구현가능하다.
-> 4 byte 값을 copying 시 나머지 byte를 0으로 채우는 특징을 이용.
movs, sign extension 에서는 4 -> 8 byte가 여전히 유효
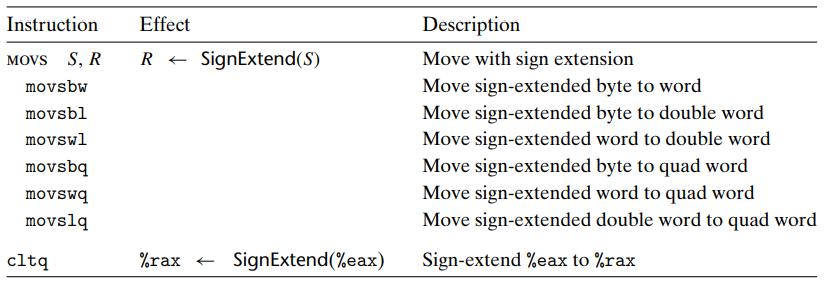
MOVS class는 dest 의 남은 바이트를 source operands 의 sign bit로 fill out 한다.
cltq는 operands 를 가지지 않는다. source 는 항상 %eax, dest는 항상 %rax 이다.
-> movslq %eax, %rax 와 같은 결과, 하지만 더 compact 한 encoding 이다.
Data movement Examples
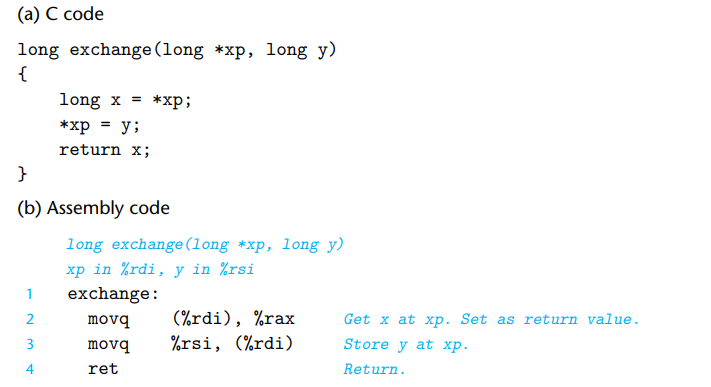
note:
1. pointer = address
2. local variable 같은 경우 memory 가 아닌 register에 저장되곤한다.
이런식의 compiling 이 이루어진다.
casting의 경우 size의 변환 먼저 이루어진다.
ex)
Stack data의 Push 와 Pop
stack은 last-in, first-out 의 discipline을 사용한다.
즉, most-recently pushed value가 pop된다.
->insert와 remove가 array의 끝에서 이루어진다. 이끝을 "top" of the stack 이라고 한다.
stack grows downward.
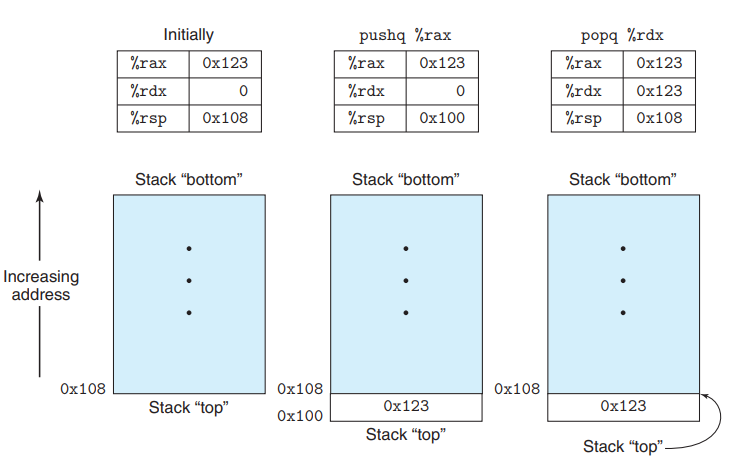
pushq %rbp 는 다음과 같은 동작을 수행한다.

popq %rax 는 다음과 같은 동작을 수행한다.

pop시에 주의해야하는점은, pop된 value은 push에 의해 overwritten 되기전까지는 여전히 메모리에 위치하고 있다는것이다.
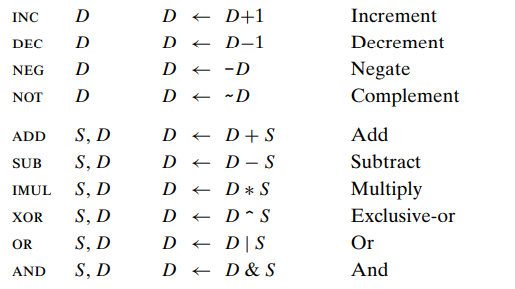
Arithmetic과 Logical Operation
operation 은 4가지 그룹으로 나뉜다: load effective address, unary(single operand), binary(two operands), shift
- Load Effective Address
leaq 는 MOV 의 변형이라고 생각하면 된다.
memory reference 를 전혀 수행하지 않고, effective address 자체를 copying 한다.
이러한 instruction 은 주로 pointer 를 생성하는데 자주 사용된다.

또한 간단한 산수에도 사용 가능하다. %rdx = x 라면...
leaq 7(%rdx, %rdx, 4), %rax
-> %rax = 5x + 7
MOV는 주소의 값을 copying 하지만, LEA는 주솟값을 copying 한다고 보면 된다.
-
Unary and Binary operation
Unary = ++/-- in C
Binary = +=/-= in C 하지만 source 가 앞, dest가 뒤에 온다.
non commutative(교환불가능)
-
Shift operation
source 로는 immediate 값 또는 "%cl" 레지스터가 들어갈 수 있다.
이 %cl 레지스터는 1 byte 크기...shift 하려는 데이터의 크기에 따라서 %cl에서 참고되는 bit의 수가 정해진다.
ex) %cl = 0xFF 일때, salb 라면, 2^3 = 8 이므로, %cl의 low 3 bit만 사용되어 shift amount 는 7이 된다. ( 111 = 7 )
note: Exclusive OR가 없는 C코드에서 xorq %rcx, %rcx 와 같은 assembly 코드가 컴파일되어 나올 때가 있다.
이 구문은 %rcx 의 값을 0으로 만드는 간단한 방법이다.
movq $0 %rcx 는 7byte의 encoding 을 요구하지만 xor은 3byte만 사용한다.
shift amount = low m bit of the %cl
2^m = w (w = size of the value to be shifted)

SAL와 SHL은 같은 left shifting 을 수행한다. fill the right with zeros
SAR은 arthmetic right shift, fill the left with copies of sign bit
SHR은 logical right shift, fill the left with zeros
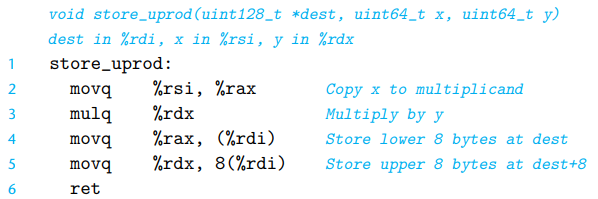
Multiplying two 64-bit integer
결과는 최대 129 bit, x86-64 instruction 은 128-bit를 지원한다.
imul with two 64-bit operands -> 64 bit multiplication
imul with one source operand -> 128 bit multiplication
imulq S 는 S x R[%rax] (for signed)
결과는 high-order 64 bit는 %rdx에, low-order 64bit는 %rax에 저장한다.
이렇게 64,128bit의 곱셈은 operand 의 갯수로 판별한다. (1개면 64bit, 2개면 128bit 곱셈)
unsigned 은 그냥 mulq를 사용한다. 다음과 같이 uint128_t를 구현할 수 있다.
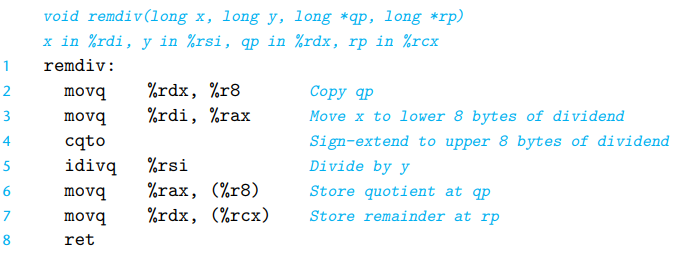
나누기 idivq 와 divq는 %rdx, %rax(total 128 bit)를 S로 나눈다.
몫은 %rdx에, 나머지는 %rax에 저장한다.
64bit 나누기 연산인 경우, %rax(low)에 나눌 값이 모두 저장되어 있어야하며, %rdx는 all zero거나 sign bit of %rax 로 채워져야한다.(unsigned/signed 차이)
%rdx를 all zero로 채울대는 "cqto" 라는 inst로 구현 가능,
%rdx를 sign bit of %rax 로 채울때는 movl $0 %eax 로 구현 가능하다.
Control
data의 값에 따라 sequence of operation 이 달라지게 하기 위해서,
1. 데이터 값에 따른 control flow 변경 (더 자주 사용)
2. 데이터 값에 따른 data flow 변경
"jump" inst 를 사용하여 실행 순서를 변경한다.
Condition Codes
CPU는 1-bit reigster인 Condition Code Register 에 most recnt arithmetic/logical operation의 정보를 저장한다.
CF: Carry Flag. MSB의 Carry out 저장, unsigned의 overflow 판단
- 캐리는 최상위 비트(MSB)에서 그 위의 비트로 자리올림이 발생하는 것을 의미
ZF: Zero Flag. 결과가 0임
SF: Sign Flag. 결과가 negative임
OF: Overflow Flag. two's complement overflow 발생 판단
ex) t = a+b 일 때,
CF = (unsigned) t < (unsigned) a 일때 1
ZF = ( t == 0 ) 일때 1
SF = ( t < 0 ) 일때 1
OF = ( a < 0 == b < 0 ) && ( t < 0 != a < 0 )
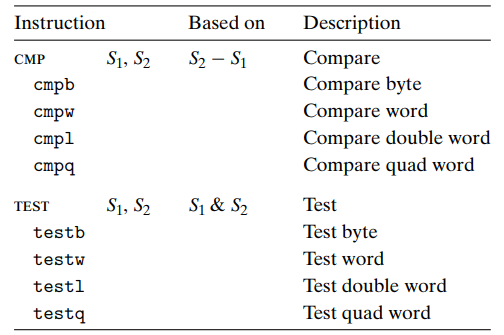
CMP는 두 operands의 차이에 따라 condition code 를 수정한다.
CMp는 두 operands의 관계(같은지/크기비교) 파악
TEST는 두 operands 의 AND를 수행, condition code를 수정한다.
TEST는 두 operands에 같은 값을 주어서 -,0,+을 판단/mask bit를 활용함.
3 ways to use Condition Code
Condtion code 조합에 따라
1. single byte를 0 또는 1 로 SET
2. jump to part of the program
3. transfer data
- SET
SET inst class set signle byte to 0 or 1 based on combination of CC
SET class의 suffix는 찾고자 하는 condition code combination 조건을 의미, size 값이 아님.
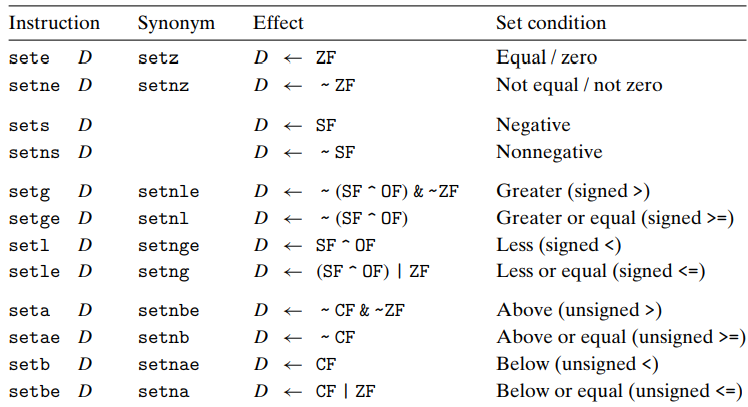
setl 의 경우 왜 xor 가 수행되는지 헷갈리는데, 그 이유는 다음과 같다.
-> a < b 의 경우 comp b a 했을때 결과가 음수 이지만, positive overflow가 발생하지 않아야 하고, (OF = 0, SF = 1) 또는 양수이지만 negative overflow가 발생했어야 한다.(OF = 1, SF = 0) . 따라서 XOR 를 사용한것.
unsigned set less 의 경우 setb 를 사용하는데, D <- CF 임을 알 수 있다. a - b < 0 일때 a - b는 carry flag를 set할 것이기 때문이다.
- jump
jump destination 으로 사용되는 부분을 Label 이라고 한다.
2가지 종류가 있는데, 첫번째로 Label 을 destination 으로 가지는 Direct jump 와 두번째로 register/memory location 에서 읽어오는 Indirect jump 형식이 있다.
Label은 .(label name) 형태을 띔.

jmp은 unconditional jump 이고, conditional jump 은 combination of condition code 에 따라 jump 할지, 그대로 진행할지 결정한다.
이름과 그에 따른 condntion 은 SET의 그것과 같다. (jl, jb... 등)
condtional jump 는 무조건 Direct jump 여야 한다.
Jump target Encoding
jump target 의 위치를 encoding 할때, 주로 PC relative 라는 기법을 사용한다.
-> target instruction 의 주소와 jump 바로 다음 instruction 주소(Program Counter)의 차이를 사용하는 기법. 예를 들자면, 다음과 같다.
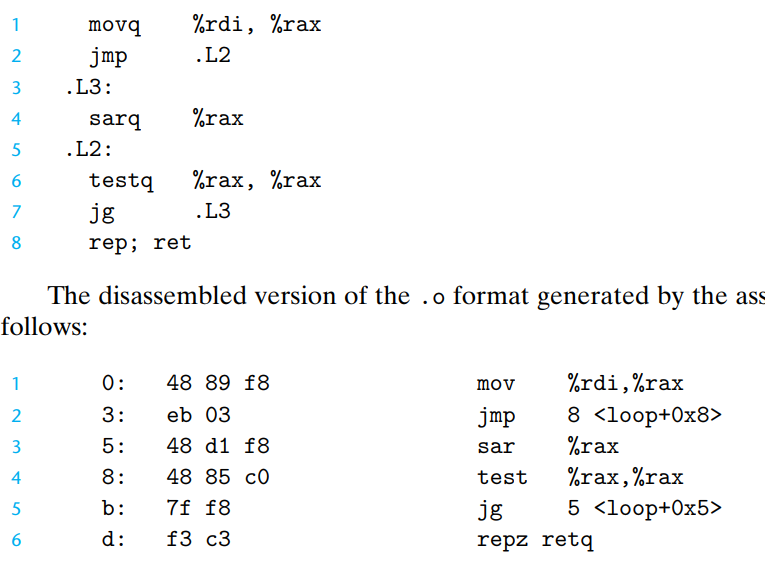
encoding 부분에서 target 주소를 보면 각각 03, f8 인데 이들은 10진수로 각각 3, -8이다.
그리고 바로 다음 instruction 들의 주소는 0x5, 0xd 이다. 이들은 10진수로 각각 5, 13이다.
5 + 3 = 8
13 + (-8) = 5
Line 2 jump instruction 은 0x8, Line 4로 jump 시키고,
Line 5 jump instruction 은 0x5, Line 3로 jump 시킨다.
이러한 주소의 차이, PC(Program Counter) relative 기법을 사용하여 Linking 된 후에도 object 코드는 변하지 않는다.
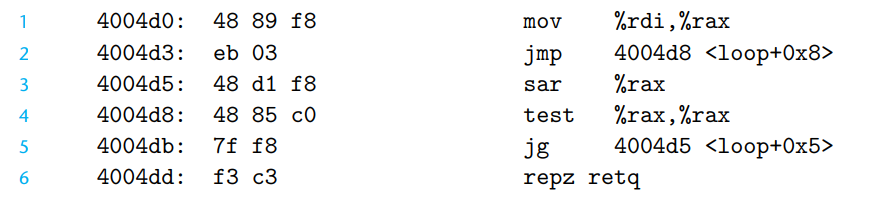
또한 instruction 의 크기가 줄어든다는 장점이 있음(2byte).
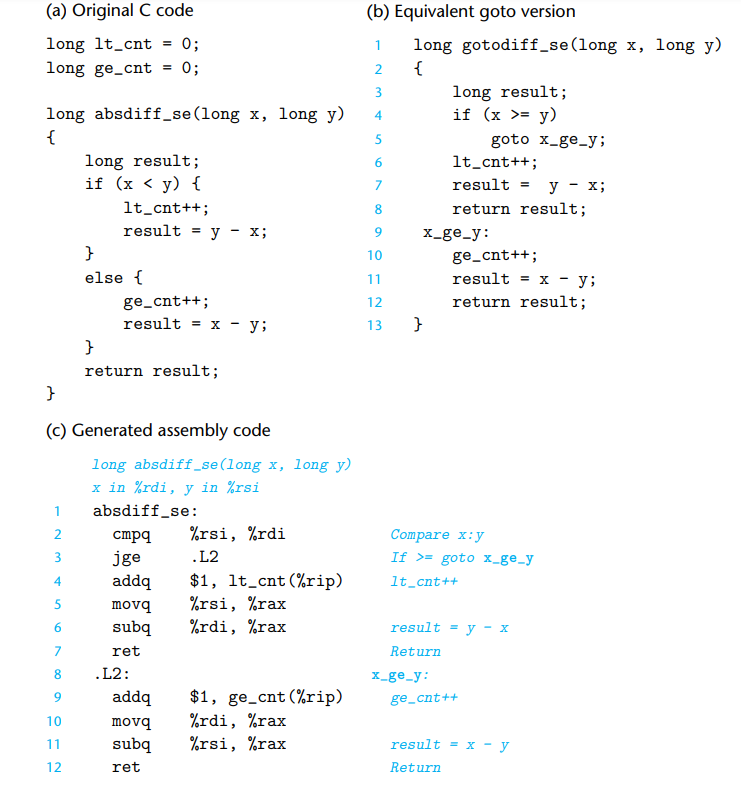
Implementing Conditional Branches with Conditional Control
if-else 구문을 goto 구문으로 변경,
해당 goto를 assembly로 생각해보면 쉽다.
Implementing Conditional Branches with Data moves
"cmov" instruction 을 사용해서 조건에 따라 source 에서 dest로 값을 옮긴다.
cmov 의 suffix는 set의 그것과 같다.
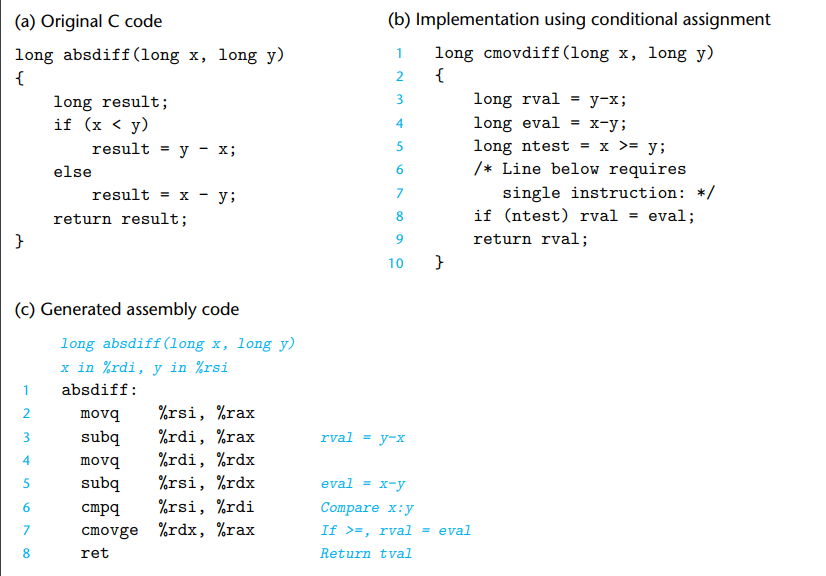
cmov instruction class의 source와 destination 은 16,34,64 bit만 가능하고 8 bit, 1byte는 불가능하다.
mov와 같은 unconditional inst 와 달리 size 를 명시하지 않고 dest register 의 이름만으로 크기를 유추한다.
conditional jumps와 다르게, The processor simply reads the source value (possibly from memory), checks the condition code, and then either updates the destination register or keeps it the same.
이러한 conditional data transfer 은 control transfer 보다 성능이 좋은데, 그 이유는 최신 CPU 의 Pipelining 기능 덕분이다.
Pipelining
Pipelining은 한 instruction이 실행되는데 필요한 부분들을 statge 로 나뉜뒤, 연속된 stage들을 동시에 실행시킴으로써 high performance 를 구현한다.
-> 원활한 Pipeline의 동작을 위해서 실행시킬 inst sequence 를 사전에 결정하는것이 중요한데, control flow 에서는 값을 테스트하기 전까지는 어느것을 실행할지 모른다. (바로 다음 inst? target inst?) 따라서 branch prediction logic 으로 예측하여 결정하긴 하나, 예측이 틀린 경우, 실행했던 inst 를 모두 폐기하고 새 inst 를 처음부터 다시 실행시켜야한다. (15~30 clock 정도의 손해)
그렇다면
Computation time wasted in Data transfer
vs
potential for performance penalty due to branch misprediction
-> 정해진것은 없다. 컴파일러마다 계산하는 기준이 다르다.
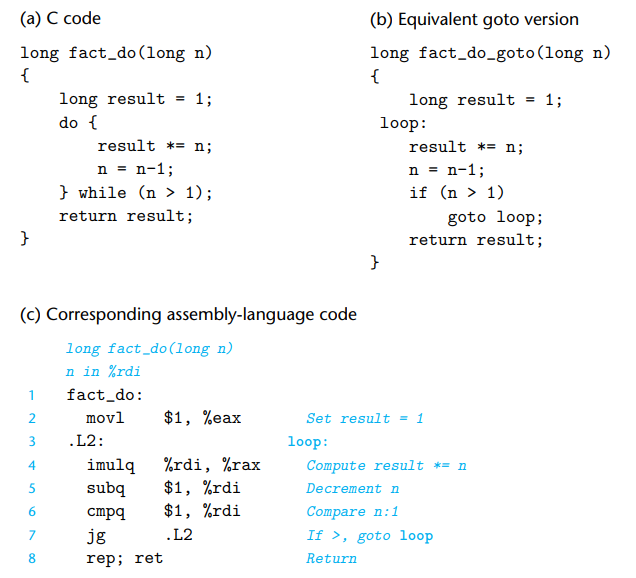
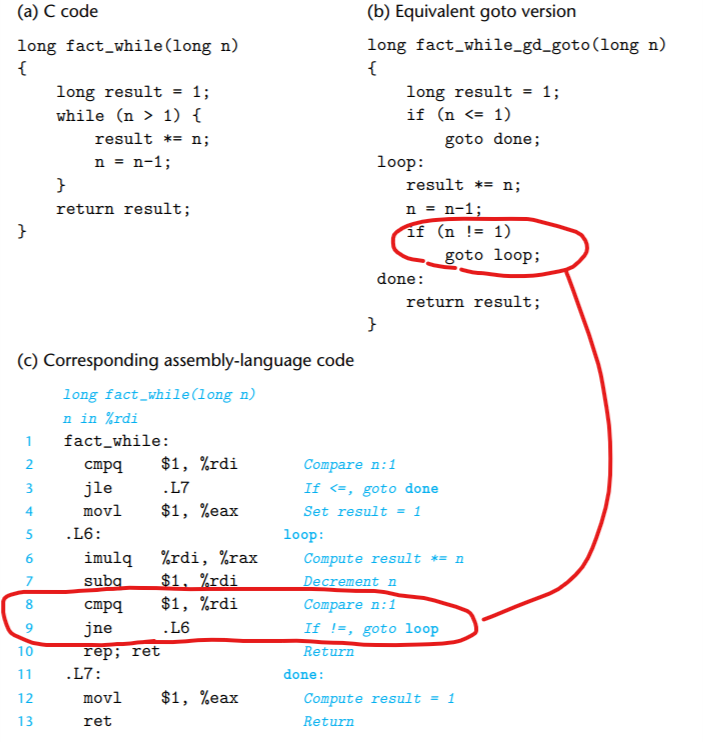
Implementation of the Loop statement
conditonal test 와 jump를 이용하여 구현한다.
do-while은 간단하다.
condition code 조정 -> jump 사용하여 지정 Label 로 돌아감. 이라는 메카니즘을 사용한다.
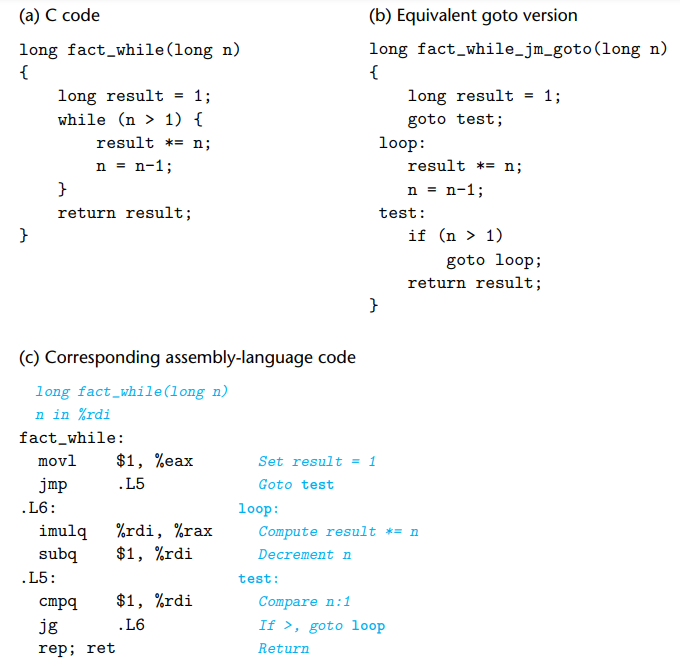
while의 경우 2가지 방법을 사용한다.
- jump-to-middle 기법
loop끝에 있는 test로 unconditional jump 후, loop body statement 로 jump하거나 그대로 진행한다.
C 코드 비교
- guarded-do 기법
추가적인 conditional branch 를 사용하여 initial test가 실패하면 loop를 skip할 수 있도록 한다. do-while loop와 같은 형식을 띈다.
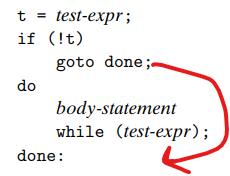
C코드 비교
for문의 경우 while과 동일하므로 생략함.
Implementation of the Switch statement
jump table 이라는것을 사용한다.
switch index가 "i" 에 해당할때 실행되어야 하는 code segment가 있을것이다.
이러한 code segment의 메모리 주소를 갖고 있는 array 를 jump table 이라고 한다.
entry "i" 가 각 "i" index에 해당하는 주솟값을 가지고 있다.
Jump table label L4:
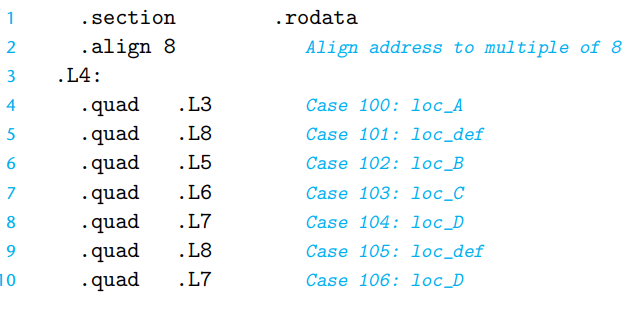
.rodata(read only data) 라는 object-code 파일 segment 안에 7개의 quad sequence 가 존재. 각 word 마다 asm label의 inst address가 주어짐
C 와 ASM 비교 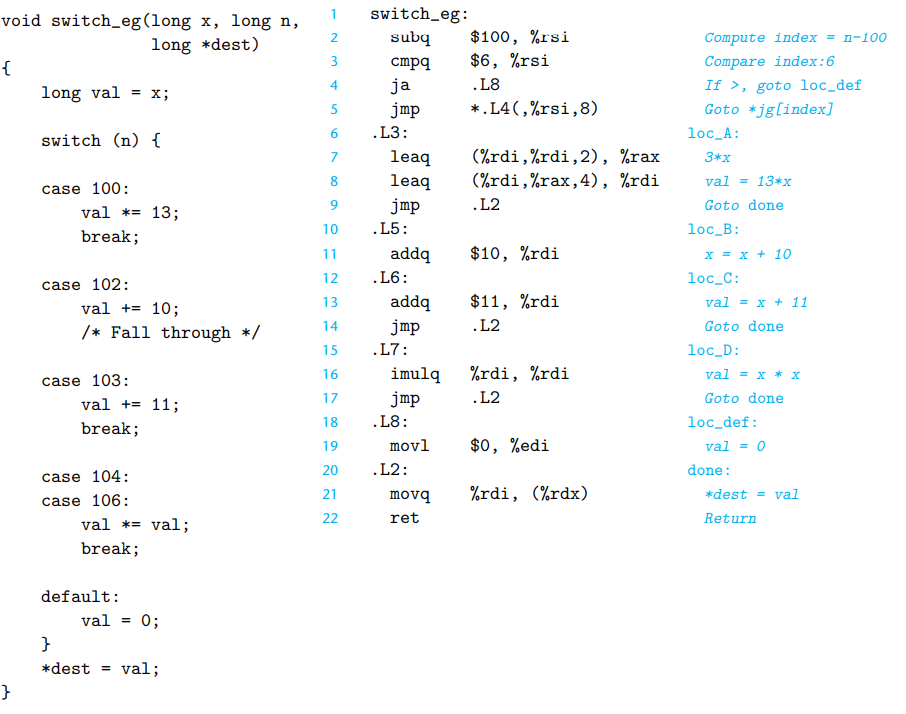
첫번째로 array index를 계산해낸다. jump table 에서 하는 entry index는 0부터 시작해야하므로, 그에 맞게 수를 더하거나 빼줘야한다.
jmp .L4(,%rsi,8) 은
starting address of the jump table array allocator + index 8 을 의미한다.