1. Swagger란?
2. Swagger 버전
3. Gradle 의존성 추가
4. Swagger 3.x.x 버전 호환 이슈 해결
5. Swagger 설정 class 생성
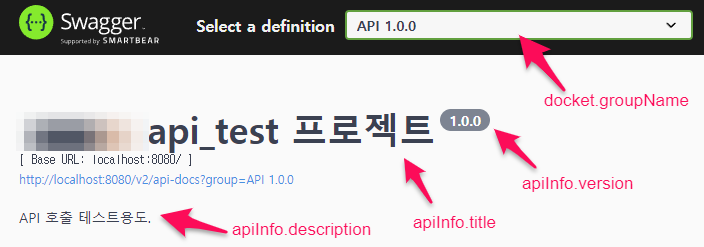
6. Swagger-ui 실행
7. API에 Swagger DOC @Annotation 추가
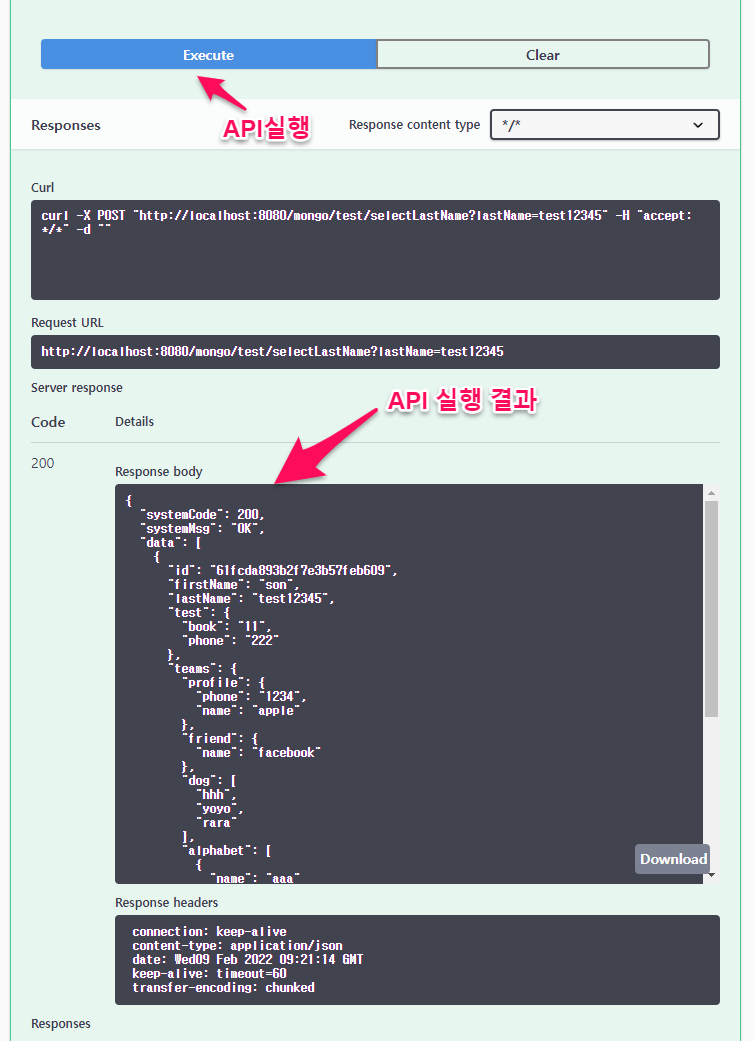
8. Swagger-ui 화면 예시
9. 후기
1. Swagger란?
개발한 API를 사용자에게 제공하도록 word등의 문서로 기입하여 관리하는데 많은 노동력이 필요했다.
Swagger를 사용하면 @어노테이션 코드 몇 줄 추가하여 간단하게 API별로 문서화 및 API테스트 가능한 UI 까지 제공하여 문서 작성 시간을 극도로 단축하여 개발에 집중 할 수 있다.
2. Swagger 버전
Swagger 3.x.x 이후 부터 접속url 변경 등 2.x.x 와 3.x.x 는 차이점이 있으며
해당 프로젝트는 Swagger 3.0.0 사용한다.
3. Gradle 의존성 추가
Gradle 사용
springfox-boot-starter 사용 추천! 대부분의 라이브러리가 포함되어 있다.
https://mvnrepository.com/artifact/io.springfox/springfox-boot-starter
dependencies {
    implementation 'io.springfox:springfox-boot-starter:3.0.0'
}
4. Swagger 3.x.x 버전 호환 이슈 해결
spring boot 2.6.x 버전과 Swagger 3.x.x 간에 호환 이슈가 있기에 아래처럼 Porject별 설정 파일 (application.yml | application.properties ..등)에 추가해야 한다. Spring Boot에서 설정이 변경되어 호환 이슈가 발생하였다고 한다.
yml표기법
#swagger2
spring:
  mvc:
    pathmatch:
      matching-strategy: ant_path_matcher
위 설정방법을 추가해도 장애가 발생했다면 프로젝트에서
actuator찾아보고, 주석처리 후 해결되었다.
또는 Spring Boot 버전을 2.6.X --> 2.5.X로 낮춰도 해결이 된다.[Maven]
<dependency>
	<groupId>org.springframework.boot</groupId>
	<artifactId>spring-boot-starter-actuator</artifactId>
</dependency>
5. Swagger 설정 class 생성
SwaggerConfig.java 생성. (위치 및 class명 자유)
생성 후 빌드 까지 했다면 Swagger-ui 에 접속이 가능하다.
@EnableSwagger2
@Configuration
public class SwaggerConfig {
    @Bean
    public Docket api() {
        return new Docket(DocumentationType.SWAGGER_2)
                .select()
                .apis(RequestHandlerSelectors.any()) // 특정 패키지경로를 API문서화 한다. 1차 필터
                .paths(PathSelectors.any()) // apis중에서 특정 path조건 API만 문서화 하는 2차 필터
                .build()
                .groupName("API 1.0.0") // group별 명칭을 주어야 한다.
                .pathMapping("/")
                .apiInfo(apiInfo())
                .useDefaultResponseMessages(false); // 400,404,500 .. 표기를 ui에서 삭제한다.
    }
    private ApiInfo apiInfo() {
        return new ApiInfoBuilder()
                .title("fantoo_api_test 프로젝트")
                .description("API 호출 테스트용도.")
                .version("1.0.0")
                .termsOfServiceUrl("")
//                .contact()
                .license("")
                .licenseUrl("")
                .build()
                ;
    }
}
6. Swagger-ui 실행
- 3.x.x : http://localhost:8080/swagger-ui/
SwaggerConfig.java에서 설정한 정보들이 표기된다.

7. API에 Swagger DOC @Annotation 추가


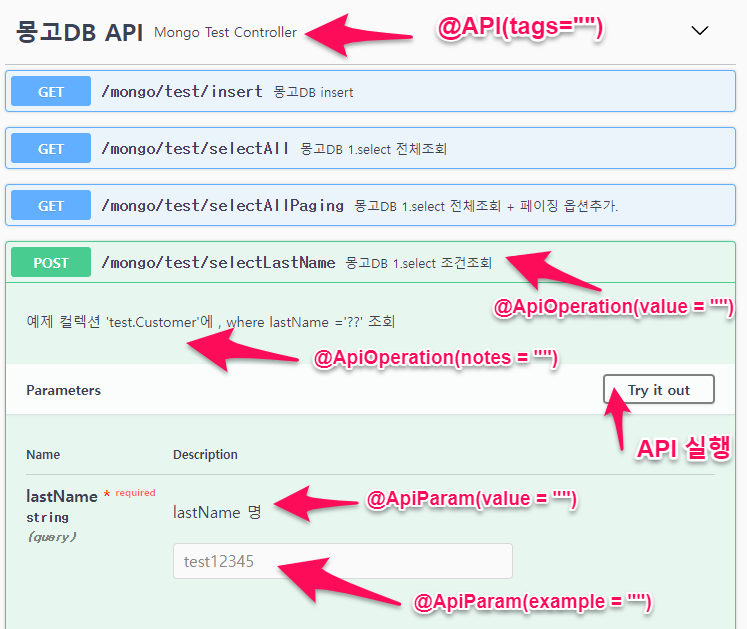
각각의 API에서는 아래 3개의 @만 사용해도 API문서를 작성하는데 문제가 없다.
그 외에 사용 가능한 @에 대해 참고한 자료 링크
https://velog.io/@banjjoknim/Swagger
https://Swagger.io/resources/open-api/
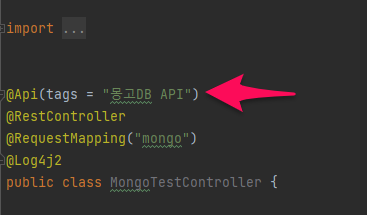
@Api
- tags : 해당하는 XXXXcontroller.java 에 대한 Title명칭 부여@ApiOperation
- value : API에 대한 요약하여 작성
- notes : API에 대한 자세한 설명 작성@ApiParam
- value= 파라미터에 대한 설명 description
- example = 파라미터의 default 값이 있을 때 사용
- required = true : 파라미터의 필수인지 표기 필수는 true, 아니면 false
- %주의%,@ApiParam은 적용하는 파라미터의 컴마 없이 사용해야 한다.
8. Swagger-ui 화면 예시


9. 후기
깔끔하게 API문서 정리 가능하며 단점으로는
7.API에 Swagger DOC @Annotation 추가 내용과 같이 개발한 API마다 @Api, @ApiOperation , @ApiParam 등 사용하여 내용을 기입해야 하는 번거로움과 생소한 코드가 추가되어 번잡함이 있지만 그것을 감안해도 훌륭하다.
3개의 댓글
https://www.globhy.com/article/brazil-bamboo-flooring-market-reviews-suppliers
https://www.globhy.com/article/wellmade-bamboo-flooring-reviews-product-highlights
https://www.globhy.com/article/canadian-bamboo-flooring-vancouver-ottawa-and-toronto
https://yamap.com/users/4784209
https://forum.iscev2024.ca/member.php?action=profile&uid=1357
https://forum.stargate-rs.de/memberlist.php?mode=viewprofile&u=24445
https://my.usaflag.org/members/bothbest/profile/
https://myliveroom.com/bothbest
https://forum.geckos.ink/member.php?action=profile&uid=642
https://competitorcalendar.com/members/bothbest/profile/
https://www.fruitpickingjobs.com.au/forums/users/bothbest/
https://thefwa.com/profiles/bamboo-flooring
https://chanylib.ru/ru/forum/user/9508/
https://greenpolen.activeboard.com/m3844104/profile/
https://utahtelugu.org/forums/member.php?action=profile&uid=1313
https://greenteam.app/bothbest
http://www.v0795.com/home.php?mod=space&uid=2304271
https://wearedevs.net/profile?uid=201358
https://www.templepurohit.com/forums/users/chinahousehold/
https://eu.renshuu.org/me/1687780&profile
https://tutorialslink.com/member/FlooringBamboo/68089
https://www.tkaraoke.com/forums/profile/bothbest/
https://www.aipictors.com/users/bothbest
https://www.valinor.com.br/forum/usuario/bothbest.136696/


Is it possible to apply to snake game?