웹을 개발하는 방법으로 크게 3가지가 존재한다.
1. 정적 컨텐츠
- 서버에서 어떠한 행동을 하는 것이 아닌, 파일을 웹 브라우저에 그대로 전달.
2. MVC와 템플릿 엔진
- JSP, PHP와 같은 템플릿 엔진을 이용해 서버에서 서버에서 html을 동적으로 변형하여 웹브라우저에 전달.
3. API
- ios나 android client와 개발시 Jason이라는 data 구조 format으로 client에게 data를 전달. / data만 전달하고 html은 client가 그리는 방식 or 서버끼리 통신할 때 많이 사용.
💡 정적 컨텐츠
Spring Boot는 /static 폴더에서 정적 컨텐츠 기능을 자동으로 제공한다. 예를 들어 이 폴더 안에 hello.html 파일을 작성하고, localhost:8080/hello.html에 들어가면 파일 내용이 그대로 전달된 것을 볼 수 있다.
전체적인 과정의 큰 틀을 살펴보자.
- localhost:8080/hello 접속 요청을 내장 톰캣 서버가 받으면 Spring Boot에게 알린다.
- 그럼 Spring Boot는 먼저 Controller에서 hello가 있는지 찾는다.
- 없으면 resources 안에 있는 static에서 hello.html을 찾는다.
- 있다면 웹 브라우저로 반환한다.
💡 MVC와 템플릿 엔진
MVC : Model, View, Controller
View는 화면을 그리고, Model이나 Controller는 내부적인 것을 처리하는 데에 집중한다. Controller는 Business logic이나 서버에 관련된 일을 처리하고 Model에 화면과 관련된 필요한 정보를 담아 넘겨준다.
(Business logic : 데이터가 어떻게 생성되고 저장되고 수정되는지를 정의한 것)
(Window) Ctrl + P : parameter 정보
HelloController.java
@Controller
public class HelloController {
    @GetMapping("hello-mvc")
    // 이번엔 외부 parameter를 통해 data를 받음.
    public String helloMvc(@RequestParam("name") String name, Model model) {
        model.addAttribute("name", name);
        return "hello-template";  // hello-template.html
    }
}
hello-template.html
<!DOCTYPE html>
<html xmlns:th="http://www.thymeleaf.org">
<body>
<p th:text="'hello ' + ${name}"></p>
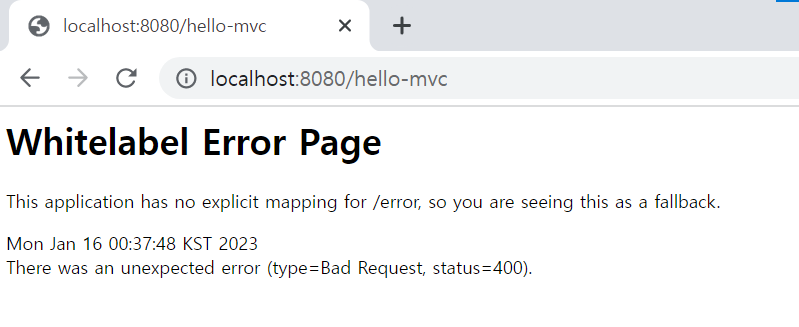
</body>이 상태에서 localhost:8080/hello-mvc에 접속하면 아래와 같이 오류가 뜬다.
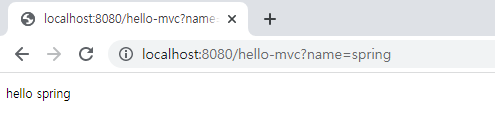
아래와 같이 parameter인 name 뒤에 data를 넘겨주어야 한다.

data로 spring을 주었다.
전체적인 과정을 살펴보자.
- localhost:8080/hello-mvc 접속 요청을 내장 톰캣 서버가 받으면 Spring Boot에게 알린다.
- Spring은 helloController에서 메소드에 hello-mvc가 mapping이 된 것을 확인하고 해당 메소드를 호출한다. (이때 model에 key가 name이고 값이 spring인 data를 넣어주고, hello-template을 리턴)
- viewResolver(view를 찾아주고 템플릿 엔진을 연결시킴)가 컨트롤러에서 리턴한 hello-template.html 파일을 찾아 템플릿 엔진이 처리하도록 넘긴다.
- 템플릿 엔진이 렌더링을 해서 변환을 한 html을 웹 브라우저에 반환한다. (정적일 때는 변환하지 않고 그대로 반환)
💡 API
템플릿 엔진과는 달리 view를 거치지 않고 data를 client에게 직접 내린다.
HelloController.java
@Controller
public class HelloController {
    @GetMapping("hello-string")
    //API 방식
    @ResponseBody  //http의 body 부분에 data를 직접 넣겠다.
    public String helloString(@RequestParam("name") String name) {
        return "hello " + name;  //name에 data를 넣어주면 hello data로 변환.
    }

}
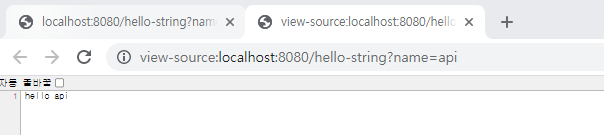
아래처럼 페이지 소스를 보면 html 태그가 하나도 없는 걸 확인할 수 있다.
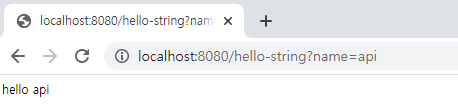
실제 api 방식을 사용하여 data를 넘겨보자.
HelloController.java
@Controller
public class HelloController {
@GetMapping("hello-api")
@ResponseBody
public Hello hellApi(@RequestParam("name") String name) {
Hello hello = new Hello();
hello.setName(name);
return hello; //객체를 넘김.
}
static class Hello {
private String name; //key
public String getName() {
return name;
}
public void setName(String name) {
this.name = name;
}
}
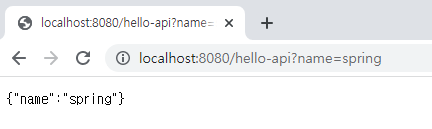
}아래와 같이 JSON 형태로 나타나게 된다.
(JSON : 인터넷에서 자료를 주고받을 때 그 자료를 표현하는 방법. ex) key와 value 쌍인 collection)
@ResponseBody 사용 원리
- localhost:8080/hello-api 접속 요청을 내장 톰캣 서버가 받으면 Spring Boot에게 알린다.
- Spring은 helloController에서 메소드에 hello-api가 mapping이 된 것을 확인한다.
- @RequestBody를 발견하면 HttpMessageConverter(조건에 따라 StringConverter와 JsonConverter로 나뉨.)가 http 응답에 data를 그대로 넘겨야겠다!하고 동작한다.
- 단순 문자이면 StringConverter가 동작하여 그대로 data를 반환하고, 객체가 반환되면 JsonConverter가 JASON 방식으로 data를 만들어 http 응답에 반환하겠다!라고 동작한다.
- JsonConverter는 JSON 형태로 바꾼 data를 웹 브라우저에 응답한다.
@ResponseBody 사용 시
- http의 body에 data를 직접 반환
- viewReslover 대신 'HttpMessageConverter'가 동작
- 기본 문자처리: StringHttpMessageConverter
- 기본 객체처리: MappingJackson2HttpMessageConverter
- byte 처리 등 여러 HttpMessageConverter가 등록되어 있음.
