프로젝트를 진행하다가 Audio에 관해 좀더 공부가 필요해 자료를 찾는 도중 MDN에서 AudioContext자료를 찾았고, tutorial까지 있는 것을 확인하였다. MDN에는 정말 유용한 문서들이 많은 것 같다. 그래서 앞으로 MDN에 있는 튜토리얼들을 한번씩 따라해볼 예정이다.
우선 첫번째로 지금 하는 프로젝트와 관련있는 WebAudioAPI편
MDN-WebAudioAPI문서를 보다가 중간에 tutorial이 있는 것을 보고 따라해보자 생각이 들어 해보게 되었다.
이번에 진행할 MDN tutorial
간단한 boombox를 만드는 예제인데, 재생/정지 볼륨조절, 패닝(왼쪽 오른쪽 소리조절)이 되는 붐박스를 만드는 예제라고 한다. 진행해보도록 하겠다.
웹 오디오 API의 강력한 기능은 그것이 "사운드 콜 제한"을 가지고 있지 않다는 것이다.예를 들어 한 번에 32개 또는 64개의 소리 호출의 상한선이 없습니다. 일부 프로세서는 1,000개 이상의 동시 사운드를 더듬지 않고 재생할 수 있습니다.(A powerful feature of the Web Audio API is that it does not have a strict "sound call limitation". For example, there is no ceiling of 32 or 64 sound calls at one time. Some processors may be capable of playing more than 1,000 simultaneous sounds without stuttering. 파파고 돌림).라고 한다. 좀더 세세하고 다양한 오디오 컨트롤이 가능하게 되나보다.

먼저 간단하게 파일을 만들고 index.html과 index.js파일을 만들어 주었다. 그리고 https://freesound.org/에서 free mp3 audio하나를 받아서 넣어줬다.
먼저 index.js에
// for legacy browsers
const AudioContext = window.AudioContext || window.webkitAudioContext;

const audioContext = new AudioContext();
코드를 넣어준다.
Web Audio API와 어떤 것을 하는 것을 가능케 하기 위해, audioContext의 instance를 만드는 것이 필요하다. 그러면 API의 모든 기능과 특징을 사용할 수 있게 된다.
위와 같이 코드를 입력하면 BaseAudioContext가 자동적으로 만들어지고 online audio context로 연장된다. 우리는 라이브 사운드를 play할거기 때문에 이것이 필요하다.
이제, 우리가 만든 오디오 컨텍스트를 통해 재생할 사운드가 필요하다. API로 이 작업을 수행하는 방법은 여러가지가 있지만 여기서는 가장 간단한 <audio>태그를 이용해보기로 한다.
index.html파일에
<audio controls src="558115__johnnie-holiday__background-music-130bpm.mp3"></audio>audio태그를 추가해준다. 그리고 script태그를 통해 index.js와 연결해주었다. 그런데 여기서 생각지도 못한 문제가 발생했다. cors에러가 나타난 것이다. <script>태그로 연결을 안해주면 오디오가 정상적으로 작동하지만 script태그로 연결해주면 cors에러가 나타났다. 내 로컬인데 도대체 왜 cors에러가 나타나는지 모르고 있다가 로컬에서CORS policy관련에러가 발생하는 이유여기서 정리를 정말 잘해주셔서 이 글을 보고 이유를 알 수 있었다. 정리해보면 SOP와 로컬에서는 origin이 null이라는 점 때문이었다. 그래서 나는 예전에 VS Code에 Live Server익스텐션을 깔아둔 게 있어 Live Server로 여니깐 정상작동하였다!
주님 감사합니다!
계속 진행해보겠다.
Web Audio APi의 모든 멋진 기능들을 사용하기 위해 이 audio엘리먼트의 소스를 우리가 만든 audioContext와 연결시켜주는 것이 필요하다. 운좋게도 이것을 해주는 메서드가 있다. AudioContext.createMediaElementSource
index.js에 계속해서 적어주자.
// get the audio element
const audioElement = document.querySelector('audio');

// pass it into the audio context
const track = audioContext.createMediaElementSource(audioElement);
웹에서 소리를 재생할 때, 유저가 컨트롤 할 수 있게 하는 것이 중요하다. 여기에는 엄청나게 많은 방법들이 있지만, 여기서는 재생/일시정지, 볼륨조절, 왼쪽 오른쪽 소리조절 만 하도록 하겠다.
자바스크립트 코드에서 프로그래밍 방식으로 사운드를 제어하는 것은 브라우저의 자동 재생 지원 정책에 의해 다루어지는데, 이러한 정책은 사용자가 허가하지 않아도 차단될 가능성이 높다(또는 화이트리스트). 자동 실행 정책은 일반적으로 스크립트가 오디오를 재생하도록 트리거하기 전에 명시적 권한이나 페이지와의 사용자 참여가 필요하다.
자세한 사항은 여기 Autoplay guide for media and Web Audio APIs
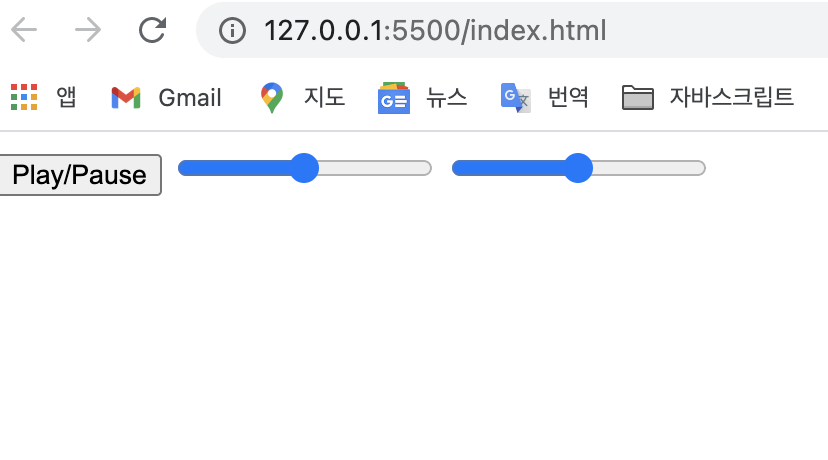
지금 만드는 앱은 사용자가 버튼을 클릭하게 만들기 때문에 위 정책에 위반 되지 않는다. html에 다음 버튼을 추가해준다.
<button data-playing="false" role="switch" aria-checked="false">
    <span>Play/Pause</span>
</button>
여기서 button에 attributes로 넣어준 data-playing은 그 안의 true false를 바꿔서 조절하게 해주는 일종의 custom attributes? property?라고 보면 좋을 것 같고HTMLElement.dataset role은 좀더 역할을 명확하게 해주기 위해 넣어준 거고 aria-checked도 비슷한 맥락이긴 하다. 참고자료 - ARIA 소개
트랙을 재생하기 전에 오디오 소스/인풋 노드의 그래프를 destination과 연결해 주어야 한다. API에 우리의 오디오 엘리먼트를 통과시켜줌으로써 우리는 이미 우리의 인풋 노드를 만들어 주었다. (const track = audioContext.createMediaElementSource(audioElement);)
For the most part, you don't need to create an output node, you can just connect your other nodes to BaseAudioContext.destination, which handles the situation for you:
(대부분의 경우 출력 노드를 생성할 필요가 없으며 다른 노드를 BaseAudioContext.destination에 연결하면 다음과 같은 상황이 처리됩니다. 파파고돌림)
audioContext.destination이 출력장치를 나타내서 오디오 소스를 출력장치와 연결해 주는 역할을 하는 듯 하다.
track.connect(audioContext.destination);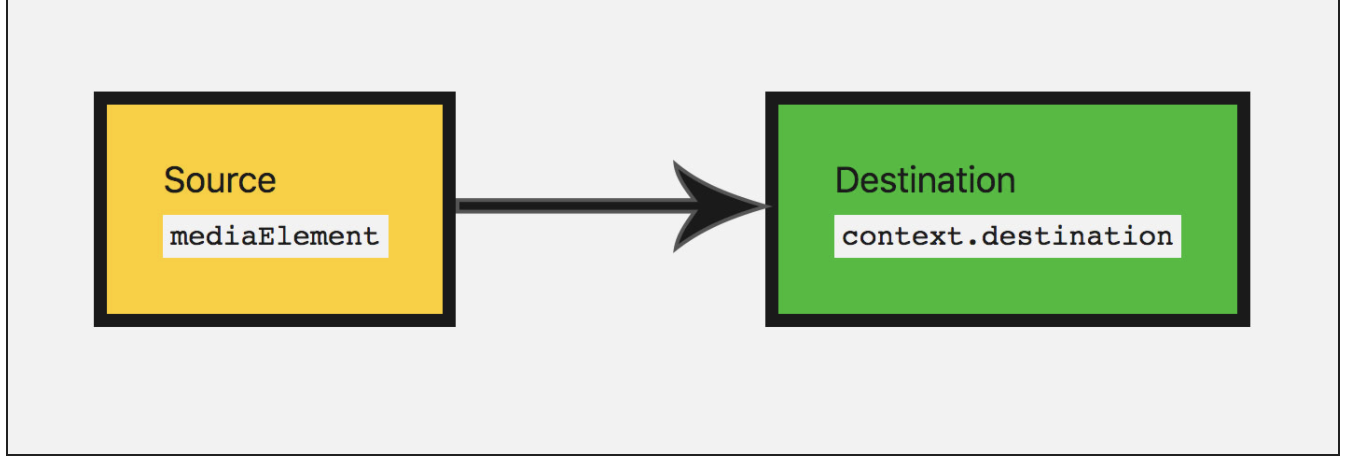
그림으로 나타내면 위와 같다고 한다.
이제 재생/일시정지 버튼 기능을 넣을 수 있다.
// select our play button
const playButton = document.querySelector('button');

playButton.addEventListener('click', function() {

    // check if context is in suspended state (autoplay policy)
    if (audioContext.state === 'suspended') {
        audioContext.resume();
    }

    // play or pause track depending on state
    if (this.dataset.playing === 'false') {
        audioElement.play();
        this.dataset.playing = 'true';
    } else if (this.dataset.playing === 'true') {
        audioElement.pause();
        this.dataset.playing = 'false';
    }

}, false);
이제 노래 재생/일시중지 기능이 된다.
그리고 끝났을 때도 가정해
audioElement.addEventListener('ended', () => {
    playButton.dataset.playing = 'false';
}, false);
이 코드도 넣어준다. 그러면 노래가 다 끝났을 때 버튼의 playing속성이 false가 되서(data-playing에서 앞의 data는 사용자지정데이터특성으로 빠지게 된다. 위의 HTMLElement.dataset링크 참조) 다시 재생할 수 있는 상태로 만들어 준다.
소리수정
이제 가지고 있는 소리를 수정하기 위해 소리를 수정하는 기본 노드들을 좀 뒤져보쟈. 여기서부터 WebAudioAPI가 유용하게 활용되기 시작한다. 가장 먼저, 볼륨을 바꿔보자. 이건 음파의 크기를 나타내는 GainNode를 사용함으로써 가능하게된다. Web Audio API를 이용해 노드를 만드는 방법은 2가지가 있다. 팩토리 메서드(e.g. audioContext.createGain())또는 노드 생성자 (e.g.new GainNode()).우리는 팩터리 메서드를 사용해보겠다. 팩토리 메서드 패턴 참조 블로그.
const gainNode = audioContext.createGain();이제, 이전의 오디오 그래프를 업데이트 해야한다. gain node와 인풋(소스)를 연결해주고, 다시 destination과 연결해주어야 한다.
//track.connect(audioContext.destination)이렇게 되있던걸 밑처럼 업데이트
track.connect(gainNode).connect(audioContext.destination);
그럼 이런 모양의 그래프가 된다.
gain 의 default value는 1이다;현재의 볼륨과 같다. gain은 미니멈 -3.4에서 최대 3.4까지 된다. 지금 만드는 붐박스는 최대 2(오리지널 볼륨의 2배)에서 0(사실상 음소거)까지로 만들어 보겠다.
유저에게 이걸 컨트롤 할수있게 하자. 우선 html에 다음 태그를 넣어준다.
<input type="range" id="volume" min="0" max="2" value="1" step="0.01">이 range input의 value와 실제 음량을 조절하는 gain의 value를 연결해서 유저가 음량을 조절 할 수 있도록 하자. js파일에 다음 코드를 추가해준다.
const volumeControl = document.querySelector('#volume');

volumeControl.addEventListener('input', function() {
    gainNode.gain.value = this.value;
}, false);
이제 음량을 조절할 수 있다!
이제 또 다른 조정을 해보자.
유저가 왼쪽과 오른쪽 스피커 조절을 할 수 있다면, 왼쪽과 오른쪽 스피커의 밸런스를 조절하는 StereoPannerNode라는 노드가 있다.(아마도 기계에 따라서 다르지 않을까 싶다)
(Note: The StereoPannerNode is for simple cases in which you just want stereo panning from left to right. There is also a PannerNode, which allows for a great deal of control over 3D space, or sound spatialisation, for creating more complex effects. This is used in games and 3D apps to create birds flying overhead, or sound coming from behind the user for instance.)

이것을 시각화하면 이렇게 된다.
이번에는 생성자 메서드를 통해 노드를 만들어보자. 이 방법으로 할 때, context와 특정 노드에서 취할 수 있는 옵션을 전달해야 한다.
js파일에 추가해준다.
const pannerOptions = { pan: 0 };
const panner = new StereoPannerNode(audioContext, pannerOptions);
조절할 수 있게 html에 인풋 밸류도 넣어준다. 기본값 0, 미니멈 -1에서 맥시멈 1로 만들어 준다. -1로 가까이 갈수록 왼쪽으로 가고 1로 갈수록 오른쪽으로 간다.
<input type="range" id="panner" min="-1" max="1" value="0" step="0.01">소리 조절할 때 처럼 연결해준다.
const pannerControl = document.querySelector('#panner');

pannerControl.addEventListener('input', function() {
    panner.pan.value = this.value;
}, false);
마지막으로 위 그림처럼 연결되도록 노드들을 연결해준다.
track.connect(gainNode).connect(panner).connect(audioContext.destination);다 됬다!
CSS는 생략하도록 하겠다.
최종 모습과 코드
html
<!DOCTYPE html>
<html lang="en">
<head>
    <meta charset="UTF-8">
    <meta http-equiv="X-UA-Compatible" content="IE=edge">
    <meta name="viewport" content="width=device-width, initial-scale=1.0">
    <title>Document</title>
</head>
<body>
    <audio  src="558115__johnnie-holiday__background-music-130bpm.mp3"></audio>

    <button data-playing="false" role="switch" aria-checked="false">
        <span>Play/Pause</span>
    </button>
    <input type="range" id="volume" min="0" max="2" value="1" step="0.01"/>
    <input type="range" id="panner" min="-1" max="1" value="0" step="0.01" />

    <script src="index.js"></script>
</body>
</html>
js
const AudioContext = window.AudioContext || window.webkitAudioContext;

const audioContext = new AudioContext();

//get the audio element
const audioElement = document.querySelector('audio');

//pass it into the audio context
const track = audioContext.createMediaElementSource(audioElement);
// track.connect(audioContext.destination);

//select our play button
const playButton = document.querySelector('button');

playButton.addEventListener('click', function (){
    //check if context is in suspended state (auto policy)
    if(audioContext.state === 'suspended'){
        audioContext.resume();
    }
    console.log("this.dataset : ", this.dataset);
    //play or pause track depending on state
    if(this.dataset.playing === 'false'){
        audioElement.play();
        this.dataset.playing = 'true'
    }else if(this.dataset.playing === 'true'){
        audioElement.pause();
        this.dataset.playing = 'false';
    }
},false);

audioElement.addEventListener('ended', () => {
    playButton.dataset.playing = 'false';
}, false);

const gainNode = audioContext.createGain();
// track.connect(gainNode).connect(audioContext.destination);

const volumeControl = document.querySelector('#volume');

volumeControl.addEventListener('input', function(){
    gainNode.gain.value = this.value
}, false);

const pannerOptions = { pan : 0 };
const panner = new StereoPannerNode(audioContext, pannerOptions);

const pannerControl = document.querySelector('#panner');

pannerControl.addEventListener('input', function(){
    panner.pan.value = this.value;
}, false);
track.connect(gainNode).connect(panner).connect(audioContext.destination);
완성!
주님께 감사드립니다.
블로그 작성하는 데 생각보다 너무 오래걸렸다. 블로그 써주시는 분들 께 정말 감사한 마음으로 글을 읽어야겠다.
주님 감사드립니다.