socket.io 공식 홈페이지 튜토리얼을 보며 정리하는 글
1단계. 간단한 채팅
express로 간단한 서버를 만들어준다.
파일명은 index.js로
여기는 생략.
간단한 html페이지를 하나 만들어준다. 공홈에 있는 그대로 가져왔다.
파일명은 index.html로
<!DOCTYPE html>
<html lang="en">
    <head>
        <title>Socket.IO chat</title>
        <style>
          body { margin: 0; padding-bottom: 3rem; font-family: -apple-system, BlinkMacSystemFont, "Segoe UI", Roboto, Helvetica, Arial, sans-serif; }

          #form { background: rgba(0, 0, 0, 0.15); padding: 0.25rem; position: fixed; bottom: 0; left: 0; right: 0; display: flex; height: 3rem; box-sizing: border-box; backdrop-filter: blur(10px); }
          #input { border: none; padding: 0 1rem; flex-grow: 1; border-radius: 2rem; margin: 0.25rem; }
          #input:focus { outline: none; }
          #form > button { background: #333; border: none; padding: 0 1rem; margin: 0.25rem; border-radius: 3px; outline: none; color: #fff; }

          #messages { list-style-type: none; margin: 0; padding: 0; }
          #messages > li { padding: 0.5rem 1rem; }
          #messages > li:nth-child(odd) { background: #efefef; }
        </style>
      </head>
      <body>
        <ul id="messages"></ul>
        <form id="form" action="">
          <input id="input" autocomplete="off" /><button>Send</button>
        </form>
      </body>
</html>
socket.io 모듈을 설치하고 index.js파일에 적용해준다.
const express = require("express");
const app = express();
const http = require("http");
const server = http.createServer(app);
const { Server } = require("socket.io");
const io = new Server(server);

app.get("/", (req, res) => {
  res.sendFile(__dirname + "/index.html");
});

io.on("connection", (socket) => {
  console.log("a user connected");
});

server.listen(3000, () => {
  console.log("Listening on 3000");
});
여기에서
const http = require("http");
const server = http.createServer(app);
server.listen(3000, () => {
  console.log("Listening on 3000");
});
이부분이 의문이 갔었다. express에서 app.listen()을 해도 바로 서버를 돌릴 수 있을 텐데 왜 이렇게 했을까? express 공식 홈페이지에서 답을 찾았다.
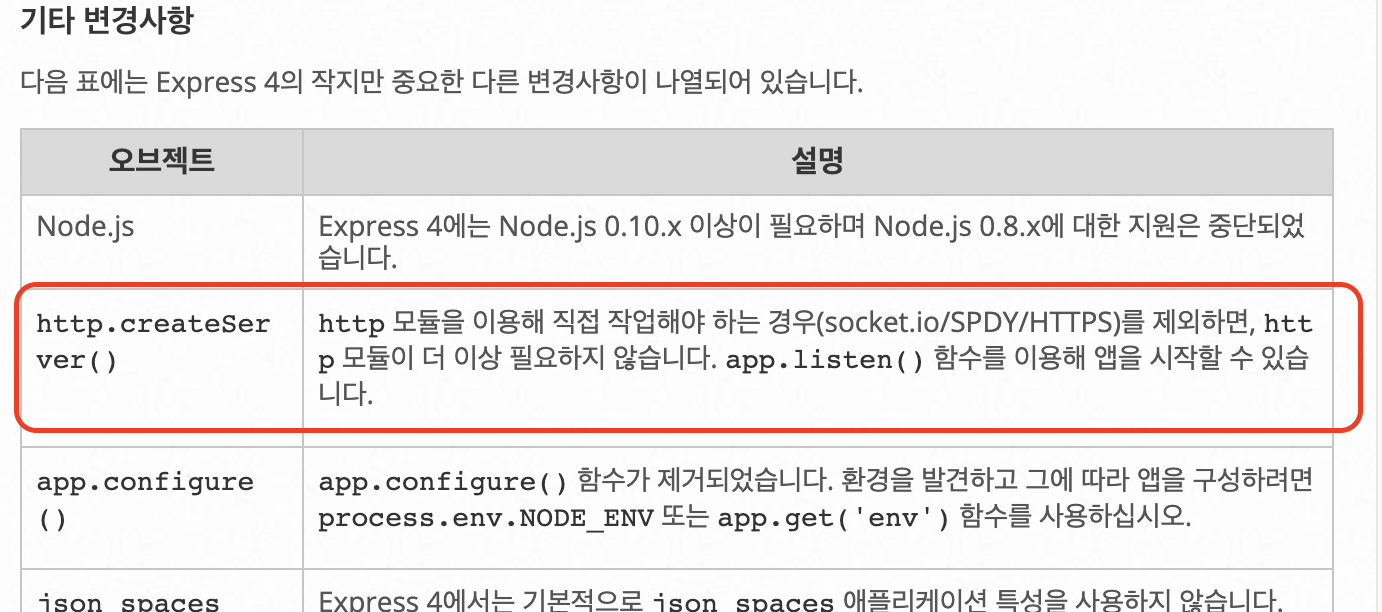
http 모듈을 직접 이용해야 했기 때문이다. 계속 진행한다.
index.html 파일의 바디태그가 끝나는 바로 앞부분(</body>)에 다음 스크립트를 추가해준다.
	<script src="/socket.io/socket.io.js"></script>
        <script>
            let socket = io();
        </script>
      </body>
이게 되는 이유. 공식홈페이지
That’s all it takes to load the socket.io-client, which exposes an io global (and the endpoint GET /socket.io/socket.io.js), and then connect.
If you would like to use the local version of the client-side JS file, you can find it at node_modules/socket.io/client-dist/socket.io.js.
poiemaweb의 설명
클라이어트 라이브러리는 script tag의 src 어트리뷰트값으로 “/socket.io/socket.io.js”을 지정하면 된다. 실제 path에 socket.io.js 파일을 배치할 필요는 없다. 그 이유는 socket.io가 서버 기동 시에 socket.io.js 라이브러리를 자동 생성해 주기 때문이다.
Notice that I’m not specifying any URL when I call io(), since it defaults to trying to connect to the host that serves the page.
If you now restart the process (by hitting Control+C and running node index.js again) and then refresh the webpage you should see the console print “a user connected”.
이제 서버를 껐다가 다시 켜보면 이런 메세지를 볼 수 있다. a user connected
% node index.js
Listening on 3000
a user connected
이제 브라우저를 키고 끄면 이런 메세지를 볼 수 있다.
a user connected
user disconnected
Emitting events
The main idea behind Socket.IO is that you can send and receive any events you want, with any data you want. Any objects that can be encoded as JSON will do, and binary data is supported too.
이제 index.html파일에 다음과 같이 작성해주자.
<script>
            let socket = io();

            let form = document.getElementById('form');
            let inpu = document.getElementById('input');

            form.addEventListener('submit',(e) => {
                e.preventDefault();

                if(input.value){
                    socket.emit('chat message', input.value);	//socket에 메세지를 전송해주는 함수
                    input.value = '';
                }
            });
  </script>
그리고 index.js에 다음과 같이 추가해준다.
io.on("connection", (socket) => {
  console.log("a user connected");
  socket.on("disconnect", () => {
    console.log("user disconnected");
  });

  socket.on("chat message", (msg) => {
    console.log("message : ", msg);
  });
});
그리고 서버를 다시 실행시키고 메세지를 입력해보면
Listening on 3000
a user connected
message :  123
message :  asdfasdf
다음과 같이 터미널에 메세지가 찍힌다!
❗️여기서 중요한 것은 client에서 emit할 때 'chat message'안에 담아서 메세지를 보내줬으 므로 서버에서도 socket.on("chat message", (msg)...이런 식으로 받아 준 것이다.
Broadcasting
The next goal is for us to emit the event from the server to the rest of the users.
In order to send an event to everyone, Socket.IO gives us the io.emit() method.
io.emit('some event', { someProperty: 'some value', otherProperty: 'other value' }); // This will emit the event to all connected socketsIf you want to send a message to everyone except for a certain emitting socket, we have the broadcast flag for emitting from that socket:
io.on('connection', (socket) => {
  socket.broadcast.emit('hi');
});
In order to send an event to everyone, Socket.IO gives us the io.emit() method.
마지막으로 index.html을 작성해준다.
<script src="/socket.io/socket.io.js"></script>
        <script>
            let socket = io();

            let form = document.getElementById('form');
            let inpu = document.getElementById('input');
            let messages = document.getElementById('messages'); <!-- 추가 된 부분 -->

            form.addEventListener('submit',(e) => {
                e.preventDefault();

                if(input.value){
                    socket.emit('chat message', input.value);
                    input.value = '';
                }
            });

            socket.on('chat message', function(msg) {	<!-- 추가된 부분 -->
                let item = document.createElement('li');
                item.textContent = msg;
                messages.appendChild(item);
                window.scrollTo(0, document.body.scrollHeight);
            })
        </script>
이제 재실행 해보면 채팅 앱이 잘 실행된다. 브라우저를 여러개 띄워놓고 실험해보자.
- 참조하면 좋을 것
Socket.io를 사용한 실시간 채팅 애플리케이션