
1. 제어문- if
1-1. if 구문
조건식의 결과에 따라 수행문이 실행되는 조건문
if(조건식) {
	수행문;
  }else{
  수행문2;
  }
1-2. if - else if 구문
public static void main(String[] args) {
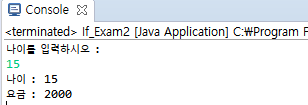
System.out.println("나이를 입력하시오 :");
Scanner scanner = new Scanner(System.in); // 입력을 할수 있게 함
int age = scanner.nextInt();
int charge = 0;
if(age < 8) {
charge = 1000;
}else if(age < 14){
charge = 1500;
}else if(age < 20) {
charge = 2000;
}else {
charge = 3000;
}
System.out.println("나이 : "+ age);
System.out.println("요금 : "+ charge);
}
1-3. case 구문
public static void main(String[] args) {
Scanner scanner = new Scanner(System.in);
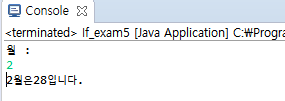
System.out.println("월 : ");
int month = scanner.nextInt();
int day;
switch(month) {
case 1: case 3: case 5: case 7: case 8: case 10: case 12:
day = 31;
break;
case 2:
day = 28;
break;
case 4: case 6: case 11:
day = 30;
break;
default :
System.out.println("Error");
day = 0;
}
System.out.println(month +"월은" + day + "입니다.");
}
응용) 2월은 윤년인 경우로 나누고 외부 클래스에서 사용하지 말도록하며, boolean을 사용해라
public class MyDate{
private int day;
private int month;
private int year;
private boolean isValid = true;
public MyDate(int day, int month, int year) {
	setYear(year);
	setMonth(month);
	setDay(day);
}
public int getDay() {
	return day;
}
public void setDay(int day) {
	switch(month) {
		case 1: case 3: case 5: case 7: case 8: case 10: case 12:
			if (day <0 || day >31) {
				isValid = false;
			}
			else {
				this.day = day;
			}
			break;
		case 4: case 6: case 9: case 11:
			if (day <0 || day >30) {
				isValid = false;
			}
			else {
				this.day = day;
			}
			break;
		case 2:
		if (( ( year % 4 ==0 &&  year % 100 !=0 ) || year % 400 ==0)){ //윤년인 경우
				if (day <0 || day >29) {
					isValid = false;
				}
				else {
					this.day = day;
				}
			}
			else {
				if (day <0 || day >28) {
					isValid = false;
				}
				else {
					this.day = day;
				}
			}
			break;
		default:
			isValid = false;
	}
}
public int getMonth() {
	return month;
}
public void setMonth(int month) {
	if( month <1 || month >12) {
		isValid = false;
	}
	else {
		this.month = month;
	}
}
public int getYear() {
	return year;
}
public void setYear(int year) {
	if (year > Calendar.getInstance().get(Calendar.YEAR)) {
		isValid = false;
	}
	else {
		this.year = year;
	}
}
public String isValid() {
	if(isValid) {
		return year + "년" + month + "월" + day + "일" + "입니다.";
	}
	else {
		return "유효하지 않은 날짜입니다.";
        }
	}
}

   public static void main(String[] args) {
		MyDate date1 = new MyDate(29, 2, 2000);
		System.out.println(date1.isValid());
		MyDate date2 = new MyDate(2, 100, 2006);
		System.out.println(date2.isValid());
	}
( 부가 설명 )
public, private, protected는 해당 멤버들의 접근을 어떻게 하느냐를 지정하는 것입니다.
예를들어, public은 프로젝트 전체에서 접근이 가능하고
protected는 현재클래스와 상속클래스에서 접근이 가능합니다.
private는 현재 클래스에서만 접근이 가능합니다.
private를 사용하려면 getters & setters 설정을 해주어야 됩니다.
getters & setters 설정하는 방법
-> (private)있는 화면에 마우스 오른쪽 클릭 -> source -> getters & setters -> generate
instance of
public boolean equals(Object obj){
if(obj instance of student){
	Student std = (Student)obj;
    return(this.student == std)
}- 객체가 특정 클래스로부터 상속된 객체인지 판별해주는 연산자
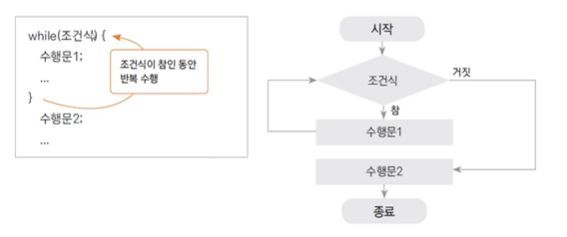
2. 반복문 - while
2-1. while
public class WhileExample {
public static void main(String[] args) {
int input;
int sum = 0;
Scanner scanner = new Scanner(System.in);
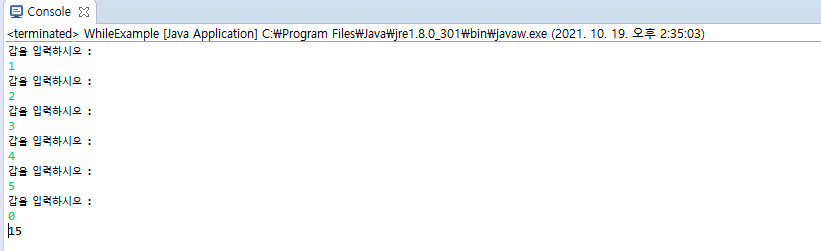
System.out.println("갑을 입력하시오 : ");
input = scanner.nextInt();
while(input != 0) {
System.out.println("갑을 입력하시오 : ");
sum += input;
input = scanner.nextInt();
}
System.out.println(sum);
}
}Scanner로 입력 값을 받아 0을 입력 받을 때, while 반복문이 끝이 나고 입력 받은 수의 합으로 결과 값을 받습니다.
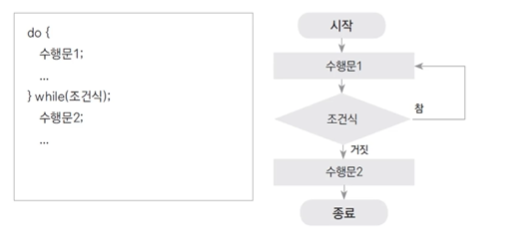
2-2. do - while
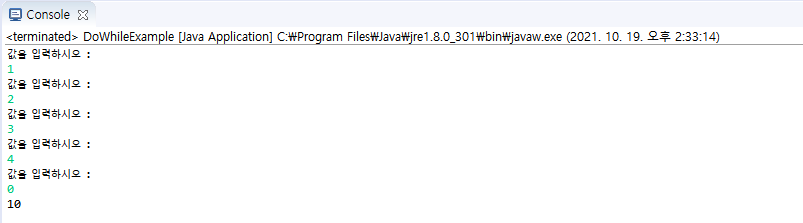
public class DoWhileExample {
	public static void main(String[] args) {
		Scanner scanner = new Scanner(System.in);
		int input;
		int sum = 0;
		do {
			System.out.println("값을 입력하시오 : ");
			input = scanner.nextInt();
			sum += input;
		}while(input !=0);
		System.out.println(sum);
	}
}
- while은 조건이 맞아야 수행이 돌아갑니다.
- do while은 먼저 수행1번(do) 하고 조건(while)을 뒤에서 체크합니다.
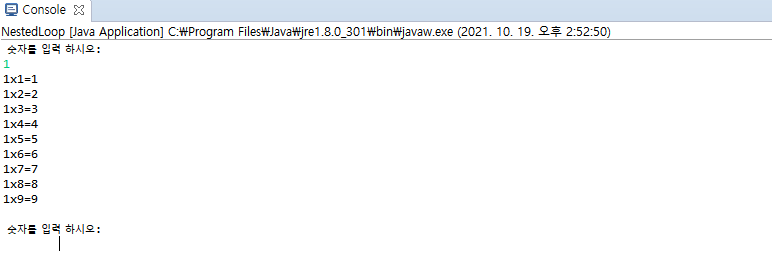
Example)) Scanner로 입력 받아 구구단을 만드시오.
public class NestedLoop {
	public static void main(String[] args) {
		Scanner scanner = new Scanner(System.in);
		int dan = 0;
		int num = 0;
		while(dan < 10) {
			num = 1; // 숫자를 1로 초기화 시켜줍니다.
			System.out.println(" 숫자를 입력 하시오: ");//scanner 입력 값을 받는다.
			dan = scanner.nextInt();
			while(num < 10) { //
				System.out.println(dan + "x" + num + "=" + dan * num);
				num++;
			}
			System.out.println();
			dan++;
		}
	}
}
3. 반복문 - For
3-1. For 구문
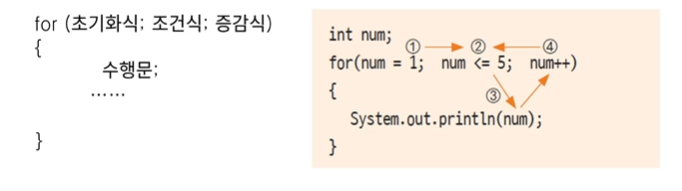
- 반복문 중 가장 많이 사용합니다.
- 일정 횟수에 기반한 반복을 구현할 때 효율적입니다.
public class ForExample {
	public static void main(String[] args) {
		int sum = 0;
		for(int num = 0; num < 11; num++) {
			sum += num;
		}
		System.out.println(sum);
	}
}

결과 값 : 55
3-2. For-continue문
public class ContinueExample {
	public static void main(String[] args) {
		for(int num = 1; num <= 100; num++) {
			if((num % 3) != 0) continue;
			System.out.println(num);
		}
	}
}
- continue 반복의 수행 중 조건문과 조건이 맞는 경우 이후 블록 내부의 다른 수행문을 수행하지 않습니다.
3-3. For-Break문
public class BreakExample {
	public static void main(String[] args) {
		int sum = 0;
		for(int num = 0; ; num++) {
			sum += num;
			if(sum > 100)break;
		}
		System.out.println(sum);
		System.out.println(num);
	}
}

결과 값 : 105, 14- 감싸고 있는 블록의 제어를 빠져나오는 기능
- 반복문, 조건문, switch-case 등과 같이 쓰이며 현재 수행하고 있던 블록에서 수행을 중지하고 외부로 제어가 이동합니다.
- 반복문과 같이 사용하면 특정 조선일 때 반복을 중지 하는 기능을 구현 할수 있습니다.
4. 2차원 배열
-
1차원 배열 : toString
-
다차원 배열 : deepToString
-
테이블 형태의 데이터를 저장하기 위한 배열
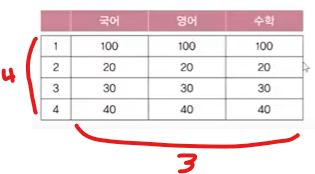
-
int[][] score = new int[4][3]; // 4행 3열의 2차원 배열 score를 생성
4-1 2차원 배열의 초기화
int[][] score = {
	{100,100,100},
	{20,20,20},
	{30,30,30},
	{40,40,40}
};
4-2 2차원배열의 예제
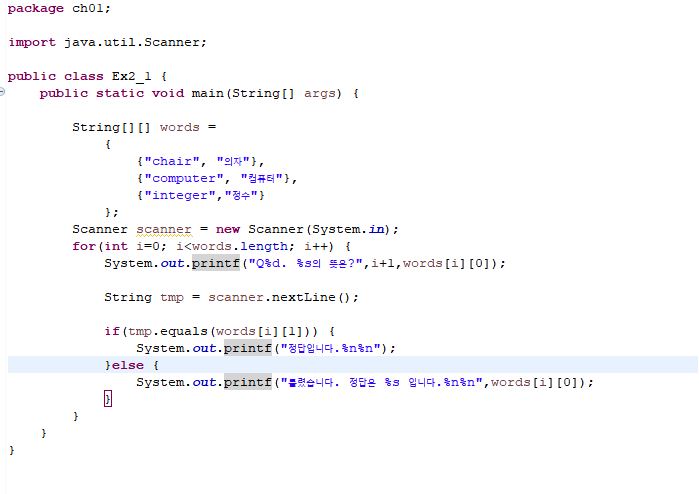
문제 ) chair, computer, integer라는 단어의 입력값을 받고 정답을 도출 해보라.
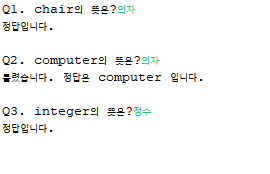
결과
5. 매개변수
5-1 기본형 매개변수
- 기본형 매개변수 -> 변수의 값을 읽기만 할 수 있다. (read only)
- 참조형 매개변수 -> 변수의 값을 읽고 변경할 수 있다. (read & write)
class Data {int x;}
class Ex2_1 {
public static void main(String[] args) {
Data d = new Data();
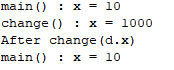
d.x = 10;
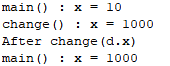
System.out.println("main() : x = " + d.x);
change(d.x);
System.out.println("After change(d.x)");
System.out.println("main() : x = " + d.x);
}
static void change(int x) {
x = 1000;
System.out.println("change() : x = " + x);
}
} 결과 값 :
부가설명)
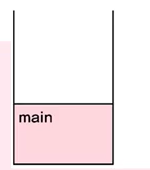
- stack으로 설명하자면, 처음에 main 함수가 먼저 실행되고
- Data 의 객체를 만들어 임의의 x 변수 값을 정해준다.
- 객체 d가 main 메서드 안에 형성이되고
- main 메서드 위에 println 함수가 호출이 된다.
- 임의의 x 변수를 바꾸는 메서드 change를 만들어서 x = 1000이라는 값을 대입
- change 메서드가 main 위로 호출되면서 실행이된다.
- 종료 후에 다시 main 메서드 함수가 실행이되고 println 함수가 실행 되는 것이다.
5-2 참조형 매개변수
package ch01;

class Data {int x;}
class Ex2_1 {
	public static void main(String[] args) {

	Data d = new Data();
	d.x = 10;
	System.out.println("main() : x = " + d.x);

	change(d);
	System.out.println("After change(d.x)");
	System.out.println("main() : x = " + d.x);
		}
	static void change(Data d) {
		d.x = 1000;
		System.out.println("change() : x = " + d.x);
	}
}
결과 값 :
부가설명)
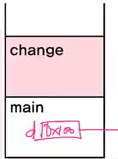
- main 메서드가 먼저 stack에 쌓이고 실행이된다.
- println이 main 위로 호출되면서 실행되고 종료후에 change 메서드가 호출되면서 실행이 된다.
- change 메서드 만들 때 참조형 매개변수를 객체 Data타입으로 받아주면 change 메서드 실행될 때 d.x 변수에 1000이라는 값을 저장시킨다.
- change 메서드가 종료가 되면, 다시 main 메서드의 println 함수를 호출해 실행시킨다.
TIP:1) 정적(static) 멤버 생성
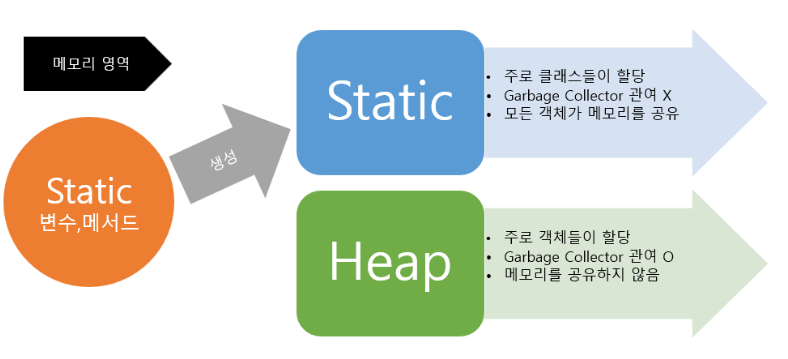
-
Garbage Collection(가비지 컬렉션)이란?
프로그램을 개발 하다 보면 유효하지 않은 메모리인 가바지(Garbage)가 발생하게 된다. C언어를 이용하면 free()라는 함수를 통해 직접 메모리를 해제해주어야 한다. 하지만 Java나 Kotlin을 이용해 개발을 하다 보면 개발자가 메모리를 직접 해제해주는 일이 없다. 그 이유는 JVM의 가비지 컬렉터가 불필요한 메모리를 알아서 정리해주기 때문이다. 대신 Java에서 명시적으로 불필요한 데이터를 표현하기 위해서 일반적으로 null을 선언해준다.
TIP:2) 메서드 간의 호출과 참조
- static 메서드는 인스턴스 변수를 사용할 수 없다.
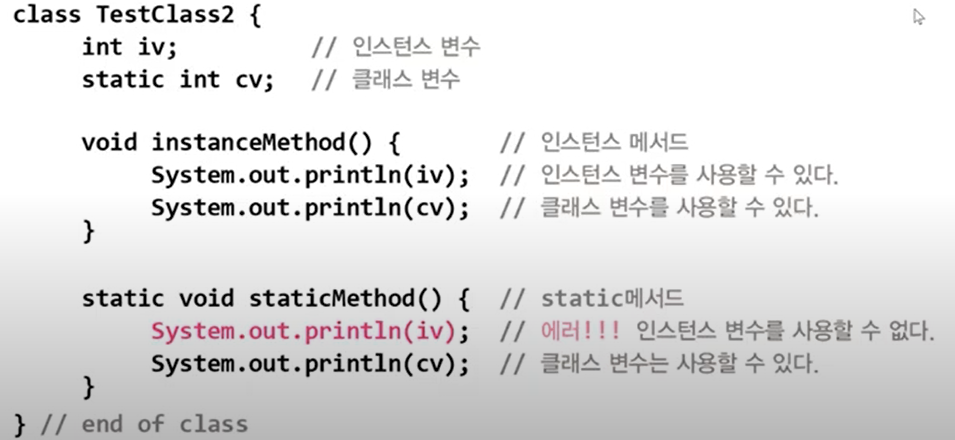
static 메서드는 static 메서드 호출 가능한가?
-> 네 가능합니다. 언제나 사용(호출) 가능합니다.
static 메서드는 인스턴스 변수 사용가능한가?
-> 아니요 불가합니다. 인스턴스 변수는 객체생성을 해야 사용가능 합니다.
static 메서드는 인스턴스 메서드 호출 가능한가?
-> 아니요 불가합니다. 인스턴스 변수와 같이 객체 생성을 해야 인스턴스 메서드 호출이 가능합니다.
why? static 메서드는 인스턴스 멤버를 쓸수 없나?
-> static 메서드 호출시 객체가 없을수도 있어 사용(호출)할 수 없습니다.
