0.들어가기에 앞서
이전에 진행한 작업에 관해 요약하고자 한다.
- 싱글톤과 옵저버 제네릭 패턴 구현
- 플레이어 캐릭터를 구성하는 세 컴포넌트를 구현
- PlayerStatus
- PlayerMovement
- PlayerController
- 시네머신을 통한 3인칭 시점과 조준 시점 구현
이와 같은 작업을 바탕으로 이번에는 캐릭터 에셋의 적용 및 애니메이션 작업을 진행하고, 오디오 작업까지 진행해 볼 예정이다.
1. 플레이어용 에셋
사용할 에셋은 Robot Hero를 적용할 예정이다.
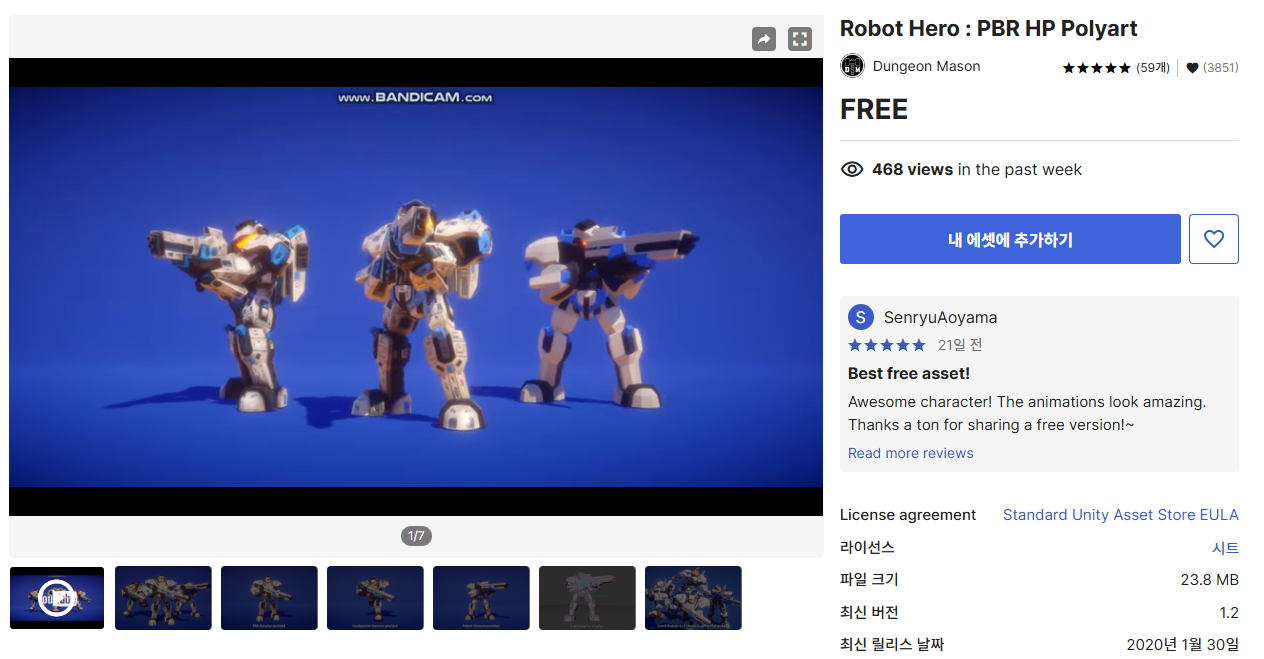
해당 에셋을 바로 적용하기에 앞서 어떤 식으로 구성되어 있는지 살펴보자.
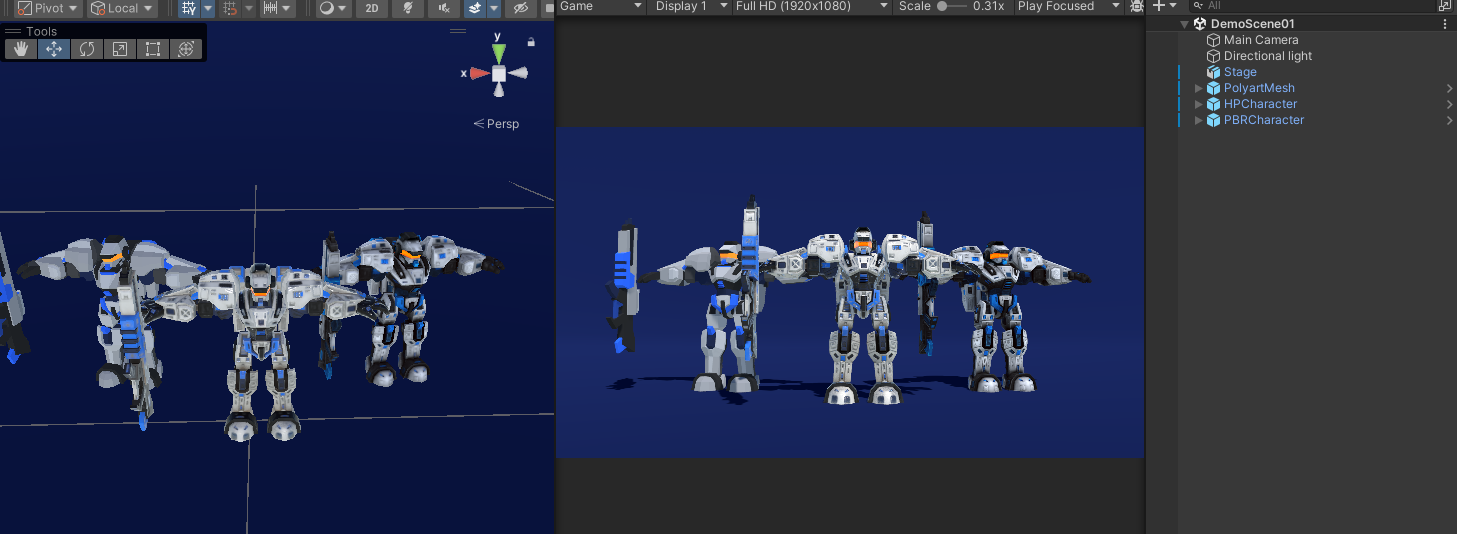
데모 씬을 살펴보면 세 가지 캐릭터 종류가 있고, 저화질 버전에서 고화질 버전까지 있다.
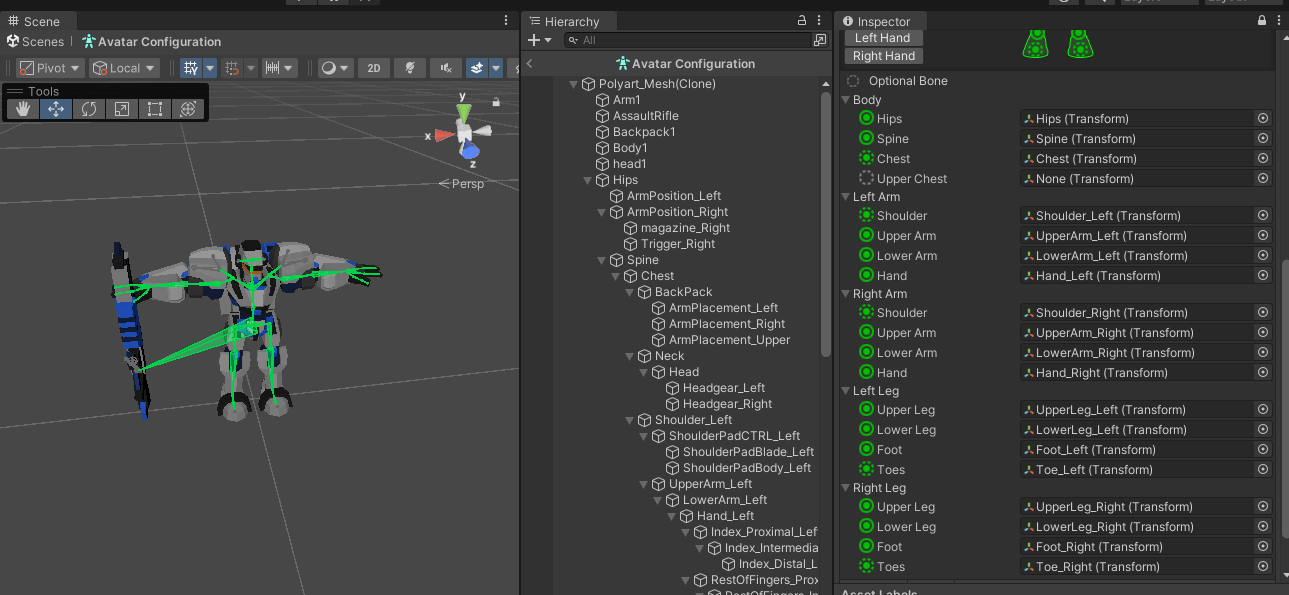
특징이 있디고 한다면 Upper Chest가 없는 구조라서 빠져 있는 것을 확인할 수 있다. 그리고 총이 따로 있는데, 총은 골반과 연결되어 구동하는 방식임을 알 수 있다.
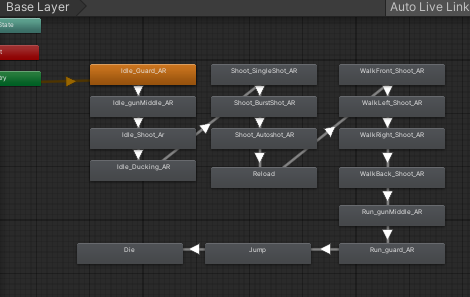
애니메이터를 살펴보면 각각의 모션 자체를 보여주는 시연에만 그치는 방식이라 이 애니메이터를 그대로 활용하기는 어려워 보인다. 따라서 애니메이션 작동 방식에 대한 부분은 직접 만들어서 구동시켜 볼 예정이다.
2. 플레이어 프리팹에 에셋 적용하기
우선 프리팹에 캐릭터를 적용시켜보자. 기존에 있었던 아바타를 제거하고 에셋을 적용시키면 된다.
말 그대로 에셋만 갈아끼우면 되니 편했다.
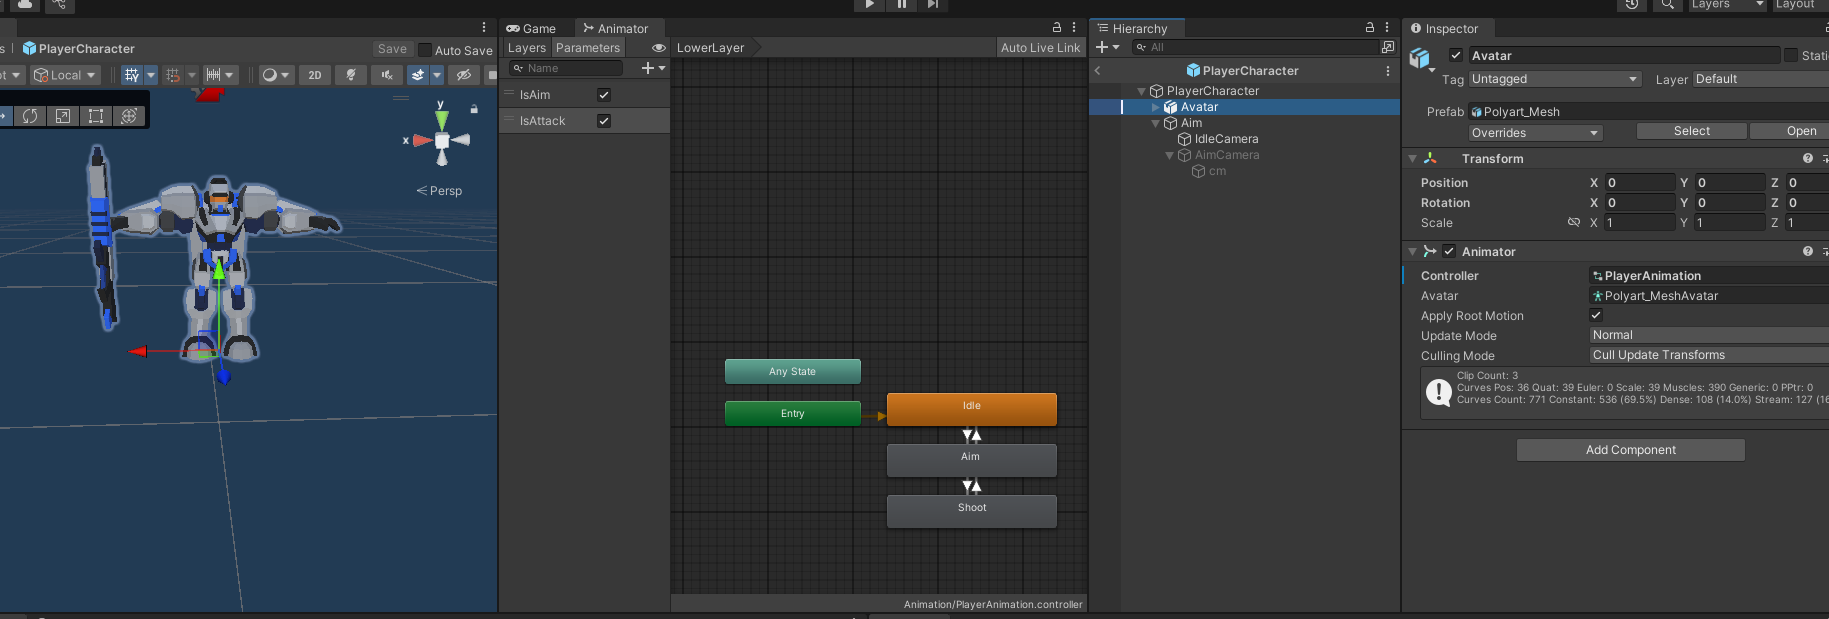
다음으로 애니메이터는 PlayerCharacter에 넣어서 세팅해둔다.
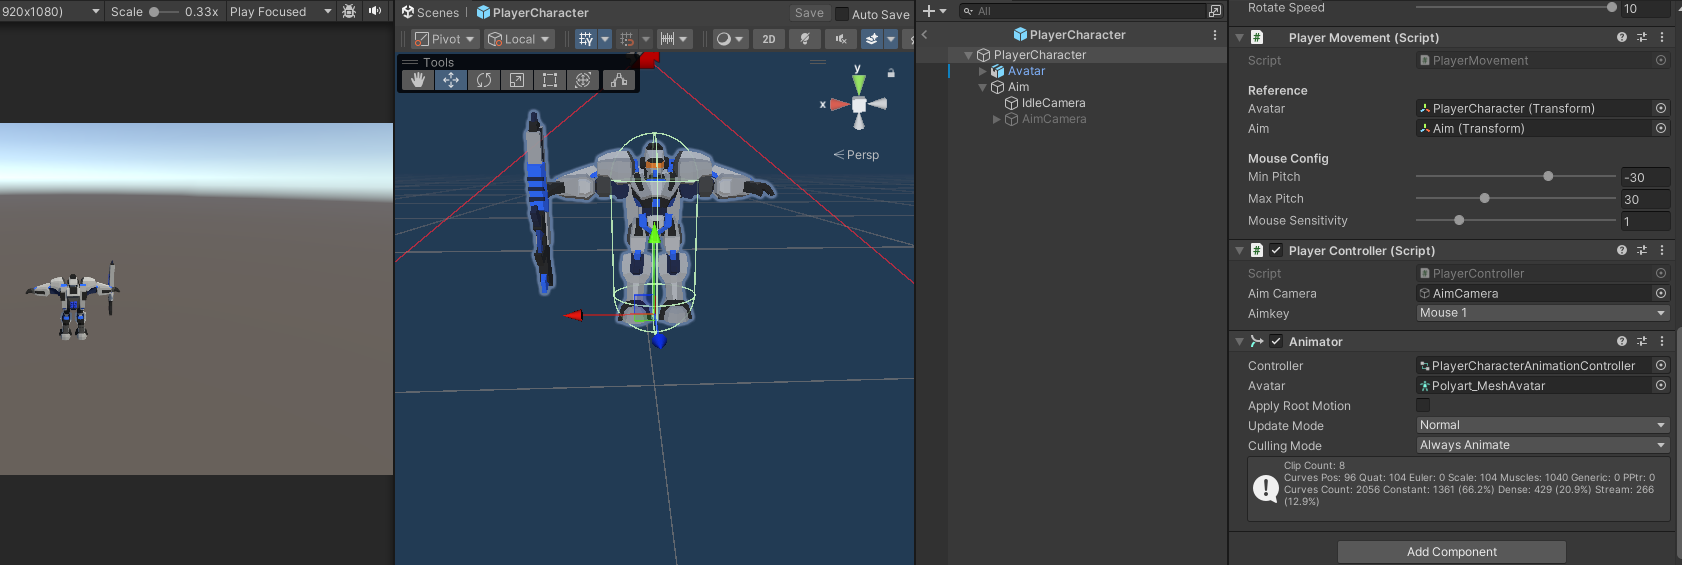
Avatar에는 해당 에셋에 해당하는 메쉬를 넣고 저장한 뒤에 애니메이터를 만들고, 이를 PlayerCharatcterAnimationController로 붙일 것이다.
이 애니메이터까지 만들고 프리팹에 넣은 뒤로 프리팹 화면을 끄자.
3. 애니메이터 1차 설정
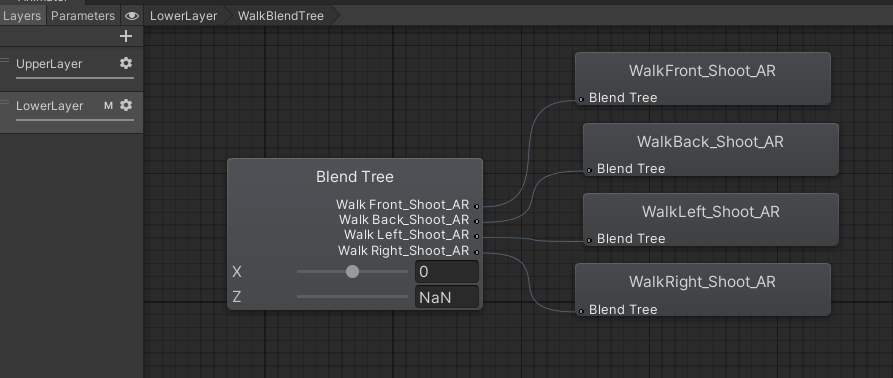
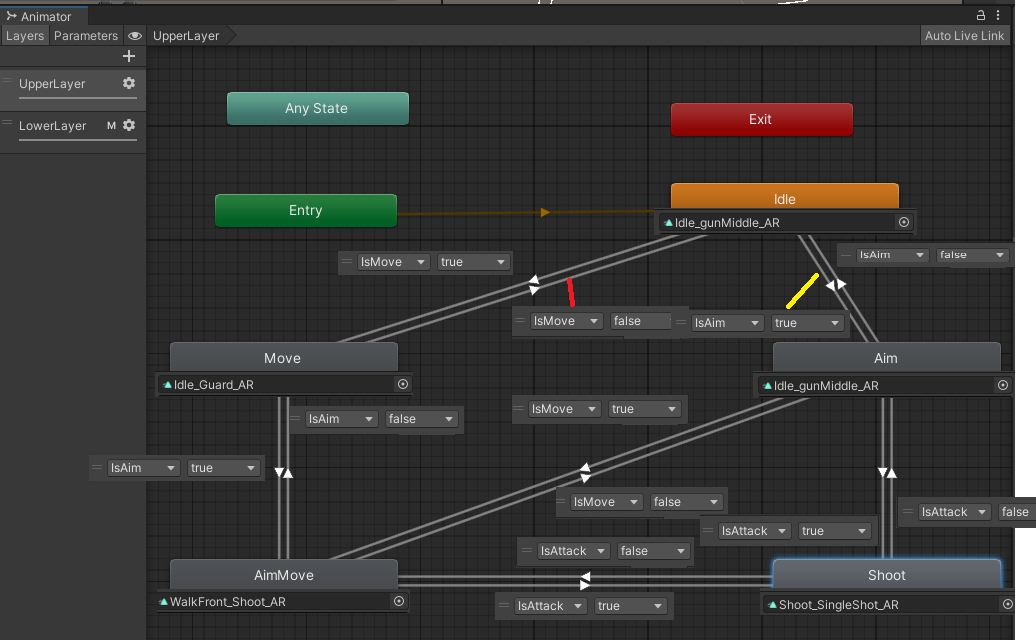
이번 내용 중 가장 골머리를 썩힌 게 애니메이션 파트였다. 초기 설정은 아래와 같이 했었으나, 이후로 에셋 상의 문제 때문에 계속 변경되게 된다. 우선 Base Layer를 Upper Layer로 두고, Lower Layer를 만든 후 아래와 같이 세팅하였다.
-
Upper Layer 초기 세팅
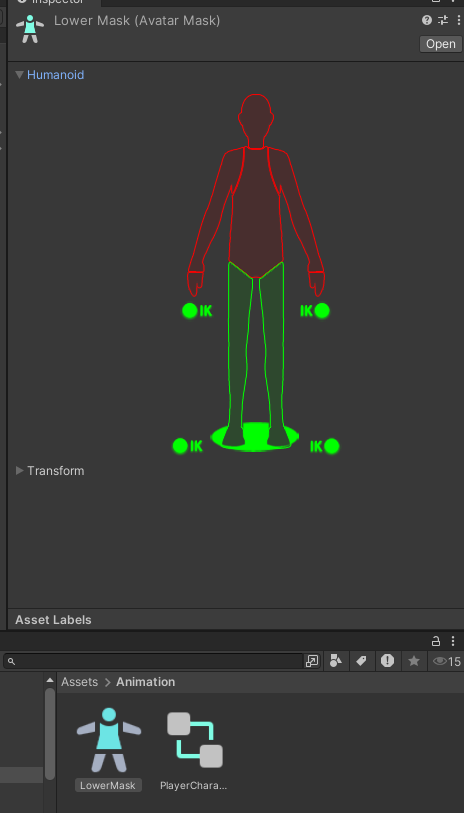
-
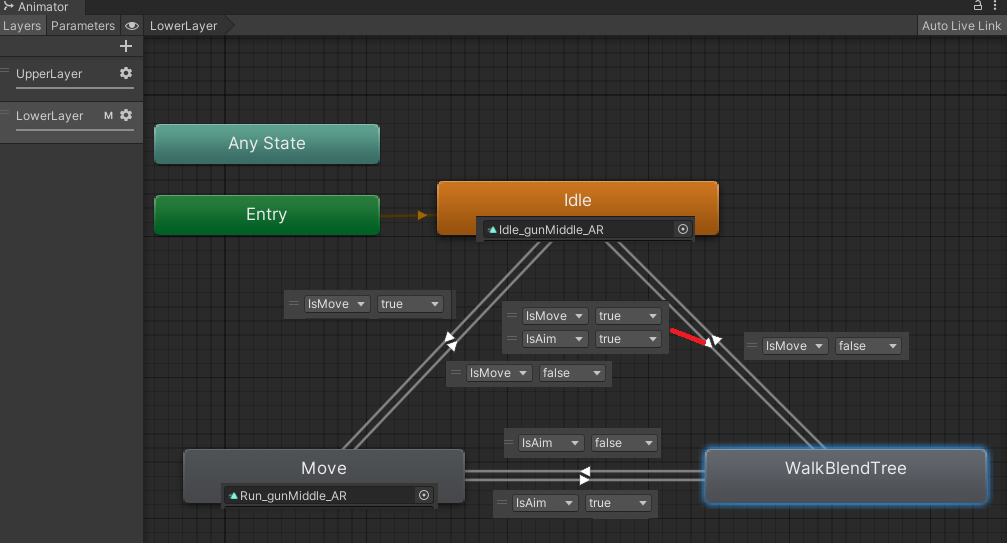
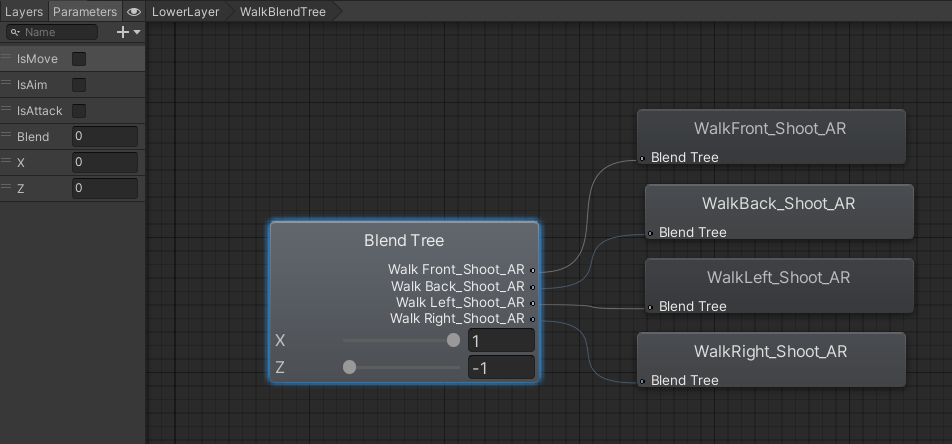
Lower Layer 초기 세팅과 Avatar Mask

4. GameManager, AudioManager 구현
이전에 만들었던 싱글톤 제네릭 패턴으로 게임 매니저와 오디오 매니저를 만들어보자.
내용은 간단하니 설명 없이 스크립트만 적었다.
- GameManager
using DesignPattern;

public class GameManager : Singleton<GameManager>
{
    private void Awake() => Init();

    private void Init()
    {
        base.SingletonInit();
    }
}- AudioManager
using System.Collections;
using System.Collections.Generic;
using UnityEngine;
public class AudioManager : MonoBehaviour
{
private AudioSource _bgmSource;
private void Awake() => Init();
private void Init()
{
_bgmSource = GetComponent<AudioSource>();
}
public void BgmPlay()
{
_bgmSource.Play();
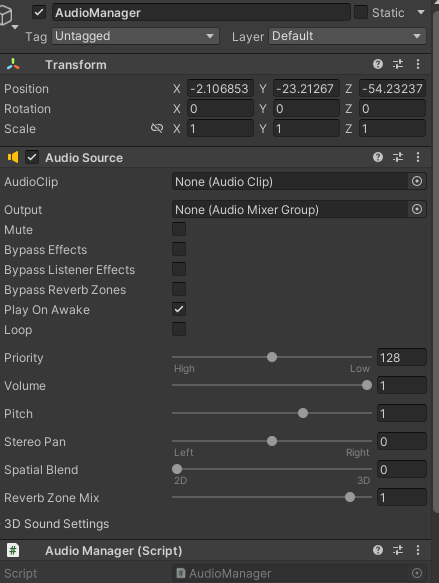
}
}사운드를 재생할 방법으로 이번엔 Audio Source 컴포넌트를 활용할 것이다.
5. Object Pool Patern 구현
새로운 디자인 패턴인 Object Pool 패턴은 구현해보려고 한다.
오브젝트 풀 패턴은 반복적으로 많이 사용되는 오브젝트를 계속 생성하고 파괴하는 데 생기는 부담을 줄이기 위해 사용하는 최적화를 위한 패턴이다.
우리는 이번에 이 오브젝트 풀 패턴을 확장성을 고려해 제네릭 형태로 만들어 볼 것이며 이를 이용한 총격 사운드 오브젝트 풀 패턴을 만들 것이다.
우선은 오브젝트 풀부터 만들어보자. 스택을 이용한 형태로 만들 예정이다.
- ObjectPool 클래스
using System.Collections.Generic;
using UnityEngine;

namespace DesignPattern
{
	public class ObjectPool
    {
    	private Stack<PooledObject> _stack;
        private PooledObject _targetPrefab;
        private GameObject _poolObject;

        public ObjectPool(Transform parent, PooledObject targetPrefab, int initSize = 5)
        => Init(parent, target, initSize);

        private void Init(Transform parent, PooledObject targetPrefab, int initSize)
        {
        	_stack = new Stack<PooledObject>(initSize);
            _targetPrefab = targetPrefab;
            // 풀을 담을 오브젝트를 타겟프리팹의 이름으로 생성
            _poolObject = new GameObject($"{targetPrefab.name}");
            _poolObject.transform.parent = parent;

        	for(int i = 0; i < initSize; i++)
        	{
        		CreatePooledObject();
        	}
        }

        public PooledObject PopPool()
        {
        	if(_stack.Count == 0) CreatePooledObject();

            PooledObject pooledObject = _stack.Pop();
            pooledObject.gameObject.SetActive(true);
            return pooledObject;
        }

        public void PushPool(PooledObject target)
        {
        	target.transform.parent = _poolObject.transform;
            target.gameObject.SetAcive(false);
            _stack.Push(target)
        }

        private void CreatePooledObject()
        {
        	PooledObject obj = MonoBehaviour.Instantiate(_targetPrefab);
            obj.PooledInit(this);
            PushPool(obj);
        }
    }
}
이와 같이 PooledObject인 모든 오브젝트에 한해 오브젝트 풀을 구성할 수 있는 클래스가 만들어졌다.
이어서 또 다른 DesignPattern으로, PooledObject의 내용을 구성하여 이를 반영하는 클래스를 만들어보고자 한다.
- PooledObject 클래스
PooledObject 클래스는 추상클래스로 만들어 다른 클래스가 상속받을 수 있도록 만들었다.
using UnityEngine;

namespace DesignPattern
{
	public abstract class PooledObject : MonoBehaviour
    {
    	public ObjectPool ObjPool { get; private set; }

        public void PoolInit(ObjectPoll objPool)
        {
        	ObjPool = objPool;
        }

        public void ReturnPool()
        {
        	ObjPool.PushPool(this);
        }
    }
}
6. 애니메이션의 반영과 문제 발생
에셋의 반영과 함께 애니메이션과 관련된 스크립트가 추가되어 아래 같이 내용을 반영했다.
using UnityEngine;
public class PlayerController : MonoBehaviour
{
...
private Animator _animator;
[SerializeField] private KeyCode _shootKey = KeyCode.Mouse0;
...
private void Init()
{
_status = GetComponent<PlayerStatus>();
_movement = GetComponent<PlayerMovement>();
_animator = GetComponent<Animator>();
}
private void HandlePlayerControl()
{
if (!isControlActive) return;
HandleMovement();
HandleAiming();
HandleShooting();
}
private void HandleShooting()
{
if(_status.IsAming.Value && Input.GetKey(_shootKey))
{
_status.IsAttacking.Value = _gun.Shoot();
}
else
{
_status.IsAttacking.Value = false;
}
}
private void HandleMovement()
{
...(움직임 및 에셋 회전 내용 생략)
if(_status.IsAming.Value)
{
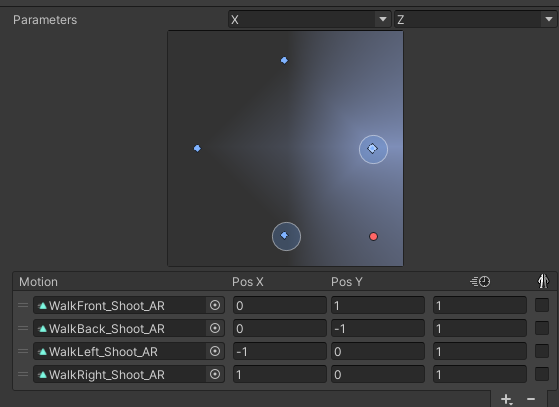
Vector3 input = _movement.GetInputDirection();
_animator.SetFloat("X", input.x);
_animator.SetFloat("Z", input.z);
}
}
private void HandleAiming()
{
_status.IsAming.Value = Input.GetKey(_aimkey);
}
public void SubscribeEvents()
{
_status.IsMoving.Subscribe(SetMoveAniation);
_status.IsAming.Subscribe(_aimCamera.gameObject.SetActive);
_status.IsAming.Subscribe(SetAimAnimation);
_status.IsAttacking.Subscribe(SetAttackAnimation);
}
public void UnsubscribeEvents()
{
_status.IsMoving.Subscribe(SetMoveAniation);
_status.IsAming.UnSubscribe(_aimCamera.gameObject.SetActive);
_status.IsAming.UnSubscribe(SetAimAnimation);
_status.IsAttacking.UnSubscribe(SetAttackAnimation);
}
private void SetAimAnimation(bool value) => _animator.SetBool("IsAim", value);
private void SetMoveAniation(bool value) => _animator.SetBool("IsMove", value);
private void SetAttackAnimation(bool value) => _animator.SetBool("IsAttack", value);
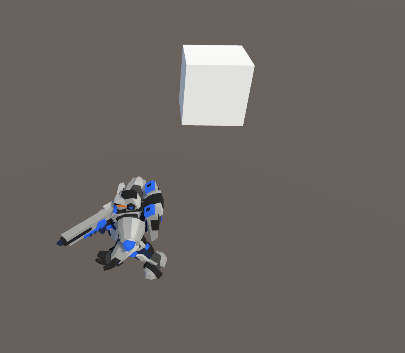
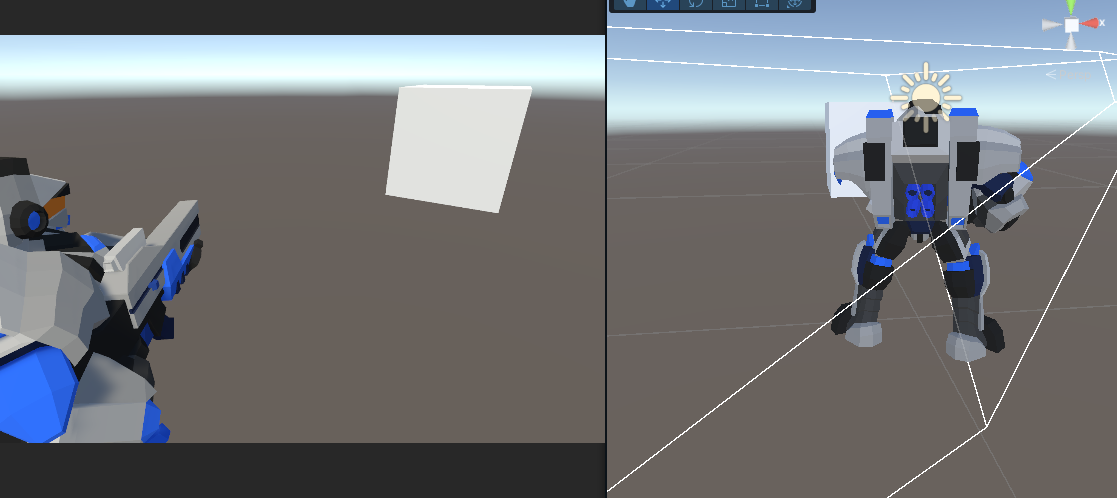
}이와 같이 작성하면 애니메이션 자체는 잘 작동한다. 하지만 지속적으로 발생한 문제가, 총의 모션과 총을 쏘는 손의 모션이 자꾸 안 맞다는 문제가 생긴다는 것이었다.
손이 총 속으로 들어가버린다거나 총이 붕 떠 있는 모션이 된다거나 이런 식으로 표시된다는 문제였다.
왜 이런 문제가 발생하는지 에셋을 다시 살펴 보니, 원인은 에셋 자체의 구조에 있었다.
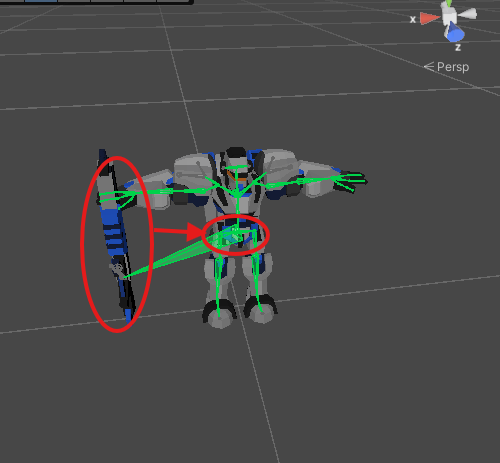
이와 같이 에셋의 골격 구조를 살펴보면 총이 골반과 연결되어 있는 것을 확인할 수 있다. 따라서 상반신에서 조작되어야 할 총의 모션이 하반신에 연동되어 작동하고 있으니 의도하지 않은 애니메이션 모션이 나온 것이다.
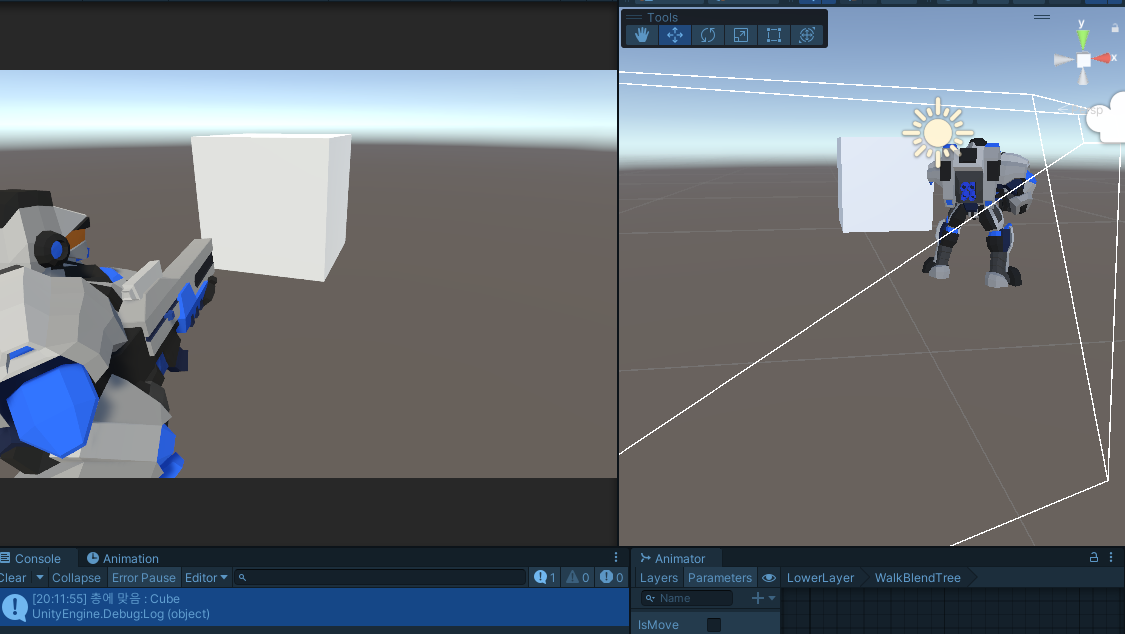
이건 프리팹 자체의 문제이기 때문에 어쩔 수 없이 애니메이션 모션을 여러모로 조정한 끝에 이와 같이 세팅을 진행하였다.
이와 같이 애니메이션 세팅을 하고 게임 매니저 및 여러 컴포넌트들을 프리팹화 시켰다.
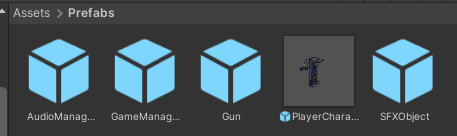
* GameManager는 AudioManager를 자식 오브젝트로 가져야 한다.
7. AudioManager 내용 추가와 SFXContoroller
마지막으로 오브젝트 풀을 상속한 SFXController를 만든 뒤 총을 쏠 때마다 총 소리가 나도록 해야 한다.
이때 AudioManager가 이런 사운드 출력을 담당할 수 있도록 역할을 나누었다.
- AudioManager
using System.Collections.Generic;
using DesignPattern;
using UnityEngine;

public class AudioManager : MonoBehaviour
{
    private AudioSource _bgmSource;
    private ObjectPool _sfxPool;

    [SerializeField] private List<AudioClip> _bgmList = new();
    [SerializeField] private SFXController _sfxPrefab;

    private void Awake() => Init();

    private void Init()
    {
        _bgmSource = GetComponent<AudioSource>();

        _sfxPool = new ObjectPool(transform, _sfxPrefab, 10);
    }

    public void BgmPlay(int index)
    {
        if (0 <= index && index < _bgmList.Count)
        {
            _bgmSource.Stop();
            _bgmSource.clip = _bgmList[index];
            _bgmSource.Play();
        }
    }

    public SFXController GetSFX()
    {
        PooledObject po = _sfxPool.PopPool();
        return po as SFXController;
    }
}- SFXController
using DesignPattern;
using UnityEngine;

public class SFXController : PooledObject
{
    private AudioSource _audioSource;
    private float _currentCount;

    private void Awake() => Init();

    private void Init()
    {
       _audioSource = GetComponent<AudioSource>();
    }

    private void Update()
    {
        _currentCount -= Time.deltaTime;

        if(_currentCount <= 0) ReturnPool();
    }

    public void Play(AudioClip clip)
    {
        _audioSource.Stop();
        _audioSource.clip = clip;
        _audioSource.Play();

        _currentCount = clip.length;
    }
}
이와 같이 만든 후 SFXObject 프리팹을 AudioManager한테 끼우면 사운드가 원활하게 재생되는 것을 확인할 수 있었다.