0. 들어가기에 앞서
어제 겨우 기본적인 인벤토리 구현에 성공했다. 튜토리얼을 이어서 분석하면서 기능을 추가로 더 구현했다.
1. 작일 ~ 금일 한 업무 정리, 구현 내용
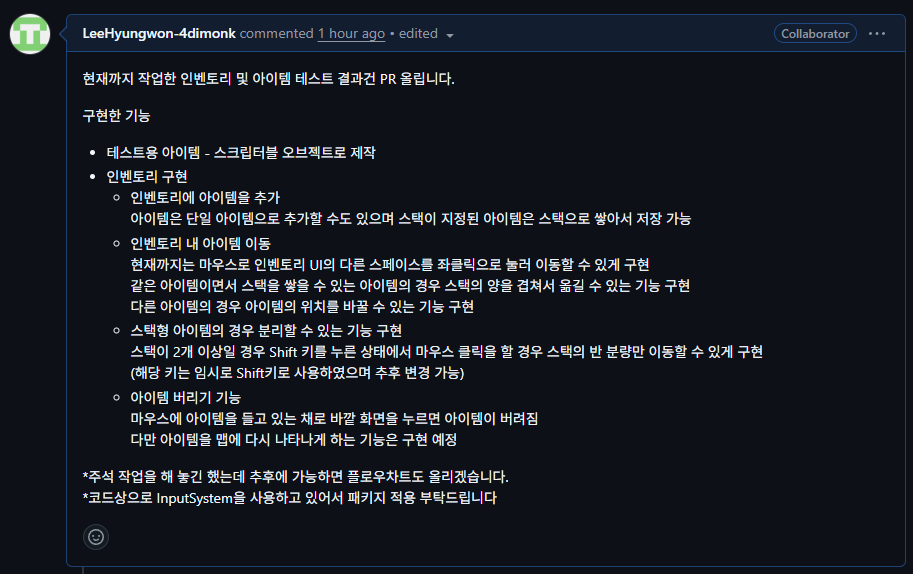
어제자에는 PR을 하지 않았고, 오늘 첫 PR을 올렸다.

현재까지 구현한 내용은 대략 이와 같이 되어 있고, 아래와 같이 테스트 영상도 찍어 보았다.
2. 문제의 발생과 해결과정
오늘은 코드 자체의 문제보다는 인스펙터 상에서 문제를 많이 겪었었다. 아무래도 튜토리얼을 따라 적용하다 보니 금방 코드 내용을 익히기는 쉽지 않았고, 코드내용을 정확하기 이해하기까지는 문제를 해결하는 데 제법 시간이 걸렸다.
따라서 코드 분석 및 적용 방법을 중심으로 서술하고자 한다.
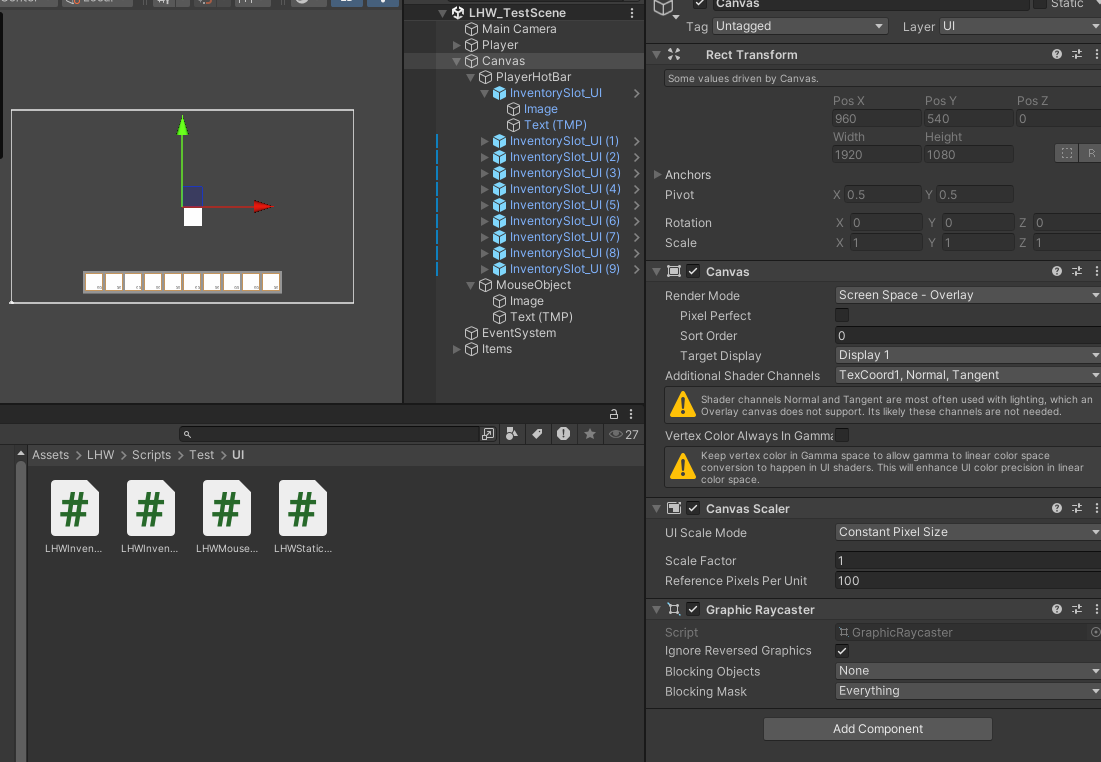
2.1 인벤토리 UI 구현하기 - 씬 뷰 상 UI 설정
기본적인 UI 구성방식은 다음과 같다.
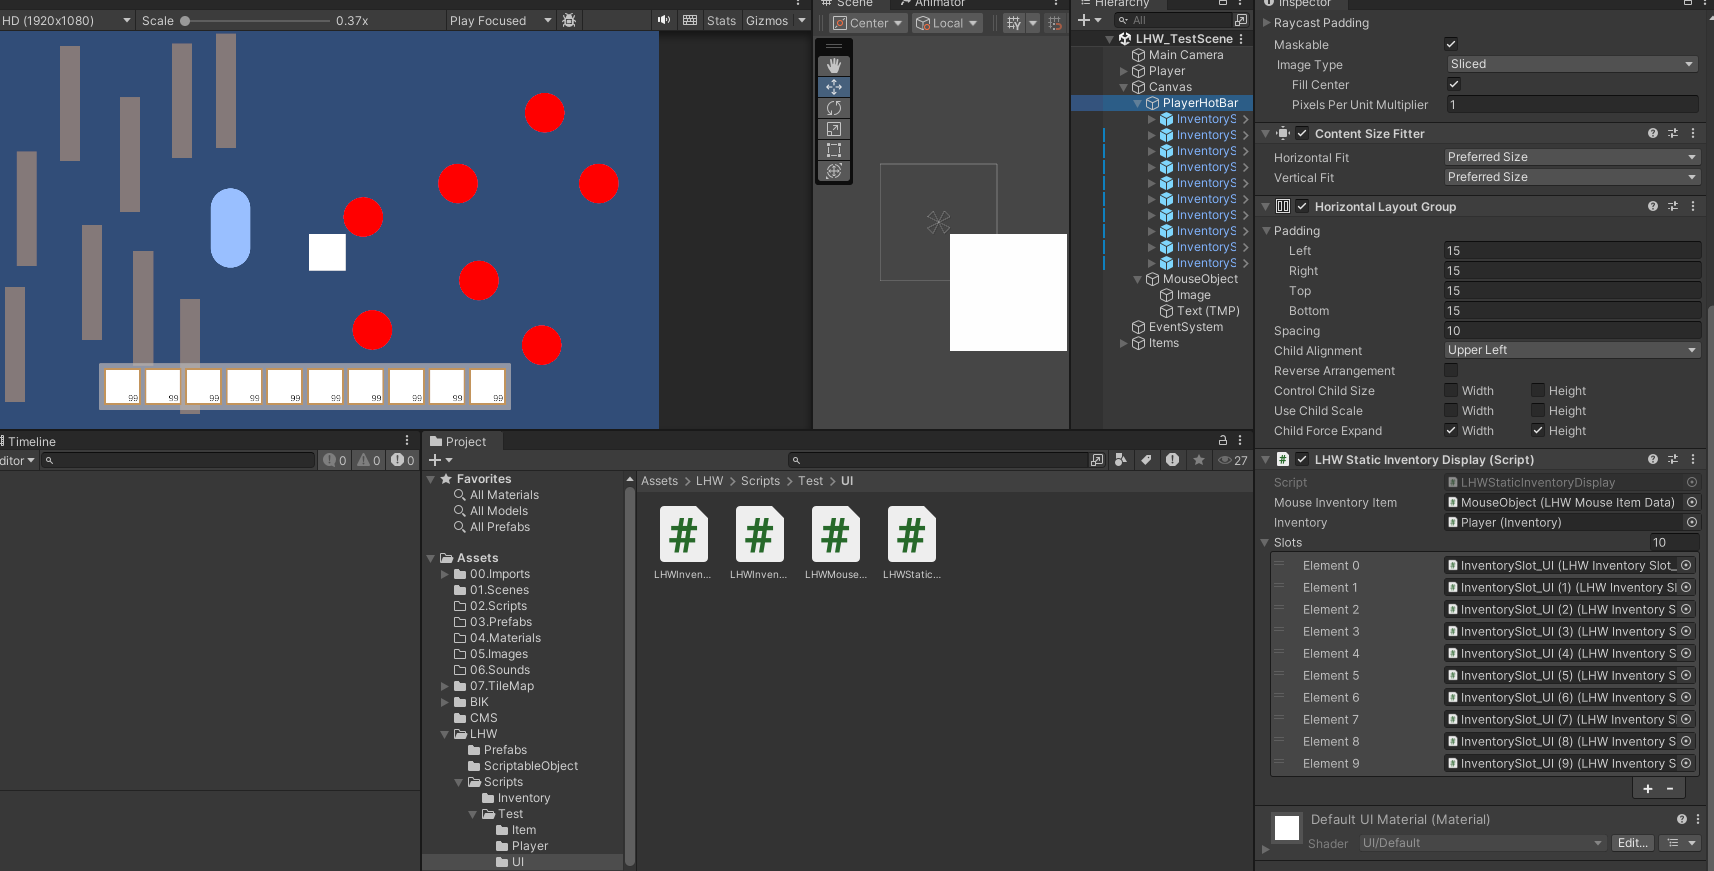
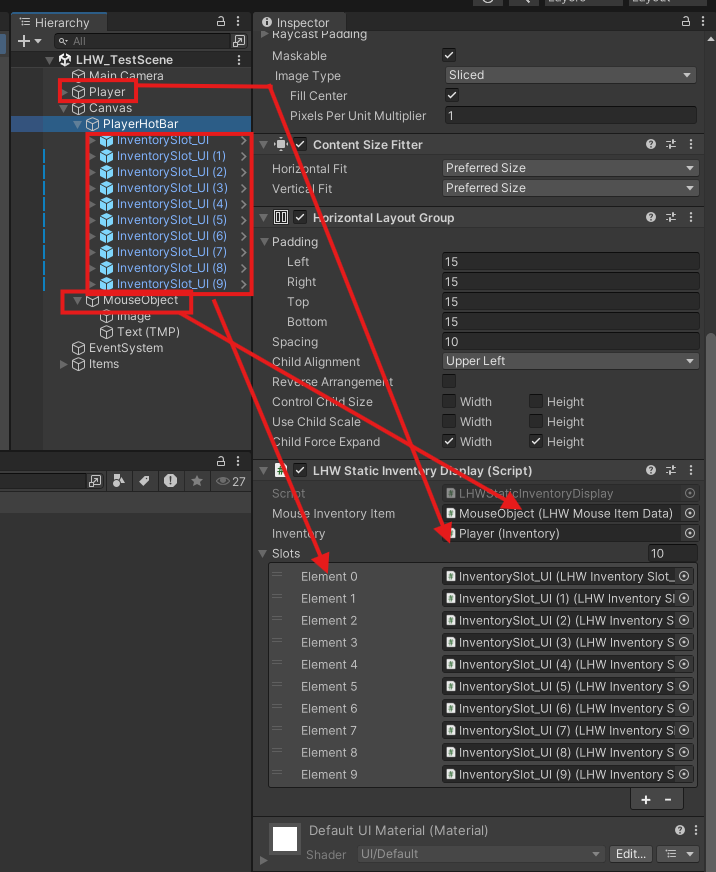
Canvas를 만들고 그 안에 PlayerHotbar(인벤토리 퀵슬롯 칸을 만든다. 여기서 칸의 수를 일정하게 만들기 위해 Content Size Filter를 적용하고, Horizontal Layout Group을 컴포넌트로 추가한다.
이와 같이 설정하면 하위 오브젝트에서 오브젝트를 추가할 때마다 알맞게 칸이 늘어나게 된다.
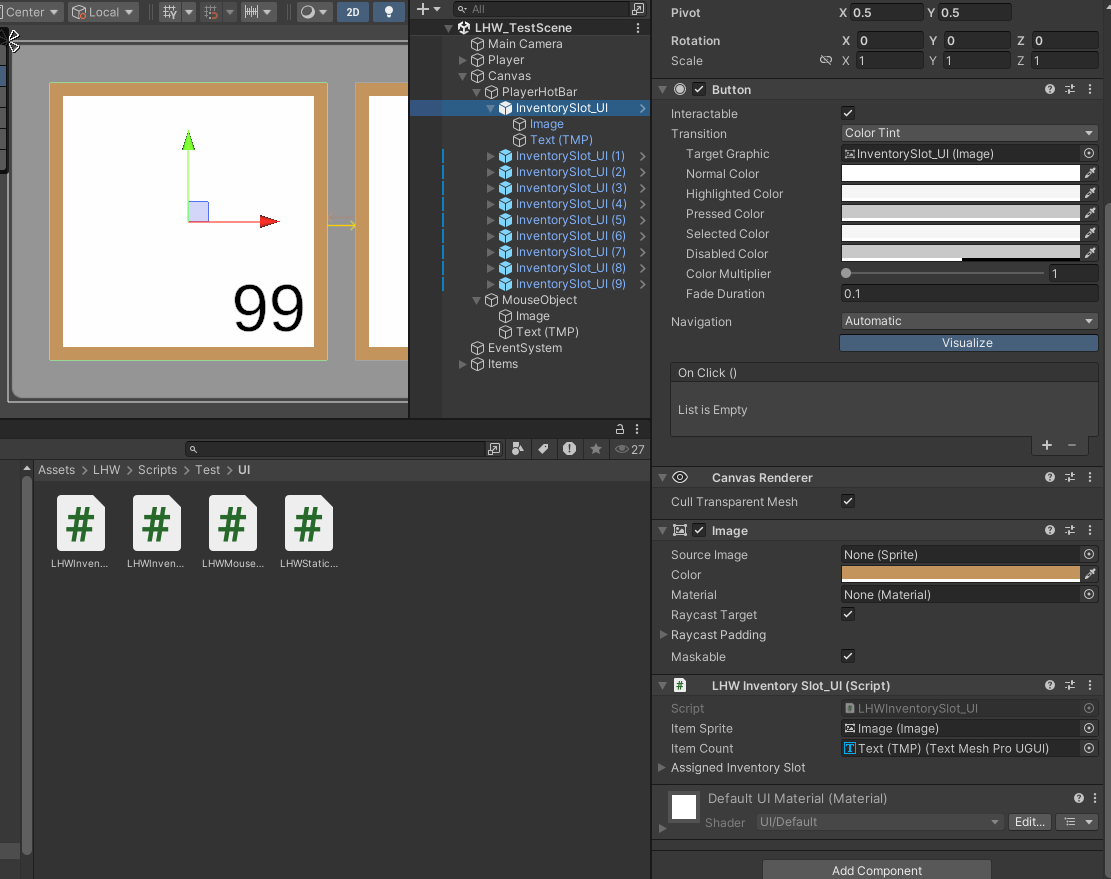
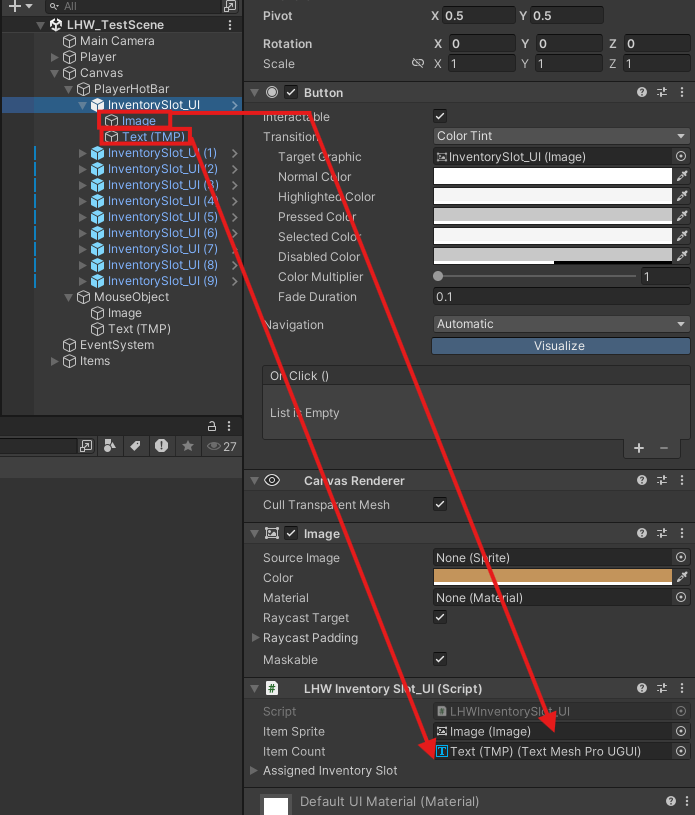
InventorySlot_UI는 이미지로 처음 생성한 다음 버튼 컴포넌트를 추가한다. 여기에서 하위 오브젝트에 또다시 이미지가 있는데, 이 하위 오브젝트의 이미지가 아이템 이미지가 될 녀석이다. 또한 글자는 수량을 표기하는 글자로, InventorySlot_UI는 핫바의 버튼 색깔이므로 원하는 색깔로 정해준다.
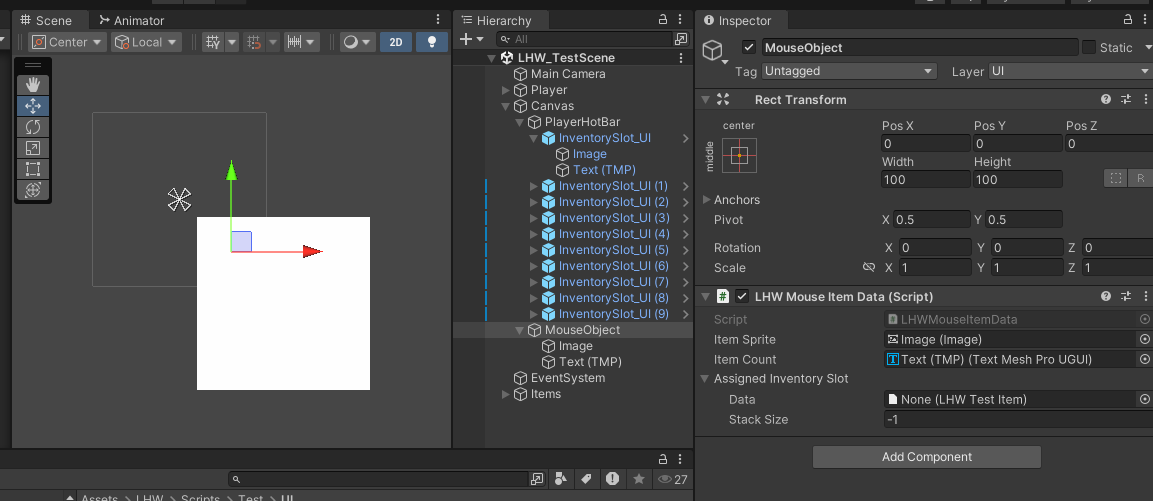
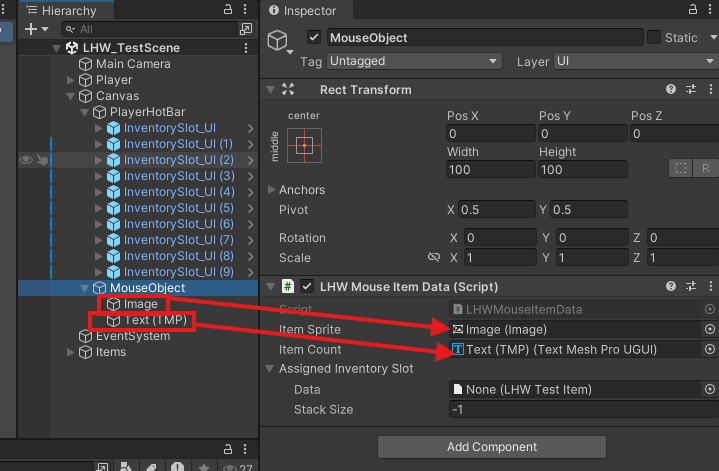
MouseObject는 PlayerHotBar 아래에 둔다. (핫바보다 후에 출력되어야 함.) 여기서 특이점은 이미지와 글자를 위와 같이 우측 하단에 두어야 한다는 건데, 이는 아이템을 마우스로 옮길 때 출력하기 위한 이미지다 보니, 이와 같이 설정해야 한다.
이와 같이 설정을 마치고 전체적인 윤곽을 보면 이와 같다.
세부적인 컴포넌트 설정과 인스펙터 참조는 코드 내용을 다루고 난 이후에 상세히 다뤄보자.
2.2 인벤토리 UI 스크립트
어제자와 비교하여 추가된 스크립트는 4개이다.
이 네 개의 스크립트가 작동하는 방식은 인벤토리를 세 부분으로 나눈 방식과 유사하게 작동된다.
InventoryDisplay라는 클래스를 통해서 UI 내에서 일어나야 하는 변화에 대해 정의하고, 이를 상속한 InventoryStaticDisplay가 실제 컴포넌트에 부착된다. InventorySlot_UI는 인벤토리라는 UI내 각 한 칸마다 부착하여 각 칸마다의 변화를 정의한다.
그리고 MouseItemData는 마우스를 따라다니는 UI에 대한 컴포넌트로 사용된다.
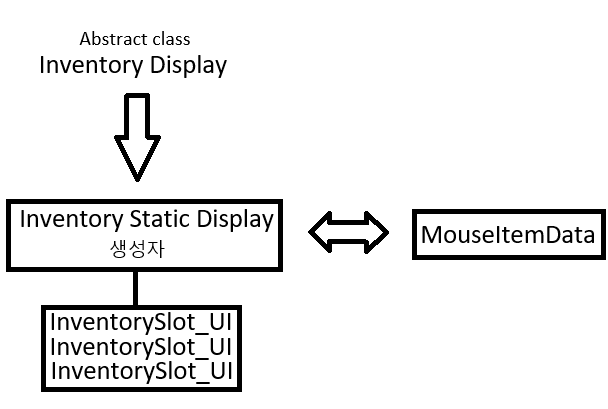
이와 같이 개요를 알아본 뒤 내용을 분석해보자.
- InventoryDisplay
인벤토리의 데이터 변화를 확인하고, 해당 변화를 UI로서 반영하는 컴포넌트이다. 버튼이 눌렸을 때 아이템에 대해 어떤 행위가 반영되어야 하는지 확인하고, UI로서 가시적으로 변화를 반영한다.
여기서 정의된 행동은 크게 아래와 같다.
- 인벤토리 UI 를 반영한다. (이미지, 스택 개수, 활성화/비활성화 등)
- 인벤토리 UI의 버튼이 눌렸을 때의 헹동을 반영한다.
2.1 인벤토리에는 아이템이 있고 마우스에는 아이템이 없다. 버튼이 Shift를 누른 상태에서 눌렸을 경우, 해당 아이템이 스택이 있는지 확인한다. 스택이 있으면 스택을 반으로 나누어 반 분량만 옮길 수 있게 한다. 스택이 없으면 아이템을 옮긴다.
2.2 인벤토리는 비어있고 마우스로는 아이템을 들고 있을 때 눌렸을 경우, 해당 아이템을 빈 인벤토리에 넣는다.
2.3 인벤토리와 마우스 둘 다 아이템이 있을 경우, 아래와 같은 조건에 따라 행동한다.
2.3.1 두 아이템이 같고 인벤토리의 스택에 공간이 있을 경우 마우스의 아이템을 인벤토리의 아이템과 합친다.
2.3.2 두 아이템이 같고 인벤토리의 스택에 공간이 없을 경우, 두 가지로 나눈다.
인벤토리의 스택 여유칸이 없을 경우 아이템 위치를 변경
인벤토리 스택 여유칸이 있을 경우 아이템의 일부만 합친다.
2.3.3 두 아이템이 다를 경우 아이템의 위치를 바꾼다.
using System.Collections.Generic;
using UnityEngine;
using UnityEngine.InputSystem;

public abstract class LHWInventoryDisplay : MonoBehaviour
{
    [SerializeField] LHWMouseItemData _mouseInventoryItem;

    protected InventorySystem _inventorySystem;
    protected Dictionary<LHWInventorySlot_UI, InventorySlots> _slotDictionary;

    public InventorySystem InventorySystem => _inventorySystem;
    public Dictionary<LHWInventorySlot_UI, InventorySlots> SlotDitionary => _slotDictionary;

    protected virtual void Start() { }

    public abstract void AssignSlot(InventorySystem invToDisplay);

    /// <summary>
    /// Updates the data to UI.
    /// </summary>
    /// <param name="updatedSlot"></param>
    protected virtual void UpdateSlot(InventorySlots updatedSlot)
    {
        foreach (var slot in SlotDitionary)
        {
            if (slot.Value == updatedSlot)
            {
                slot.Key.UpdateUISlot(updatedSlot);
            }
        }
    }

    /// <summary>
    /// If the slot is clicked.
    /// </summary>
    /// <param name="clickedUISlot"></param>
    public void SlotClicked(LHWInventorySlot_UI clickedUISlot)
    {
        bool isShiftPressed = Keyboard.current.leftShiftKey.isPressed;

        // If there's item in the inventory slot, and not in mouse slot.
        if (clickedUISlot.AssignedInventorySlot.Data != null && _mouseInventoryItem.AssignedInventorySlot.Data == null)
        {
            // If the item is over two stack and player is holding shift key? Split the stack.
            // Change isShiftPressed if you want to change splitKey.
            if (isShiftPressed && clickedUISlot.AssignedInventorySlot.SplitStack(out InventorySlots halfStackSlot))
            {
                _mouseInventoryItem.UpdateMouseSlot(halfStackSlot);
                clickedUISlot.UpdateUISlot();
                return;
            }
            // If the item is not stackable or one stack, just move the item to mouse slot.
            else
            {
                _mouseInventoryItem.UpdateMouseSlot(clickedUISlot.AssignedInventorySlot);
                clickedUISlot.ClearSlot();
                return;
            }
        }

        // If there's no item in the inventory slot, and in mouse slot.
        if (clickedUISlot.AssignedInventorySlot.Data == null && _mouseInventoryItem.AssignedInventorySlot.Data != null)
        {
            clickedUISlot.AssignedInventorySlot.AssignItem(_mouseInventoryItem.AssignedInventorySlot);
            clickedUISlot.UpdateUISlot();

            _mouseInventoryItem.ClearSlot();
            return;
        }

        // If there item in the inventory slot and in the mouse slot.
        if (clickedUISlot.AssignedInventorySlot.Data != null && _mouseInventoryItem.AssignedInventorySlot.Data != null)
        {
            bool isSameItem = clickedUISlot.AssignedInventorySlot.Data == _mouseInventoryItem.AssignedInventorySlot.Data;

            // If inventory item is same as mousehold item. And the stack remain in inventory is enough.
            if (isSameItem && clickedUISlot.AssignedInventorySlot.RoomLeftInStack(_mouseInventoryItem.AssignedInventorySlot.StackSize))
            {
                clickedUISlot.AssignedInventorySlot.AssignItem(_mouseInventoryItem.AssignedInventorySlot);
                clickedUISlot.UpdateUISlot();

                _mouseInventoryItem.ClearSlot();
                return;
            }
            // If inventory item is same as mousehold item. And the stack remain in inventory is not enough.
            else if (isSameItem &&
                !clickedUISlot.AssignedInventorySlot.RoomLeftInStack(_mouseInventoryItem.AssignedInventorySlot.StackSize, out int leftInStack))
            {
                // stack is full so swap the items
                if (leftInStack < 1)
                {
                    SwapSlots(clickedUISlot);
                    return;
                }
                // slot is not at max, so take what's need from the mouse inventory
                else
                {
                    int remainingOnMouse = _mouseInventoryItem.AssignedInventorySlot.StackSize - leftInStack;
                    clickedUISlot.AssignedInventorySlot.AddToStack(leftInStack);
                    clickedUISlot.UpdateUISlot();

                    var newItem = new InventorySlots(_mouseInventoryItem.AssignedInventorySlot.Data, remainingOnMouse);
                    _mouseInventoryItem.ClearSlot();
                    _mouseInventoryItem.UpdateMouseSlot(newItem);
                    return;
                }
            }
            // If the inventory item is different with mousehold item.
            else if (!isSameItem)
            {
                SwapSlots(clickedUISlot);
                return;
            }
        }
    }

    /// <summary>
    /// Swap items in inventory with in mouse slot.
    /// </summary>
    /// <param name="clickedUISlot"></param>
    private void SwapSlots(LHWInventorySlot_UI clickedUISlot)
    {
        var clonedSlot = new InventorySlots(_mouseInventoryItem.AssignedInventorySlot.Data, _mouseInventoryItem.AssignedInventorySlot.StackSize);
        _mouseInventoryItem.ClearSlot();

        _mouseInventoryItem.UpdateMouseSlot(clickedUISlot.AssignedInventorySlot);

        clickedUISlot.ClearSlot();

        clickedUISlot.AssignedInventorySlot.AssignItem(clonedSlot);
        clickedUISlot.UpdateUISlot();
    }
}
아무래도 복잡하게 정의된 논리가 필요하다 보니 구조 자체를 찌는 것이 쉽지는 않았다. 하지만 견고하게 잘 짜두면 유용하게 쓰일 수 있는 것으로 보인다.
- InventoryStaticDislplay
InventoryDisplay를 상속한다. 따라서 InventoryDisplay에서 정의한 기능을 그대로 가지고 있으며, 여기에서는 인벤토리 핫바를 생성하는 간단한 내용만이 들어간다.
using System.Collections.Generic;
using UnityEngine;

/// <summary>
/// Attach to UI Component
/// </summary>
public class LHWStaticInventoryDisplay : LHWInventoryDisplay
{
    [SerializeField] private Inventory _inventory;
    [SerializeField] private LHWInventorySlot_UI[] _slots;

    protected override void Start()
    {
        base.Start();

        if (_inventory != null)
        {
            _inventorySystem = _inventory.InventorySystem;
            _inventorySystem.OnInventorySlotChanged += UpdateSlot;
        }
        else Debug.LogWarning($"No inventory assigned to {this.gameObject}");

        AssignSlot(_inventorySystem);
    }

    /// <summary>
    /// Create Inventory Hotbar.
    /// </summary>
    /// <param name="invToDisplay"></param>
    public override void AssignSlot(InventorySystem invToDisplay)
    {
        _slotDictionary = new Dictionary<LHWInventorySlot_UI, InventorySlots>();

        if(_slots.Length != _inventorySystem.InventorySize) Debug.Log($"Inventory slots out of sync on {this.gameObject.name}");

        for(int i = 0; i < _inventorySystem.InventorySize; i++)
        {
            _slotDictionary.Add(_slots[i], _inventorySystem.InventorySlots[i]);
            _slots[i].Init(_inventorySystem.InventorySlots[i]);
        }
    }
}- InventorySlot_UI
인벤토리 각 한 칸의 기능만 구현한 스크립트이다.
생성과 함께 초기화되고 아래와 같은 기능을 정의한다.
- 한 칸의 UI를 업데이트 한다.
- 한 칸의 UI요소를 지운다.
- 버튼이 눌렸을 때 부모 오브젝트의 절차가 시작된다.
using TMPro;
using UnityEngine;
using UnityEngine.UI;

public class LHWInventorySlot_UI : MonoBehaviour
{
    [SerializeField] private Image _itemSprite;
    [SerializeField] private TMP_Text _itemCount;
    [SerializeField] private InventorySlots _assignedInventorySlot;

    private Button button;

    public InventorySlots AssignedInventorySlot => _assignedInventorySlot;
    public LHWInventoryDisplay ParentDisplay { get; private set; }

    private void Awake()
    {
        ClearSlot();

        button = GetComponent<Button>();
        button?.onClick.AddListener(OnUISlotClick);

        ParentDisplay = transform.parent.GetComponent<LHWInventoryDisplay>();
    }

    public void Init(InventorySlots slot)
    {
        _assignedInventorySlot = slot;
        UpdateUISlot(slot);
    }

    /// <summary>
    /// Updates the inventory slot.
    /// </summary>
    /// <param name="slot"></param>
    public void UpdateUISlot(InventorySlots slot)
    {
        if(slot.Data != null)
        {
            _itemSprite.sprite = slot.Data.Icon;
            _itemSprite.color = Color.white;
            if (slot.StackSize > 1) _itemCount.text = slot.StackSize.ToString();
            else _itemCount.text = "";
        }
        else
        {
            _itemSprite.color = Color.clear;
            _itemSprite.sprite = null;
            _itemCount.text = "";
        }
    }

    /// <summary>
    /// Updates the inventory slot.
    /// </summary>
    public void UpdateUISlot()
    {
        if(_assignedInventorySlot != null) UpdateUISlot(_assignedInventorySlot);
    }

    /// <summary>
    /// Clears the inventorySlot.
    /// </summary>
    public void ClearSlot()
    {
        _assignedInventorySlot?.ClearSlot();
        _itemSprite.sprite = null;
        _itemSprite.color = Color.clear;
        _itemCount.text = "";
    }

    /// <summary>
    /// If the UISlot is clicked.
    /// </summary>
    public void OnUISlotClick()
    {
        ParentDisplay?.SlotClicked(this);
    }
}- MouseItemData
마우스에 붙어 있는 UI에 대해 변화를 정의한다.
생성과 함께 초기화되고 아래와 같은 기능을 정의한다.
- 한 칸의 UI를 업데이트 한다.
- 한 칸의 UI요소를 지운다.
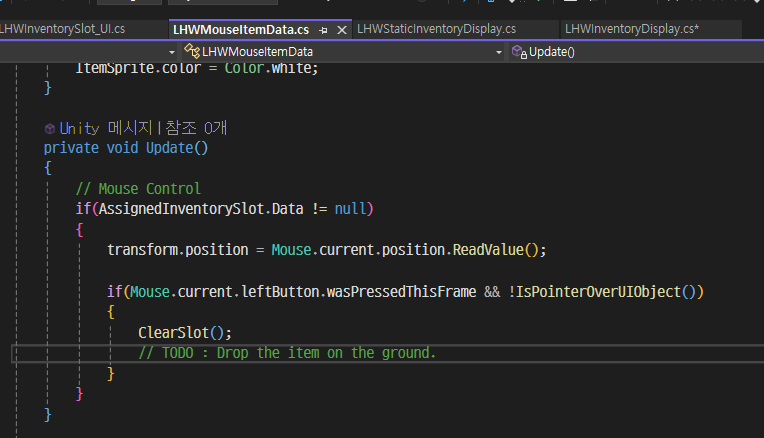
- Update 과정에서 Mouse의 위치를 레이캐스트로 판별하여 이미지와 글자 UI가 마우스에 붙어서 따라다닐 수 있도록 한다.
- 아이템을 UI 밖에서 클릭했을 경우 마우스에 들고 있던 아이템을 지운다. (버리는 과정에 대한 부분은 이후 만들어야 함.)
using System.Collections.Generic;
using TMPro;
using UnityEngine;
using UnityEngine.UI;
using UnityEngine.InputSystem;
using UnityEngine.EventSystems;

public class LHWMouseItemData : MonoBehaviour
{
    // Change this to getter setter occurs NullreferenceError.
    // Need to find accessibility restrict.
    [SerializeField] public Image ItemSprite;
    [SerializeField] public TMP_Text ItemCount;
    [SerializeField] public InventorySlots AssignedInventorySlot;

    private void Awake()
    {
        ItemSprite.color = Color.clear;
        ItemCount.text = "";
    }

    /// <summary>
    /// Updates the mouse item slot.
    /// </summary>
    /// <param name="invSlot"></param>
    public void UpdateMouseSlot(InventorySlots invSlot)
    {
        AssignedInventorySlot.AssignItem(invSlot);
        ItemSprite.sprite = invSlot.Data.Icon;
        // if item is stackable, return stack size.
        // if not, don't print item amount.
        ItemCount.text = invSlot.StackSize > 1 ? invSlot.StackSize.ToString() : "";
        ItemSprite.color = Color.white;
    }

    private void Update()
    {
        // Mouse Control
        if(AssignedInventorySlot.Data != null)
        {
            transform.position = Mouse.current.position.ReadValue();

            if(Mouse.current.leftButton.wasPressedThisFrame && !IsPointerOverUIObject())
            {
                ClearSlot();
                // TODO : Drop the item on the ground.
            }
        }
    }

    /// <summary>
    /// Clears the slot.
    /// </summary>
    public void ClearSlot()
    {
        AssignedInventorySlot.ClearSlot();
        ItemCount.text = "";
        ItemSprite.color = Color.clear;
        ItemSprite.sprite = null;
    }

    /// <summary>
    /// Defines whether mouse is on the UI.
    /// </summary>
    /// <returns></returns>
    public static bool IsPointerOverUIObject()
    {
        PointerEventData eventDataCurrentPosition = new PointerEventData(EventSystem.current);
        eventDataCurrentPosition.position = Mouse.current.position.ReadValue();
        List<RaycastResult> results = new List<RaycastResult>();
        EventSystem.current.RaycastAll(eventDataCurrentPosition, results);
        return results.Count > 0;
    }
}
이 외에도 기존 스크립트에서의 변경점으로, InventorySlots에서 아이템의 변화에 대한 반영과 아이템의 분리에 대한 스크립트가 추가되었다.
/// <summary>
/// Assigns an item to the slot
/// </summary>
/// <param name="invSlot"></param>
public void AssignItem(InventorySlots invSlot)
{
    // Does the slot contains the same item? Add to stack if so.
    if(_data == invSlot.Data) AddToStack(invSlot._stackSize);
    // Overwrite slot with the inventory slot that we;re passing in.
    else
    {
        _data = invSlot.Data;
        _stackSize = 0;
        AddToStack(invSlot._stackSize);
    }
}

...

/// <summary>
/// Defines whether items can be split,
/// and return split stack size.
/// </summary>
/// <param name="splitStack"></param>
/// <returns></returns>
public bool SplitStack(out InventorySlots splitStack)
{
    if(_stackSize <= 1)
    {
        splitStack = null;
        return false;
    }

    int halfStack = Mathf.RoundToInt(_stackSize / 2);
    RemoveFromStack(halfStack);

    splitStack = new InventorySlots(_data, halfStack);
    return true;
}
2.3 인스펙터상의 컴포넌트 참조
각 컴포넌트의 참조를 살펴보자.
인벤토리 각 칸의 경우 참조를 시킨 후 프리팹으로 만들었다.
인벤토리 핫바의 경우 하위 오브젝트들을 전부 슬롯으로 참조하고, 플레이어의 인벤토리와 마우스 오브젝트를 연동시킨다.
마우스 오브젝트는 하위 오브젝트 참조만 하면 된다.
3. 개선점 및 과제
- 개선점
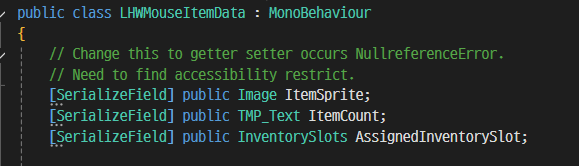
현재 MouseItemData에 관해 접근자 설정에 대한 고민이 필요한 것이 있다.
접근자를 변경하면 오류가 발생하기 때문에 임시로 아래와 같이 두었으며 안정성을 위한 개선이 필요하다.
- 과제
- TODO
아이템을 바닥에 떨어트리는 기능 구현
- 아이템을 사용하는 기능 구현
- 아이템을 테이블로 받아 CSV 파일로 데이터를 받고, 이를 Scriptable Object로 생성할 수 있는 방법 구현
- (도전) 아이템을 정렬하는 기능
또한 현재 기획팀에서 정확한 인벤토리 UI 계획이 나오지는 않았지만, 핫바에서는 사용할 수 있는 아이템만 등록하고 재료와 같은 아이템은 팝업형 UI로 볼 수 있게 할 수 있는 기능을 원한다고 한다. 이런 팝업형 UI를 구현하기 위한 준비도 해야할 것으로 보인다.
(마인크래프트와 비슷한 UI 형식을 요구하는 것으로 보임)
또한 버튼으로 핫바의 버튼을 누를 수 있는 기능도 필요하다 보니, 이 부분은 R&D가 필요해 보인다.
