노드버전 확인하기
우선 원하는 디렉토리로 이동후
✔️ CRA 설치
npx create-react-app 폴더명(리액트로 작업할 프로젝트명)
✔️ React Router 설치
npm install react-router-dom --save
✔️ Sass 설치
npm install node-sass --save
( CRA와 node-sass 호환이 안되는 버전이 있기 때문에 밑에 버전 설치 권장)
버전 지정해서 설치하는 명령어: npm install node-sass@4.14.1 —-save
✔️ styled-components
npm install --save styled-components
✔️ .eslintcache 파일 .gitignore에 추가
gitignore -> .eslintcache 추가하기
eslintcache ?????
일반적으로 eslint를 vscode와 사용하면 저장할 때마다 lint를 적용시킴
이 때 eslintcache 파일이 있으면 변경된 파일만 린트를 적용
즉, 보다 빠른작업이 가능하다는 뜻
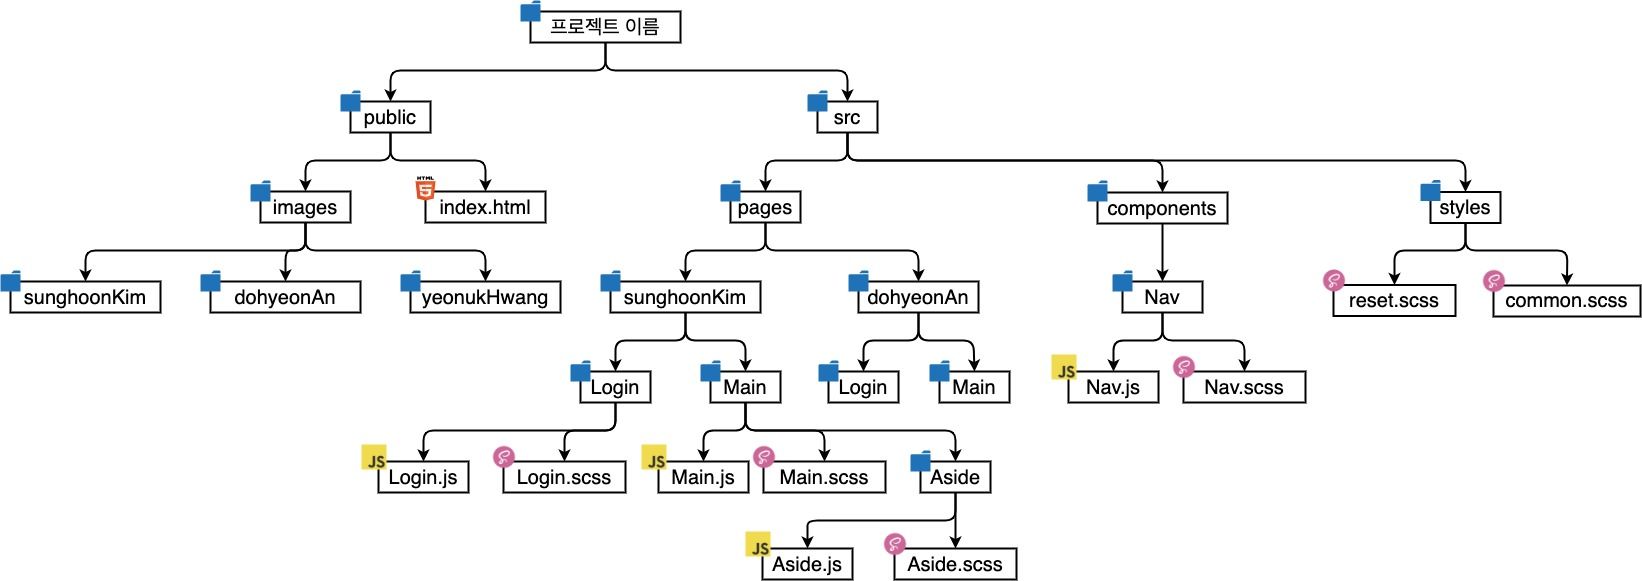
✔️ CRA 폴더 및 파일 가이드

로컬에서 폴더만 생성하고 빈 폴더로 두고 PR을 올릴 경우 폴더가 GitHub에 올라가지 않습니다.
반드시 폴더 안에 아무 파일이나 하나 생성해서 올려주세요. 빈 .js 파일이든 .md파일이든 상관없습니다.
src 폴더
- pages 폴더
각자 작업할 컴포넌트 파일 관리 - components 폴더
모든 페이지에서 공통으로 사용되는 컴포넌트를 관리
(ex. Header, Footer) - styles 폴더
공통으로 들어갈 sass파일 관리
(ex. reset.scss , common.scss, variables.scss )
Routes.js
import Login-sunhoLee from './pages/sunho/Login/Login';
import Main-sunhoLee from './pages/sunho/Main/Main';

<Route exact path='/login-sunho' component={Login-sunhoLee} />
<Route exact path='/main-sunho' component={Main-sunhoLee} />
추가기능 설치하기
ESLint, Prettier를 검색해서 각각 설치
.png)
.png)
ESLint : 작성된 코드 분석해서 버그가 발생할 여지가 있거나 , 불필요한 코드, 보안상 위험한 코드등에 대한 경고 띄어준다.
(좋은 품질의 자바스크립트 코드를 작성하기 위한 일종의 코드 스타일 가이드다.)
Prettier : 자동으로 코드의 스타일을 맞춰주는 기능을 지원하고 있다.
(ex. 들여쓰기 같은거 때문에 오류가 날때 알아서 맞춰준다. 개꿀 )
npm 패키지로 설치하는 방법
npm install -D prettier eslint-config-prettier eslint-plugin-prettier
.vscode/settings.json
{
  "editor.defaultFormatter": "esbenp.prettier-vscode",
  "editor.tabSize": 2,
  "editor.formatOnSave": true,
  "editor.codeActionsOnSave": {
  "source.fixAll.eslint": true,
  },

  "javascript.format.enable": false,
  "eslint.alwaysShowStatus": true,
  "files.autoSave": "onFocusChange"
}
.eslintrc
- 팀원이 모두 맥 유저일 경우
{
  "extends": ["react-app", "plugin:prettier/recommended"]
}- 팀원 중 윈도우 유저가 있을 경우
{
  "extends": ["react-app", "plugin:prettier/recommended"],
  "rules": {
   "prettier/prettier": [
     "error",
      {
        "endOfLine": "auto"
      }
    ]
  }
}
.prettierrc
{
  "tabWidth": 2,
  "endOfLine": "lf",
  "arrowParens": "avoid",
  "singleQuote": true,
}
프로젝트에 필요한 외부 패키지들은
package.json에 담겨야 한다.
( 이유는node_modules폴더의 용량이 크기 때문에 github에 업로드 할 수 없다.)
eslint, prettier 애네는 전자(로컬 개발 단계)에서만 사용되는 대표적인 예시라고 할 수 있다.
- 따라서 npm을 기반으로 작성된 프로젝트를 clone 받았을 경우 package.json의 정보를 기반으로 필요한 의존성들을 재구성(설치)하게 된다.
📍github repo 연동 및 push
초기세팅 작업 완료 후
-
git add .
-
git commit -m "Add: first commit. 초기 세팅 완료."
-
설치한 CRA 프로젝트와 github repo를 연동시켜줍니다.
git remote add origin (해당 repo 주소 입력) -
연동된 repository로 push 해주세요.
git push origin master
repo를 clone 받고, master에서 바로 작업 하는게 아니라 반드시 branch 새로 생성하고 시작하기!!
- git clone (repo 주소 입력)
- npm install
node-modules 폴더 생성(패키지 소스코드 생성) - git branch feature/sunho

