
지금까지 공부한 내용을 토대로 간단한 일정 관리 어플리케이션을 구현해보고자 한다.
앞으로 만들 컴포넌트들은 다음과 같다 :
TodoTemplate: 화면을 가운데 정렬, 앱 타이틀을 보여 준다. children으로 내부 JSX를 props로 받아 렌더링한다.TodoList: 새로운 항목을 입력, 추가할 수 있는 컴포넌트. state를 통해 인풋 상태를 관리한다.TodoListItem: 각 항목에 대한 정보를 보여주는 컴포넌트이다. todo 객체를 props로 받아서 상태에 따라 다른 스타일의 UI를 구현한다.TodoList: todos 배열을 props로 받은 후 이를 map 함수를 이용해 여러 개의TodoListItem컴포넌트로 변환한다.
CSS에 주안점을 두고 만들어 보자.
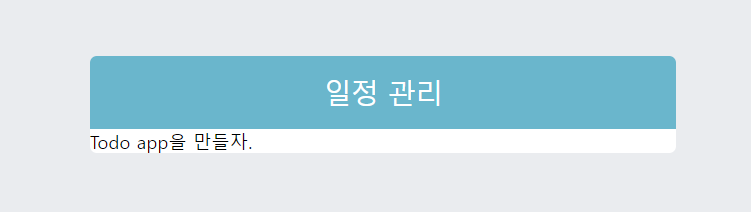
TodoTemplate 만들기
export default function TodoTemplate({children}) {
  return (
    <div className='TodoTemplate'>
        <div className="app-title">일정 관리</div>
        <div className="content">{children}</div>
    </div>
  )
}
.TodoTemplate {
width:512px;
margin-left: auto;
margin-right: auto;
margin-top: 6rem;
border-radius: 6px;
overflow: hidden;
}
.app-title {
background: #22b8cf;
color: white;
height: 4rem;
font-size: 1.5rem;
display: flex;
align-items: center;
justify-content: center;
}
.content {
background: white;
}
TodoInsert 만들기
react-icons 사용하기
웹페이지에서 사용하면 좋은 양질의 아이콘들을 import 하여 사용할 수 있다.
npm install react-iconsreact-icons를 설치한 후,
https://react-icons.github.io/react-icons 에 접속하여 원하는 아이콘을 찾는다. 이 교재의 경우 material design icons 에서 MdAdd 아이콘을 일정 추가 버튼으로써 사용했다.
import {MdAdd} from 'react-icons/md'const TodoInsert = () => {
return (
<form className="TodoInsert">
<input type="text" placeholder="type your to-do" />
<button type="submit">
<MdAdd />
</button>
</form>
);
};이것을 TodoTemplate의 children으로 넣어준다.
export default function App() {
  return (
    <div>
      <TodoTemplate>
        <TodoInsert />
      </TodoTemplate>
    </div>
  );
}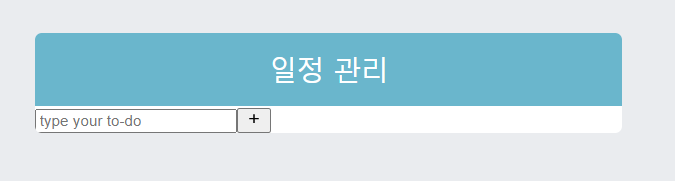
귀여운 인풋 창 등장. CSS를 입혀주자.
.TodoInsert {
    display: flex;
    background: #495057;

    input {
        background: none;
        outline: none;
        border: none;
        padding: 0.5rem;
        font-size: 1.125rem;
        line-height: 1.5;
        color: white;

        &::placeholder {
            color: #dee2e6;
        }

        flex : 1;
    }

    button {
        background: none;
        outline: none;
        border: none;
        background: #868e96;
        color: white;
        padding-left: 1rem;
        padding-right: 1rem;
        font-size: 1.5rem;
        display: flex;
        align-items: center;
        cursor: pointer;
        transition: 0.1s background ease-in;

        &:hover {
            background: #adb5bd;
        }
    }
}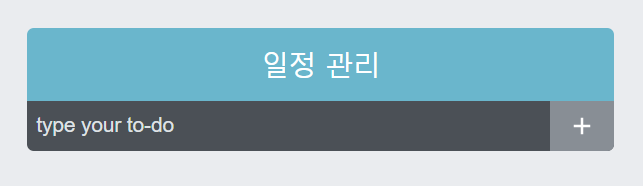
꽤 예뻐진 모습을 볼 수 있다.
TodoListItem과 TodoList 만들기
이제 일정들이 보일 부분을 만들어 준다. 먼저 TodoListItem부터 만들어 보자.
TodoListItem.js
import {
    MdCheckBoxOutlineBlank,
    MdCheckBox,
    MdRemoveCircleOutline
} from 'react-icons/md';
import './TodoListItem.scss';

export const TodoListItem = () => {
  return (
    <div className="TodoListItem">
        <div className="checkBox">
            <MdCheckBoxOutlineBlank />
            <div className="text">할 일</div>
        </div>
        <div className="remove">
            <MdRemoveCircleOutline />
        </div>
    </div>
  )
}
TodoList.js
import { TodoListItem } from './TodoListItem'
import './TodoList.scss';

export const TodoList = () => {
  return (
    <div className="TodoList">
        <TodoListItem />
        <TodoListItem />
        <TodoListItem />
    </div>
  )
}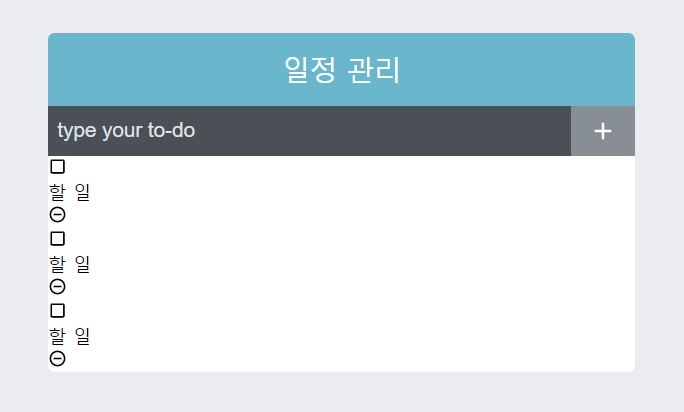
CSS를 입혀주면,
.TodoList {
    min-height: 320px;
    max-height: 513px;
    overflow-y: auto;
}
.TodoListItem {
padding: 1rem;
display: flex;
align-items: center;
&:nth-child(even) {
background: #f8f9fa;
}
.checkbox {
cursor: pointer;
flex: 1;
display: flex;
align-items: center;
svg {
font-size: 1.5rem;
}
.text {
margin-left: 0.5rem;
flex: 1;
}
&:checked {
svg {
color: #22b8cf;
}
.text {
color: #adb5bd;
text-decoration: line-through;
}
}
}
.remove {
display: flex;
align-items: center;
font-size: 1.5rem;
color: #ff6b6b;
cursor: pointer;
&:hover {
color: #ff8787;
}
}
&+& {
border-top: 1px solid #dee2e6;
}
}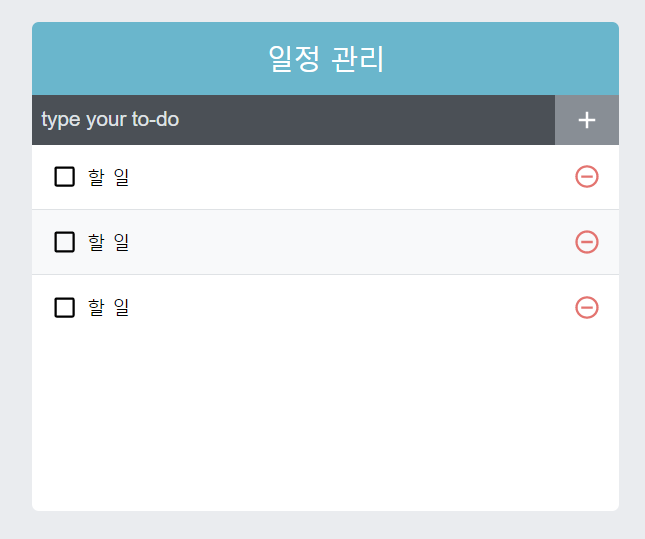
깔끔해진 모습!
scss를 사용하면서 느낀 점인데, 클래스별로 나누어서 묶어놓을 수 있으니까 가독성이 확실히 좋아진 것을 느낀다. 막 짰을 때는 확실히 중구난방이었는데 정리정돈이 되는 느낌
기능 구현
App.js
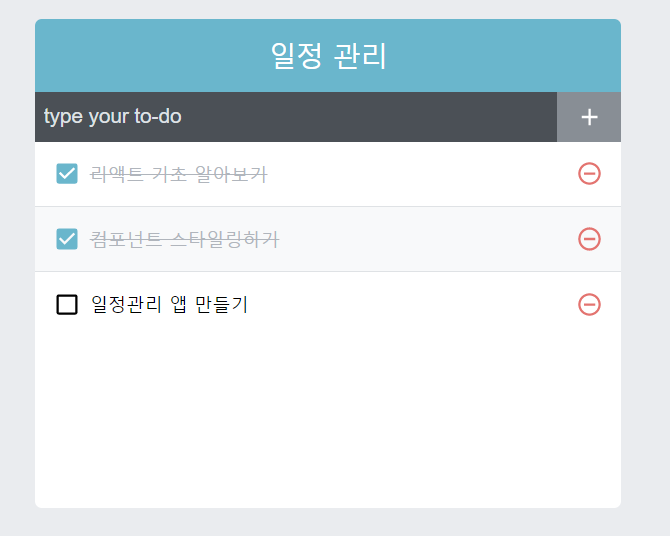
export default function App() {
  const [todos, setTodos] = useState([
    {
      id: 1,
      text: '리액트 기초 알아보기',
      checked: true,
    },
    {
      id: 2,
      text: '컴포넌트 스타일링하기',
      checked: true,
    },
    {
      id: 3,
      text: '일정관리 앱 만들기',
      checked: false,
    },
  ]);

  return (
    <div>
      <TodoTemplate>
        <TodoInsert />
        <TodoList todos={todos}/>
      </TodoTemplate>
    </div>
  );
}
TodoList.scss
.TodoList {
    min-height: 320px;
    max-height: 513px;
    overflow-y: auto;
}
TodoListItem.scss
.TodoListItem {
    padding: 1rem;
    display: flex;
    align-items: center;

    &:nth-child(even) {
        background: #f8f9fa;
    }

    .checkbox {
        cursor: pointer;
        flex: 1;
        display: flex;
        align-items: center;

        svg {
            font-size: 1.5rem;
        }

        .text {
            margin-left: 0.5rem;
            flex: 1;
        }

        &.checked {
            svg {
                color: #22b8cf;
            }

            .text {
                color: #adb5bd;
                text-decoration: line-through;
            }
        }
    }

    .remove {
        display: flex;
        align-items: center;
        font-size: 1.5rem;
        color: #ff6b6b;
        cursor: pointer;

        &:hover {
            color: #ff8787;
        }
    }

    &+& {
        border-top: 1px solid #dee2e6;
    }
}
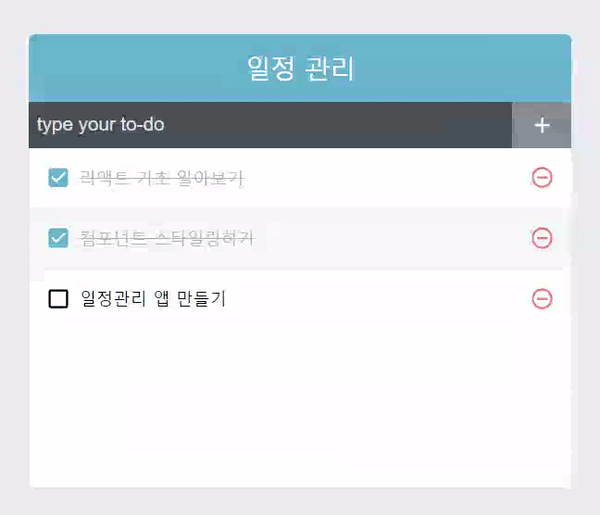
CSS가 리액트보다 더 어렵다. ㅋㅋ;;
아무튼 완성이 되었다.
완성 코드 ↓
App.js
export default function App() {
  const [todos, setTodos] = useState([
    {
      id: 1,
      text: "리액트 기초 알아보기",
      checked: true,
    },
    {
      id: 2,
      text: "컴포넌트 스타일링하기",
      checked: true,
    },
    {
      id: 3,
      text: "일정관리 앱 만들기",
      checked: false,
    },
  ]);

  const nextId = useRef(4);

  const onInsert = useCallback(
    (text) => {
      const todo = {
        id: nextId.current,
        text,
        checked: false,
      };
      setTodos(todos.concat(todo));
      nextId.current += 1;
    },
    [todos]
  );

  const onRemove = useCallback(
    (id) => {
      setTodos(todos.filter((item) => id !== item.id));
    },
    [todos]
  );

  const onToggle = useCallback(
    (id) => {
      setTodos(
        todos.map((todo) =>
          todo.id === id ? { ...todo, checked: !todo.checked } : todo,
        )
      );
    },
    [todos]
  );

  return (
    <div>
      <TodoTemplate>
        <TodoInsert onInsert={onInsert} />
        <TodoList todos={todos} onRemove={onRemove} onToggle={onToggle} />
      </TodoTemplate>
    </div>
  );
}
TodoTemplate.js
export default function TodoTemplate({children}) {
  return (
    <div className='TodoTemplate'>
        <div className="app-title">일정 관리</div>
        <div className="content">{children}</div>
    </div>
  )
}
TodoInsert.js
const TodoInsert = ({onInsert}) => {
  const [value, setValue] = useState("");

  const onChange = useCallback(e => {
    setValue(e.target.value);
  }, []);

  const onSubmit = useCallback(
    e => {
      e.preventDefault();
      onInsert(value);
      setValue('');
    },
    [onInsert, value],
  )

  return (
    <form className="TodoInsert" onSubmit={onSubmit}>
      <input type="text" placeholder="type your to-do" value={value} onChange={onChange} />
      <button type="submit">
        <MdAdd />
      </button>
    </form>
  );
};
TodoList.js
export const TodoList = ({ todos, onRemove, onToggle }) => {
  return (
    <div className="TodoList">
      {todos.map((todo) => (
        <TodoListItem
          todo={todo}
          key={todo.id}
          onRemove={onRemove}
          onToggle={onToggle}
        />
      ))}
    </div>
  );
};
TodoListItem.js
export const TodoListItem = ({ todo, onRemove, onToggle }) => {
  const { id, text, checked } = todo;

  return (
    <div className="TodoListItem">
      <div className={cn("checkbox", { checked })} onClick={() => onToggle(id)}>
        {checked ? <MdCheckBox /> : <MdCheckBoxOutlineBlank />}
        <div className="text">{text}</div>
      </div>
      <div className="remove" onClick={() => onRemove(id)}>
        <MdRemoveCircleOutline />
      </div>
    </div>
  );
};
className 부분과 scss 파일만 남겨두고 다시 한번 짜 보면서 손에 익히는게 좋겠다.