네트워크 관리
nmcli
nmcli(Network Manager Command Line Interface)
: 네트워크 관리자가 제공하는 가장 강력한 커맨드라인 도구
네트워크 연결(connection) 목록 확인
# 네트워크매니저 상태 확인
**$ systemctl status NetworkManager**
● NetworkManager.service - Network Manager
     Loaded: loaded (/usr/lib/systemd/system/NetworkManager.service; enable>
     Active: active (running) since Fri 2025-08-29 00:23:36 UTC; 2min 24s a>
       Docs: man:NetworkManager(8)
   Main PID: 607 (NetworkManager)
      Tasks: 3 (limit: 5795)
     Memory: 13.3M
        CPU: 207ms
     CGroup: /system.slice/NetworkManager.service
             └─607 /usr/sbin/NetworkManager --no-daemon

# 탭키 두번 눌러 nmcli 다양한 옵션 확인
**$ nmcli**
agent       device      help        networking
connection  general     monitor     radio

# 네트워크 연결 목록 확인
# Device: 연결과 매핑된 인터페이스의 이름
**$ nmcli connection show**
NAME    UUID                                  TYPE      DEVICE
enp0s3  53663641-fc96-4c9b-a390-fdc1aa6967cd  ethernet  enp0s3
lo      aef4f5f0-e616-474c-82c9-89a0437c3b61  loopback  lo

# 해당 인터페이스의 더 자세한 정보 확인
**$ nmcli connection show enp0s3**
connection.id:                          enp0s3
connection.uuid:                        53663641-fc96-4c9b-a390-fdc1aa6967cd
connection.stable-id:                   --
connection.type:                        802-3-ethernet
connection.interface-name:              enp0s3
**connection.autoconnect:                 yes**
connection.autoconnect-priority:        0
connection.autoconnect-retries:         -1 (default)
connection.multi-connect:               0 (default)
...
# 소문자 -> 설정된 값?
# ip를 받아오는 것이 자동 -> DHCP
**ipv4.method:                            auto**
...
# 그래서 해당 칸이 비어있음
# ip 가 고정되어있지 않고 DHCP 서버에서 매번 받아오기 때문?
**ipv4.addresses:                         --**
# 대문자 -> 활성화된 값?
****...
IP4.ADDRESS[1]:                         10.0.2.15/24
IP4.GATEWAY:                            10.0.2.2
IP4.ROUTE[1]:                           dst = 10.0.2.0/24, nh = 0.0.0.0, mt>
IP4.ROUTE[2]:                           dst = 0.0.0.0/0, nh = 10.0.2.2, mt >
IP4.DNS[1]:                             168.126.63.1
IP4.DNS[2]:                             203.248.252.2
# 디바이스 상태 확인
**$ nmcli device status**
DEVICE TYPE STATE CONNECTION
enp0s3 ethernet connected enp0s3
lo loopback connected (externally) lo연결 생성
동적 ip vs. 정적 ip
→ 동적 ip: 자동으로 받아옴
→ 정적 ip: 수동으로 설정(고정됨)
# 탭 키 두번 눌러 nmcli connection 다양한 옵션 확인
**$ sudo nmcli connection**
add      delete   edit     help     load     modify   reload   up
clone    down     export   import   migrate  monitor  show

# 새로운 연결 생성 (동적 ip)
# autoconnect yes
**$ sudo nmcli connection add type ethernet con-name "my-dynamic"
ifname enp0s3 autoconnect yes**
Connection 'my-dynamic' (4b19acd9-fb6a-4dba-ba48-3d5d08cd26ac) successfully added.

# 생성되었는지 연결 목록 확인
**$ sudo nmcli connection show**
NAME        UUID                                  TYPE      DEVICE
enp0s3      53663641-fc96-4c9b-a390-fdc1aa6967cd  ethernet  enp0s3
lo          aef4f5f0-e616-474c-82c9-89a0437c3b61  loopback  lo
my-dynamic  4b19acd9-fb6a-4dba-ba48-3d5d08cd26ac  ethernet  --

# 새로운 연결 생성(정적 ip)
**$ sudo nmcli connection add type ethernet con-name "my-static"
ifname enp0s3 ipv4.method manual
ipv4.addresses 192.168.1.100/24 ipv4.gateway 192.168.1.1**
Connection 'my-static' (9660917f-9944-4f16-b8e4-8544d3d04d67) successfully added.
→ 아직 외부 서버와 통신하려면 DNS 설정 필요
연결설정 수정(modify)
# 이미 있는 연결 설정 수정
# my-static (정적 ip 연결)에 DNS 설정 추가
# DNS 두개 설정(공백으로 구분)
**$ sudo nmcli connection modify my-static ipv4.dns "8.8.8.8 1.1.1.1"**

# 연결 목록 확인
**$ sudo nmcli connection show**
NAME        UUID                                  TYPE      DEVICE
# 현재 활성화된 네트워크
**enp0s3      53663641-fc96-4c9b-a390-fdc1aa6967cd  ethernet  enp0s3**
lo          aef4f5f0-e616-474c-82c9-89a0437c3b61  loopback  lo
my-dynamic  4b19acd9-fb6a-4dba-ba48-3d5d08cd26ac  ethernet  --
my-static   9660917f-9944-4f16-b8e4-8544d3d04d67  ethernet  --
# my-static 연결 활성화
# 터미널 고장남
# <- 원래 호스트와 통신하고 있던 가상머신의 창구(10.0.15.4)를
# 다른 ip (192.168.1.100)로 바꿨기 때문
**$ sudo nmcli connection up my-static**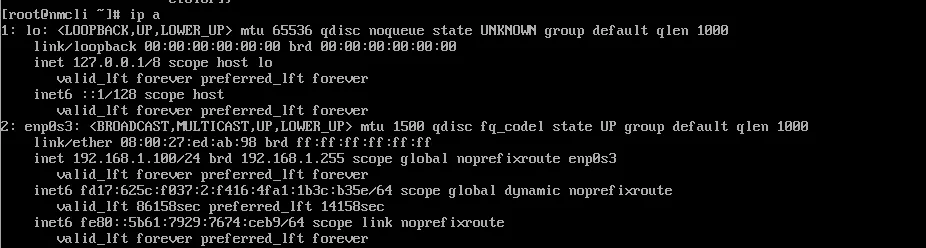
→ ip 192.168.1.100 으로 바뀐 것을 확인 가능

→ 활성화된 연결도 my-static 인 걸 확인 가능

→ 다시 원래 연결로 바꾼 후 확인
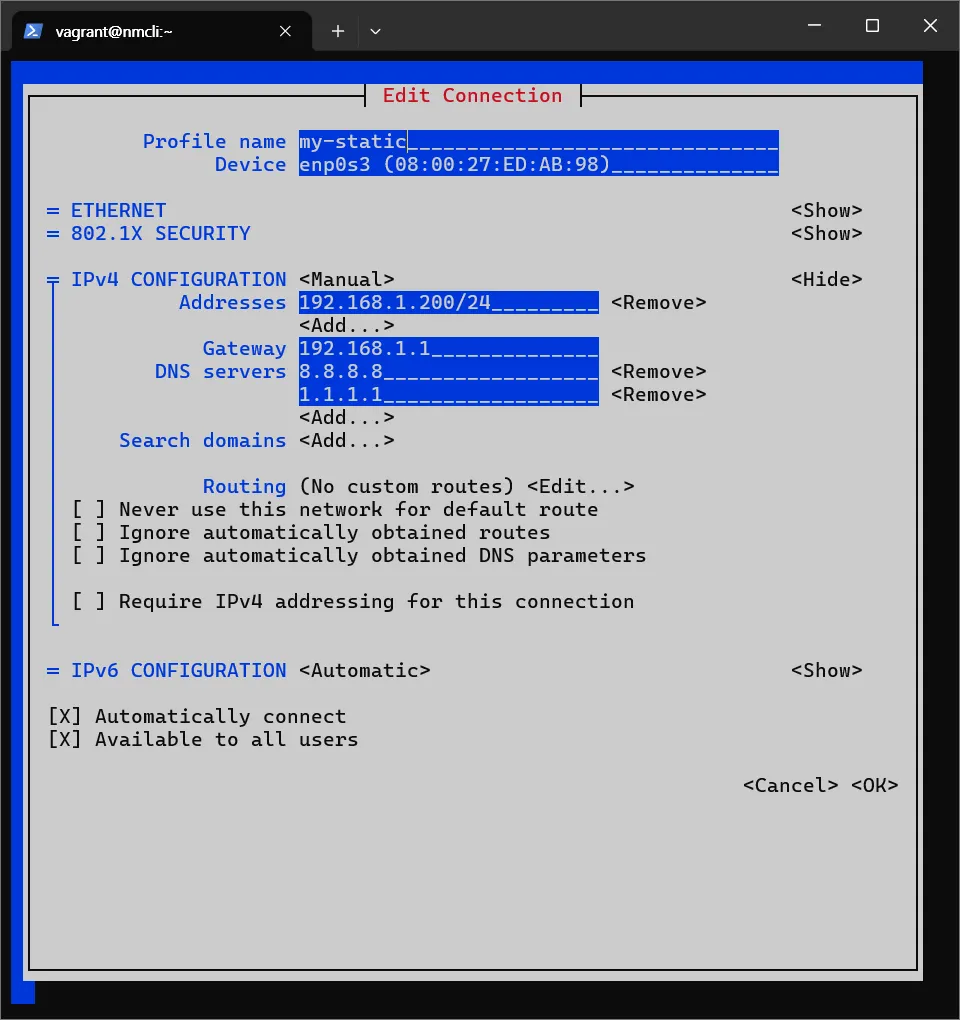
# my-static ip 주소 192.168.1.200/24 로 변경
**$ sudo nmcli connection modify my-static
ipv4.addresses 192.168.1.200/24**

# my-static 변경된 ip 주소 확인
**$ nmcli connection show my-static**
connection.id:                          my-static
connection.uuid:                        9660917f-9944-4f16-b8e4-8544d3d04d67
...
**ipv4.addresses:                         192.168.1.200/24**
...

# address 부분만 보기 위해 grep 활용
# -E 옵션 없어도 나오는데 넣는 이유?
**$ nmcli connection show my-static | grep -E 'ipv4.add'**
ipv4.addresses:                         192.168.1.200/24
연결설정 삭제(delete)
**$ nmcli con show**
NAME        UUID                                  TYPE      DEVICE
enp0s3      53663641-fc96-4c9b-a390-fdc1aa6967cd  ethernet  enp0s3
lo          aef4f5f0-e616-474c-82c9-89a0437c3b61  loopback  lo
**my-dynamic  4b19acd9-fb6a-4dba-ba48-3d5d08cd26ac  ethernet  --**
my-static   9660917f-9944-4f16-b8e4-8544d3d04d67  ethernet  --

# my-dynamic 연결 삭제
**$ sudo nmcli connection delete my-dynamic**
Connection 'my-dynamic' (4b19acd9-fb6a-4dba-ba48-3d5d08cd26ac) successfully deleted.

# 삭제된 걸 확인
**$ nmcli con show**
NAME       UUID                                  TYPE      DEVICE
enp0s3     53663641-fc96-4c9b-a390-fdc1aa6967cd  ethernet  enp0s3
lo         aef4f5f0-e616-474c-82c9-89a0437c3b61  loopback  lo
my-static  9660917f-9944-4f16-b8e4-8544d3d04d67  ethernet  --
nmtui
→ nmcli 로 충분하므로 굳이 쓸 일 없을 것
호스트이름(hostname) 설정
- DNS 주소와 DNS(hostname)
1. DNS의 기본 개념
-
DNS (Domain Name System): 사람이 쓰기 편한 도메인 이름(예:
www.google.com)을 컴퓨터가 쓰는 IP 주소(예:142.250.196.132)로 변환해 주는 시스템. -
즉, hostname ↔ IP 주소 매핑 역할을 합니다.
2. DNS 주소 (DNS Server Address)
-
여기서 “DNS 주소”라고 하면 보통 DNS 서버의 IP 주소를 의미합니다.
-
즉, “내 컴퓨터가 도메인 이름을 IP로 바꾸려면 누구한테 물어볼까?”라는 질문의 답.
-
예시:
- 구글 DNS 서버:8.8.8.8,8.8.4.4
- Cloudflare:1.1.1.1
- KT/LGU+/SKB 같은 ISP의 자체 DNS 서버👉 요약: DNS 주소 = 네임서버의 IP 주소
3. DNS Hostname (도메인 이름)
-
“호스트네임(hostname)”은 네트워크 상에서 장치나 서비스의 사람이 읽을 수 있는 이름을 뜻합니다.
-
예시:
www.naver.com→ 웹 서버의 hostnamemail.google.com→ 구글 메일 서비스의 hostname
-
hostname은 최종적으로 DNS를 통해 IP로 변환되어야 실제 통신이 가능합니다.
👉 요약: DNS hostname = 우리가 입력하는 도메인 이름
4. 관계
-
사용자가 브라우저에
www.google.com(hostname)을 입력 → -
운영체제가 미리 설정된 DNS 서버(
8.8.8.8같은 DNS 주소)에 질의 → -
DNS 서버가 IP 주소(
142.250.196.132)를 응답 → -
이후 TCP/IP로 실제 서버와 통신.
5. 헷갈리는 포인트
-
“DNS 주소” = DNS 서버의 IP (내가 질의하는 대상)
-
“DNS hostname” = 도메인 이름(호스트 이름) (내가 알고 싶은 대상)
-
DNS 서비스
: 시스템의 IP주소와 이름을 지정하여 매핑시키는 서비스
이때 매핑시키는 이름
→ FQDN(Full Qualified Domain Nam)
: 정규화된 도메인 이름
→ 호스트 이름(hostname)과 도메인 이름(domain name)으로 구성
# 탭 키 두 번 눌러 hostnmaectl 의 다양한 옵션 확인
**$ hostnamectl**
chassis     deployment  hostname    icon-name   location    status

# --help 로 간략한 설명 확인
**$ hostnamectl --help**
hostnamectl [OPTIONS...] COMMAND ...

Query or change system hostname.

Commands:
  status                 Show current hostname settings
  hostname [NAME]        Get/set system hostname
  icon-name [NAME]       Get/set icon name for host
  chassis [NAME]         Get/set chassis type for host
  deployment [NAME]      Get/set deployment environment for host
  location [NAME]        Get/set location for host

Options:
  -h --help              Show this help
     --version           Show package version
     --no-ask-password   Do not prompt for password
  -H --host=[USER@]HOST  Operate on remote host
  -M --machine=CONTAINER Operate on local container
     --transient         Only set transient hostname
     --static            Only set static hostname
     --pretty            Only set pretty hostname
     --json=pretty|short|off
                         Generate JSON output

See the hostnamectl(1) man page for details.
# 호스트네임 변경
**$ sudo hostnamectl set-hostname "rocky9"**
# 호스트네임 확인
**$ hostname**
rocky9
**$ cat /etc/hostname**
rocky9
# 호스트네임 변경
**$ sudo hostnamectl hostname rocky8**
# 호스트네임 확인
**$ hostname**
rocky8
**$ cat /etc/hostname**
rocky8
# 재로그인
**[vagrant@nmcli ~]$ sudo su - vagrant**
Last login: Fri Aug 29 00:24:36 UTC 2025 from 10.0.2.2 on pts/0
# nmcli -> rocky8로 호스트네임 변경된 걸 확인 가능
**[vagrant@rocky8 ~]$**→ set-hostname 과 hostname 은 동작 원리 동일하나, 공식 문서에서는 set-hostname 을 좀 더 권장함
# 127.0.0.1 : localhost, 즉 자신의 ip
# hostname 과 ip 를 매핑할 수 있는 파일
**$ cat /etc/hosts**
127.0.0.1   localhost localhost.localdomain localhost4 localhost4.localdomain4
::1         localhost localhost.localdomain localhost6 localhost6.localdomain6
127.0.1.1 nmcli nmcli

# 본인 ip 에 naver.com 추가
**$ sudo vi /etc/hosts**
127.0.0.1   localhost localhost.localdomain localhost4 localhost4.localdomain4 **naver.com**
::1         localhost localhost.localdomain localhost6 localhost6.localdomain6
127.0.1.1 nmcli nmcli

# naver.com 이 본인의 ip 로 뜸(127.0.0.1)
**$ ping naver.com**
PING localhost (**127.0.0.1**) 56(84) bytes of data.
64 bytes from localhost (127.0.0.1): icmp_seq=1 ttl=64 time=0.138 ms
64 bytes from localhost (127.0.0.1): icmp_seq=2 ttl=64 time=0.126 ms
64 bytes from localhost (127.0.0.1): icmp_seq=3 ttl=64 time=0.262 ms
64 bytes from localhost (127.0.0.1): icmp_seq=4 ttl=64 time=0.194 ms
/etc/hosts
: 호스트 이름과 ip주소 매핑 설정 파일
OpenSSH(Open Secure Shell)
새로운 가상머신(ssh) 생성
**$ vagrant init
$ ii Vagrantfile**
# -*- mode: ruby -*-
# vi: set ft=ruby :
vm_image = "nobreak-labs/rocky-9"
vm_subnet = "192.168.56."

Vagrant.configure("2") do |config|
  config.vm.synced_folder ".", "/vagrant", disabled: true

  config.vm.define "client" do |node|
    node.vm.box = vm_image
    node.vm.provider "virtualbox" do |vb|
      vb.name = "client"
      vb.cpus = 2
      vb.memory = 1024
    end

    node.vm.network "private_network", ip: vm_subnet + "77", nic_type: "virtio"
    node.vm.hostname = "client"
  end

  config.vm.define "server" do |node|
    node.vm.box = vm_image
    node.vm.provider "virtualbox" do |vb|
      vb.name = "server"
      vb.cpus = 2
      vb.memory = 1024
    end

    node.vm.network "private_network", ip: vm_subnet + "88", nic_type: "virtio"
    node.vm.hostname = "server"
  end
end
**$ vagrant up**

# 터미널 창 2개
# 하나는 client
$ vagrant ssh client
# 하나는 server
$ vagrant ssh server
# client ip 주소 확인
**[vagrant@client ~]$ ip a**
3: enp0s8: <BROADCAST,MULTICAST,UP,LOWER_UP> mtu 1500 qdisc fq_codel state UP group default qlen 1000
link/ether 08:00:27:1f:e6:8b brd ff:ff:ff:ff:ff:ff
inet **192.168.56.77/24** brd 192.168.56.255 scope global noprefixroute enp0s8
valid_lft forever preferred_lft forever
inet6 fe80::a00:27ff:fe1f:e68b/64 scope link
valid_lft forever preferred_lft forever
# server ip 주소 확인
**[vagrant@server ~]$ ip a**
3: enp0s8: <BROADCAST,MULTICAST,UP,LOWER_UP> mtu 1500 qdisc fq_codel state UP group default qlen 1000
link/ether 08:00:27:69:c5:fc brd ff:ff:ff:ff:ff:ff
inet **192.168.56.88/24** brd 192.168.56.255 scope global noprefixroute enp0s8
valid_lft forever preferred_lft forever
inet6 fe80::a00:27ff:fe69:c5fc/64 scope link
valid_lft forever preferred_lft forever# client -> server ping 테스트
**[vagrant@client ~]$ ping 192.168.56.88**
PING 192.168.56.88 (192.168.56.88) 56(84) bytes of data.
64 bytes from 192.168.56.88: icmp_seq=1 ttl=64 time=1.67 ms
64 bytes from 192.168.56.88: icmp_seq=2 ttl=64 time=0.520 ms
64 bytes from 192.168.56.88: icmp_seq=3 ttl=64 time=0.854 ms
64 bytes from 192.168.56.88: icmp_seq=4 ttl=64 time=1.03 ms
64 bytes from 192.168.56.88: icmp_seq=5 ttl=64 time=0.504 ms
64 bytes from 192.168.56.88: icmp_seq=6 ttl=64 time=1.15 ms
64 bytes from 192.168.56.88: icmp_seq=7 ttl=64 time=1.50 ms
64 bytes from 192.168.56.88: icmp_seq=8 ttl=64 time=1.91 ms
64 bytes from 192.168.56.88: icmp_seq=9 ttl=64 time=0.545 ms
^C
--- 192.168.56.88 ping statistics ---
9 packets transmitted, 9 received, 0% packet loss, time 8143ms
rtt min/avg/max/mdev = 0.504/1.075/1.907/0.494 ms
# server -> client ping 테스트
**[vagrant@server ~]$ ping 192.168.56.77/24**
ping: 192.168.56.77/24: Name or service not known
[vagrant@server ~]$ ping 192.168.56.77
PING 192.168.56.77 (192.168.56.77) 56(84) bytes of data.
64 bytes from 192.168.56.77: icmp_seq=1 ttl=64 time=0.661 ms
64 bytes from 192.168.56.77: icmp_seq=2 ttl=64 time=1.26 ms
64 bytes from 192.168.56.77: icmp_seq=3 ttl=64 time=1.06 ms
64 bytes from 192.168.56.77: icmp_seq=4 ttl=64 time=1.69 ms
64 bytes from 192.168.56.77: icmp_seq=5 ttl=64 time=0.886 ms
64 bytes from 192.168.56.77: icmp_seq=6 ttl=64 time=1.04 ms
64 bytes from 192.168.56.77: icmp_seq=7 ttl=64 time=1.02 ms
64 bytes from 192.168.56.77: icmp_seq=8 ttl=64 time=1.11 ms
64 bytes from 192.168.56.77: icmp_seq=9 ttl=64 time=2.19 ms
64 bytes from 192.168.56.77: icmp_seq=10 ttl=64 time=1.35 ms
^C
--- 192.168.56.77 ping statistics ---
11 packets transmitted, 11 received, 0% packet loss, time 10012ms
rtt min/avg/max/mdev = 0.661/1.183/2.193/0.418 msOpenSSH 소개
: 시스템을 원격에서 접속할 때 사용하는 서비스
원격 접속에 사용되는 도구
- 텔넷(telnet), 리모트쉘(rsh)
- 평문(Plain Text) 전송 : 데이터가 암호화되지 않음 : 누구나 데이터 원문을 읽을 수 있음 → 보안적 치명적 결함 http 도 평문 전송 프로토콜 https (s=secure) 암호화된 프로토콜
ssh
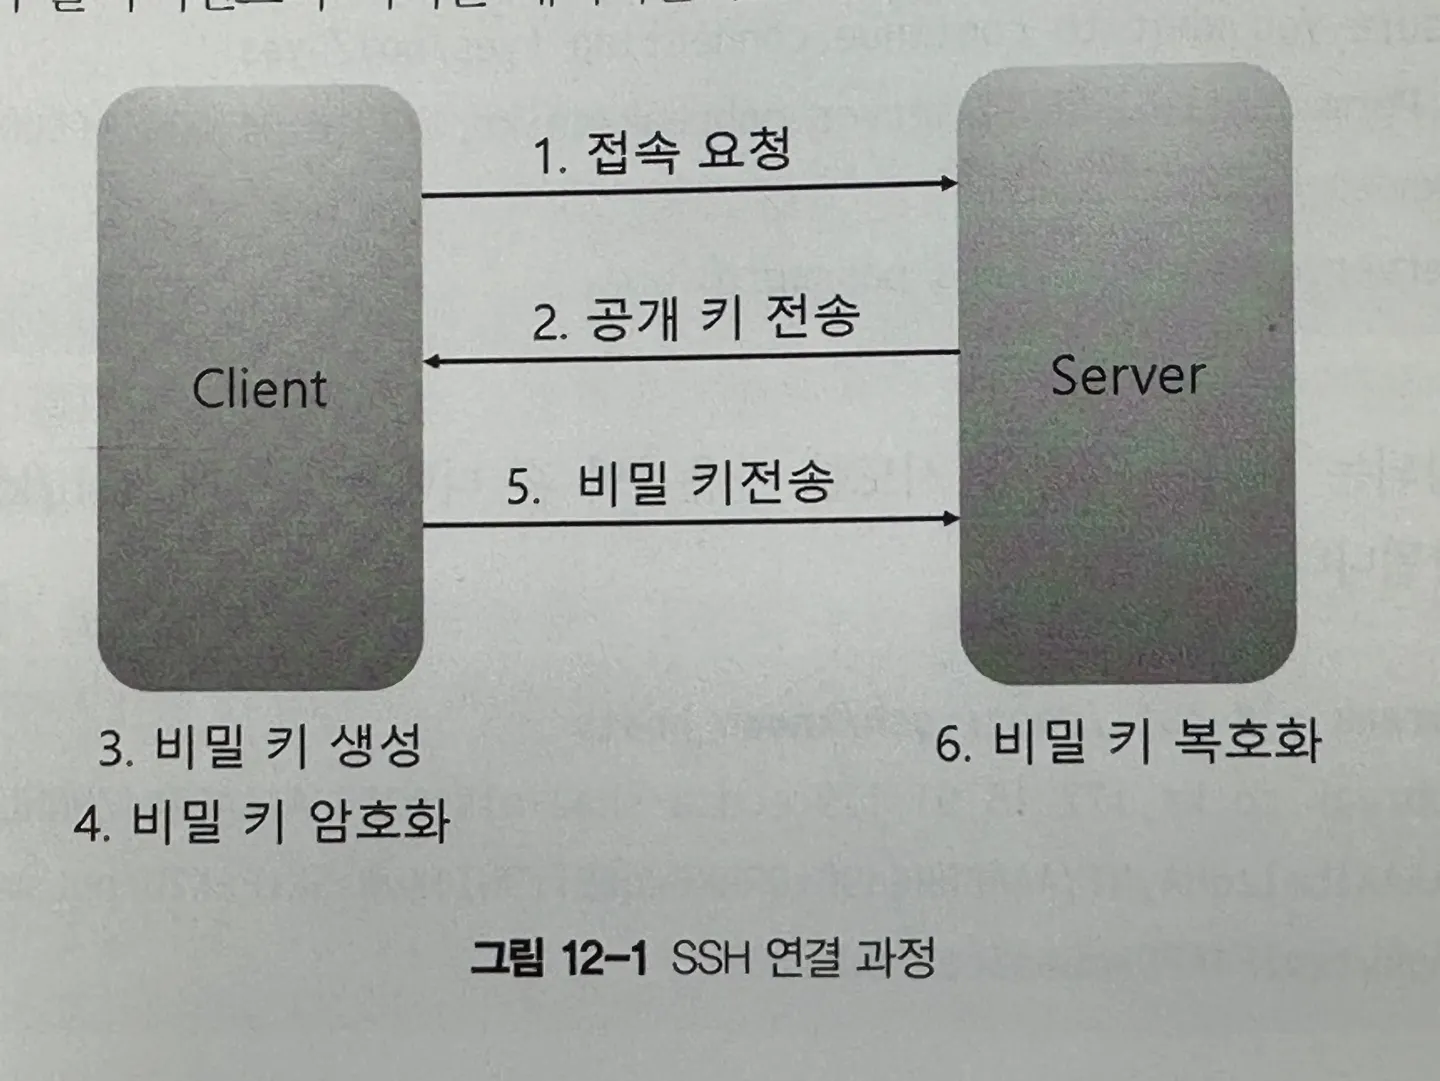
ssh 는 평문 전송의 보안적 결함을 해결하기 위해 나타남
→ 비대칭키 암호화와 대칭키 암호화 알고리즘을 사용
종류
- OpenSSH
- SSH Comunications Security 의 SSH : 엔터프라이즈용 상용화 서비스
대칭키
: 동일한 키를 사용해서 데이터를 암호화, 복호화하는 방식
- 송신자와 수신자가 동일한 키를 공유
- 동일한 키를 암호화해서 넘기면, 받아서 복호화함
- 장점 : 암호화, 복호화 속도가 빠름. 적은 컴퓨팅 자원 사용.
- 한계 : 키를 서로 어떻게 줄 것이냐? : 그냥 넘기면 제3자가 해당 키를 탈취 가능하므로 치명적 보안적 결함 발생 : 안전한 키 교환이 불가능
→ 안전한 키 교환을 위한 방법이 필요
→ 비대칭 키로 해결
- 대칭키 알고리즘
- AES
- DES
비대칭 키
: 대칭키의 안전한 키 교환을 보장해줄 수 있음
: 서로 다른 키를 가짐
- 키
- private key(개인키) : 절대 아무한테도 공개하지 않음 : 나만이 갖고 있을 수 있음
- public key(공개키) : 어디에든 공개돼도 상관없음
- private key(개인키) : 절대 아무한테도 공개하지 않음 : 나만이 갖고 있을 수 있음
- 동작 방식
- 기밀성 (Confidentiality)
-
목적: “남은 몰라도 되고 나만 알아야 한다”
-
과정:
1. A가 B에게 메시지를 보낼 때, **B의 공개키**로 암호화 2. B는 자신의 **개인키**로 복호화 -
효과: 중간자가 메시지를 가로채도 개인키 없이는 읽을 수 없음
👉 예: 이메일 암호화(PGP, S/MIME)
-
- 인증 & 서명 (Authentication / Digital Signature)
- 목적: “이게 내가 보낸 게 맞다”
- 과정:
- A가 메시지에 대해 자신의 개인키로 서명(암호화)
- 다른 사람들은 A의 공개키로 서명을 검증
- 효과: 개인키를 가진 사람(A)만 만들 수 있으므로 위조 불가
- 기밀성 (Confidentiality)
⇒ 안전한 키 교환이 가능해짐
- 한계 : 대칭키 알고리즘보다 오래 걸림 : 무거움
- 비대칭 키 알고리즘
- RSA
 매우 중요!
- 서버 → 클라이언트 : 서버 인증서(공개키) 전달
- 클라이언트 : 임의의 세션 키 생성
- 클라이언트 → 서버 : 세션 키를 서버의 공개키로 암호화해 전송
- 서버 : 개인키로 복호화하여 같은 세션 키 획득
- DSA
- RSA
키 교환까지 비대칭 키 사용
그 후로 대칭키 사용
vagrant ssh vs. ssh user@ip주소
→ vagrant 가 더 느림(ruby 알고리즘을 따로 사용하므로?)
# user@ip주소
# 첫 접속이므로 서버의 fingerprint 를 클라이언트의 known_hosts 에 저장
# fingerprint: 서버의 공개키(public key)를 해시(hash) 한 값.
# /known_hosts 에 서버 공개키 저장?
**PS C:\Users\DS 14\rapa2> ssh vagrant@192.168.56.77**
The authenticity of host '192.168.56.77 (192.168.56.77)' can't be established.
ED25519 key fingerprint is ...
This key is not known by any other names.
Are you sure you want to continue connecting (yes/no/[fingerprint])? y
Please type 'yes', 'no' or the **fingerprint**: yes
Warning: Permanently added '192.168.56.77' (ED25519) to the list of known hosts.
vagrant@192.168.56.77's password:
Last login: Fri Aug 29 02:34:13 2025 from 10.0.2.2

#  첫 접속 이후에는 fingerprint 어쩌구 출력 x
**PS C:\Users\DS 14\rapa2> ssh vagrant@192.168.56.77**
vagrant@192.168.56.77's password:
Permission denied, please try again.
vagrant@192.168.56.77's password:
Last login: Fri Aug 29 03:27:54 2025 from 192.168.56.1
# 명령어 하나만 실행하고, 자동 로그아웃됨
**PS C:\Users\DS 14\rapa2> ssh vagrant@192.168.56.77 'hostname'**
vagrant@192.168.56.77's password:
client
**PS C:\Users\DS 14\rapa2> ssh vagrant@192.168.56.77 'ls -la'**
vagrant@192.168.56.77's password:
total 20
drwx------. 3 vagrant vagrant 116 Aug 29 03:27 .
drwxr-xr-x. 3 root root 21 Mar 28 10:39 ..
-rw-------. 1 vagrant vagrant 141 Aug 29 03:27 .bash_history
-rw-r--r--. 1 vagrant vagrant 18 Apr 30 2024 .bash_logout
-rw-r--r--. 1 vagrant vagrant 141 Apr 30 2024 .bash_profile
-rw-r--r--. 1 vagrant vagrant 492 Apr 30 2024 .bashrc
drwx------. 2 vagrant root 29 Aug 29 02:29 .ssh
-rw-r--r--. 1 vagrant vagrant 5 Mar 28 10:40 .vbox_version**[vagrant@server ~]$ ls -l /etc/ssh**
total 608
-rw-r--r--. 1 root root 578094 Nov 5 2024 moduli
# 서버: ssh 서버
# 클라이언트: 본인(hostname 이 server)
# 클라이언트(자신, server)의 설정 파일
**-rw-r--r--. 1 root root 1921 Nov 5 2024 ssh_config**
drwxr-xr-x. 2 root root 28 Mar 28 10:37 ssh_config.d
# 서버의 설정 파일
**-rw-------. 1 root root 3701 Mar 28 10:40 sshd_config**
drwx------. 2 root root 28 Mar 28 10:37 sshd_config.d
# dsa 알고리즘으로 생성된 개인 키?
# 권한 600
**-rw-------. 1 root root 1393 Aug 29 02:29 ssh_host_dsa_key**
-rw-r--r--. 1 root root 616 Aug 29 02:29 ssh_host_dsa_key.pub
-rw-r-----. 1 root ssh_keys 492 Aug 29 02:29 ssh_host_ecdsa_key
-rw-r--r--. 1 root root 162 Aug 29 02:29 ssh_host_ecdsa_key.pub
-rw-r-----. 1 root ssh_keys 387 Aug 29 02:29 ssh_host_ed25519_key
-rw-r--r--. 1 root root 82 Aug 29 02:29 ssh_host_ed25519_key.pub
# rsa 알고리즘으로 생성된 개인 키?
# 권한 640
**-rw-r-----. 1 root ssh_keys 2578 Aug 29 02:29 ssh_host_rsa_key**
-rw-r--r--. 1 root root 554 Aug 29 02:29 ssh_host_rsa_key.pub# 새 유저 생성
**$ sudo useradd testuser**
# 해당 유저 비밀번호 설정
**$ sudo passwd testuser**
Changing password for user testuser.
New password:
BAD PASSWORD: The password is shorter than 8 characters
Retype new password:
passwd: all authentication tokens updated successfully.
# 해당 유저로 접속
# 첫 접속이므로 fingerprint
**[vagrant@server ~]$ ssh testuser@192.168.56.88**
The authenticity of host '192.168.56.88 (192.168.56.88)' can't be established.
ED25519 **key fingerprint** is ...
This key is not known by any other names
Are you sure you want to continue connecting (yes/no/[fingerprint])? yes
Warning: Permanently added '192.168.56.88' (ED25519) to the list of known hosts.
testuser@192.168.56.88's password:
**[testuser@server ~]$**# 클라이언트의 ssh 설정 파일에서 패스워드 인증 불가능하게 수정
# 공개키 인증으로 방식을 바꾼다고 해도
# 서버에 클라이언트의 공개키를 복사할 때 패스워드로 인증을 해야지만
# 공개키 인증이 가능하므로
# 그전에 No 로 바꾸면 처음에 인증 방법이 사라져서 접속이 아예 막힘
# 공개키 복사하기 전까지는 Yes 로 해놓고
# 패스워드로 인증 후에 No 로 바꿔서 공개키 인증만 가능하도록(보안을 위해)
# 바꿀 수 있음
**[vagrant@server ~]$ sudo vi /etc/ssh/ssh_config
...
# PasswordAuthentication yes
-> PasswordAuthentication no
...**
# 설정 파일 리로드
**[vagrant@server ~]$ sudo systemctl reload sshd**
# 해당 클라이언트(hostname server)에서
# 비밀번호로 로그인 시도 시 Permission denied
**[vagrant@server ~]$ ssh testuser@192.168.56.88**
testuser@192.168.56.88: Permission denied (publickey,gssapi-keyex,gssapi-with-mic,password).키 생성
# 키 생성
# 탭 키를 두번 눌러 ssh-keygen -t 의 다양한 옵션 확인
**[vagrant@client ~]$ ssh-keygen -t**
dsa         ecdsa       ecdsa-sk    ed25519     ed25519-sk  rsa

# 경로와 키 이름 지정해서 키 생성
**[vagrant@client ~]$ ssh-keygen -t ed25519 -f ~/.ssh/client_key**
Generating public/private ed25519 key pair.
Enter passphrase (empty for no passphrase):
Enter same passphrase again:
Your identification has been saved in /home/vagrant/.ssh/client_key
Your public key has been saved in /home/vagrant/.ssh/client_key.pub
The key fingerprint is:
...
vagrant@client
The key's randomart image is:
...

# 지정한 경로에서 키 생성됐는지 확인
**[vagrant@client ~]$ ls -la .ssh**
total 20
drwx------. 2 vagrant root    111 Aug 29 05:27 .
drwx------. 3 vagrant vagrant 116 Aug 29 03:27 ..
-rw-------. 1 vagrant vagrant  89 Aug 29 02:29 authorized_keys
**-rw-------. 1 vagrant vagrant 411 Aug 29 05:27 client_key**
# 클라이언트 공개키
**-rw-r--r--. 1 vagrant vagrant  96 Aug 29 05:27 client_key.pub**
-rw-------. 1 vagrant vagrant 837 Aug 29 03:52 known_hosts
-rw-r--r--. 1 vagrant vagrant  95 Aug 29 03:52 known_hosts.old

# 경로 및 이름 지정 없이 키 생성 시 해당 경로에 생성됨
**[vagrant@client ~]$ ssh-keygen -t ed25519**
Generating public/private ed25519 key pair.
Enter file in which to save the key (**/home/vagrant/.ssh/id_ed25519**):
# 클라이언트의 공개키를 해당 서버에 복사?
# **/etc/ssh/ssh_config** 에서 **PasswordAuthentication No** 로 설정하면
# permission denied
# Yes 로 설정되어있으면 정상적으로 복사됨
**[vagrant@client ~]$ ssh-copy-id -i ~/.ssh/client_key testuser@192.168.56.88**
/usr/bin/ssh-copy-id: INFO: Source of key(s) to be installed: "/home/vagrant/.ssh/client_key.pub"
/usr/bin/ssh-copy-id: INFO: attempting to log in with the new key(s), to filter out any that are already installed
/usr/bin/ssh-copy-id: INFO: 1 key(s) remain to be installed -- if you are prompted now it is to install the new keys
testuser@192.168.56.88's password:
Number of key(s) added: 1
Now try logging into the machine, with: "ssh 'testuser@192.168.56.88'"
and check to make sure that only the key(s) you wanted were added.
# 위에서 서버에 클라이언트의 공개키를 복사(저장)해놨기 때문에
# 클라이언트의 공개키로 인증 가능
**[vagrant@client ~]$ ssh -i ~/.ssh/client_key testuser@192.168.56.88**
Last login: Fri Aug 29 05:05:25 2025 from 192.168.56.88
**[testuser@server ~]$**# testuser 서버에 클라이언트(vagrant)의 공개키가 저장돼있음을 확인
**[testuser@server ~]$ cat .ssh/authorized_keys**
ssh-ed25519 AAA...xNLLXpr vagrant@client
# 클라이언트 공개키 삭제
[testuser@server ~]$ rm .ssh/authorized_keys
[testuser@server ~]$ ls .ssh/authorized_keys
ls: cannot access '.ssh/authorized_keys': No such file or directory
# 키 기반 인증이 우선순위가 높지만
# 키가 삭제되어 패스워드 인증이 실행됨
[vagrant@client ~]$ ssh -i ~/.ssh/client_key testuser@192.168.56.88
testuser@192.168.56.88's password:ssh-copy-id 가 돌아가긴 하는데 실제로 서버에 클라이언트의 공개키가 저장되지 않는 경우가 많음
→ 어떻게 해결하느냐
# 패스워드 인증 끄기
# 서버에서 클라이언트의 키는 이미 삭제 돼있음
**[vagrant@server ~]$ sudo vi /etc/ssh/sshd_config**
...
PasswordAuthentication No
...
# 설정 파일 리로드하도록 재시작
**[vagrant@server ~]$ sudo systemctl restart sshd**

# 클라이언트의 공개키 확인 후 직접 복사(Ctrl+C)
**[vagrant@client ~]$ cat .ssh/client_key.pub**
ssh-ed25519 AAA...NLLXpr vagrant@client

****# hostname server 에서 testuser 로 로그인 <- 얜 왜 되는거? su - 라서(유저 변경)
**[vagrant@server ~]$ sudo su - testuser**
Last login: Fri Aug 29 06:02:33 UTC 2025 on pts/0

# 키를 직접 붙여넣음
**[testuser@server ~]$ echo "ssh-ed25519 AAA...NLLXpr vagrant@client" > .ssh/authorized_keys
[testuser@server ~]$ ls -l .ssh/authorized_keys**
-rw-r--r--. 1 testuser testuser 96 Aug 29 06:09 .ssh/authorized_keys

# 권한이 너무 많아서 재설정
**[testuser@server ~]$ chmod 600 .ssh/authorized_keys
[testuser@server ~]$ ls -l .ssh/authorized_keys**
-rw-------. 1 testuser testuser 96 Aug 29 06:09 .ssh/authorized_keys

# 그럼 키 기반 인증으로 로그인 가능해진 걸 확인 가능
**[vagrant@client ~]$ ssh -i ~/.ssh/client_key testuser@192.168.56.88**
Last login: Fri Aug 29 06:08:57 2025
scp (Secure Copy)
# 새 파일 생성
**[vagrant@client ~]$ echo "test file" > testfile.txt**
**[vagrant@client ~]$ ls**
testfile.txt
**[vagrant@client ~]$ cat testfile.txt**
test file

# hostname server 에 해당 파일 전송
# ip 뒤에 해당 서버 경롳어디로 전송할지 지정
**[vagrant@client ~]$ scp testfile.txt vagrant@192.168.56.88:~/**
vagrant@192.168.56.88's password:
testfile.txt                              100%   10     6.2KB/s   00:00

# 서버에 정상적으로 전송됐음을 확인 가능
**[vagrant@server ~]$ ls**
testfile.txt

# 서버에서 파일을 가져오기도 가능(경로 및 파일 이름 ./download_file.txt 으로 지정)
**[vagrant@client ~]$ scp vagrant@192.168.56.88:~/testfile.txt ./download_file.txt**
vagrant@192.168.56.88's password:
testfile.txt                              100%   10     2.7KB/s   00:00
[vagrant@client ~]$ cat download_file.txt
test file
NTP 서버 관리
: 컴퓨터의 시스템의 시간을 동기화할 때 사용하는 프로토콜
: 컴퓨터 간의 시간을 동기화
: 인터넷에서 표준 시간으로 사용되고 있음
모든 IT 서버 시스템에서는 정확한 시간정보를 유지하는 것이 매우 중요
- 각 컴퓨터마다 1-2초마다 시간이 조금씩 다른데
- 로그에서 어디가 문제가 생겼는지 파악도 힘들고
- 보안 인증서 문제
- data transaction 에서 큰 문제(통신)
NTP 동작 방식
: 서버와 클라이언트가 서로 패킷을 전송할 때 발생하는 지연 시간을 보정함
NTP 계층 구조
- 1~15단계
- Stratum 0 : 가장 상위 계층. : Primary Reference Clock : 시간의 근원. 시간 정보 자체 : 원자시계, GPS 등의 고정밀 장비 : 정확한 시간 신호를 발생 : Stratum 1 에게 정확한 시간정보를 제공하는 용도로 사용
- Stratum 1 : Stratum 0 에 직접적으로 연결돼있는 서버 : 클라이언트가 시간 동기화를 요청할 수 있는 최상위 NTP : 요청이 과도하게 집중될 경우 부하가 높아질 수 있어, : 일반적으로 Stratum 2 서버 이외의 접근을 차단함
- Stratum 2 : 공개 NTP 서버 : Stratum 1 로부터 시간을 동기화하여 높은 정확도를 가지고 있음 : 일반적인 시간동기화 요청에 사용할 수 있는 최상위 NTP
- 상위 계층일수록 정확한 시간 정보
chrony
: 최신 리눅스에서 ntp 에서 chrony 로 대체됨
: 데몬 형태로 동작하며 지속적으로 시스템의 시간을 NTP 서버와 동기화함
데몬 = 백그라운드에서 실행되는 데몬(daemon) 프로세스
chronyc
: chronyd 를 제어할 수 있는 명령어
: CLI 제공
# chronyd 서비스 상태 확인
# 서비스 프로세스는 kill 될 수 없음
# stop 만 가능
# 서비스는 정지되더라도 항상 메모리의 일정 부분 차지
**$ sudo systemctl status chronyd**
● chronyd.service - NTP client/server
     Loaded: loaded (/usr/lib/systemd/system/chronyd.service; enabled; pres>
     Active: active (running) since Fri 2025-08-29 02:28:46 UTC; 4h 9min ago
       Docs: man:chronyd(8)
             man:chrony.conf(5)
   Main PID: 628 (chronyd)
      Tasks: 1 (limit: 5769)
     Memory: 4.4M
        CPU: 298ms
     CGroup: /system.slice/chronyd.service
             └─628 /usr/sbin/chronyd -F 2
...

# chronyd 설정 파일
**$ sudo vi /etc/chrony.conf
$ cat /etc/chrony.conf**
# Use public servers from the pool.ntp.org project.
# Please consider joining the pool (https://www.pool.ntp.org/join.html).
pool 2.rocky.pool.ntp.org iburst
...
# Enable kernel synchronization of the real-time clock (RTC).
rtcsync
...
# Specify directory for log files.
logdir /var/log/chrony

# Select which information is logged.
#log measurements statistics tracking
# 탭 키를 두 번 눌러 chronyc 의 다양한 옵션 확인
**$ chronyc**
accheck exit online settime
activity help onoffline shutdown
add keygen polltarget smoothing
allow local quit smoothtime
authdata makestep refresh sourcename
burst manual rekey sources
clients maxdelay reload sourcestats
cmdaccheck maxdelaydevratio reselect timeout
cmdallow maxdelayratio reselectdist tracking
cmddeny maxpoll reset trimrtc
cyclelogs maxupdateskew retries waitsync
delete minpoll rtcdata writertc
deny minstratum selectdata
dns ntpdata selectopts
dump offline serverstats
# 시간동기화 정보 확인
**$ chronyc tracking**
# 현재 동기화된 ntp 서버
**Reference ID : DD97764E (time.ravnus.com)**
# 참조하는 ntp 서버 계층
**Stratum : 3**
...
# ntp 시간과 시스템 시간의 차이
**System time : 0.000137686 seconds slow of NTP time**
...
# 시간 소스 정보 확인
**$ chronyc sources**
MS Name/IP address Stratum Poll Reach LastRx Last sample
===============================================================================
# 주 서버
^***** time.ravnus.com 2 10 377 797 -78us[ -45us] +/- 2832us
# 연결 불가능한 서버
^**?** 240b:400d:3:3300:aeda:71> 0 7 0 - +0ns[ +0ns] +/- 0ns
# 사용 가능한 서버(후보)
^**+** 193.123.243.2 2 10 377 318 +655us[ +655us] +/- 6932us
^? 2401:c080:1c00:24a1:5400> 0 9 0 - +0ns[ +0ns] +/- 0ns
^? 240b:400d:3:3300:aeda:71> 0 7 0 - +0ns[ +0ns] +/- 0ns
^? any.time.nl 0 9 0 - +0ns[ +0ns] +/- 0ns
# 사용이 가능하지만 제외된 서버
^**-** mail.innotab.com 3 10 172 95m +532us[ +243us] +/- 35ms
^? 2605:e440:44::de 0 9 0 - +0ns[ +0ns] +/- 0ns공용 NTP 서버 목록
https://senarin.kr/wiki/%EA%B3%B5%EC%9A%A9_NTP_%EC%84%9C%EB%B2%84_%EB%AA%A9%EB%A1%9D
영구 설정 변경
/etc/chrony.conf
: ntp 서버 사용 설정 파일
# ntp 서버 사용 설정 파일
# ntp 서버 주석 처리
**$ sudo vi /etc/chrony.conf
#pool 2.rocky.pool.ntp.org iburst
-> 주석 처리
$ sudo systemctl restart chronyd**
# 아무것도 안뜸
**$ chronyc sources**
MS Name/IP address         Stratum Poll Reach LastRx Last sample
===============================================================================

# time.cloudflare.com 으로 ntp 서버 변경
**$ sudo systemctl restart chronyd
...**
pool time.cloudflare.com iburst
**...
$ chronyc sources**
MS Name/IP address         Stratum Poll Reach LastRx Last sample
===============================================================================
^? time.cloudflare.com           0   6     0     -     +0ns[   +0ns] +/-    0ns
^? time.cloudflare.com           0   6     0     -     +0ns[   +0ns] +/-    0ns
^? time.cloudflare.com           3   6     1     1  -1904us[-1904us] +/-   75ms
^? time.cloudflare.com           3   6     1     2  +3523us[+3523us] +/-   75ms
**$ chronyc tracking**
Reference ID    : A29FC801 (time.cloudflare.com)
Stratum         : 4
Ref time (UTC)  : Fri Aug 29 07:17:56 2025
System time     : 0.000000854 seconds slow of NTP time
Last offset     : +0.001887191 seconds
RMS offset      : 0.001887191 seconds
Frequency       : 2.119 ppm fast
Residual freq   : -173.303 ppm
Skew            : 0.049 ppm
Root delay      : 0.149704963 seconds
Root dispersion : 0.007976220 seconds
Update interval : 2.0 seconds
Leap status     : Normal
timedatectl
# 시간 확인
**$ date**
Fri Aug 29 07:19:46 AM UTC 2025

# 시간 수동 설정
**$ sudo date -s "2025-08-29 16:20:00"**
Fri Aug 29 04:20:00 PM UTC 2025
**$ date**
Fri Aug 29 04:20:04 PM UTC 2025

# 시간 수동 설정 다른 방법
# 공식 문서에서도 이 방법을 더 권장
# timedatectl
**$ timedatectl**
               Local time: Fri 2025-08-29 16:20:41 UTC
           Universal time: Fri 2025-08-29 16:20:41 UTC
                 RTC time: Fri 2025-08-29 07:21:12
                Time zone: UTC (UTC, +0000)
System clock synchronized: no
              NTP service: active
          RTC in local TZ: yes

Warning: The system is configured to read the RTC time in the local time zone.
         This mode cannot be fully supported. It will create various problems
         with time zone changes and daylight saving time adjustments. The RTC
         time is never updated, it relies on external facilities to maintain it.
         If at all possible, use RTC in UTC by calling
         'timedatectl set-local-rtc 0'.
**$ timedatectl list-timezones**
Africa/Abidjan
Africa/Accra
Africa/Addis_Ababa
Africa/Algiers
...

# 탭 키 두 번 눌러 sudo timedatectl set-timezone Asia/ 의 다양한 옵션 확인
**$ sudo timedatectl set-timezone Asia/**
Asia/Aden           Asia/Ho_Chi_Minh    Asia/Pyongyang
Asia/Almaty         Asia/Hong_Kong      Asia/Qatar
Asia/Amman          Asia/Hovd           Asia/Qostanay
Asia/Anadyr         Asia/Irkutsk        Asia/Qyzylorda
Asia/Aqtau          Asia/Istanbul       Asia/Rangoon
Asia/Aqtobe         Asia/Jakarta        Asia/Riyadh
Asia/Ashgabat       Asia/Jayapura       Asia/Saigon
Asia/Ashkhabad      Asia/Jerusalem      Asia/Sakhalin
Asia/Atyrau         Asia/Kabul          Asia/Samarkand
Asia/Baghdad        Asia/Kamchatka      Asia/Seoul
Asia/Bahrain        Asia/Karachi        Asia/Shanghai
Asia/Baku           Asia/Kashgar        Asia/Singapore
Asia/Bangkok        Asia/Kathmandu      Asia/Srednekolymsk
Asia/Barnaul        Asia/Katmandu       Asia/Taipei
Asia/Beirut         Asia/Khandyga       Asia/Tashkent
Asia/Bishkek        Asia/Kolkata        Asia/Tbilisi
Asia/Brunei         Asia/Krasnoyarsk    Asia/Tehran
Asia/Calcutta       Asia/Kuala_Lumpur   Asia/Tel_Aviv
Asia/Chita          Asia/Kuching        Asia/Thimbu
**$ sudo timedatectl set-timezone Asia/Seoul
$ date**
Sat Aug 30 01:23:59 AM **KST** 2025
# ntp 서버 사용 여부 설정
**$ sudo timedatectl set-ntp true**