SELinux
semanage 도구
SELinux 모드
Disabled
: SELinux 를 완전히 비활성화
Enforcing
: SELinux 가 활성화되어 있고,
: 정책을 강제함
Permissive
: SELinux 가 활성화되어 있지만,
: 정책은 강제하지 않음
: 차단을 강제하지 않고 메시지만 로그에 기록됨
# 현재 SELinux 모드 출력
**$ getenforce**

# 모드 선택해서 설정 가능
# disabled 불가
**$ setenforce**
usage:  setenforce [ Enforcing | Permissive | 1 | 0 ]

# Permissive 모드로 설정
**$ sudo setenforce 0**
**$ getenforce**
Permissive
→ 재부팅, 리로드 시 설정 초기화
# 영구 변경
**$ sudo vi /etc/selinux/config**
컨텍스트
# -Z : 보안 컨텍스트 확인
**$ ps -Z -p 1**
LABEL                               PID TTY          TIME CMD
system_u:system_r:init_t:s0           1 ?        00:00:02 systemd
[vagrant@user01 ~]$ ps -Z -C httpd
LABEL                               PID TTY          TIME CMD
system_u:system_r:httpd_t:s0        672 ?        00:00:00 httpd
system_u:system_r:httpd_t:s0        701 ?        00:00:00 httpd
system_u:system_r:httpd_t:s0        702 ?        00:00:01 httpd
system_u:system_r:httpd_t:s0        730 ?        00:00:01 httpd
system_u:system_r:httpd_t:s0        731 ?        00:00:01 httpd

# 권한이 rwx 소유자, 소유그룹.. 이랑 완전히 다름
**$ ls -Z /etc/passwd**
system_u:object_r:passwd_file_t:s0 /etc/passwd
**$ ls -dZ /var/www/html**
system_u:object_r:httpd_sys_content_t:s0 /var/www/html
system_u:object_r:httpd_sys_content_t:s0 /var/www/html
사용자 : 역할 : 유형 : 레벨
system_u: SELinux 사용자 : 해당 사용자의 권한을 뜻하는 것이 아님 : system_u 가 만들었구나 라고 라벨을 붙여 분류한 것
object_r: 역할 : 시스템의 모든 구성요소를 subject(주체) 와 object(객체)로 구분함 : 도메인에 대한 권한 부여 : 사용자와 도메인을 연결하는 기능
httpd_sys_content_t: 유형(Type)httpd: Apache 웹 서버sys: 시스템 레벨content: 웹 콘텐츠t: 타입 ⇒ 아파치 웹서버가 시스템 레벨에서 관리하는 웹 콘텐츠 타입
s0: 보안 레벨- s0: 가장 낮은 레벨
- s0~ : 숫자가 높아질 수록 고레벨
- 일반적인 보안 수준에서는 s0 으로 충분. 더 높아지면 복잡성 매우 증가.
**$ ls -dZ /var/www/html**
system_u:object_r:httpd_sys_content_t:s0 /var/www/html

**$ sudo touch /var/www/html/filea**

# 사용자는 유저가 만들었다는 뜻의 라벨
# 상위 디렉토리의 타입을 상속받음
**$ ls -Z /var/www/html/filea**
unconfined_u:object_r:httpd_sys_content_t:s0 /var/www/html/filea

# 실행을 하는 타입
**$ ls -Z /bin/passwd**
system_u:object_r:passwd_**exec**_t:s0 /bin/passwd

# -a 옵션으로 복사
**$ sudo cp -a /bin/passwd /var/www/html/fileb**
# 컨텍스트 그대로 유지
# -a 옵션이 원본 파일 그대로 옮김
**$ ls -Z /var/www/html/fileb**
system_u:object_r:passwd_exec_t:s0 /var/www/html/fileb

# 옵션 없이 복사
**$ sudo cp /bin/passwd /var/www/html/filec**
# 사용자와 타입 모두 바뀜
**$ ls -Z /var/www/html/filec**
unconfined_u:object_r:httpd_sys_content_t:s0 /var/www/html/filec- 파일을 새로 생성할 때는 상위 디렉토리의 타입을 상속받는다
- 또한 사용자가 uncofined_u 로 라벨이 붙는다
cp로 아무 옵션 없이 복사를 하면 새 파일 생성할 때와 똑같은 규칙 적용-a옵션을 사용하면 원본 파일 그대로 생성
컨텍스트 변경
**$ echo "test" > test**
**$ ls -Z test**
unconfined_u:object_r:user_home_t:s0 test

# 컨텍스트 타입 변경(임시 변경)
**$ chcon -t httpd_sys_content_t test
$ ls -Z test**
unconfined_u:object_r:**httpd_sys_content_t**:s0 test
**$ systemctl status httpd**
● httpd.service - The Apache HTTP Server
Loaded: loaded (/usr/lib/systemd/system/httpd.service; enabled; preset>
Active: **active (running)** since Tue 2025-09-02 01:04:22 UTC; 1h 23min a>
...
**$ echo "SELinux Test Page" | sudo tee /var/www/html/index.html**
SELinux Test Page
# 내 ip 주소 찾기
**$ ip a**
...
3: enp0s8: <BROADCAST,MULTICAST,UP,LOWER_UP> mtu 1500 qdisc fq_codel state UP group default qlen 1000
link/ether 08:00:27:40:fa:8f brd ff:ff:ff:ff:ff:ff
inet **192.168.56.11/24** brd 192.168.56.255 scope global noprefixroute enp0s8
...
# 방화벽 설정
**$ sudo firewall-cmd --list-services**
cockpit dhcpv6-client ssh
**$ sudo firewall-cmd --add-service=http**
success
**$ sudo firewall-cmd --list-services**
cockpit dhcpv6-client **http** ssh
# public 영역에서 http 규칙(허용) 영구 설정
**$ sudo firewall-cmd --add-service=http --permanent**
success
# 영구 설정 불러오기 위해선 리로드
**$ sudo firewall-cmd --reload**
success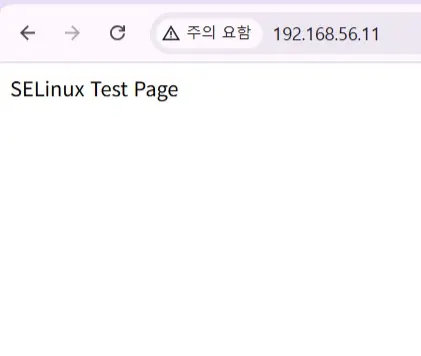
# html 파일 생성
**$ mkdir /tmp/webtest
$ echo "Custom test" > /tmp/webtest/custom.html**

# 복사
**$ sudo cp /tmp/webtest/custom.html /var/www/html/**

# 컨텍스트 타입 확인
**$ ls -Z /tmp/webtest/**
unconfined_u:object_r:**user_tmp_t**:s0 custom.html
**$ ls -Z /var/www/html/**
unconfined_u:object_r:**httpd_sys_content_t**:s0 custom.html
unconfined_u:object_r:httpd_sys_content_t:s0 filea
          system_u:object_r:passwd_exec_t:s0 fileb
unconfined_u:object_r:httpd_sys_content_t:s0 filec
unconfined_u:object_r:httpd_sys_content_t:s0 index.html
**$ ls -Z /var/www/html/custom.html**
unconfined_u:object_r:**httpd_sys_content_t**:s0 /var/www/html/custom.html
**$ sudo chcon -t user_tmp_t /var/www/html/custom.html
$ ls -Z /var/www/html/custom.html**
unconfined_u:object_r:**user_tmp_t**:s0 /var/www/html/custom.html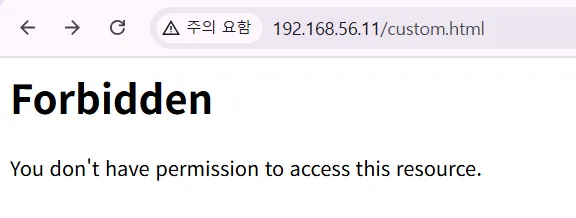
**$ sudo chcon -t httpd_sys_content_t /var/www/html/custom.html
$ ls -Z /var/www/html/custom.html**
unconfined_u:object_r:**httpd_sys_content_t**:s0 /var/www/html/custom.html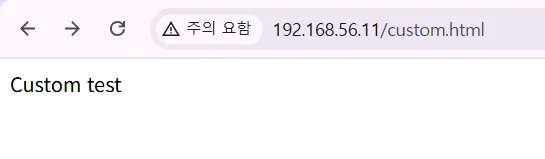
SELinux 부울
부울
: SELinux 에서 시스템이 운영중일 때 정책의 동작을 변경할 수 있는 스위치와 같은 기능
**$ getsebool -a | less**

**$ getsebool httpd_can_network_connect**
httpd_can_network_connect --> off

**$ getsebool -a | grep httpd**
...
httpd_can_network_connect --> off
...

# 임시 변경
**$ sudo setsebool httpd_can_network_connect on**
# 확인 (앞에 부분 on)
**$ sudo semanage boolean -l | grep httpd_can**
...
httpd_can_network_connect      (**on**   ,  off)  Allow HTTPD scripts and modules to connect to the network using TCP.
...

# 영구 변경 (뒤에 on)
**$ sudo setsebool -P httpd_can_network_connect on
$ sudo semanage boolean -l | grep httpd_can_network**
httpd_can_network_connect (on , **on**) Allow HTTPD scripts and modules to connect to the network using TCP.**# 두개 힌번에 수정 semanage 로 가능
$ sudo semanage boolean -m --on use_nfs_home_dirs
$ sudo semanage boolean -l | grep use_nfs_home_dir**
use_nfs_home_dirs (on , on) Support NFS home directories# 따로 등록한 적 없지만 http 포트 레이블이 이미 등록돼있음
**$ sudo semanage port -l | grep http**
http_cache_port_t tcp 8080, 8118, 8123, 10001-10010
http_cache_port_t udp 3130
http_port_t tcp 80, 81, 443, 488, 8008, 8009, 8443, 9000
pegasus_http_port_t tcp 5988
pegasus_https_port_t tcp 5989기본 포트가 아닌 임의의 포트를 사용한다면 방화벽 public 규칙에 등록해야 하며,
포트레이블에도 등록해야 함
**$ sudo firewall-cmd --list-all**
public (active)
  target: default
  icmp-block-inversion: no
  interfaces: enp0s3 enp0s8
  sources:
  services: cockpit dhcpv6-client http ssh
  **ports:**
  protocols:
  forward: yes
  masquerade: no
  forward-ports:
  source-ports:
  icmp-blocks:
  rich rules:

# 포트 레이블에 우리가 지정할 포트 추가
**$ sudo semanage port -a -t http_port_t -p tcp 82
$ sudo semanage port -l | grep http**
http_cache_port_t              tcp      8080, 8118, 8123, 10001-10010
http_cache_port_t              udp      3130
http_port_t                    tcp      82, 80, 81, 443, 488, 8008, 8009, 8443, 9000
pegasus_http_port_t            tcp      5988
pegasus_https_port_t           tcp      5989

# 방화벽 포트 규칙도 추가
**$ sudo firewall-cmd --add-port=82/tcp**
success
SELinux 관련 트러블슈팅 방법
# SELinux 꺼보기(Permissive 모드로 전환)
# sudo setenforce 0 -> 달라진 거 있는지 확인 -> 1
**$ sudo setenforce 0
$ sudo setenforce 1
$ getenforce**
Enforcing

# 로그 확인
# /var/log/audit/audit.log 에 기록되어 있는 거부 메시지 확인('denied')
**$ sudo grep denied /var/log/audit/audit.log**
type=AVC msg=audit(1756339855.293:777): avc:  denied  { open }
for  pid=4000 comm="20-chrony-dhcp"
path="/etc/sysconfig/network-scripts/ifcfg-enp0s8" dev="sda3" ino=34560071
scontext=system_u:system_r:NetworkManager_dispatcher_chronyc_t:s0
tcontext=unconfined_u:object_r:user_tmp_t:s0 tclass=file permissive=0
...

**$ sudo sealert -a /var/log/audit/audit.log**
DNS 서버
DNS 는 왜 필요한가?
: ip 를 일일히 외울 수 없으므로
DNS(Domain Name System)
: 호스트의 이름을 통해 호스트의 IP 주소를 확인
DNS 동작 방식
일반적으로 ISP(Internet Service Provider)로부터 인터넷 서비스를 제공받는 사용자들은 ISP의 DHCP(Dynamic Host Configuration Protocol) 서버로부터 IP 주소와 함께 DNS 서버의 정보를 전달받음
DNS 서버
- KT : 168.126.63.1
- google: 8.8.8.8
- … 기타등등
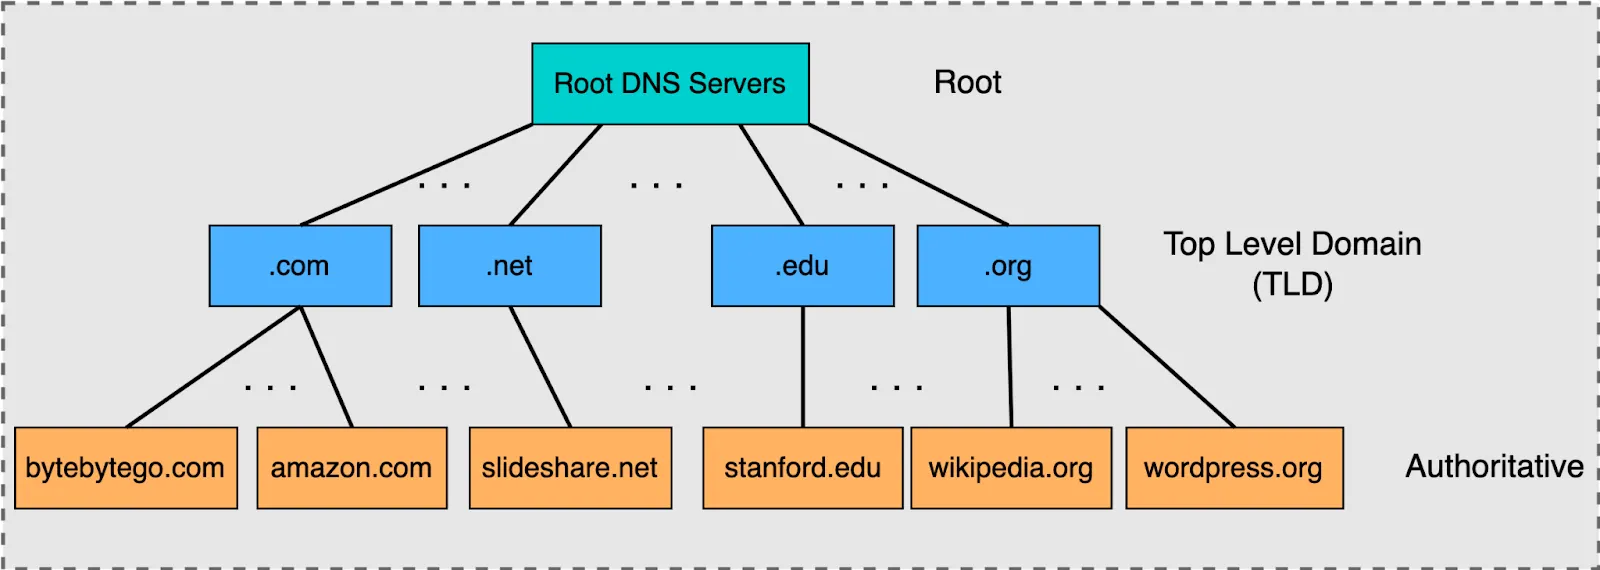
DNS 계층 구조 및 동작 방식
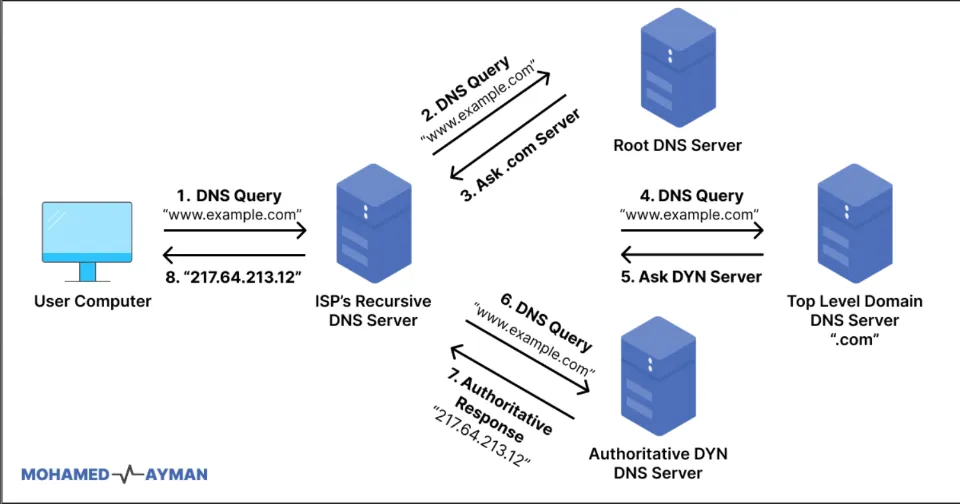
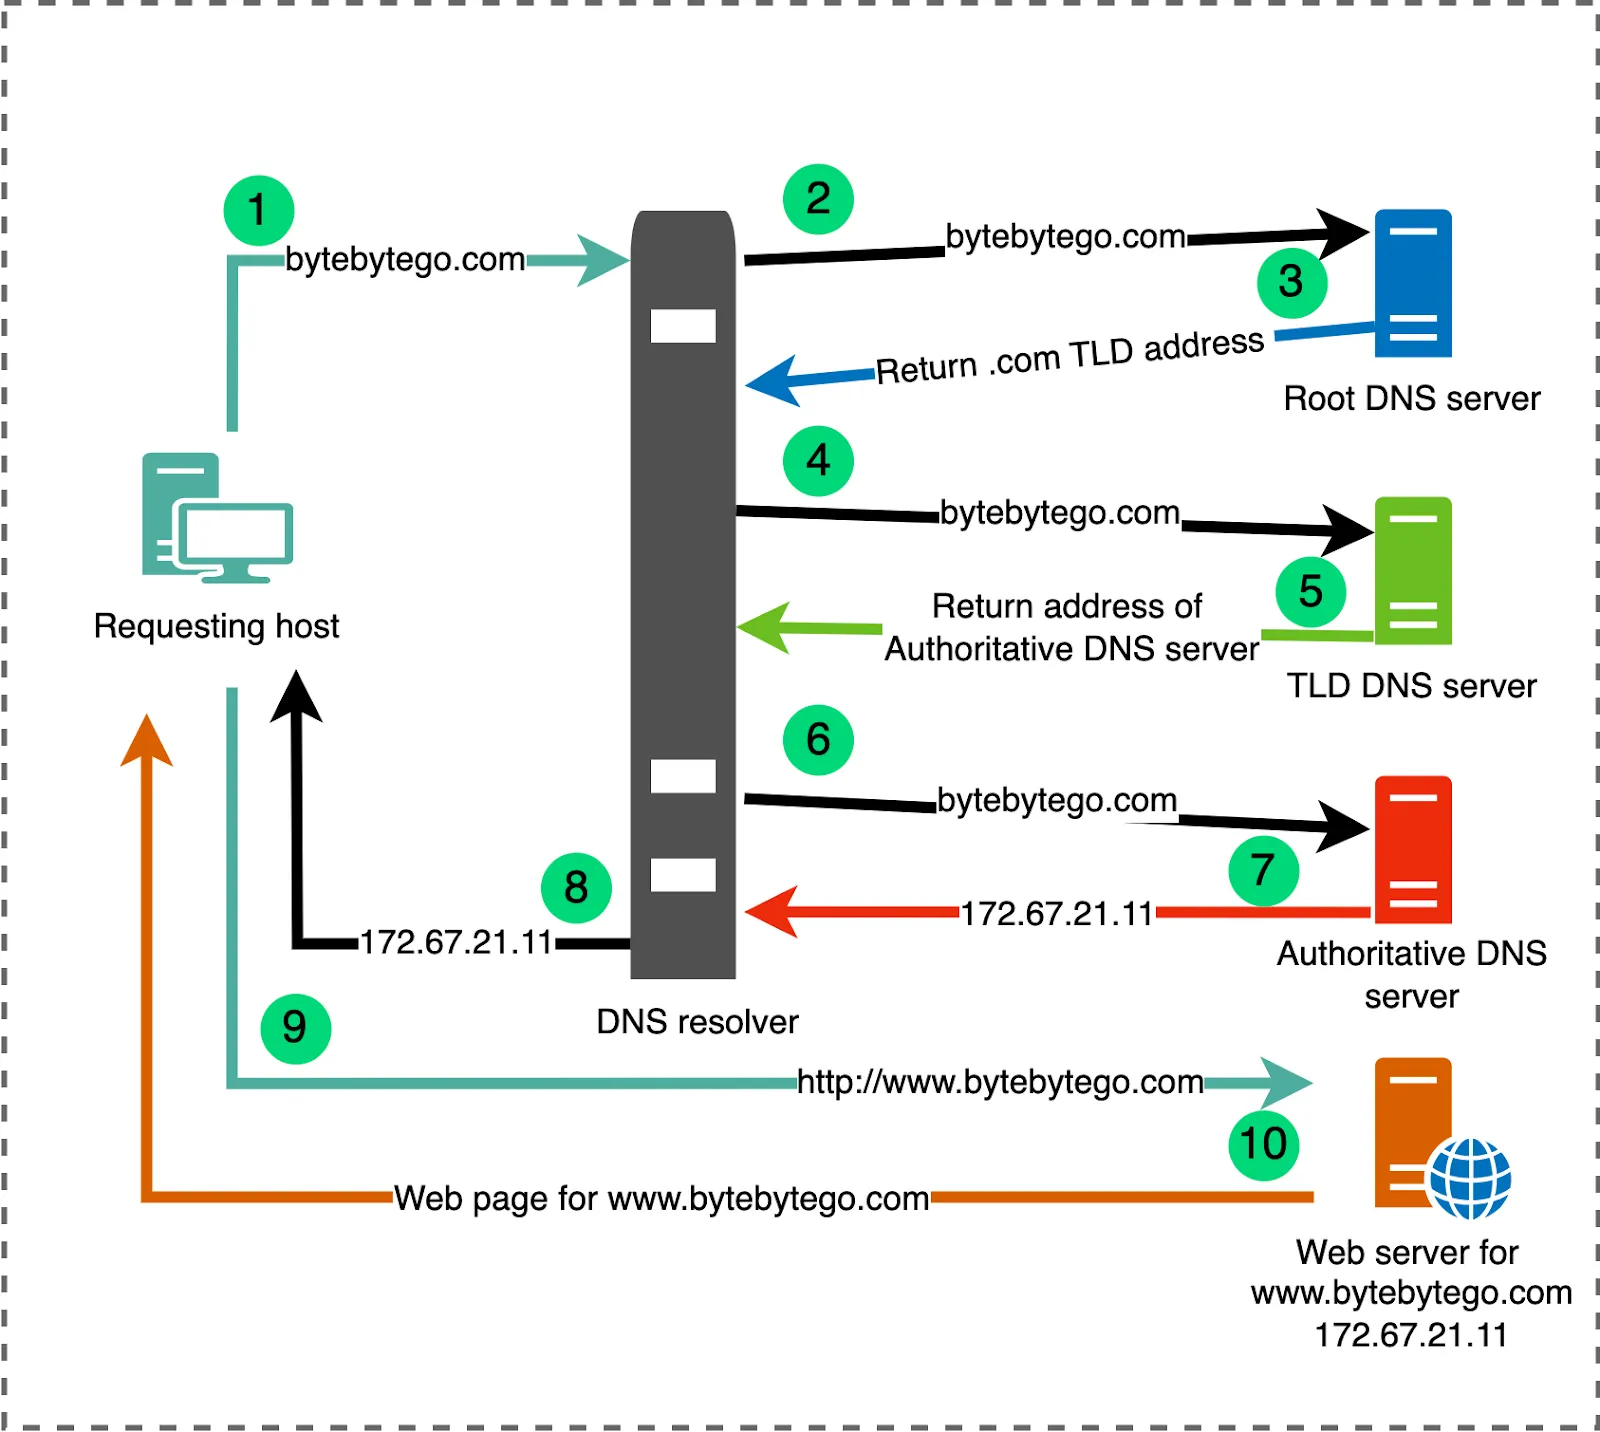
재귀 쿼리
: 사용자는 자신이 요청한 DNS 서버에게만 요청을 전송하고, 요청에 대한 응답을 수신함
: 이름 요청을 전송하고, 요청에 대한 정확한 응답을 수신하는 과정을 재귀 쿼리라고 함
: 일반적으로 클라이언트가 DNS 서버에게 요청할 때 발생
: DNS 서버가 다시 다른 DNS 서버에게 요청하는 경우에도 사용
→ 이를 요청의 전달(Forwarding)이라고 함
순환 쿼리
: 클라이언트 요청을 수신한 DNS 서버는 요청을 처리하기 위하여 다른 DNS 서버로부터 단계적으로 질의하는 과정을 수행
: 이 과정을 순환 쿼리라고 함
동작 방식
- 순환 쿼리를 처리하기 위해서 가장 높은 단계의 요청을 처리하는 DNS 서버를 Root DNS 서버 또는 Root Hint DNS 서버라고 함
- 중간 단계의 DNS 서버는 다음 단계의 도메인 이름에 대한 요청만 처리하므로 특정 도메인 이름 전체에 대한 정보를 가지고 있을 필요가 없음
- 그러나 ‘www.google.com’ 과 같이 특정 호스트의 정확한 주소를 알기 위해서는 최종 단계에서 요청된 호스트의 정보를 정확하게 알고 있는 DNS 서버가 필요 → 각 도메인의 DNS 서버가 해당 정보를 가지고 있음 ex) ns.nobreak.co.kr 서버는 www.nobreak.co.kr 또는 mail.nobreak.co.kr 등 nobreak.co.kr 이라는 특정 도메인에 해당하는 정보를 가지고 있음 → 이 범위를 영역(Zone)이라고 함
정방향 조회 / 역방향 조회
정방향 조회
: 호스트 이름 → IP 주소
역방향 조회
: IP 주소 → 호스트 이름
- 역방향 조회는 제약 조건이 많음
- DNS 서버 구조 자체가 호스트 이름 → IP 주소이므로 해당 IP 주소에 대한 레코드를 가지고 있는 DNS 서버를 찾는 것이 불가능함
⇒ 역방향 조회를 지원하기 위한 특수 도메인이 설계됨
⇒ in-addr.arpa
: 다시 각 IP 주소의 대역별로 IP 주소를 조회할 수 있는 DNS 서버가 계층 구조로 구성
: 역방향 조회를 사용하려면 DNS 서버가 서비스하고 있는 도메인의 각 호스트에 대한 역방향 조회 영역이 필요함
: 역방향 조회 영역에는 포인터 레코드(PTR)도 필요함
DNS 캐시
: 말그대로 DNS 로 조회한 정보를 캐싱함
: DNS 는 레코드의 수명(TTL)을 설정하여, 한 번 조회한 레코드의 수명이 다하기 전까지는 해당 레코드를 그대로 사용하도록 함
: 엔드 포인트뿐만 아니라, DNS 서버 중 재귀적 리졸버(== ISP DNS 서버)에도 존재
→ 이전에 요청이 와서 응답했던 정보라면 TTL 이 지나기 전까지 저장하고 있다가 굳이 다른 DNS 서버에게 물어보는 과정을 거치지 않고 바로 응답을 보냄
DNS 레코드
- A, AAAA 레코드 : 특정 호스트의 주소(IPv4, IPv6)
- CNAME : 호스트의 별칭 정보
- MX
- NS : 현재 도메인의 이름 서버(Name Server)
- Name Server : 도메인 내의 호스트에 대한 안내를 제공
- Name Server : 도메인 내의 호스트에 대한 안내를 제공
- PTR : 도메인 이름에 대한 포인터 : IP 주소에 해당하는 도메인의 이름 정보를 저장 : [IP 주소 → 도메인의 이름 정보] 포인터
- SOA
- TXT
- 각 계층의 DNS 서버가 가지고 있는 레코드의 종류
1. 루트 네임서버
-
하는 일: “최상위 도메인(.com, .net, .kr…)은 어디에 있니?” 알려주는 것.
-
가지고 있는 레코드:
- TLD 네임서버(NS 레코드) + Glue A 레코드(IP 주소)
- 예:
.com도메인을 관리하는 TLD 서버는a.gtld-servers.net(IP: 192.x.x.x)
-
❌
www.example.com의 A 레코드 같은 건 없음.
2. TLD 네임서버
-
하는 일: 특정 TLD 내 도메인의 권한 네임서버를 알려줌.
-
가지고 있는 레코드:
- 도메인의 NS 레코드 + Glue A 레코드
- 예:
example.com의 권한 네임서버는ns1.iana.org.
-
❌
example.com의 웹 서버 IP(A 레코드)는 없음.
3. 권한 네임서버(Authoritative Name Server)
-
하는 일: 해당 도메인(zone)의 모든 레코드를 보관.
-
가지고 있는 레코드:
- A, AAAA, MX, CNAME, TXT, SOA, NS … (zone 파일에 정의된 것들 전부)
- 예:
example.com의 웹서버 IP, 메일 서버, TXT 레코드 등.
-
✅ 여기서 비로소 최종 답변을 얻을 수 있음.
4. 재귀적 리졸버 (ISP DNS, 8.8.8.8 같은 공개 DNS)
-
하는 일: 사용자를 대신해서 루트 → TLD → 권한 서버까지 따라가며 답변 획득.
-
가지고 있는 레코드:
- 자기가 직접 가진 건 없고, 다른 서버에서 얻은 것을 TTL 동안 캐시에 저장.
- 즉, “임시로 여러 도메인의 A, MX, TXT…” 등을 보관.
5. 핵심 요약
-
모든 DNS 서버가 모든 레코드를 갖는 건 절대 아님.
-
루트 → TLD → 권한 서버 → (재귀 리졸버 캐시) 이렇게 역할이 나뉘어 있음.
👉 한 마디로:
-
루트 서버: TLD 네임서버 정보만
-
TLD 서버: 해당 TLD 도메인의 NS 정보만
-
권한 서버: 자기 zone에 정의된 모든 레코드
-
재귀 리졸버: 다른 서버에서 얻은 결과를 캐시에 저장
-
DNS 조회 방법
: 호스트 이름에 대한 실제 IP 주소를 확인하고 싶을 때
host
**$ echo "nameserver 10.0.2.3" | sudo tee -a /etc/resolv.conf**
nameserver 10.0.2.3
**$ cat /etc/resolv.conf**
# Generated by NetworkManager
nameserver 168.126.63.1
nameserver 203.248.252.2
nameserver 10.0.2.3
**$ host google.com**
google.com has address 142.250.199.110
google.com has IPv6 address 2404:6800:4004:828::200e
google.com mail is handled by 10 smtp.google.co**m.
$ host naver.com**
naver.com has address 223.130.192.247
naver.com has address 223.130.192.248
naver.com has address 223.130.200.219
naver.com has address 223.130.200.236
naver.com mail is handled by 20 mx4.mail.naver.com.
naver.com mail is handled by 20 mx6.mail.naver.com.
naver.com mail is handled by 10 mx2.naver.com.
naver.com mail is handled by 10 mx1.naver.com.
naver.com mail is handled by 10 mx3.naver.com.
naver.com mail is handled by 20 mx5.mail.naver.com.
**$ host artist.mnetplus.world**
artist.mnetplus.world is an alias for real-lb.bstage.in.
real-lb.bstage.in has address 104.17.232.102
real-lb.bstage.in has address 104.16.160.91
real-lb.bstage.in has IPv6 address 2606:4700::6811:e866
real-lb.bstage.in has IPv6 address 2606:4700::6810:a05b
nslookup
- 대화형
- 비대화형
- 리눅스 및 윈도우에 기본적으로 포함되어있음
**$ nslookup google.com**
Server:         168.126.63.1
Address:        168.126.63.1#53

# google.com 메인 서버에서 가져온 게 아니라 캐시에서 가져왔다는 뜻
**Non-authoritative answer:**
Name:   google.com
Address: 142.251.42.142
Name:   google.com
Address: 2404:6800:4004:823::200e

**$ nslookup google.com 8.8.8.8**
Server:         8.8.8.8
Address:        8.8.8.8#53

Non-authoritative answer:
Name:   google.com
Address: 142.250.76.142
Name:   google.com
Address: 2404:6800:400a:80e::200e

**$ nslookup google.com 1.1.1.1**
Server:         1.1.1.1
Address:        1.1.1.1#53

Non-authoritative answer:
Name:   google.com
Address: 142.250.206.238
Name:   google.com
Address: 2404:6800:400a:804::200e

**$ nslookup -type=MX google.com**
Server:         168.126.63.1
Address:        168.126.63.1#53

Non-authoritative answer:
google.com      mail exchanger = 10 smtp.google.com.

Authoritative answers can be found from:
SMTP.google.com internet address = 142.251.10.27
SMTP.google.com internet address = 172.217.194.26
SMTP.google.com internet address = 172.217.194.27
SMTP.google.com internet address = 172.253.118.26
SMTP.google.com internet address = 172.253.118.27
SMTP.google.com has AAAA address 2404:6800:4003:c03::1a
SMTP.google.com has AAAA address 2404:6800:4003:c03::1b
SMTP.google.com has AAAA address 2404:6800:4003:c05::1a
SMTP.google.com has AAAA address 2404:6800:4003:c05::1b

**$ nslookup -type=NS google.com**
Server:         168.126.63.1
Address:        168.126.63.1#53

Non-authoritative answer:
google.com      nameserver = ns1.google.com.
google.com      nameserver = ns2.google.com.
google.com      nameserver = ns3.google.com.
google.com      nameserver = ns4.google.com.

Authoritative answers can be found from:
ns1.google.com  internet address = 216.239.32.10
ns2.google.com  internet address = 216.239.34.10
ns3.google.com  internet address = 216.239.36.10
ns4.google.com  internet address = 216.239.38.10
ns1.google.com  has AAAA address 2001:4860:4802:32::a
ns2.google.com  has AAAA address 2001:4860:4802:34::a
ns3.google.com  has AAAA address 2001:4860:4802:36::a
ns4.google.com  has AAAA address 2001:4860:4802:38::a
dig
: 상세한 정보 출력
**$ dig google.com**

; <<>> DiG 9.16.23-RH <<>> google.com
;; global options: +cmd
;; Got answer:
**;; ->>HEADER<<- opcode: QUERY, status: NOERROR, id: 34175
;; flags: qr rd ra; QUERY: 1, ANSWER: 1, AUTHORITY: 0, ADDITIONAL: 1**

;; OPT PSEUDOSECTION:
; EDNS: version: 0, flags:; udp: 1232
; COOKIE: ca5d5a38a2b774040100000068b69066b065d57fb861aad9 (good)
# google.com 의 A 레코드에 대해서 질의
**;; QUESTION SECTION:
;google.com.                    IN      A**

# 질의에 대한 응답
# google.com 에 대한 질의
# 150: TTL(Time To Live) -> 150초 동안 캐싱
# A 레코드에 대한 질의
# A 레코드 응답(142.~)
**;; ANSWER SECTION:
google.com.             150     IN      A       142.250.198.14**

# 걸린 시간?
# DNS 서버?
**;; Query time: 7 msec
;; SERVER: 168.126.63.1#53(168.126.63.1)**
;; WHEN: Tue Sep 02 06:36:23 UTC 2025
;; MSG SIZE  rcvd: 83
DNS 서버 구성
간단!
- 직접 도메인을 호스팅하거나,
- 디렉토리 서비스를 사용할 경우
- DNS 서버를 자체적으로 구성해야 함
BIND(Berkeley Internet Name Domain)
# bind 설치
# bind-utils 설치
**$ sudo yum install -y bind
$ sudo yum install -y bind-utils**
BIND 구성
# named 서비스 설정 파일 수정
# 혹시 모를일을 위해  백업
**$ sudo cp /etc/named.conf /etc/named.conf.bak
$ sudo vi /etc/named.conf**
# DNS 포트 번호 : 53
...
options {
        listen-on port 53 { 127.0.0.1; };
        listen-on-v6 port 53 { ::1; };
        directory       "/var/named";
        dump-file       "/var/named/data/cache_dump.db";
        statistics-file "/var/named/data/named_stats.txt";
        memstatistics-file "/var/named/data/named_mem_stats.txt";
        secroots-file   "/var/named/data/named.secroots";
        recursing-file  "/var/named/data/named.recursing";
        allow-query     { localhost; };
...
# 아래처럼 수정
# 현재 시스템에서만 DNS 요청을 받아들이도록 설정돼있던 걸
# 다른 호스트도 현재 서버의 DNS 서비스를 사용하도록 구성
options {
        listen-on port 53 { **any;** };
        listen-on-v6 port 53 { **none; };**
        directory       "/var/named";
        dump-file       "/var/named/data/cache_dump.db";
        statistics-file "/var/named/data/named_stats.txt";
        memstatistics-file "/var/named/data/named_mem_stats.txt";
        secroots-file   "/var/named/data/named.secroots";
        recursing-file  "/var/named/data/named.recursing";
        allow-query     { **any;** };
# 방화벽 기본 영역에 dns 규칙 영구 설정
**$ sudo firewall-cmd --add-service=dns --permanent**
success
**$ sudo firewall-cmd --reload**
success
**$ sudo firewall-cmd --list-services**
cockpit dhcpv6-client **dns** http ssh# 어떤 DNS 서버를 사용했는지는 나오지 않음
**$ host google.com**
google.com has address 142.250.199.110
google.com has IPv6 address 2404:6800:4004:80f::200e
google.com mail is handled by 10 smtp.google.com.
# 현재 시스템의 기본 dns 서버
**$ cat /etc/resolv.conf**
# Generated by NetworkManager
nameserver 168.126.63.1
nameserver 203.248.252.2
nameserver 10.0.2.3
# 우리 서버의 ip 로 dns 서버 설정
# 안됨
**$ host google.com 192.168.56.11**
;; connection timed out; no servers could be reached
**$ dig google.com**
; <<>> DiG 9.16.23-RH <<>> google.com
;; global options: +cmd
;; Got answer:
;; ->>HEADER<<- opcode: QUERY, status: NOERROR, id: 63701
;; flags: qr rd ra; QUERY: 1, ANSWER: 1, AUTHORITY: 0, ADDITIONAL: 1
;; OPT PSEUDOSECTION:
; EDNS: version: 0, flags:; udp: 1232
; COOKIE: 3be5a2ce5afb14570100000068b6988947fd1ab5c57a72a6 (good)
;; QUESTION SECTION:
;google.com. IN A
;; ANSWER SECTION:
google.com. 176 IN A 142.250.198.14
;; Query time: 7 msec
;; SERVER: 168.126.63.1#53(168.126.63.1)
;; WHEN: Tue Sep 02 07:11:05 UTC 2025
;; MSG SIZE rcvd: 83
# 우리 서버의 ip 로 dns 서버 설정
# 우리 서버가 아니라 설정된 dns 서버에서 받아온 걸 확인 가능
**$ dig google.com 192.168.56.11**
; <<>> DiG 9.16.23-RH <<>> google.com 192.168.56.11
;; global options: +cmd
;; Got answer:
;; ->>HEADER<<- opcode: QUERY, status: NOERROR, id: 6911
;; flags: qr rd ra; QUERY: 1, ANSWER: 1, AUTHORITY: 0, ADDITIONAL: 1
;; OPT PSEUDOSECTION:
; EDNS: version: 0, flags:; udp: 1232
; COOKIE: d6f2fe881cdd816c0100000068b698b0e32eca3efc767eef (good)
;; QUESTION SECTION:
;google.com. IN A
;; ANSWER SECTION:
google.com. 117 IN A 142.250.199.110
;; Query time: 7 msec
# 우리가 원하는 건 여기가 192.168.56.11 인데 원래 dns 서버
;; **SERVER: 168.126.63.1#53(168.126.63.1)**
;; WHEN: Tue Sep 02 07:11:44 UTC 2025
;; MSG SIZE rcvd: 83
# status: NXDOMAIN -> 192.168.56.11 이 Non-Existent Domain
# dns 서버가 아니라 찾아야 하는 도메인으로 취급한 것
# 그래서 answer도 두 개
;; Got answer:
;; ->>HEADER<<- opcode: QUERY, **status: NXDOMAIN**, id: 26453
;; flags: qr rd ra; QUERY: 1, ANSWER: 0, AUTHORITY: 1, ADDITIONAL: 1
;; OPT PSEUDOSECTION:
; EDNS: version: 0, flags:; udp: 1232
; COOKIE: d6f2fe881cdd816c0100000068b698b07301a424c93170d5 (good)
;; QUESTION SECTION:
;192.168.56.11. IN A
;; AUTHORITY SECTION:
. 10796 IN SOA a.root-servers.net. nstld.verisign-grs.com. 2025090200 1800 900 604800 86400
;; Query time: 5 msec
;; SERVER: 168.126.63.1#53(168.126.63.1)
;; WHEN: Tue Sep 02 07:11:44 UTC 2025
;; MSG SIZE rcvd: 145
# dig --help 를 보면 [@local-server] 규칙이 써있음
**$ dig google.com @192.168.56.11**
; <<>> DiG 9.16.23-RH <<>> google.com @192.168.56.11
;; global options: +cmd
;; Got answer:
;; ->>HEADER<<- opcode: QUERY, status: SERVFAIL, id: 25663
;; flags: qr rd ra; QUERY: 1, ANSWER: 0, AUTHORITY: 0, ADDITIONAL: 1
;; OPT PSEUDOSECTION:
; EDNS: version: 0, flags:; udp: 1232
; COOKIE: c0ec4f382a2b2b100100000068b69a20df0c67bf0cf5e54e (good)
;; QUESTION SECTION:
;google.com. IN A
# 우리 서버가 실제로 DNS 서버로 쓰일 수 있음을 확인
;; Query time: 0 msec
;; SERVER: **192.168.56.11**#53(192.168.56.11)
;; WHEN: Tue Sep 02 07:17:52 UTC 2025
;; MSG SIZE rcvd: 67
영역(Zone) 구성
: DNS 서버를 캐싱 용도로만 사용할 수도 있지만, 특정 도메인에 대하여 직접 DNS 레코드를 관리하면서 DNS 응답을 수행하도록 설정할 수 있음
→ 특정 도메인에 대해서 관리 및 응답하려면 영역
- 영역 파일(Zone File) :
# 영역 파일 생성
# 영역 파일 생성해야 하는 위치: /var/named/
# 해당 디렉토리에는 bind 설치 과정에서 생성된 파일들이 존재
**$ sudo cd /var/named
$ sudo ls -l /var/named**
total 16
drwxrwx---. 2 named named   23 Sep  2 07:16 data
drwxrwx---. 2 named named   60 Sep  2 07:18 dynamic
-rw-r-----. 1 root  named 2112 Jul 29 19:50 named.ca
-rw-r-----. 1 root  named  152 Jul 29 19:50 named.empty
-rw-r-----. 1 root  named  152 Jul 29 19:50 named.localhost
-rw-r-----. 1 root  named  168 Jul 29 19:50 named.loopback
drwxrwx---. 2 named named    6 Jul 29 19:49 slaves
**$ sudo ls -ld /var/named**
drwxrwx--T. 5 root named 127 Sep  2 07:17 /var/named

# 정방향 조회 영역 파일 생성
**$ sudo vi /var/named/data/dns.example.zone**
$TTL 86400
@ IN SOA ns.dns.example. admin.dns.example. (
                2024040801 ; Serial
                3600       ; Refresh (1시간)
                1800       ; Retry (30분)
                604800     ; Expire (1주일)
                86400 )    ; Minimum TTL (1일)

; 네임서버 설정
@       IN NS   ns.dns.example.

; 기본 도메인 주소
@       IN A    192.168.56.11

; 호스트 설정 - 실습을 위해 모두 우리 서버의 IP로 설정
ns      IN A    192.168.56.11  ; 네임서버
www     IN A    192.168.56.11  ; 웹 서버
db      IN A    192.168.56.11  ; 데이터베이스 서버
mail    IN A    192.168.56.11  ; 메일 서버

; 메일 서버 설정
@       IN MX 10 mail.dns.example.

; 별칭 설정
webmail IN CNAME mail

# 역방향 조회 영역 파일 생성
**$ sudo vi /var/named/data/db.192.168.56**
$TTL 86400
@ IN SOA ns.dns.example. admin.dns.example. (
                2024040801 ; Serial
                3600       ; Refresh
                1800       ; Retry
                604800     ; Expire
                86400 )    ; Minimum TTL

; 네임서버 설정
@       IN NS   ns.dns.example.

; 역방향 조회 설정 - 우리 서버의 IP만 설정
10      IN PTR  ns.dns.example.    ; 192.168.56.10

# /etc/named.conf : DNS 서버의 연결정보, BIND 를 통해 서비스할 영역에 대한 설정
**$ sudo vi /etc/named.conf**
// 정방향 조회 영역
zone "dns.example" IN {
    type master;
    file "data/dns.example.zone";
};

# 역방향 조회 영역은 서버의 대역과 일치해야 함
// 역방향 조회 영역
zone "56.168.192.in-addr.arpa" IN {
    type master;
    file "data/db.192.168.56";
};
# 권한 설정
# root 만 수정 가능, named 는 읽기만 가능하도록 설정
**$ sudo chown root:named /var/named/data/dns.example.zone**
**$ sudo chown root:named /var/named/data/db.192.168.56
$ sudo chmod 640 /var/named/data/dns.example.zone
$ sudo chmod 640 /var/named/data/db.192.168.56**# 설정 파일에 대한 유효성 검증
# 아무 메시지도 없으면 에러 X
**$ sudo named-checkconf /etc/named.conf**
# 영역 파일에 대한 유효성 검증
# **dns.example** : 영역 검사할 영역 이름
**$ sudo named-checkzone dns.example /var/named/data/dns.exa
mple.zone**
zone dns.example/IN: loaded serial 2024040801
OK
**$ sudo named-checkzone 56.168.192.in-addr.arpa
/var/named/data/db.192.168.56**
zone 56.168.192.in-addr.arpa/IN: loaded serial 2024040801
OK
# 변경된 설정을 적용하기 위해 서비스 재시작
**$ sudo systemctl restart named.service**# DNS 서비스 동작 확인
**$ dig dns.example @localhost**
; <<>> DiG 9.16.23-RH <<>> dns.example @localhost
;; global options: +cmd
;; Got answer:
;; ->>HEADER<<- opcode: QUERY, status: NOERROR, id: 31999
;; flags: qr **aa** rd ra; QUERY: 1, ANSWER: 1, AUTHORITY: 0, ADDITIONAL: 1
;; OPT PSEUDOSECTION:
; EDNS: version: 0, flags:; udp: 1232
; COOKIE: 47ae98215800832f0100000068b6a3d71f92a80f0867cd78 (good)
;; QUESTION SECTION:
;dns.example. IN A
;; ANSWER SECTION:
dns.example. 86400 IN A 192.168.56.11
;; Query time: 0 msec
;; SERVER: 127.0.0.1#53(127.0.0.1)
;; WHEN: Tue Sep 02 07:59:19 UTC 2025
;; MSG SIZE rcvd: 84
**$ dig dns.example @192.168.56.11**
; <<>> DiG 9.16.23-RH <<>> dns.example @192.168.56.11
;; global options: +cmd
;; Got answer:
;; ->>HEADER<<- opcode: QUERY, status: NOERROR, id: 18616
;; flags: qr **aa** rd ra; QUERY: 1, ANSWER: 1, AUTHORITY: 0, ADDITIONAL: 1
;; OPT PSEUDOSECTION:
; EDNS: version: 0, flags:; udp: 1232
; COOKIE: 96755a927326c53d0100000068b6a3ff8df4272fb362b796 (good)
;; QUESTION SECTION:
;dns.example. IN A
;; ANSWER SECTION:
dns.example. 86400 IN A 192.168.56.11
;; Query time: 0 msec
;; **SERVER:** **192.168.56.11**#53(192.168.56.11)
;; WHEN: Tue Sep 02 07:59:59 UTC 2025
;; MSG SIZE rcvd: 84
**$ host dns.example 192.168.56.11**
Using domain server:
Name: 192.168.56.11
Address: 192.168.56.11#53
Aliases:
dns.example has address 192.168.56.11
dns.example mail is handled by 10 mail.dns.example.