도커 스토리지
도커 컨테이너는 언젠가는 삭제되기 때문에 도커 컨테이너의 파일을 보존하기 위해서는 도커 스토리지가 필요함
도커 스토리지의 개념
컨테이너가 삭제되면 컨테이너 내부에 존재하는 파일도 함께 삭제됨
도커 스토리지는 도커 컨테이너에서 생성되는 데이터를 보존하기 위해 사용됨
- volume
- bind mount
도커 스토리지의 필요성
mysql 접속
$ docker run -d --name db -e "MYSQL_ROOT_PASSWORD=1234" mysql:5.7

$ docker exec -it db bash

bash-4.2# mysql -u root -p
데이터베이스, 테이블, 테스트 데이터 생성
mysql> CREATE DATABASE myapp;
mysql> use myapp;
mysql> INSERT INTO users VALUES (1, 'testUser');
mysql> select * from users;
컨테이너 삭제
$ docker stop db

$ docker rm db
새로운 DB 생성 후 mysql 접속
$ docker run -d --name db-new -e "MYSQL_ROOT_PASSWORD=1234" mysql:5.7

$ docker exec -it db-new mysql -u root -p1234
삭제 후 새로 생성한 db에서 이전에 만들었던 데이터를 확인하려고 하면 당연히 없음
mysql> SHOW DATABASES;
+--------------------+
| Database           |
+--------------------+
| information_schema |
| mysql              |
| performance_schema |
| sys                |
+--------------------+
4 rows in set (0.00 sec)

mysql> USE myapp;
ERROR 1049 (42000): Unknown database 'myapp'
⇒ 컨테이너를 삭제하면 데이터도 날아가므로 데이터 보존을 위해선 스토리지가 꼭 필요!
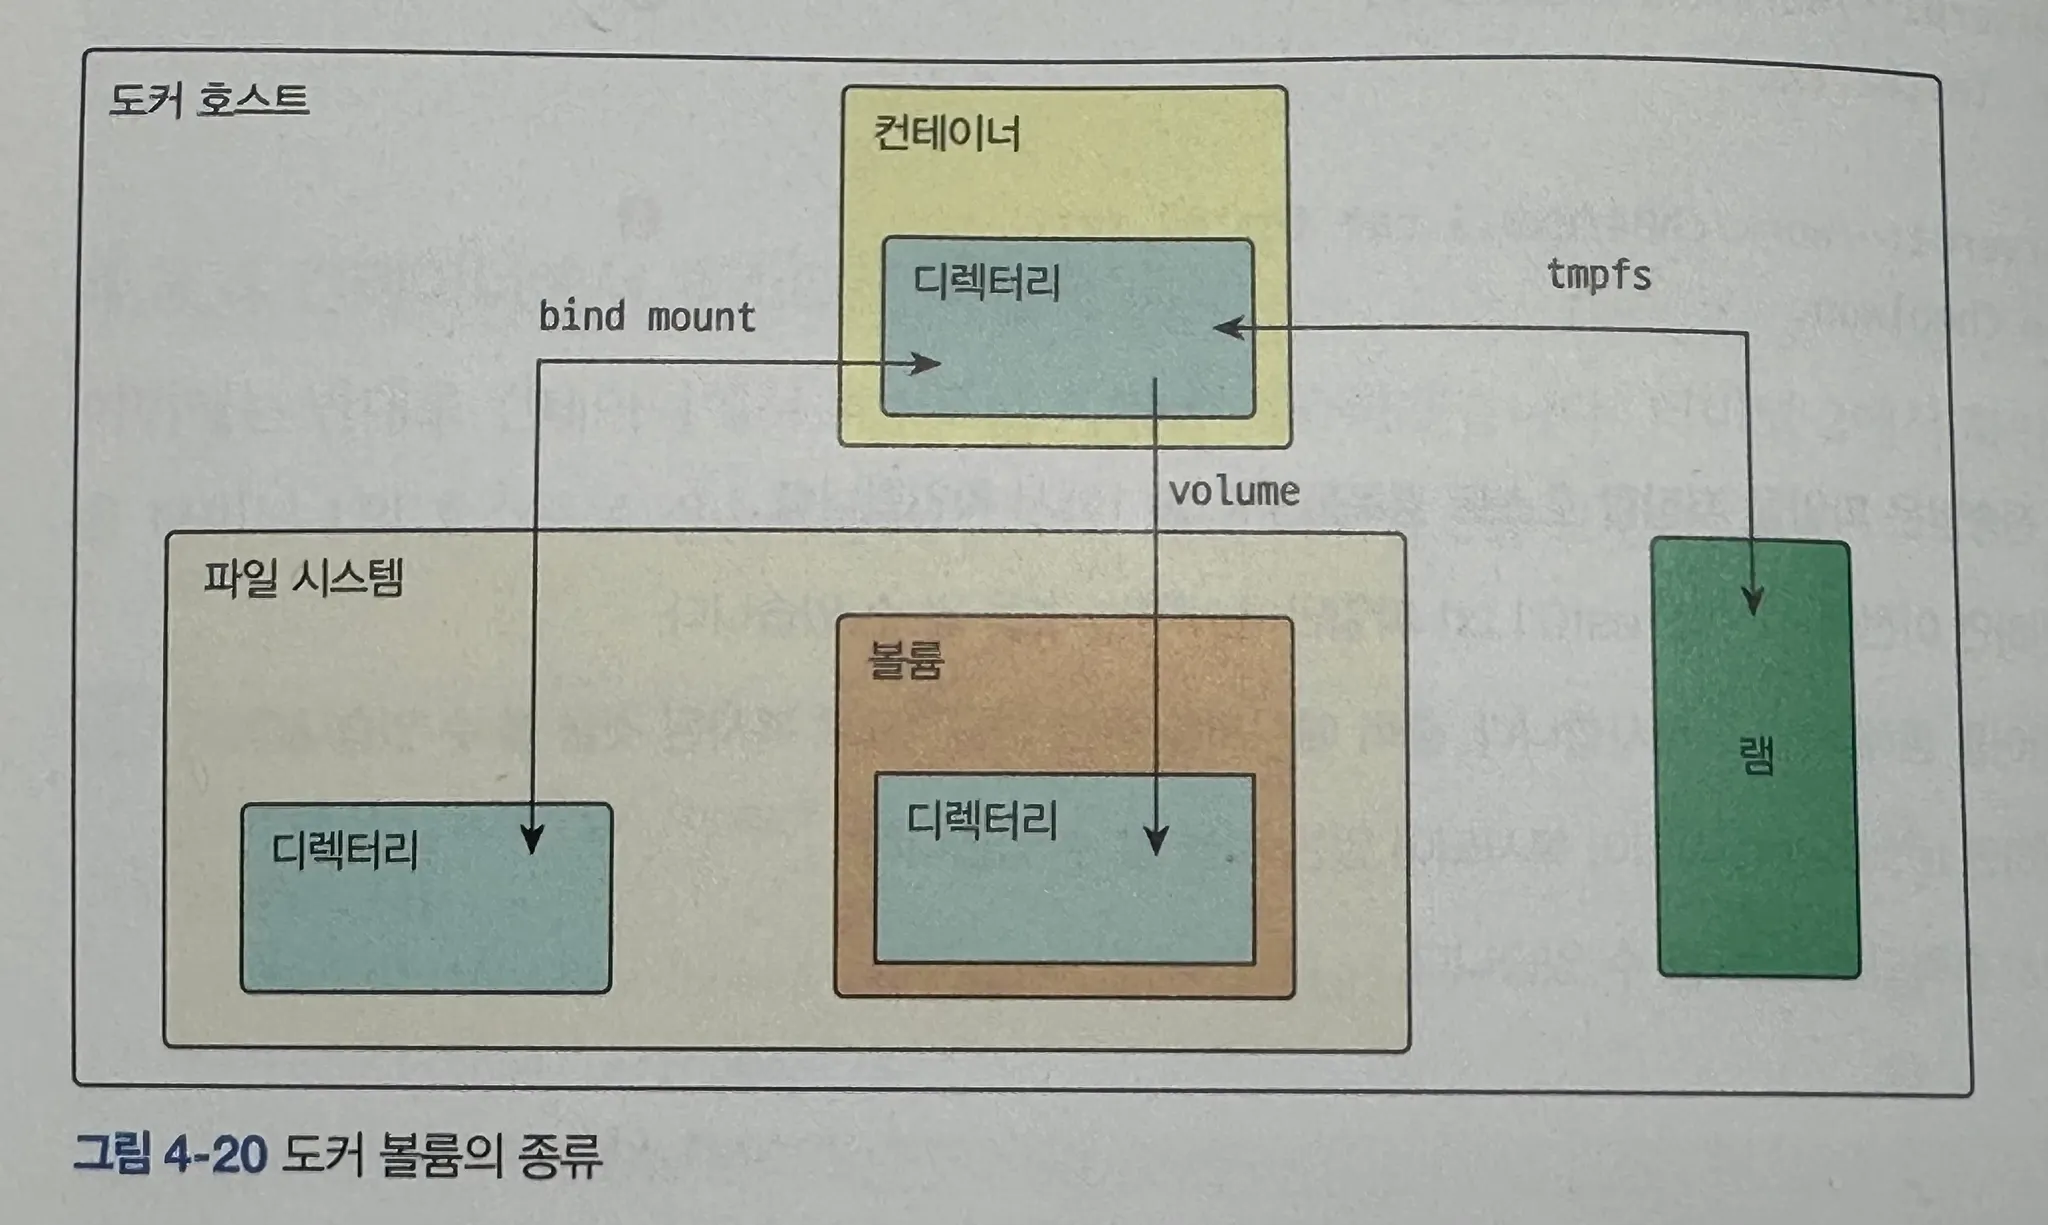
도커 스토리지의 종류
- 볼륨 (volume) : 도커가 직접 관리하는 특별한 저장 공간
- 컨테이너를 이 외장하드에 연결(mount)
/var/lib/docker/volumes**$ sudo ls /var/lib/docker/volumes** 240e3db1214d2af4ea8ec640eaaba9ea4ddb5e7367df1711f9cd297ba42ab395 24df211bcaa543dfc1bd1801a85e06e32c13686a3ddef22038a684f9d7d206d9 2be0230b0057d91a942bb7223e6526414cf60cd8de01871855f78cc37e470a94 5e42df50de960cbd8c77b346d3e0fbefd5e3af52109918f6dc376f80e188daca 76c86dd3e90737b5af3e1cab34ea271b351b8da5b5a3be022fffbf3f48424492 95f8dce85c422c8cca77a71f9a2049d4e46ab12bf8af0815f94802cc7caf3694 backingFsBlockDev f19cf41514ded7e63846493ff16f73dd33d8ac47b227755a187ceb27b4e9ad97 metadata.db**$ docker volume ls** DRIVER VOLUME NAME local 2be0230b0057d91a942bb7223e6526414cf60cd8de01871855f78cc37e470a94 local 5e42df50de960cbd8c77b346d3e0fbefd5e3af52109918f6dc376f80e188daca local 24df211bcaa543dfc1bd1801a85e06e32c13686a3ddef22038a684f9d7d206d9 local 76c86dd3e90737b5af3e1cab34ea271b351b8da5b5a3be022fffbf3f48424492 local 95f8dce85c422c8cca77a71f9a2049d4e46ab12bf8af0815f94802cc7caf3694 local 240e3db1214d2af4ea8ec640eaaba9ea4ddb5e7367df1711f9cd297ba42ab395 local f19cf41514ded7e63846493ff16f73dd33d8ac47b227755a187ceb27b4e9ad97- 데이터베이스 데이터처럼 컨테이너가 관리해야 할 데이터를 저장하는데 가장 권장되는 방식
- 도커가 관리(docker volume create, ls, rm)
- 호스트로부터 독립적:
- 도커가 관리하는 경로(/var/lib/docker/volumes)에서 생성되므로 호스트의 폴더구조와 완전히 분리
- 이식성이 높음
- 안정성
- 컨테이너는 볼륨을 통해서 데이터에 접근할 수 있으므로, 호스트의 민감한 파일에 접근할 위험이 없음
- 컨테이너는 볼륨을 통해서 데이터에 접근할 수 있으므로, 호스트의 민감한 파일에 접근할 위험이 없음
- 다양한 드라이버
- 도커가 관리하는 경로(/var/lib/docker/volumes)에서 생성되므로 호스트의 폴더구조와 완전히 분리
- 바인드 마운트 (bind mount) : 도커 호스트에 있는 ‘일반 디렉토리’를 컨테이너 안으로 그대로 연결
- 호스트의 특정 폴더를 컨테이너의 특정 경로와 동기화
- 장점
- 사용이 쉽고 직관적
- 성능이 좋음(읽고 쓰기가 빠름)
- 단점
- 호스트에 대한 의존성이 높음
- 도커가 관리하지 않음
- 보안에 취약:
- 호스트의 ‘/’ 나 ‘/etc’ 같은 시스템 중요 디렉토리를 컨테이너에 연결해버리면, 컨테이너를 통해 호스트 시스템 전체가 위험에 노출될 수 있음
- tmpfs 마운트 (tmpfs mount) : 파일을 디스크가 아니라 컴퓨터의 ‘메모리(RAM)’에 저장하는 방식 : 아주 빠른 ‘임시 저장 공간’ : 컨테이너를 중지하면 메모리에서 데이터가 삭제
volume
볼륨 생성
**$ docker volume create vol1

$ docker volume ls**
DRIVER    VOLUME NAME
local     2be0230b0057d91a942bb7223e6526414cf60cd8de01871855f78cc37e470a94
local     5e42df50de960cbd8c77b346d3e0fbefd5e3af52109918f6dc376f80e188daca
local     24df211bcaa543dfc1bd1801a85e06e32c13686a3ddef22038a684f9d7d206d9
local     76c86dd3e90737b5af3e1cab34ea271b351b8da5b5a3be022fffbf3f48424492
local     95f8dce85c422c8cca77a71f9a2049d4e46ab12bf8af0815f94802cc7caf3694
local     240e3db1214d2af4ea8ec640eaaba9ea4ddb5e7367df1711f9cd297ba42ab395
local     f19cf41514ded7e63846493ff16f73dd33d8ac47b227755a187ceb27b4e9ad97
**local     vol1

$ docker inspect vol1**
[
    {
        "CreatedAt": "2025-10-20T19:19:52Z",
        "Driver": "local",
        "Labels": null,
        "Mountpoint": "/var/lib/docker/volumes/vol1/_data",
        "Name": "vol1",
        "Options": null,
        "Scope": "local"
    }
]
"Mountpoint": "/var/lib/docker/volumes/vol1/_data"
→ 볼륨은 도커가 관리하므로 건드리지 않는 게 좋음
$ docker run -d --name anon-vol-test -v /app-data nginx-v /app-data-v: 볼륨을 지정
- 익명 볼륨을 생성해서 컨테이너의 /app-data 에 마운트?
$ docker rm -f anon-vol-test
anon-vol-test
이 상태에서 해당 컨테이너를 삭제하면 생성된 익명 볼륨은 주인 잃은 볼륨으로 공간만 차지함
→ Dangling Volume
$ docker volume prune주인 없는 볼륨 모두 삭제
$ docker run -d --name db-persistent -e \
MYSQL_ROOT_PASSWORD=1234 \
--mount type=volume,source=vol1,target=/var/lib/mysql mysql:5.7--mount: 컨테이너에 파일시스템을 붙이는 옵션type: 타입 지정- volume
- bind
- tmpfs
sourcetarget: 컨테이너의 어떤 디렉토리에 연결할 건지 지정
== -v vol1:/var/lib/mysql
그러나, mount 옵션이 더 명시적이고 가독성이 좋으므로 권장됨
$ docker run -d --name db-test \
-e MYSQL_ROOT_PASSWORD=1234 \
-v vol1:/var/lib/mysql mysql:5.7
mysql 접속
$ docker exec -it db-persistent mysql -u root -p테스트 데이터 추가
mysql> create database myapp;
Query OK, 1 row affected (0.00 sec)

mysql> use myapp;
Database changed
mysql> create table users(id INT, name varchar(20));
Query OK, 0 rows affected (0.03 sec)

mysql> insert into users values(1, 'testuser');
Query OK, 1 row affected (0.05 sec)

mysql> select * from users;
+------+----------+
| id   | name     |
+------+----------+
|    1 | testuser |
+------+----------+
1 row in set (0.00 sec)
컨테이너 중지 및 삭제
$ docker stop db-persistent
db-persistent

$ docker rm db-persistent
db-persistent
**$ docker volume ls**
DRIVER VOLUME NAME
local 240e3db1214d2af4ea8ec640eaaba9ea4ddb5e7367df1711f9cd297ba42ab395
local vol1컨테이너가 삭제돼도 볼륨은 잘 살아있는 거 확인 가능
해당 볼륨 연결해서 새로운 컨테이너 생성
$ docker run -d --name db-restored \
-e MYSQL_ROOT_PASSWORD=1234 \
--mount type=volume,source=vol1,target=/var/lib/mysql mysql:5.7
새로 생성한 컨테이너 mysql 접속
 $ docker exec -it db-restored mysql -u root -p1234

mysql> use myapp;
Reading table information for completion of table and column names
You can turn off this feature to get a quicker startup with -A

Database changed

mysql> show databases;
+--------------------+
| Database           |
+--------------------+
| information_schema |
| myapp              |
| mysql              |
| performance_schema |
| sys                |
+--------------------+
5 rows in set (0.00 sec)

mysql> select * from users;
+------+----------+
| id   | name     |
+------+----------+
|    1 | testuser |
+------+----------+
1 row in set (0.00 sec)
데이터가 멀쩡히 남아있는 거 확인 가능
vol1 을 마운트하고, web1 이라는 이름을 가진 httpd 컨테이너 생성
$ docker run -d --name web3 --mount type=volume,source=vol1,target=/usr/local/apache2/htdocs httpd:latestweb3 웹서버 컨테이너가 vol1 볼륨의 데이터를 외부에 서비스하고, os4 라는 우분투 컨테이너가 vol1 볼륨에 데이터를 채워넣도록 할 것
/usr/local/apache2/htdocs
- index.html 이 여기에 위치함
→ vol1 이 index.html 을 가져와야 함
→ os4 가 index.html 을 수정하도록 할 것
**$ docker volume create httpd-vol**
httpd-vol

**$ docker run --rm -v httpd-vol:/volume-data alpine:latest ls -l /volume-data**
total 0
새 볼륨을 생성하고 해당 볼륨이 빈 볼륨인지 확인
→ --rm 옵션을 줘서 할 일이 끝나면 컨테이너가 바로 삭제되도록 함
→ -v 로 생성한 볼륨을 컨테이너에 연결하고
→ ls -l 로 비었는지 확인
**$ docker run -d --name web-vol-test -p 8080:80 -v httpd-vol:/usr/local/apache2/htdocs httpd:latest**
edb7f6e818837a542977a96273e2e4edd25d0692e08abf82263b9fea3c7e7c9f

**$ docker exec -it web-vol-test sh**

**# ls /usr/local/apache2/htdocs**
index.html

**# exit**

**$ docker run --rm -v httpd-vol:/volume-data alpine:latest ls -l /volume-data**
total 4
-rw-r--r--    1 501      50              45 Jun 11  2007 index.html
볼륨 초기화
: 비어있는 볼륨을 이미지의 파일시스템에 있는 디렉토리에 연결하면, 해당 이미지의 디렉토리에 있는 파일들이 볼륨에 복사됨
**$ mkdir**

**$ docker run --rm \
--mount type=volume,source=vol1,target=/volume-data \
--mount type=bind,source=$HOME/backup,target=/backup \
ubuntu:latest \
tar cvf /backup/backup.tar /volume-data**

**$ ls backup/**
backup.tar- 백업 대상인 vol1 볼륨을 컨테이너의 /volume-data 에 연결
- 백업 파일을 저장할 호스트의 ~/backup 디렉토리를 컨테이너의 /backup에 바인드 마운트로 연결
/volume-data를/backup/backup.tar로 압축해서 저장
⇒ vol1 데이터를 아카이빙함
bind mount
$ mkdir bm1

$ touch bm1/fileA.txt

$ ls bm1/
fileA.txt
$ docker run -itd --name os3 -v $HOME/bm1:/tmp/mount ubuntu:latest
$ echo $HOME
/home/vagrant$ docker run -itd --name os3-mount \
--mount type=bind,source=$HOME/bm1,target=/tmp/mount \
ubuntu:latest
$ docker ps
CONTAINER ID IMAGE COMMAND CREATED STATUS PORTS NAMES
3e8303d4232f ubuntu:latest "/bin/bash" 40 seconds ago Up 39 seconds os3-mount
a5861badead0 ubuntu:latest "/bin/bash" 2 minutes ago Up 2 minutes os3$ docker exec os3-mount ls /tmp/mount
fileA.txt호스트에서 생성한 파일 컨테이너의 바인드 마운트한 디렉토리에서도 확인 가능
$ ls bm1/
fileA.txt fileC.txt$ echo "hello docker" > bm1/fileB.txt
$ docker exec os3-mount ls /tmp/mount
fileA.txt
fileB.txt
fileC.txt
$ docker exec os3 ls /tmp/mount
fileA.txt
fileB.txt
fileC.txt실습1
**$ docker run -d --name my-postgres --mount type=volume,source=pg-data,target=/var/lib/postgres/data postgres

$ docker logs my-postgres**
Error: Database is uninitialized and superuser password is not specified.
       You must specify POSTGRES_PASSWORD to a non-empty value for the
       superuser. For example, "-e POSTGRES_PASSWORD=password" on "docker run".

       You may also use "POSTGRES_HOST_AUTH_METHOD=trust" to allow all
       connections without a password. This is *not* recommended.

       See PostgreSQL documentation about "trust":
       https://www.postgresql.org/docs/current/auth-trust.html
**$ docker run -d --name my-postgres -e POSTGRES_PASSWORD=1234 --mount type=volume,source=pg-data,target=/var/lib/postgres/data postgres
$ docker exec -it my-postgres psql --help**
psql is the PostgreSQL interactive terminal.
Usage:
psql [OPTION]... [DBNAME [USERNAME]]
General options:
-c, --command=COMMAND run only single command (SQL or internal) and exit
-d, --dbname=DBNAME database name to connect to
-f, --file=FILENAME execute commands from file, then exit
-l, --list list available databases, then exit
-v, --set=, --variable=NAME=VALUE
set psql variable NAME to VALUE
(e.g., -v ON_ERROR_STOP=1)
-V, --version output version information, then exit
-X, --no-psqlrc do not read startup file (~/.psqlrc)
-1 ("one"), --single-transaction
execute as a single transaction (if non-interactive)
-?, --help[=options] show this help, then exit
--help=commands list backslash commands, then exit
--help=variables list special variables, then exit
Input and output options:
-a, --echo-all echo all input from script
-b, --echo-errors echo failed commands
-e, --echo-queries echo commands sent to server
-E, --echo-hidden display queries that internal commands generate
-L, --log-file=FILENAME send session log to file
-n, --no-readline disable enhanced command line editing (readline)
-o, --output=FILENAME send query results to file (or |pipe)
-q, --quiet run quietly (no messages, only query output)
-s, --single-step single-step mode (confirm each query)
-S, --single-line single-line mode (end of line terminates SQL command)
Output format options:
-A, --no-align unaligned table output mode
--csv CSV (Comma-Separated Values) table output mode
-F, --field-separator=STRING
field separator for unaligned output (default: "|")
-H, --html HTML table output mode
-P, --pset=VAR[=ARG] set printing option VAR to ARG (see \pset command)
-R, --record-separator=STRING
record separator for unaligned output (default: newline)
-t, --tuples-only print rows only
-T, --table-attr=TEXT set HTML table tag attributes (e.g., width, border)
-x, --expanded turn on expanded table output
-z, --field-separator-zero
set field separator for unaligned output to zero byte
-0, --record-separator-zero
set record separator for unaligned output to zero byte
Connection options:
-h, --host=HOSTNAME database server host or socket directory
-p, --port=PORT database server port
-U, --username=USERNAME database user name
-w, --no-password never prompt for password
-W, --password force password prompt (should happen automatically)
For more information, type "\?" (for internal commands) or "\help" (for SQL
commands) from within psql, or consult the psql section in the PostgreSQL
documentation.
Report bugs to <pgsql-bugs@lists.postgresql.org>.
PostgreSQL home page: <https://www.postgresql.org/>
# postgres 는 기본 root계정
**$ docker exec -it my-postgres psql -U postgres -W**postgres 의 기본 root 계정
: postgres
# 데이터베이스 생성
postgres=# create database testdb;

# 데이터베이스 모두 확인
postgres=# \l
                                                    List of databases
   Name    |  Owner   | Encoding | Locale Provider |  Collate   |   Ctype    | Locale | ICU Rules |   Access privileges
-----------+----------+----------+-----------------+------------+------------+--------+-----------+-----------------------
 postgres  | postgres | UTF8     | libc            | en_US.utf8 | en_US.utf8 |        |           |
 template0 | postgres | UTF8     | libc            | en_US.utf8 | en_US.utf8 |        |           | =c/postgres          +
           |          |          |                 |            |            |        |           | postgres=CTc/postgres
 template1 | postgres | UTF8     | libc            | en_US.utf8 | en_US.utf8 |        |           | =c/postgres          +
           |          |          |                 |            |            |        |           | postgres=CTc/postgres
 testdb    | postgres | UTF8     | libc            | en_US.utf8 | en_US.utf8 |        |           |
(4 rows)
# 컨테이너 삭제
$ docker rm -f my-postgres
$ docker run -d --name my-postgres-2 -e POSTGRES_PASSWORD=
1234 --mount type=volume,source=pg-data,target=/var/lib/postgres/data postgres
# psql 접속
$ docker exec -it my-postgres-2 psql -U postgres -W
# 생성했던 데이터베이스 남아있는지 확인
postgres=# \l
List of databases
Name | Owner | Encoding | Locale Provider | Collate | Ctype | Locale | ICU Rules | Access privileges
-----------+----------+----------+-----------------+------------+------------+--------+-----------+-----------------------
postgres | postgres | UTF8 | libc | en_US.utf8 | en_US.utf8 | | |
template0 | postgres | UTF8 | libc | en_US.utf8 | en_US.utf8 | | | =c/postgres +
| | | | | | | | postgres=CTc/postgres
template1 | postgres | UTF8 | libc | en_US.utf8 | en_US.utf8 | | | =c/postgres +
| | | | | | | | postgres=CTc/postgres
(3 rows)
안남아있음
⇒ 타겟 디렉토리 경로 틀림
/var/lib/postgres/data → /var/lib/postgresql/data
Dockerfile
: 도커 이미지를 생성하기 위해 필요한 명령어를 모아놓은 파일
- FROM : 베이스 이미지
- RUN : 새로운 layer에서 명령어 실행 및 commit. : commit된 이미지 Dockerfile의 나머지 단계에서 사용
- 시점: 이미지 빌드
- COPY : 파일, 디렉터리를 복사
- 시점: 이미지 빌드
- CMD : Dockerfile에는 1개의 CMD만 존재 가능. 여러 개의 CMD를 사용하면 마지막 CMD만 적용.
- Docker run 시점에서 명령어 넘겨 준다면 CMD 무시
- 인자만 넘겨줄 수도 있고(ENTRYPOINT 반드시 필요) 명령도 같이 넘길 수 있음
- 시점: 컨테이너 실행
ENTRYPOINT 와 CMD 는 둘 다
컨테이너가 실행될 때 PID 1, 즉 메인 프로세스를 정의하거나 구성하는 역할
도커 컨테이너는 PID=1 프로세스의 생명주기와 1:1로 연결
- PID 1 프로세스가 생성되면 컨테이너가 시작되고,
- PID 1 프로세스가 종료되면 컨테이너도 바로 종료
컨테이너 = “하나의 프로세스”를 격리한 환경
도커는 “가벼운 가상머신”이 아니라,
리눅스의 프로세스 격리 기술(namespace + cgroups)을 이용해서
하나의 리눅스 프로세스를 독립된 공간처럼 보이게 하는 것
즉,
컨테이너의 본질 = 리눅스에서 돌아가는 한 개의 프로세스 (PID=1)
이 프로세스가 컨테이너의 “주 프로세스(Main Process)”
다른 모든 프로세스는 이 PID 1의 자식으로 존재
Dockerfile에서의 실행 단계 구분
| 실행 시점 | 대표 명령어 | 설명 |
|---|---|---|
| 이미지 빌드 시(build time) | RUN, COPY, ADD, ENV, … | 이미지를 구성하는 명령. 한 줄마다 새로운 이미지 레이어를 만듦. |
| 컨테이너 실행 시(runtime) | CMD, ENTRYPOINT | 컨테이너가 시작될 때 실제 실행되는 명령. |
Dockerfile 작성
**$ echo "Hello, Dockerfile" > index.html

$ vi Dockerfile**
FROM rockylinux:9
RUN yum install -y httpd
COPY index.html /var/www/html/index.html
EXPOSE 80
CMD ["/usr/sbin/httpd", "-DFOREGROUND"]
도커 빌드
**$ docker build -t myweba:1.0 .

$ docker run -d --name myweb myweba:1.0
$ curl localhost:80**
curl: (7) Failed to connect to localhost port 80: Connection refused
핵심 원인: 포트 공개 안 함
docker run을 기본 bridge 네트워크로 실행하면, 컨테이너의 80/tcp는 호스트에서 바로 접근 불가
EXPOSE 80은 “문서화/메타데이터”일 뿐, 실제로 포트를 열어주지 않음
그래서 curl localhost:80이 Connection refused가 뜬 것
⇒ 포트포워딩 or 호스트 네트워크 그대로 쓰기?
$ docker run -d --name myweb --network host myweba:1.0
4add465c9618e442908956a3d579d9fcbc54439da6c825913c2b8ea1ce97617b

$ curl localhost:80
Hello, Dockerfile
호스트 네트워크 그대로 씀
Dockerfile 사용 이유
- 코드 기반 인프라(Infrastructure as code, IaC)
- 이미지 빌드 과정을 코드로 관리
- Git과 같은 버전 관리 시스템으로 변경 이력을 추적하고, 협업하기 매우 용이
- 투명성 및 문서화
- 파일 자체가 이미지의 설계도.
- 누구나 어떻게 동작하는지 명확하게 알 수 있음
- 자동화
- CI/CD(지속적 통합/지속적 배포) 파이프라인의 핵심 요소
- 빌드 캐시 활용
- 각 명령어는 하나의 레이어(layer)로 만들어짐
도커파일 지시어
- 대소문자 구별 안함
- 하지만 관례적으로 대문자로 작성하여 일반 명령과 구분
FROM: 빌드의 바탕이 될 베이스 이미지를 지정(필수, 반드시 첫 줄에 와야 함)
RUN: 이미지 빌드과정에서 실행할 명령어를 지정(패키지 설치, 디렉터리 생성 등등)
CMD: 컨테이너가 시작될 때 실행될 기본 명령어를 지정
COPY: 호스트의 파일이나 디렉토리를 이미지 안으로 복사
EXPOSE: 컨테이너가 내부적으로 사용하는 네트워크 포트를 외부에 알림
WORKDIR: RUN, CMD, COPY 등의 명령어가 실행될 작업 디렉터리(컨테이너) 지정
ENV: 이미지 내부에서 사용할 환경 변수
VOLUME: 컨테이너의 데이터를 영속적으로 저장하기 위한 볼륨 마운트 포인트 지정