Mock-Exam-3
Create a new service account with the name pvviewer. Grant this Service account access to list all PersistentVolumes in the cluster by creating an appropriate cluster role called pvviewer-role and ClusterRoleBinding called pvviewer-role-binding.Next, create a pod called pvviewer with the image: redis and serviceAccount: pvviewer in the default namespace.
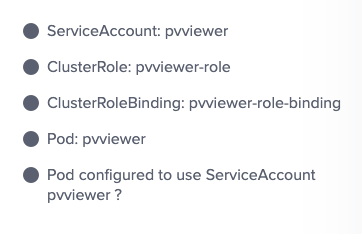
일단 serviceaccount를 만들어주자.
kubectl create serviceaccount pvviewer
그 다음 persistent volumes에 대한 목록의 list 동작을 수행할 수 있는 권한을 만들어준다.
kubectl create clusterrole pvviewer-role --verb=list --resource=persistentvolumes
그 다음 이 전에 만든 serviceaccount에 해당 clusterrole 을 binding해줘야 한다. (namespace:name 형식으로 입력해야 함)
kubectl create clusterrolebinding pvviewer-role-binding --clusterrole=pvviewer-role --serviceaccount=default:pvviewer
그 다음 지문에 나온대로 pod를 생성하고 serviceAccount계정을 추가해주자.
apiVersion: v1
kind: Pod
metadata:
  creationTimestamp: null
  labels:
    run: pvviewer
  name: pvviewer
spec:
  serviceAccountName: pvviewer
  containers:
  - image: redis
    name: pvviewer
    resources: {}
  dnsPolicy: ClusterFirst
  restartPolicy: Always
status: {}
요약
serviceaAccount생성 > clusterRole 생성 > clusterRoleBinding 생성 > pod에 해당 serviceAccount할당
List the InternalIP of all nodes of the cluster. Save the result to a file /root/CKA/node_ips. (cluster 내 모든 IP 저장하기)
json path에 관한 문제이다. 해당 정보를 검색해서 파일로 저장하면 된다.
나는 path를 살펴본 뒤 아래와 같은 명령줄을 만들었지만
kubectl get nodes -o=jsonpath='{.items[*].status.addresses[0].address}'
아래의 방법도 있음.
k get nodes -o jsonpath='{.items[*].status.addresses[?(@.type=="InternalIP")].address}'
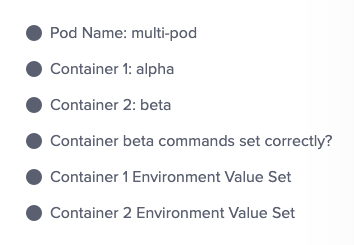
Create a pod called multi-pod with two containers.Container 1, name: alpha, image: nginx Container 2: name: beta, image: busybox, command: sleep 4800 (multi-pod 구축)
Environment Variables:
container 1:
name: alpha
Container 2:
name: beta
apiVersion: v1
kind: Pod
metadata:
creationTimestamp: null
labels:
run: alpha
name: multi-pod
spec:
containers:
- image: nginx
name: alpha
env:
- name: "name"
value: "alpha"
- image: busybox
name: beta
env:
- name: "name"
value: "beta"
command: ["sleep", "4800"]
resources: {}
dnsPolicy: ClusterFirst
restartPolicy: Always
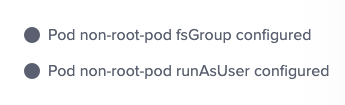
status: {}Create a Pod called non-root-pod , image: redis:alpine
runAsUser: 1000
fsGroup: 2000
apiVersion: v1
kind: Pod
metadata:
  creationTimestamp: null
  labels:
    run: non-root-pod
  name: non-root-pod
spec:
  securityContext:
    runAsUser: 1000
    fsGroup: 2000
  containers:
  - image: redis:alpine
    name: non-root-pod
    resources: {}
  dnsPolicy: ClusterFirst
  restartPolicy: Always
status: {}
이걸로 확인 함
k get pods non-root-pod -o yaml | grep securityContext
We have deployed a new pod called np-test-1 and a service called np-test-service. Incoming connections to this service are not working. Troubleshoot and fix it. Create NetworkPolicy, by the name ingress-to-nptest that allows incoming connections to the service over port 80. (network policy만들기)
apiVersion: networking.k8s.io/v1
kind: NetworkPolicy
metadata:
  name: ingress-to-nptest
  namespace: default
spec:
  podSelector:
    matchLabels:
      run: non-root-pod
  policyTypes:
    - Ingress
  ingress:
    -
      ports:
        - protocol: TCP
          port: 80
인그레스 밑의 yml문법을 유의해야 할 듯
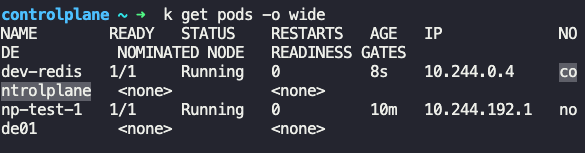
Taint the worker node node01 to be Unschedulable. Once done, create a pod called dev-redis, image redis:alpine, to ensure workloads are not scheduled to this worker node. Finally, create a new pod called prod-redis and image: redis:alpine with toleration to be scheduled on node01.

우선 지문에 맞게 taint 설정을 해주자
kubectl taint nodes node01 env_type=production:NoSchedule
그리고 pod 하나를 만들어서 node01에 배치되지 않는지 확인하자.
k run --image=redis:alpine dev-redis
그리고 새로운 파드를 만들어서 taint에 대응하는 tolerations을 설정해줘야 node01에 스케줄 할 수 있다.
tolerations:
- key: "key1"
  operator: "Equal"
  value: "value1"
  effect: "NoSchedule"
최종 pod yml
apiVersion: v1
kind: Pod
metadata:
  creationTimestamp: null
  labels:
    run: prod-redis
  name: prod-redis
spec:
  containers:
  - image: redis:alpine
    name: prod-redis
    resources: {}
  tolerations:
  - key: "env_type"
    operator: "Equal"
    value: "production"
    effect: "NoSchedule"
  dnsPolicy: ClusterFirst
  restartPolicy: Always
status: {}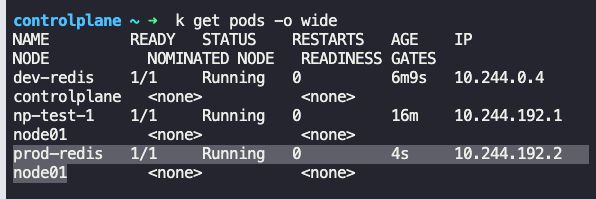
Create a pod called hr-pod in hr namespace belonging to the production environment and frontend tier . image: redis:alpine
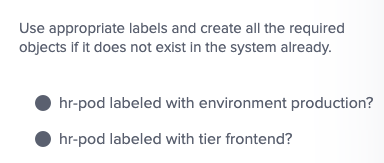
k run --image=redis:alpine hr-pod -n hr --labels="environment=production,tier=frontend"
A kubeconfig file called super.kubeconfig has been created under /root/CKA. There is something wrong with the configuration. Troubleshoot and fix it.
지문에서 준 config파일을 적용하여 node 를 조회해보자.
k get nodes --kubeconfig /root/CKA/super.kubeconfig
에러가 나고 있다.기본포트가 안 맞는 것 같음
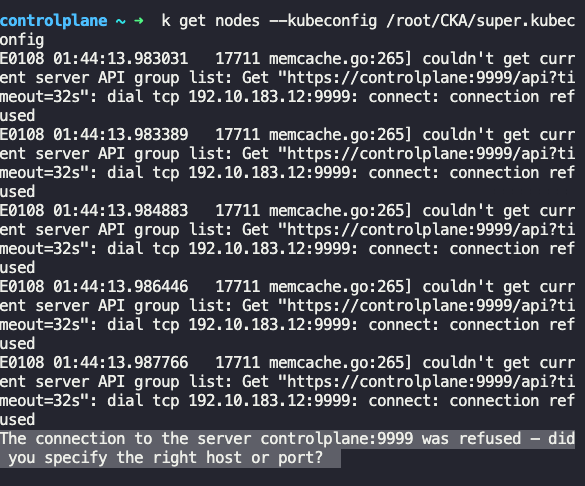
cat .kube/config 명령으로 원래 포트를 확인하고 수정해주자.
lightning-lab
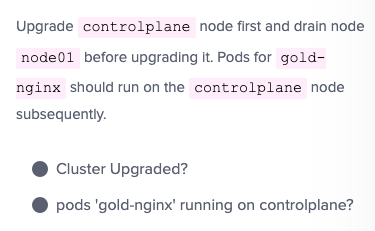
Upgrade the current version of kubernetes from 1.26.0 to 1.27.0 exactly using the kubeadm utility. Make sure that the upgrade is carried out one node at a time starting with the controlplane node. To minimize downtime, the deployment gold-nginx should be rescheduled on an alternate node before upgrading each node. (kubernetes를 1.26.0에서 1.27.0으로 업그레이드)
우선 업그레이드 할 버전을 결정하자. 난 1.27.0 마스터 노드부터 시작하자.
apt update
apt-cache madison kubeadm
controlplane node kubeadm 업그레이드
apt-mark unhold kubeadm && \ apt-get update && apt-get install -y kubeadm=1.27.0-00 && \ apt-mark hold kubeadm
kubeadm version 확인
kubeadm version
업그레이드 계획을 확인
kubeadm upgrade plan
kubernetes cluster update를 위해 kubeadm를 선택한 version으로 패치함.
sudo kubeadm upgrade apply v1.27.0
노드 드레인
kubectl drain controlplane --ignore-daemonsets
kubelet과 kubectl 업그레이드
apt-mark unhold kubelet kubectl && \ apt-get update && apt-get install -y kubelet=1.27.0-00 kubectl=1.27.0-00 && \ apt-mark hold kubelet kubectl
kubelet을 다시 시작
sudo systemctl daemon-reload
sudo systemctl restart kubelet
노드 uncordon
kubectl uncordon controlplane
그리고 controlplane노드에 taint설정이 있기 때문에 제거해주자.
k taint nodes controlplane node-role.kubernetes.io/control-plane:NoSchedule
node01
node 01 접속
ssh node01
kubeadm 업그레이드
apt-mark unhold kubeadm && \ apt-get update && apt-get install -y kubeadm=1.27.0-00 && \ apt-mark hold kubeadm
sudo kubeadm upgrade node
노드 드레인
마스터 노드로 와서 kubectl drain node01 --ignore-daemonsets
다시 node01 로 가서 kubelet과 kubectl 업그레이드
apt-mark unhold kubelet kubectl && \ apt-get update && apt-get install -y kubelet=1.19.0-00 kubectl=1.27.0-00 && \ apt-mark hold kubelet kubectl
kubelet을 다시 시작
sudo systemctl daemon-reload
sudo systemctl restart kubelet
노드 uncordon
마스터노드로 와서 kubectl uncordon controlplane
Print the names of all deployments in the admin2406 namespace in the following format
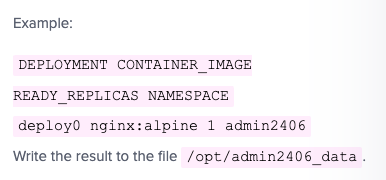
json 정보 본 후 대입
k -n admin2406 get deployments.apps -o custom-columns=DEPLOYMENT:.metadata.name,CONTAINER_IMAGE:.spec.template.spec.containers[0].image,READY_REPLICAS:.spec.replicas,NAMESPACE:.metadata.namespace --sort-by=.metadata.name > /opt/admin2406_data
A new deployment called alpha-mysql has been deployed in the alpha namespace. However, the pods are not running. Troubleshoot and fix the issue. The deployment should make use of the persistent volume alpha-pv to be mounted at /var/lib/mysql and should use the environment variable MYSQL_ALLOW_EMPTY_PASSWORD=1 to make use of an empty root password.
pvc 의 정보가 pv랑 일치하지 않았고, deployment에서 pvc의 이름을 잘못 기입되어있었음.
Take the backup of ETCD at the location /opt/etcd-backup.db on the controlplane node.(etcd백업)
ETCDCTL_API=3 etcdctl --endpoints 127.0.0.1:2379 --cacert=/etc/kubernetes/pki/etcd/ca.crt --cert=/etc/kubernetes/pki/etcd/server.crt --key=/etc/kubernetes/pki/etcd/server.key snapshot save /opt/etcd-backup.db
restore
ETCDCTL_API=3 etcdctl --data-dir /var/lib/etcd-previous snapshot restore /opt/etcd-backup.db
예상 기출문제 정리
현재 taint가 적용된 node의 이름과 개수 구하기 ?
이름
kubectl get nodes -o json | jq -r '.items[] | select(.spec.taints != null) | .metadata.name'
개수
kubectl get nodes -o json | jq -r '.items[] | select(.spec.taints != null) | .metadata.name' | wc -l
혹시나 template로 나올 시 맨윗라인 제거
| tail -n +2 | wc -l
--selector 사용시 가능한 옵션
k get all --selector env=prod --no-headers | wc -l
taint 적용 & 해제 및 tolerations 설정하기
적용
k taint node node01 key=value:NoSchedule
해제 ( 끝에 - 만 붙이면 됨)
k taint node node01 key=value:NoSchedule-
tolerations 적용
containers와 형제레벨로 적어주면 됨
tolerations:
- key: "key1"
  operator: "Equal"
  value: "value1"
  effect: "NoSchedule"
nodeAffinity 설정해서 특정 node에 배치하기
containers와 형제레벨로 설정해주면 된다. nodeSelector는 label만으로 간단하게 지정할 수 있고 nodeAffinity는 세부적인 필터가 가능하다.
affinity:
    nodeAffinity:
      requiredDuringSchedulingIgnoredDuringExecution:
        nodeSelectorTerms:
        - matchExpressions:
          - key: topology.kubernetes.io/zone
            operator: In
            values:
            - antarctica-east1
            - antarctica-west1
모니터링하기 위해 Metrics-Server 배포
아래의 git 주소를 clone하고 실행시키자.
git clone https://github.com/kodekloudhub/kubernetes-metrics-server.git
리소스의 자원 모니터링을 위해 아래의 명령어 사용 가능
k top <resources>
configmap 생성
kubectl create configmap webapp-config-map --from-literal=APP_COLOR=darkblue --from-literal=APP_OTHER=disregard
secret 생성
kubectl create secret generic db-secret --from-literal=DB_Host=sql01 --from-literal=DB_User=root --from-literal=DB_Password=password123
sidecar container
apiVersion: v1
kind: Pod
metadata:
  name: app
  namespace: elastic-stack
  labels:
    name: app
spec:
  containers:
  - name: app
    image: kodekloud/event-simulator
    volumeMounts:
    - mountPath: /log
      name: log-volume

  - name: sidecar
    image: kodekloud/filebeat-configured
    volumeMounts:
    - mountPath: /var/log/event-simulator/
      name: log-volume

  volumes:
  - name: log-volume
    hostPath:
      # directory location on host
      path: /var/log/webapp
      # this field is optional
      type: DirectoryOrCreate
initContainer
apiVersion: v1
kind: Pod
metadata:
  name: red
  namespace: default
spec:
  containers:
  - command:
    - sh
    - -c
    - echo The app is running! && sleep 3600
    image: busybox:1.28
    name: red-container
  initContainers:
  - image: busybox
    name: red-initcontainer
    command:
      - "sleep"
      - "20"
기본 게이트웨이의 IP 주소
ip route show default
kube-scheduler가 컨트롤 플레인 노드에서 수신 대기하는 포트
netstat -nplt | grep scheduler
pod 가 pending 일 때 살펴볼 이슈
1 .사용 가능한 node 의 상태를 살펴보자.
2. kube-scheduler 의 부재
보통은 /etc/kubernetes/manifests/ 에 static-pod로 존재하지만, 없다면 수동으로 셋팅해줘야한다.
아래의 코드처럼 nodeName을 직접 지정해줘도 되고
apiVersion: v1
kind: Pod
metadata:
  name: nginx
spec:
  nodeName: node01
  containers:
  -  image: nginx
     name: nginx
또는 아래의 코드 처럼 nodeSelector를 지정해줘도 된다.
apiVersion: v1
kind: Pod
metadata:
  name: nginx
spec:
  containers:
  -  image: nginx
     name: nginx
  nodeSelector:
    tier: frontend
nodeName과 nodeSelector의 차이는 전자는 node의 이름을 지정하며, 후자는 node에 설정된 label을 지정한다.
그리고 큐브 스케줄러가 존재하지 않다면 nodeSelector 도 작동하지 않기 때문에 nodeName을 선택해야 한다.
Taints & Tolerations 확인
윗 문제를 참고하자.
더 추가예정..
workder node의 kubelet down
systemctl status docker => systemctl enable --now docker
systemctl status kubelet => systemctl enable --now kubelet