
👉 1. java.lang 패키지
java.lang 패키지의 클래스들은 import문 없이도 사용할 수 있는 가장 기본이 되는 클래스
1.1 Object 클래스
Object 클래스는 모든 클래스의 최고 조상이기 때문에 Object 클래스의 멤버들은 모든 클래스에서 바로 사용 가능하다.
| Object 클래스의 메서드 | 설 명 |
|---|---|
| protected Object clone() | 객체 자신의 복사본을 반환한다. |
| public boolean equals (Object obj) | 객체 자신과 객체 obj가 같은 객체인지 알려준다.(같으면 true) |
| protected void finalize() | 객체가 소멸될 때 가비지 컬렉터에 의해 자동적으로 호출된다. 이 때 수행되어야하는 코드가 있을 때 오버라이딩한다.(거의 사용안함) |
| public Class getClass() | 객체 자신의 클래스 정보를 담고 있는 Class 인스턴스를 반환한다. |
| public int hashCode() | 객체 자신의 해시코드를 반환한다. |
| public String toString() | 객체 자신의 정보를 문자열로 반환한다. |
| public void notify() | 객체 자신을 사용하려고 기다리는 쓰레드를 하나만 깨운다. |
| public void notifyAll() | 객체 자신을 사용하려고 기다리는 모든 쓰레드를 깨운다. |
| public void wait() public void wait(long timeout) public void wait(long timeout, int nanos) | 다른 쓰레드가 notify()나 notifyAll()을 호출할 때까지 현재 쓰레드를 무한히 또는 지정된 시간(timeout, nanos)동안 기다리게 한다. (timeout은 천 분의 1초, nanos는 10^9분의 1초) |
Object 클래스는 멤버변수는 없고 오직 11개의 메서드만 가지고 있다.
equals(Object obj)
매개변수로 객체의 참조변수를 받아서 비교하여 그 결과를 boolean 값으로 알려 주는 역할
public boolean equals(Object obj) {
	return (this==obj);
}

// ex)
Value v1 = new Value(10);
Value v2 = new Value(10);

if (v1.equals(v2)) {...} // false

v2 = v1;

if (v1.equals(v2) {...} // true
equals 메서드는 두 개의 참조변수가 같은 객체를 참조하고 있는지, 즉 두 참조변수에 저장된 값(주소값)이 같은지를 판단하는 기능밖에 할 수 없다.
hashCode()
이 메서드는 해싱(hashing)기법에 사용되는 해시함수(hash function) 를 구현한 것이다.
-
해시함수는 찾고자하는 값을 입력하면, 그 값이 저장된 위치를 알려주는 해시코드(hash code)를 반환한다.
-
클래스의 인스턴스변수 값으로 객체의 같고 다름을 판단해야하는 경우라면, equals 메서드 뿐 만아니라 hashCode 메서드도
적절히 오버라이딩해야 한다.
String str1 = new String("abc");
String str2 = new STring("abc");

System.out.println(str1.equals(str2));				// true
System.out.println(str1.hashCode());				// 96354
System.out.println(str2.hashCode());				// 96354
System.out.println(System.identityHashCode(str1));	// 27134973
System.out.println(System.identityHashCode(str1));	// 1284693
String 클래스는 문자열의 내용이 같으면, 동일한 해시코드를 반환하도록 hashCode 메서드가 오버라이딩 되어 있다.
반면에 System.identityHashCode(Object x)는 Object 클래스의 hashCode 메서드처럼 객체의 주소값으로 해시코드를 생성하기 때문에 모든 객체에 대해 항상 다른 해시코드값을 반환할 것을 보장한다.
toString()
이 메서드는 인스턴스에 대한 정보를 문자열(String)로 제공할 목적으로 정의한 것이다.
public String toString() {
	return getClass.getName()+"@"+Integer.toHexString(hashCode());
}
클래스를 작성할 때 toString()을 오버라이딩하지 않는다면, 위와 같은 내용이 그대로 사용될 것이다.
-> 즉, toString()을 호출하면 클래스이름에 16진수의 해시코드를 얻게 될 것 !
String str = new String("KOREA");
java.util.Date today = new java.util.Date();

System.out.println(str);				// KOREA
System.out.println(str.toString());		// KOREA
System.out.println(today);				// Fri Dec 23 10:00:00 KST 2015
System.out.println(today.toString());	// Fri Dec 23 10:00:00 KST 2015
String 클래스의 toString()은 String 인스턴스가 갖고 있는 문자열을 반환하도록 오버라이딩되어 있고, Date 클래스도, Date 인스턴스가 갖고 있는 날짜와 시간을 문자열로 변환하여 반환하도록 오버라이딩되어 있다.
클래스 작성시 다음과 같이 오버라이딩하면 된다.
class Card {
	String kind;
    int number;

    Card() {...}

    Card(String kind, int number) {...}

    public String toString() {
    	return "kind : " + kind + ", number : " + number;
	}
}
clone()
이 메서드는 자신을 복제하여 새로운 인스턴스를 생성하는 일을 한다.
Object 클래스에 정의된 clone()은 단순히 인스턴스 변수의 값만 복사하기 때문에 참조타입의 인스턴스 변수가 있는 클래스는 완전한 인스턴스 복제가 이루어지지 않는다.
 // Cloneable 인터페이스를 구현한 클래스에서만 clone()을 호출할 수 있다.
 // 이 인터페이스를 구현하지 않고 clone()을 호출하면 예외가 발생한다.
class Point implements Cloneable {
	int x, y;

    Point(int x, int y) {
    	this.x = x;
        this.y = y;
    }

    public String toString() {
    	return "x=" + x + ", y=" + y;
	}

    public Object clone() {			// 본래 접근제어자는 protected, 오버라이딩시 public으로
    	Object obj = null;
        try {
        	obj = super.clone();	// clone()은 반드시 예외처리를 해주어야 한다.
        } catch(CloneNotSupportedException e) { }
		return obj;
	}
}
인스턴스의 데이터를 보호하기 위해, Cloneable 인터페이스를 구현한 클래스의 인스턴스만 clone()을 통한 복제 가능
공변 반환타입
JDK1.5부터 추가된 기능.
오버라이딩할 떄 조상 메서드의 반환타입을 자손 클래스의 타입으로 변경을 허용하는 것
public Object clone() {		// 1. 반환타입을 Object에서 Point로 변경
    Object obj = null;
    try {
        obj = super.clone();
    } catch(CloneNotSupportedException e) { }
	return obj;				// 2. Point타입으로 형변환한다.
}
공변 반환타입 을 사용하면, 조상의 타입이 아닌, 실제로 반환되는 자손 객체의 타입으로 반환할 수 있어서 번거로운 형변환이 줄어든다는 장점이 있다.
배열과 java.util 패키지의 Vector, ArrayList, LinkedList, HashSet, TreeSet, HashMap, TreeMap, Calendar, Date와 같은 클래스들도 clone()으로 복제가 가능하다.
얕은 복사와 깊은 복사
얕은 복사(shallow copy): 단순히 객체에 저장된 값을 그대로 복제할 뿐, 객체가 참조하고 있는 객체까지 복제하지 않음깊은 복사(deep copy): 원본이 참조하고 있는 객체까지 복제하는 것
-> 원본과 복사본이 서로 다른 객체를 참조하기 때문에 원본의 변경이 복사본에 영향을 미치지 않는다.
class Circle implements Cloneable {
    Point p;
    double r;

    Circle(Point p, double r) {
        this.p = p;
        this.r = r;
    }

    public Circle shallowCopy() {
        Object obj = null;
        try {
            obj = super.clone();
        } catch (CloneNotSupportedException e) {}
        return (Circle) obj;
    }

    public Circle deepCopy() {
        Object obj = null;
        try {
            obj = super.clone();
        } catch (CloneNotSupportedException e) {}

        Circle c = (Circle) obj;
        c.p = new Point(this.p.x, this.p.y);

        return c;
    }

    public String toString() {
        return "[p=" + p + ", r=" + r + "]";
    }
}

class Point {
    int x, y;

    Point(int x, int y) {
        this.x = x;
        this.y = y;
    }

    public String toString() {
        return "(" + x + ", " + y + ")";
    }
}

public class ShallowDeepCopy {
    public static void main(String[] args) {
        Circle c1 = new Circle(new Point(1, 1), 2.0);
        Circle c2 = c1.shallowCopy();
        Circle c3 = c1.deepCopy();

        System.out.println("c1=" + c1);
        System.out.println("c2=" + c2);
        System.out.println("c3=" + c3);

        c1.p.x = 9;
        c1.p.y = 9;
        System.out.println("= c1의 변경 후 =");
        System.out.println("c1=" + c1);
        System.out.println("c2=" + c2);
        System.out.println("c3=" + c3);
    }
}

/* 실행결과
c1=[p=(1, 1), r=2.0]
c2=[p=(1, 1), r=2.0]
c3=[p=(1, 1), r=2.0]
= c1의 변경 후 =
c1=[p=(9, 9), r=2.0]
c2=[p=(9, 9), r=2.0]
c3=[p=(1, 1), r=2.0]
*/
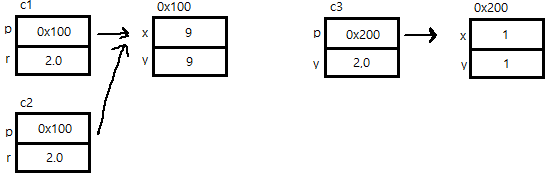
c1을 변경했을 뿐인데, c2도 영향을 받는다. 그러나 c3는 전혀 영향을 받지 않는다.
- shallowCopy()는 단순히 Object클래스의 clone()을 호출
- deepCopy()는 shallowCopy()에 두 줄을 추가하여, 복제된 객체가 새로운 Point인스턴스를 참조하도록 함.
getClass()
자신이 속한 클래스의 Class 객체를 반환하는 메서드
Class 객체를 얻는 방법
final class Card {
	// ...
    public String toString() {...}
}

class ClassEx1 {
	public static void main(String args[]) throws Exception {
    	Card c = new Card("HEART", 3);
        Card c2 = Card.class.newInstance();

        Class cobj = c.getClass();

        System.out.println(cobj.getName());			// Card
        System.out.println(cobj.toGenericString());	// final class Card
        System.out.println(cobj.toString());		// class Card
	}
}
1.2 String 클래스
변경 불가능한(immutable) 클래스
String 클래스에는 문자열을 저장하기 위해서 문자형 배열 참조변수(char[]) value 를 인스턴스 변수로 정의해놓고 있다. 인스턴스 생성 시 생성자의 매개변수로 입력받는 문자열은 이 인스턴스변수(value)에 문자형 배열(char[])로 저장되는 것이다.
public final class String implements java.io.Serializable, Comaprable {
	private char[] value;
    ...
문자열간의 결합이나 추출 등 문자열을 다루는 작업이 많이 필요한 경우에는 String 클래스 대신 StringBuffer 클래스를 사용하는 것이 좋다.
문자열의 비교
문자열을 만들 때는 ① 문자열 리터럴을 지정하는 방법 ② String 클래스의 생성자를 사용해서 만드는 방법이 있다.
public class StringEx1 {
    public static void main(String[] args) {
        String str1 = "abc";                // 문자열 리터럴 "abc"의 주소가 str1에 저장됨
        String str2 = "abc";                // 문자열 리터럴 "abc"의 주소가 str2에 저장됨
        System.out.println("String str1 = \"abc\";");
        System.out.println("String str2 = \"abc\";");

        System.out.println("str1 == str2 ? " + (str1 == str2));			// true
        System.out.println("str1.equals(str2) ? " + str1.equals(str2));	// true
        System.out.println();

        String str3 = new String("\"abc\"");    // 새로운 String인스턴스를 생성
        String str4 = new String("\"abc\"");    // 새로운 String인스턴스를 생성

        System.out.println("String str3 = new String(\"abc\");");
        System.out.println("String str4 = new String(\"abc\");");

        System.out.println("str3 == str4 ? " + (str3 == str4));			// false
        System.out.println("str3.equals(str4) ? " + str3.equals(str4));	// true
    }
}
문자열 리터럴
자바 소스파일에 포함된 모든 문자열 리터럴은 컴파일 시에 클래스 파일에 저장된다. 이 때 같은 내용의 문자열 리터럴은 한번만 저장된다.
String s1 = "AAA";
String s2 = "AAA";
String s3 = "AAA";
String s4 = "BBB";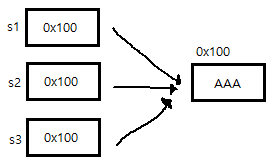
빈 문자열(empty string)
길이가 0인 배열도 존재한다. char형 배열도 길이가 0인 배열을 생성할 수 있고, 이 배열을 내부적으로 가지고 있는 문자열이 바로 빈 문자열 이다.
char[] chArr = new char[0];	// 길이가 0인 char배열
int[] iArr = {};			// 길이가 0인 int배열

String s = null;
char c = '\u0000';
// ->
String s = "";	// 빈 문자열로 초기화
char c = ' ';	// 공백으로 초기화
\u0000 은 유니코드의 첫 번째 문자로써 아무런 문자도 지정되지 않은 빈 문자이다.
String 클래스의 생성자와 메서드
좀 많지만... 인내심 가지고 표를 작성한다 😢
| 메서드/설명 | 예제 | 결과 |
|---|---|---|
| String(String s) 주어진 문자열(s)을 갖는 String인스턴스를 생성한다. | String s = new String("Hello"); | s = "Hello" |
| String(char[] value) 주어진 문자열(value)을 갖는 String인스턴스를 생성한다. | char[] c = {'H', 'e', 'l', 'l', 'o'}; String s = new String(c) | s = "Hello"; |
| String(StringBuffer buf) StringBuffer인스턴스가 갖고 있는 문자열과 같은 내용의 String인스턴스를 생성한다. | StringBuffer sb = new StringBuffer("Hello"); String s = new String(sb); | s = "Hello" |
| char charAt(int index) 지정된 위치(index)에 있는 문자를 알려준다. (index는 0부터 시작) | String s = "Hello"; String n = "0123456"; char c = s.charAt(1); char c2 = n.charAt(1); | c = 'e' c2 = '1' |
| int compareTo(String str) 문자열(str)과 사전순서로 비교한다. 같으면 0을, 사전순으로 이전이면 음수를, 이후면 양수를 반환한다. | int i = "aaa".comapreTo("aaa"); int i2 = "aaa".comapreTo("bbb"); int i3 = "bbb".compareTo("aaa"); | i = 0 i2 = -1 i3 = 1 |
| String concat(String str) 문자열(str)을 뒤에 덧붙인다. | String s = "Hello"; String s2 = s.concat(" World"); | s2 = "Hello World" |
| boolean contains(CharSequence s) 지정된 문자열(s)이 포함되었는지 검사한다. | String s = "abcdefg"; boolean b = s.contains("bc"); | b = true |
| boolean endsWith(String suffix) 지정된 문자열(suffix)로 끝나는지 검사한다. | String file = "Hello.txt"; boolean b = file.endsWith("txt"); | b = true |
| boolean equals(Object obj) 매개변수로 받은 문자열(obj)과 String 인스턴스의 문자열을 비교한다. obj가 String이 아니거나 문자열이 다르면 false를 반환한다. | String s = "Hello"; boolean b = s.equals("Hello"); boolean b2 = s.equals("hello"); | b = true b2 = false |
| boolean equalsIgnoreCase(String str) 문자열과 String인스턴스의 문자열을 대소문자 구분없이 비교한다. | String s = "Hello"; boolean b = s.equalsIgnoreCase("HELLO"); boolean b2 = s.equalsIgnoreCase("heLLo"); | b = true b2 = true |
| int indexOf(int ch) 주어진 문자(ch)가 문자열에 존재하는지 확인하여 위치 (index)를 알려준다. 못 찾으면 -1을 반환한다.(index는 0부터 시작) | String s = "hello"; int idx1 = s.indexOf('o'); int idx2 = s.indexOf('k'); | idx = 4 idx2 = -1 |
| int indexOf(int ch, int pos) 주어진 문자(ch)가 문자열에 존재하는지 지정된 위치(pos) 부터 확인하여 위치(index)를 알려준다. 못 찾으면 -1을 반 환한다.(index는 0부터 시작) | String s = "Hello"; int idx1 = s.indexOf('e', 0); int idx2 = s.indexOf('e', 2); | idx1 = 1 idx2 = -1 |
| int indexOf(String str) 주어진 문자열이 존재하는지 확인하여 그 위치(index)를 알려준다. 없으면 -1을 반환한다.(index는 0부터 시작) | String s = "ABCDEFG"; int idx = s.indexOf("CD"); | idx = 2 |
| String intern() 문자열을 상수풀(constant pool)에 등록한다. 이미 상수 풀에 같은 내용의 문자열이 있을 경우 그 문자열의 주소 값을 반환한다. | String s = new String("abc"); String s2 = new String("abc"); boolean b = (s==s2); boolean b2 = s.equals(s2); boolean b3 = (s.intern() == s2.intern()); | b = false b2 = true b3 = true |
| int lastIndexOf(int ch) 지정된 문자 또는 문자코드를 문자열의 오른쪽 끝에서부터 찾아서 위치(index)를 알려준다. 못 찾으면 -1을 반환한다. | String s = "java.lang.Object"; int idx1 = s.lastIndexOf('.'); int idx2 = s.indexOf('.'); | idx1 = 9 idx2 = 4 |
| int lastIndexOf(String str) 지정된 문자열을 인스턴스의 문자열 끝에서부터 찾아서 위치(index)를 알려준다. 못 찾으면 -1을 반환한다. | String s = "java.lang.java"; int idx1 = s.lastIndexOf("java"); int idx2 = s.indexOf("java"); | idx1 = 10 idx2 = 0 |
| int length() 문자열의 길이를 알려준다. | String s = "Hello"; int length = s.length(); | length = 5 |
| **String replace(char old, char new) 문자열 중의 문자(old)를 새로운 문자(new)로 바꾼 문자열을 반환한다. | String s = "Hello"; String s1 = s.replace('H', 'C'); | s1 = "Cello" |
| String replace(CharSequence old, CharSequence new) 문자열 중의 문자열(old)을 새로운 문자열(new)로 모두 바꾼 문자열을 반환한다. | String s = "Hellollo"; String s1 = s.replace("ll", "LL"); | s1 = "HeLLoLLo" |
| String replaceAll(String regex, String replacement) 문자열 중에서 지정된 문자열(regex)과 일치하는 것을 새로운 문자열(replacement)로 모두 변경한다. | String ab = "AABBAABB"; String r = ab.replaceAll("BB", "bb"); | r = "AAbbAAbb" |
| String replaceFirst(String regex, String replacement) 문자열 중에서 지정된 문자열(regex)과 일치 하는 것 중, 첫 번째 것만 새로운 문자열(replacement)로 변경한다. | String ab = "AABBAABB"; String r = ab.replaceFirst("BB", "bb"); | r = "AAbbAABB" |
| String[] split(String regex) 문자열을 지정된 분리자(regex)로 나누어 문자열 배열에 담아 반환한다. | String animals = "dog, cat, bear"; String[] arr = animals.split(","); | arr[0] = "dog" arr[1] = "cat" arr[2] = "bear" |
| String[] split(String regex, int limit) 문자열을 지정된 분리자(regex)로 나누어 문자열배열에 담아 반환한다. 단, 문자열 전체를 지정된 수(limit)로 자른다. | String animals = "dog, cat, bear"; String[] arr = animals.split(",", 2); | arr[0] = "dog" arr[1] = "cat, bear" |
| boolean startsWith(String prefix) 주어진 문자열(prefix)로 시작하는지 검사한다. | String s = "java.lang.Object"; boolean b = s.startWith("java"); boolean b2 = s.startsWith("lang"); | b = true b2 = false |
| String substring(int begin) String substring(int begin, int end) 주어진 시작위치(begin)부터 끝 위치(end) 범위에 포함된 문자열을 얻는다. 이 때, 시작위치의 문자는 범위에 포함 되지만, 끝 위치의 문자는 포함되지 않는다. (begin <= x < end) | String s = "java.lang.Object"; String c = s.substring(10); String p = s.substring(5,9); | c = "Object" p = "lang" |
| String toLowerCase() String 인스턴스에 저장되어있는 모든 문자열을 소문자로 변환하여 반환한다. | String s = "Hello"; String s1 = s.toLowerCase(); | s1 = "hello" |
| String toString() String 인스턴스에 저장되어 있는 문자열을 반환한다. | String s = "Hello"; String s1 = s.toString(); | s1 = "Hello" |
| String toUpperCase() String 인스턴스에 저장되어있는 모든 문자열을 대문자로 변환하여 반환한다. | String s = "Hello"; String s1 = s.toUpperCase(); | s1 = "HELLO" |
| String trim() 문자열의 왼쪽 끝과 오른쪽 끝에 있는 공백을 없앤 결과를 반환한다. 이 때 문자열 중간에 있는 공백은 제거되지 않는다. | String s = " Hello World "; String s1 = s.trim(); | s1 = "Hello World" |
| static String valueOf(boolean b) static String valueOf(char c) static String valueOf(int i) static String valueOf(long l) static String valueOf(float f) static String valueOf(double d) static String valueOf(Object o) 지정된 값을 문자열로 변환하여 반환한다. 참조변수의 경우, toString()을 호출한 결과를 반환한다. | String b = String.valueOf(true); String c = String.valueOf(); String i = String.valueOf(100); String l = String.valueOf(100L); String f = String.valueOf(10f); String d = String.valueOf(10.0); java.util.Date dd = new java.util.Date(); String date = String.valueOf(dd); | b = "true" c = "a" i = "100" l = "100" f = "10.0" d = 10.0" date = "Fri Dec 8 12:17:00 KST 2023" |
join() 과 StringJoiner
join()과 java.util.StringJoiner 클래스는 여러 문자열 사이에 구분자를 넣어서 결합한다.
// join()
String animals = "dog,cat,bear";
String[] arr = animals.split(",");	// 문자열을 ','를 구분자로 나눠서 배열에 저장
String str = String.join("-", arr);	// 배열의 문자열을 '-'로 구분해서 결합
System.out.println(str);			// dog-cat-bear

// StringJoiner
StringJoiner sj = new StringJoiner(",", "[", "]");
String[] strArr = {"aaa", "bbb", "ccc"};

for(String s : strArr)
	sj.add(s.toUpperCase());

System.out.println(sj.toString());	// [AAA,BBB,CCC]
유니코드의 보충문자
위의 String 메서드 표 중에 매개변수의 타입이 char인 것들이 있고, int인 것들이 있다.
-> 이것은 확장된 유니코드를 다루기 위해서이다.
유니코드는 원래 2byte, 즉 16비트 문자체계인데, 모자라서 20비트로 확장하게 되었다.
매개변수가 int ch 인 것들은 보충문자를 지원 / char ch 인 것들은 지원 X
문자 인코딩 변환
getBytes(String charsetName)를 사용하면, 문자열의 문자 인코딩을 다른 인코딩으로 변경할 수 있다.
byte[] utf8_str = "가".getBytes("UTF-8");	// 문자열을 UTF-8로 변환
String str = new String(utf8_str, "UTF-8");	// byte 배열을 문자열로 변환
String.format
printf()와 비슷한 형식화된 문자열을 만들어내는 방법
String str = String.format("%d 더하기 %d는 %d입니다.", 3, 5, 3+5);기본형 값을 String 으로 변환
숫자로 이루어진 문자열을 숫자로, 또는 그 반대로 변환하는 경우
- 숫자에 빈 문자열""을 더해주기
- valueOf() 사용
-> 성능은 valueOf()가 더 좋음
int i = 100;
String str1 = i + "";				// 방법1
String str2 = String.valueOf(i);	// 방법2
String을 기본형 값으로
valueOf()를 쓰거나 parseInt()를 사용
int i = Integer.parseInt("100");
int i2 = Integer.valueOf("100");
원래 valueOf()의 반환 타입은 int가 아니라 Integer인데, 오토박싱(auto-boxing)에 의해 Integer가 int로 자동 변환된다.
| 기본형 -> 문자열 | 문자열->기본형 |
|---|---|
| String.valueOf(boolean b) String.valueOf(char c) String.valueOf(int i) String.valueOf(long l) String.valueOf(float f) String.valueOf(double d) | Boolean.parseBoolean(String s) Byte.parseByte(String s) Short.parseShort(String s) Integer.parseInt(String s) Long.parseLong(String s) Float.parseFloat(String s) Double.parseDouble |
1.3 StringBuffer 클래스와 StringBuilder 클래스
String 클래스는 인스턴스를 생성할 때 지정된 문자열을 변경할 수 없지만 StringBuffer 클래스는 변경이 가능하다. 내부적으로 문자열 편집을 위한 버퍼(buffer) 를 가지고 있으며, StringBuffer인스턴스를 생성할 때 그 크기를 지정할 수 있다.
public final class StringBuffer implements java.io.Serializable {
	private char[] value;

    public StringBuffer(int length) {
    	value = new char[length];
        shared = false;
    }
    public StringBuffer() {
    	this(16);			// 버퍼의 크기를 지정하지 않으면 버퍼의 크기는 16이 된다.
	}
    public StringBuffer(String str) {
    	this(str.length() + 16);	// 지정한 문자열의 길이보다 16이 더 크게 버퍼를 생성한다.
        append(str);
	}
    ...
}
StringBuffer의 생성자
StringBuffer 클래스의 인스턴스를 생성할 때, 적절한 길이의 char형 배열이 생성되고, 이 배열은 문자열을 저장하고 편집하기 위한 공간(buffer)으로 사용된다.
저장될 문자열의 길이를 고려하여 충분히 여유있는 크기로 지정하는 것이 좋고, 버퍼의 크기를 지정해주지 않으면 16개의 문자를 저장할 수 있는 크기의 버퍼를 생성한다.
StringBuffer의 변경
StringBuffer sb = new StringBuffer("abc");	// abc
sb.append("123");							// abc123
sb.append("ZZ");							// abc123ZZ
StringBuffer의 비교
public class StringBufferEx1 {
    public static void main(String[] args) {
        StringBuffer sb = new StringBuffer("abc");
        StringBuffer sb2 = new StringBuffer("abc");

        System.out.println("sb == sb2 ? " + (sb == sb2));
        System.out.println("sb.equals(sb2) ? " + sb.equals(sb2));

        // StringBuffer의 내용을 String으로 변환한다.
        String s = sb.toString();   // String s = new String(sb);와 같다.
        String s2 = sb2.toString();

        System.out.println("s.equals(s2) ? " + s.equals(s2));
    }
}
StringBuffer클래스의 생성자와 메서드
(생략)
StringBuilder 란?
StringBuffer는 멀티쓰레드에 안전(thread safe)하도록 동기화되어 있다.
-> 동기화가 StringBuffer의 성능을 떨어뜨린다는 것 만 이해하면 된다.
1.4 Math 클래스
Math클래스는 기본적인 수학계산에 유용한 메서드로 구성되어 있다.
- Math 클래스의 생성자는 접근 제어자가 private
-> 클래스 내에 인스턴스변수가 하나도 없어 인스턴스를 생성할 필요가 없기 때문 - 메서드는 모두 static이며, 아래 2개의 상수만 정의 해놓음
public static final double E = 2.7182818284590452354;	// 자연로그의 밑
public static final double PI = 3.14159265358979323846; // 원주율
올림, 버림, 반올림
// 코드를 간단히 하기 위한 정적 import문
import static java.lang.Math.*;
import static java.lang.System.*;

public class MathEx1 {
    public static void main(String[] args) {
        double val = 90.7552;
        out.println("round(" + val + ")=" + round(val));                // 반올림 // 91

        val *= 100;
        out.println("round(" + val + ")=" + round(val));                // 반올림 // 9076

        out.println("round(" + val + ")/100 =" + round(val) / 100);     // 반올림 // 90
        out.println("round(" + val + ")/100.0=" + round(val) / 100.0);  // 반올림 // 90.76
        out.println();
        out.printf("ceil(%3.1f)=%3.1f%n", 1.1, ceil(1.1));              // 올림 // 2.0
        out.printf("floor(%3.1f)=%3.1f%n", 1.5, floor(1.5));            // 버림 // 1.0
        out.printf("round(%3.1f)=%d%n", 1.1, round(1.1));               // 반올림 // 1
        out.printf("round(%3.1f)=%d%n", 1.5, round(1.5));               // 반올림 // 2
        out.printf("rint(%3.1f)=%f%n", 1.5, rint(1.5));                 // 반올림 // 2.000000
        out.printf("round(%3.1f)=%d%n", -1.5, round(-1.5));             // 반올림 // -1
        out.printf("rint(%3.1f)=%f%n", -1.5, rint(-1.5));               // 반올림 // -2.000000
        out.printf("ceil(%3.1f)=%f%n", -1.5, ceil(-1.5));               // 올림 // -1.000000
        out.printf("floor(%3.1f)=%f%n", -1.5, floor(-1.5));             // 버림 // -2.000000
    }
}
예외를 발생시키는 메서드
삼각함수와 지수, 로그
StrictMath 클래스
Math 클래스의 메서드
| 메서드/설명 | 예제 | 결과 |
|---|---|---|
| static double abs(double a) static float abs(float f) static int abs(int f) static long abs(long f) 주어진 값의 절대값을 반환한다. | int i = Math.abs(-10); double d = Math.abs(-10.0); | i = 10 d = 10.0 |
| static double ceil(double a) 주어진 값을 올림하여 반환한다. | double d = Math.seil(10.1); double d2 = Math.ceil(-10.1); double d3 = Math.ceil(10.000015); | d = 11.0 d2 = -10.0 d3 = 11.0 |
| static double floor(double a) 주어진 값을 버림하여 반환한다. | double d = Math.floor(10.8); double d2 = Math.floor(-10.8); | d = 10.0 d2 = -11.0 |
| static double max(double a, double b) static float max(float a, float b) static int max(int a, int b) static long max(long a, long b) 주어진 두 값을 비교하여 큰 쪽을 반환한다. | double d = Math.max(9.5, 9.50001); int i = Math.max(0, -1); | d = 9.50001 i = 0 |
| static double min(double a, double b) static float min(float a, float b) static int min(int a, int b) static long min(long a, long b) 주어진 두 값을 비교하여 작은 쪽을 반환한다. | double d = Math.min(9.5, 9.50001); int i = Math.min(0, -1); | d = 9.5 i = -1 |
| static double random() 0.0~1.0 범위의 double값을 반환한다. (1.0은 범위에 포함되지 않는다.) | double d = Math.random(); int i = (int)(Math.random() * 10) + 1 | 0.0 <= d < 1.0 1 <= i < 11 |
| static double rint(double a) 주어진 double값과 가장 가까운 정수값을 double형 으로 반환한다. 단, 두 정수의 정가운데 있는 값(1.5, 2.5, 3.5 등)은 짝수를 반환 | double d = Math.rint(1.2); double d2 = Math.rint(2.6); double d3 = Math.rint(3.5); double d4 = Math.rint(4.5); | d = 1.0 d2 = 3.0 d3 = 4.0 d4 = 4.0 |
| static long round(double a) static long round(float a) 소수점 첫째자리에서 반올림한 정수값(long)을 반환한다. 매개변수의 값이 음수인 경우, round() 와 rint()의 결과가 다르다는 것에 주의하자. | long l = Math.round(1.2); long l2 = Math.round(2.6); long l3 = Math.round(3.5); long l4 = Math.round(4.5); double d = 90.7552; double d2 = Math.round(d*100)/100.0; | l = 1 l2 = 3 l3 = -4 l4 = -5 d = 90.7552 d2 = 90.76 |
1.5 래퍼(wrapper) 클래스
때로는 기본형(primitive type) 변수도 어쩔 수 없이 객체로 다뤄야 하는 경우가 있다.
- 매개변수로 객체를 요구할 때
- 기본형 값이 아닌 객체로 저장해야할 때
- 객체 간의 비교가 필요할 때
등등의 경우에는 기본형 값들로 객체로 변환하여 작업을 수행해야 하는데, 이 때 사용되는 것이 래퍼(wrapper)클래스 이다. 이 클래스들을 이용하면 기본형 값을 객체로 다룰 수 있다.
ex) int형의 래퍼 클래스인 Integer클래스의 실제코드
public final class Integer extends Number implements Comparable {
	...
    private int value;
    ...
}
<표9-7. 래퍼 클래스의 생성자>
| 기본형 | 래퍼클래스 | 생성자 | 활용 예 |
|---|---|---|---|
| boolean | Boolean | Boolean (boolean value) Boolean (String s) | Boolean b = new Boolean(true); Boolean b2 = new Boolean("true"); |
| char | Character | Character (char value) | Character c = new Character('a'); |
| byte | Byte | Byte (byte value) Byte (String s) | Byte b = new Byte(10); Byte b2 = new Byte("10"); |
| short | Short | Short (short value) Short (String s) | Short s = new Short(10); Short s2 = new Short("10"); |
| int | Integer | Integer (int value) Integer (String s) | Integer i = new Integer(100); Integer i2 = new Integer("100"); |
| long | Long | Long (long value) Long (String s) | Long l = new Long(100); Long l2 = new Long("100"); |
| float | Float | Float (double value) Float (float value) Float (String s) | Float f = new Float(1.0); Float f2 = new Float(1.0f); Float f3 = new FLoat("1.0f"); |
| double | Double | Double (double value) Double (String s) | Double d = new Double(1.0); Double d2 = new Double("1.0"); |
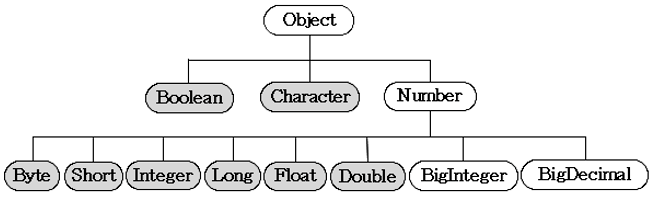
- 래퍼 클래스들은
equals(), toString()이 오버라이딩되어 있다. - 이 외에도 MAX_VALUE, MIN_VALUE, SIZE, BYTES, TYPE 등의 static 상수를 공통적으로 가지고 있다.
Nubmer 클래스
이 클래스는 추상클래스로 내부적으로 숫자를 멤버변수로 갖는 래퍼 클래스들의 조상이다.
오토박싱 & 언박싱(autoboxing & unboxing)
JDK1.5 이전에는 기본형과 참조형 간의 연산이 불가능했기 때문에, 래퍼 클래스로 기본형을 객체로 만들어서 연산해야 했다.
그러나 이제는 컴파일러가 자동으로 변환하는 코드를 넣어주기 때문에 기본형과 참조형 간의 덧셈이 가능하다.
| 컴파일 전의 코드 | 컴파일 후의 코드 |
|---|---|
| int i = 5; Integer iObj = new Integer(7); int sum = i + iObj; | int i = 5; Integer iObj = new Integer(7); int sum = i + iObj.intValue(); |
- 이 외에도 내부적으로 객체 배열을 가지고 있는 Vector 클래스나 ArrayList 클래스에 기본형 값을 저장해야 할 때나 형변환이 필요할 때도 컴파일러가 자동적으로 코드를 추가해 준다.
기본형 값을 래퍼 클래스의 자동 변환해주는 것을 오토박싱(autoboxing) 이라고 하고, 반대로 변환하는 것을 언박싱(unboxing) 이라고 한다.
👉 2. 유용한 클래스
java.util 패키지에는 많은 수의 클래스가 있지만, 실제로 자주 쓰이는 것들을 그렇게 많지 않아서 자주 사용되는 중요한 클래스들만을 골라서 다양한 용도로 활용하는 방법을 보여주고자 한다.
2.1 java.util.Objects 클래스
- Object -> Objects
Object 클래스의 보조 클래스로 Math 클래스처럼 모든 메서드가 static 이다.
- 객체의 비교나 널 체크(null check)에 유용하다.
import java.util.*;
import static java.util.Objects.*;

public class ObjectsTest {
    public static void main(String[] args) {
        String[][] str2D = new String[][]{{"aaa", "bbb"}, {"AAA", "BBB"}};
        String[][] str2D_2 = new String[][]{{"aaa", "bbb"}, {"AAA", "BBB"}};

        System.out.print("str2D ={");
        for (String[] tmp : str2D)
            System.out.print(Arrays.toString(tmp));
        System.out.println("}");

        System.out.print("str2D_2={");
        for (String[] tmp : str2D_2)
            System.out.print(Arrays.toString(tmp));
        System.out.println("}");

        System.out.println("equals(str2D, str2D_2)=" + Objects.equals(str2D, str2D_2));
        System.out.println("deepEquals(str2D, str2D_2)=" + Objects.deepEquals(str2D, str2D_2));

        System.out.println("isNull(null) =" + isNull(null));
        System.out.println("nonNull(null)=" + nonNull(null));
        System.out.println("hashCode(null=" + Objects.hashCode(null));
        System.out.println("toString(null)=" + Objects.toString(null));
        System.out.println("toString(null, \"\")=" + Objects.toString(null, ""));

        Comparator c = String.CASE_INSENSITIVE_ORDER; // 대소문자 구분 안하는 비교

        System.out.println("compare(\"aa\",\"bb\")=" + compare("aa", "bb", c));
        System.out.println("compare(\"bb\",\"aa\")=" + compare("bb", "aa", c));
        System.out.println("compare(\"ab\",\"AB\")=" + compare("ab", "AB", c));
    }
}
static import문을 사용했음에도 불구하고 Object 클래스의 메서드와 이름이 같은 것들은 충돌이 난다. 즉, 컴파일러가 구별을 못한다. 그럴 때는 클래스의 이름을 붙여줄 수 밖에 없다.
2.2 java.util.Random 클래스
Math.random() 이 외에도 Random 클래스를 사용하면 난수를 얻을 수 있다.
사실 Math.random()은 내부적으로 Random 클래스의 인스턴스를 생성해서 사용하는 것임
Random 클래스의 생성자와 메서드
public Random() {
	this(System.currentTimeMillis());	// Random(long seed)를 호출한다.
}
<표9-10 Random의 생성자와 메서드>
| 메서드 | 설명 |
|---|---|
| Random() | 현재시간(System.currentTimeMillis())을 종자값(seed)으로 이용하는 Random 인스턴스를 생성한다. |
| Random(long seed) | 매개변수 seed를 종자값으로 하는 Random 인스턴스를 생성한다. |
| boolean nextBoolean() | boolean 타입의 난수를 반환한다. |
| void nextBytes(byte[] bytes) | bytes 배열에 byte 타입의 난수를 채워서 반환한다. |
| double nextDouble | double 타입의 난수를 반환한다.(0.0 <= x < 1.0) |
| float nextFloat() | float 타입의 난수를 반환한다.(0.0 <= x < 1.0) |
| double nextGaussian() | 평균은 0.0이고 표준편차는 1.0인 가우시안(Gaussian)분포에 따른 double형의 난수를 반환한다. |
| int nextInt() | int 타입의 난수를 반환한다.(int의 범위) |
| int nextInt(int n) | 0 ~ n의 범위에 있는 int값을 반환한다.(n은 범위에 포함되지 않음) |
| void setSeed(long seed) | 종자값을 주어진 값(seed)으로 변경한다. |
ex1) 같은 종자값 사용
import java.util.Random;

public class RandomEx1 {
    public static void main(String[] args) {
        Random rand = new Random(1);
        Random rand2 = new Random(1);

        System.out.println("= rand =");
        for (int i = 0; i < 5; i++)
            System.out.println(i + ":" + rand.nextInt());

        System.out.println();
        System.out.println("= rand2 =");
        for (int i = 0; i < 5; i++)
            System.out.println(i + ":" + rand2.nextInt());
    }
}
ex3) Math.random()을 이용해서 실제 프로그래밍에 유용할만한 메서드 만들기
import java.util.*;

public class RandomEx3 {
    public static void main(String[] args) {
        for (int i = 0; i < 10; i++)
            System.out.println(getRand(5, 10) + ",");
        System.out.println();

        int[] result = fillRand(new int[10], new int[]{2, 3, 7, 5});

        System.out.println(Arrays.toString(result));
    }

    public static int[] fillRand(int[] arr, int from, int to) {
        for (int i = 0; i < arr.length; i++)
            arr[i] = getRand(from, to);

        return arr;
    }

    public static int[] fillRand(int[] arr, int[] data) {
        for (int i = 0; i < arr.length; i++)
            arr[i] = data[getRand(0, data.length - 1)];

        return arr;
    }

    public static int getRand(int from, int to) {
        return (int) (Math.random() * (Math.abs(to - from) + 1)) + Math.min(from, to);
    }
}
int[] fillRand(int[] arr, int from, int to)
: 배열 arr을 from과 to범위의 값들로 채워서 반환한다.
int[] fillRand(int[] arr, int[] data)
: 배열 arr을 배열 data에 있는 값들로 채워서 반환한다.
int getRand(int from, int to)
: from과 to범위의 정수(int)값을 반환한다. from과 to 모두 범위에 포함된다.2.3 정규식(Regular Expression) - java.util.regex 패키지
정규식이란 텍스트 데이터 중에서 원하는 조건(패턴, pattern)과 일치하는 문자열 을 찾아내기 위해 사용하는 것으로 미리 정의된 기호와 문자를 이용해서 작성한 문자열을 말한다.
-> html 문서에서 전화번호나 이메일 주소만을 따로 추출한다던가, 입력한 비밀번호가 숫자와 영문자의 조합으로 되어 있는지 확인할 수도 있다.
import java.util.regex.*;

class RegularEx1 {
	public static void main(String[] args) {
    	String[] data = {"bat", "baby", "bonus", "cA", "ca", "co", "c.",
        					"c0", "car", "combat", "count", "date", "disc"};
		Patter p = Patter.compile("c[a-z]*");	// c로 시작하는 소문자 영단어

        for(int i=0; i < data.length; i++) {
        	Matcher m = p.matcher(data[i]);
            if(m.matches())
            	System.out.print(data[i] + ",");
            }
        }
    }
}
/* 실행결과
ca, co, car, combat, count
*/
✔ 우선, 정규식을 정의하고 데이터를 비교하는 과정을 단계별로 설명하면 다음과 같다.
1. 정규식을 매개변수로 Pattern 클래스의 static 메서드인 Pattern compile(String regex)을
   호출하여 Pattern 인스턴스를 얻는다.
		Pattern p = Pattern.compile("c[a-z]*");

2. 정규식으로 비교할 대상을 매개변수로 Pattern클래스의 Matcher matcher(CharSequence input)
   를 호출해서 Matcher인스턴스를 얻는다.
		Matcher m =p.matcher(data[i]);

3. Matcher 인스턴스에 boolean matches()를 호출해서 정규식에 부합하는지 확인한다.
		if(m.matche())
정규식 패턴은 우선 생략 하도록 하겠다.
2.4 java.util.Scanner 클래스
Scanner는 화면, 파일, 문자열과 같은 입력소스로부터 문자데이터를 읽어오는데 도움을 줄 목적으로 JDK1.5 부터 추가됨.
-
Scanner에는 다음과 같은 생성자를 지원하기 때문에 다양한 입력소스로부터 데이터를 읽을 수 있다.
Scanner(String source)Scanner(File source)
Scanner(InputStream source)
Scanner(Readable source)
Scanner(ReadableByteChannel source)
Scanner(Path source) // JDK 1.7 부터 추가
2.5 java.util.StringTokenizer 클래스
StringTokenizer는 긴 문자열을 지정된 구분자(delimiter)를 기준으로 토큰(token)이라는 여러 개의 문자열로 잘라내는 데 사용된다.
StringTokenizer의 생성자와 메서드
| 생성자/메서드 | 설명 |
|---|---|
| StringTokenizer (String str, String delim) | 문자열(str)을 지정된 구분자(delim)로 나누는 StringTokenizer를 생성한다. (구분자는 토큰으로 간주되지 않음) |
| StringTokenizer(String str, String delim, boolean returnDelims) | 문자열(str)을 지정된 구분자(delim)로 나누는 StringTokenizer를 생성한다. returnDelims의 값을 true로 하면 구분자도 토큰으로 간주된다. |
| int countTokens() | 전체 토큰의 수를 반환한다. |
| boolean hasMoreTokens() | 토큰이 남아있는지 알려준다. |
| String nextToken() | 다음 토큰을 반환한다. |
import java.util.StringTokenizer;

public class StringTokenizerEx1 {
    public static void main(String[] args) {
        String source = "100,200,300,400";
        StringTokenizer st = new StringTokenizer(source, ",");

        while (st.hasMoreTokens()) {
            System.out.println(st.nextToken());
        }
    }
}
2.6 java.math.BigInteger 클래스
2.7 java.math.BigDecimal 클래스
