react-query
FrontEnd 애플리케이션을 독립적으로 개발을 하다보면 필연적으로 독립된 API 애플리케이션을 개발하고 HTTP 요청을 통해 받아온 데이터로 애플리케이션을 구동하게 된다. 일반적으로 HTTP 요청에는 javascrip의 내장 라이브러리인 Fetch API 또는 axios 라이브러리를 사용하게 된다.
이 글에서는 react-query 라이브러리를 활용하여 HTTP 요청을 관리하는 방식에 대해서 알아볼 것이다.
react-query는 복잡하고 장황한 코드 없이 React Component 내부에서 간단하고 직관적으로 API를 사용할 수 있게 도와주는 라이브러리이다. react-query를 사용하면 Data Fetching을 더 간단하게 할 수 있도록 도와주고, 옵션들을 활용해 캐싱, 에러처리, suspense, refresh, data fetching 조건 설정 등 기존에 불편했던 것들을 선언적이고 간편하게 이용할 수 있다.
세팅방법은 일반적으로 많이 사용되는 axios를 이용한 세팅 방법을 작성할 것이다. 하지만 이 포스팅은 axios를 활용하여 react-query를 세팅하는 방법에 초점을 맞추고 axios 세팅방법에 대해서는 다루지 않는다. (axios 세팅방법 참고)
세팅 방법
1. react-query 설치
# yarn 사용할 경우
$ yarn add @tanstack/react-query @tanstack/react-query-devtools

# npm 사용할 경우
$ npm install @tanstack/react-query @tanstack/react-query-devtools
2. App에 적용
import React from "react";
import { QueryClient, QueryClientProvider } from "@tanstack/react-query";
import App from "./App";

const root = ReactDOM.createRoot(document.getElementById("root"));
const queryClient = new QueryClient(); //캐시와 훅을 쓸수있게 정의

// 아래와 같이 QueryClient에 defaultOptions를 설정해서 사용할 수도 있다.
// const queryClient = new QueryClient({
//   defaultOptions: {
//     queries: {
//       suspense: true,
//     },
//   },
// })

root.render(
  <QueryClientProvider client={queryClient}>
  	<App />
  </QueryClientProvider>
);
3. API 메소드 작성
API 메소드는 편한 방식대로 작성하면된다.
아래의 예제는 클래스 형태로 작성된 예시이다.
// api.ts
import axios from 'axios';

export const api = axios.create({
    baseURL: import.meta.env.BASE_API_URL,
    headers: {
        'Content-Type': 'application/json; charset=UTF-8;',
        accept: 'application/json'
    }
})

// TestAPI.ts
import { TestInterface } from "../../types/entity/test/TestInterface";
import { api } from "../api";

export class TestAPI {
   /**
     * 목록 조회 API
     * @returns {Promise<TestInterface[]>} 조회된 목록 Promise 객체
     */
    static async getTests(): Promise<TestInterface[]> {
        const tests = await api.get('/tests');
        return tests.data.success ? tests.data.data : [];
    }

    /**
     * 생성 API
     * @param {TestInterface} 생성할 객체
     * @returns {Promise<TestInterface>} 생성할 객체의 생성 결과 Promise 객체
     */
    static async createTest({ title, data }: TestInterface): Promise<TestInterface> {
        const createdTest = await api.post('/tests', {
            title,
      		data
        });

        return createdTest.data.success ? createdTest.data.data : [];
    }

    /**
     * 단건 조회 API
     * @param id {string} 조회할 객체 식별번호
     * @returns {Promise<TestInterface>} 조회된 객체 Promise 객체
     */
    static async getTestById(id: string): Promise<TestInterface> {
        const test = await api.get(`/tests/${id}`);
        return test.data.success ? test.data.data : {};
    }

    /**
     * 수정 API
     * @param id {string} 식별번호
     * @returns {Promise<TestInterface>} 수정된 객체 Promise 객체
     */
    static async updateTest({ id, title, data }: TestInterface): Promise<TestInterface> {
        const updatedTest = await api.patch('/tests', {
            id,
            title,
        });

        return updatedTest.data.success ? updatedTest.data.data : {};
    }

    /**
     * 삭제 API
     * @param id {string} 식별번호
     * @returns {Promise<boolean>} 삭제 요청 결과
     */
    static async deleteTest(id: string): Promise<boolean> {
        const result = await api.delete(`/tests/${id}`);
        return result.data.success;
    }
}
사용법
react-query에는 기본적으로 두 개의 훅(hook)이 사용되는데 useQuery와 useMutation이다. GraphQL에서의 Query/Mutation과 동일한 개념으로 useQuery 훅은 GET 요청에, useMutation 훅은 그 외의 요청(POST/PUT/PATCH/DELETE)에 사용한다.
useQuery
기본적인 useQuery 훅의 형태는 다음과 같다.
const {
data,
dataUpdatedAt,
error,
errorUpdatedAt,
failureCount,
isError,
isFetched,
isFetchedAfterMount,
isFetching,
isIdle,
isLoading,
isLoadingError,
isPlaceholderData,
isPreviousData,
isRefetchError,
isRefetching,
isStale,
isSuccess,
refetch,
remove,
status,
} = useQuery(queryKey, queryFn?, {
cacheTime,
enabled,
initialData,
initialDataUpdatedAt
isDataEqual,
keepPreviousData,
meta,
notifyOnChangeProps,
notifyOnChangePropsExclusions,
onError,
onSettled,
onSuccess,
placeholderData,
queryKeyHashFn,
refetchInterval,
refetchIntervalInBackground,
refetchOnMount,
refetchOnReconnect,
refetchOnWindowFocus,
retry,
retryOnMount,
retryDelay,
select,
staleTime,
structuralSharing,
suspense,
useErrorBoundary,
})
// or using the object syntax
const result = useQuery({
queryKey,
queryFn,
enabled,
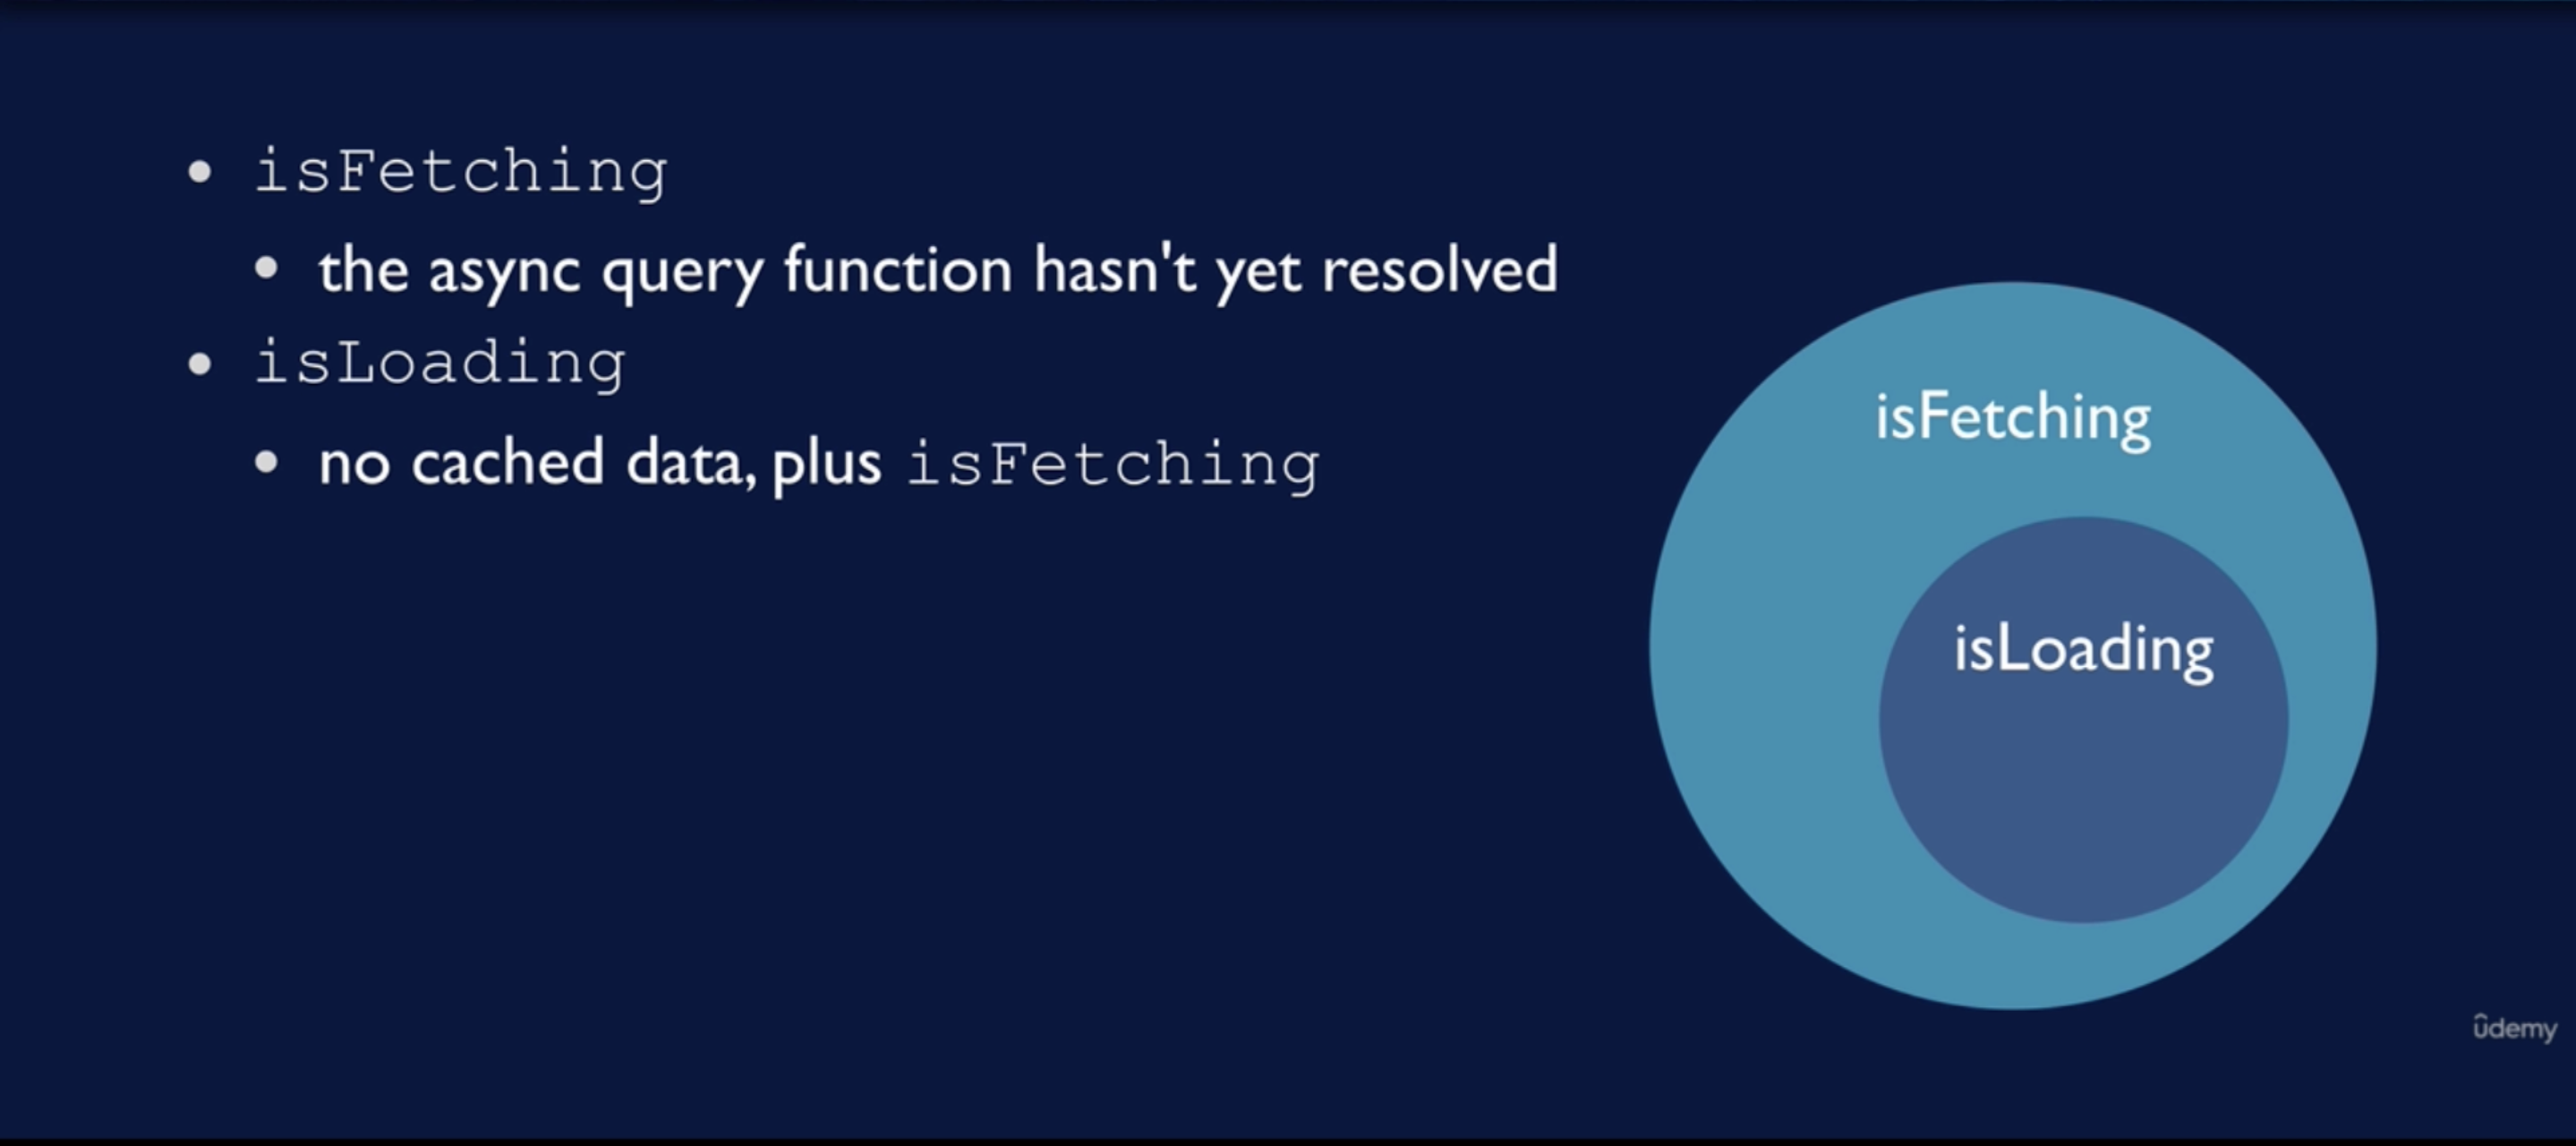
})일반적으로 data, isLoading, isFetching 을 가장 많이 사용하는데 isLoading과 isFetching의 차이는 다음과 같다.
isLoading: 서버에 요청을 보내는 중을 나타내며 boolean을 나타한다.
isFetching: 데이터 요청 중을 나타내며 boolean을 반환한다.
react-query의 경우 caching 기능이 있어서,queryKey를 사용해 반환된 데이터를 캐싱하는데, 만약 캐싱된 데이터가 있을 경우 해당 데이터를 반환하기까지의 시간동안isLoading은false가 되고isFetching은true가 된다.이를 그림으로 나타내면 다음과 같다.
즉 위의 세팅방법에서 작성한 API를 바탕으로 코드를 작성해보면 다음과 같다.
import { useQuery, useQueryClient } from "react-query";
import { useState } from "react";
import { TestAPI } from "../../api/test/TestAPI";

const QUERY_KEYS = {
	getData: "GET_DATA"
}

function DataDisplay() {
  const queryClient = useQueryClient();
  const [isEnabled, setIsEnabled] = useState<boolean>(false);
  const { data, isFetching, isError } = useQuery(
    {
      	queryKey: [QUERY_KEYS.getData],
      	queryFn: () => TestAPI.getTests(),
    	onSuccess: (result) => console.log(result),
      	onError: (error) => console.log(error),
      	enabled: isEnabled
    }
  );

  // useQuery fetching 활성화/비활성화
  const handleFetch = () => {
    setIsEnabled(!isEnabled);
  }

  // 캐싱된 쿼리 데이터 삭제
  const handleInvalidate = () => {
    queryClient.invalidateQueries([QUERY_KEYS.getData]);
  }

  return (
    <>
    	{
          isFetching ? (
          	<Fetching />
          ) : (
    		<>
    		  {
              	isError ? (
                	<Error />
                ) : (
  					<>
    					<Data data={data} />
                    	<button onClick={handleFetch}>
                          fetch
                    	</button>
						<button onClick={handleInvalidate}>
                          invalidate
                    	</button>
    				</>
  				)
              }
    	  	</>
    	  )
        }
    </>
  )
}

export default DataDisplay;
위 코드를 보면 useQuery의 option으로 enabled를 준 것을 볼 수 있는데, GraphQL에서는 useLazyQuery라는 훅이 따로 있지만 react-query에서는 enabled 옵션을 통해 fetch될 타이밍을 정할 수 있다. isEnabled에 default로 false를 준 후 상태값을 조정하여 fetch할 수 있다.
만약 해당 옵션을 사용하지 않으면 해당 컴포넌트가 렌더링될 때 즉시 데이터가 fetch된다.
또한 data에 변화가 있어 캐시된 데이터를 지워야 할 경우 useQueryClient 훅을 사용해 선언한 변수를 이용해 invalidateQueries 메소드를 통해 지울 수 있다.
추가적으로,
useQuery훅의 옵션을 보면staleTime과cacheTime이 있다staleTime: fresh의 유효기간
cacheTime: 캐시의 유효기간이를 이해하기 위해서는
cache의 생명주기를 알아야하는데, 처음 데이터를 서버로부터 받아오면 이 데이터는fresh한 상태로 캐싱이 된다. 그리고 정해진 시간이 지나면stale상태로 바뀌게 된다.이 때, 만약 데이터 fetch 요청을 보낼 때, 캐시된 데이터가 있다면 우선 해당 데이터가
fresh한 상태인지를 확인한다. 만약 데이터가fresh하다면 서버에 요청을 보내지 않고 해당 데이터를 그대로 반환한다.하지만 만약 데이터가
stale상태라면react-query는 우선 캐시된 데이터를 반환하고, 서버에 요청을 보내 다시 데이터를 받아온다. 그리고 서버로부터 받은 데이터를 캐시에 update하고 해당 데이터를 다시 반환해준다.즉,
staleTime은fresh상태를 얼마나 유지하고stale상태로 전환할지에 대한 옵션이고,cacheTime은 전체 캐시를 얼마나 유지할지를 나타내는 옵션이다.
useMutation
useMutation 훅 또한 기본적인 사용법은 useQuery와 비슷하다.
const {
  data,
  error,
  isError,
  isIdle,
  isLoading,
  isPaused,
  isSuccess,
  failureCount,
  failureReason,
  mutate,
  mutateAsync,
  reset,
  status,
} = useMutation({
  mutationFn,
  cacheTime,
  mutationKey,
  networkMode,
  onError,
  onMutate,
  onSettled,
  onSuccess,
  retry,
  retryDelay,
  useErrorBoundary,
  meta,
})useMutation은 당연히 기본적으로 즉시 실행되지 않으며 반환되는 mutate 함수를 실행하여야 한다.
위의 코드에 적용시키면 아래와 같다.
import { useQuery, useQueryClient, useMutation } from "react-query";
import { useState } from "react";
import { TestAPI } from "../../api/test/TestAPI";

const QUERY_KEYS = {
	getData: "GET_DATA"
}

function DataDisplay() {
  const queryClient = useQueryClient();
  const [isEnabled, setIsEnabled] = useState<boolean>(false);
  const { data, isFetching, isError } = useQuery(
    {
      	queryKey: [QUERY_KEYS.getData],
      	queryFn: () => TestAPI.getTests(),
    	onSuccess: (result) => console.log(result),
      	onError: (error) => console.log(error),
      	enabled: isEnabled
    }
  );

  const { mutate } = useMutation({
	mutationFn: (data) => TestAPI.createTest(data),
    onSuccess: (result) => {
      	console.log(result);
    	handleInvalidate();
      	setIsEnabled(true);
    },
    onError: (error) => console.log(error)
  })

  // useQuery fetching 활성화/비활성화
  const handleFetch = () => {
    setIsEnabled(!isEnabled);
  }

  // 캐싱된 쿼리 데이터 삭제
  const handleInvalidate = () => {
    queryClient.invalidateQueries([QUERY_KEYS.getData]);
  }

  const handleMutate = () => {
	mutate({ title: "test_title", data: "test_data" });
  }

  return (
    <>
    	{
          isFetching ? (
          	<Fetching />
          ) : (
    		<>
    		  {
              	isError ? (
                	<Error />
                ) : (
  					<>
    					<Data data={data} />
                    	<button onClick={handleFetch}>
                          fetch
                    	</button>
						<button onClick={handleInvalidate}>
                          invalidate
                    	</button>
						<button onClick={handleMutate}>
                          mutate
                    	</button>
    				</>
  				)
              }
    	  	</>
    	  )
        }
    </>
  )
}

export default DataDisplay;