1️⃣ Spring Cloud Config

MSA에서 각 서비스마다 설정을 따로 관리하게 되면 DB 정보, API URL 등 중복되는 설정이 많아지고 환경별 관리(local, dev, test, prod)가 복잡해집니다. 또한 하나의 서비스에서 설정 변경 시 재배포가 필요합니다. 이를 해결하기 위해 Config Server를 사용합니다.
Spring Cloud Config는 분산 시스템 환경에서 중앙 집중식 구성 관리를 제공하는 프레임워크입니다. 애플리케이션의 설정을 중앙에서 관리하고, 변경 사항을 실시간으로 반영할 수 있습니다. Git, 파일 시스템, JDBC 등 다양한 저장소를 지원합니다. 주요 기능은 아래와 같습니다.
- 중앙 집중식 구성 관리: 모든 마이크로서비스의 설정을 중앙에서 관리합니다.
- 환경별 구성: 개발, 테스트, 운영 등 환경별로 구성을 분리하여 관리할 수 있습니다.
- 실시간 구성 변경: 설정 변경 시 애플리케이션을 재시작하지 않고도 실시간으로 반영할 수 있습니다.
만약 실시간 구성 변경이 되지 않는다면 어떤 문제가 발생할까요? 애플리케이션 재배포가 필요하기 때문에, 큰 서비스의 경우 중단 및 재기동 시 접속 중인 수많은 사용자에게 문제가 발생할 수 있습니다.
2️⃣ 설정 파일 저장소 구축
Config Repository를 생성합니다.
아래는 디렉토리 구조 예시입니다.
config-repo/
 ├── application.yml
 ├── application-dev.yml
 ├── application-prod.yml
 ├── order-service
       ├── order-service.yml
       ├── order-service-dev.yml
       ├── order-service-prod.yml
 ├── product-service
       ├── product-service.yml
├── product-service-dev.yml- application.yml → 공통 설정
- order-service.yml → 서비스별 설정
- -dev, -prod → 환경별 설정
설정 파일은 크게 다음의 위치에 존재할 수 있으며 다음의 순서대로 읽어집니다. 나중에 읽어지는 것이 우선순위가 높습니다.
- 프로젝트의 application.yml
- 설정 저장소의 application.yml
- 프로젝트의 application-{profile}.yml
- 설정 저장소의 {application name}/{application name}-{profile}
만약 읽어지는 순서대로 읽다가 동일한 값을 지니는 설정 정보가 있다면 덮어 씌워지므로 주의해야 합니다. 즉, 위 네 가지 모두 중복되는 내용이 있다면 설정 저장소의 최종적으로 읽혀 적용되는 환경변수 값은 설정 저장소의 {application name}/{application name}-{profile}의 값입니다.
3️⃣ 설정 서버 구축
Config 서버는 설정 파일을 저장하고 제공하는 역할을 합니다.
- build.gradle에 의존성을 추가합니다.
dependencies {
    implementation 'org.springframework.cloud:spring-cloud-config-server'
    implementation 'org.springframework.boot:spring-boot-starter-web'
}- 메인 클래스에 config 서버를 설정합니다.
@SpringBootApplication
@EnableConfigServer
public class ConfigServerApplication {
    public static void main(String[] args) {
        SpringApplication.run(ConfigServerApplication.class, args);
    }
}- application.yml에 설정 내용을 추가해줍니다.
server:
  port: 8888

spring:
  cloud:
    config:
      server:
        git:
          uri: https://github.com/my-config-repo/config-repo
          default-label: master
          search-paths:
            - configs/common
            - configs/{application}
clone-on-start: true- uri: 설정파일이 있는 깃 주소
- default-label: 깃 주소의 브랜치 이름
- search-paths: 설정 파일들을 찾을 경로
- clone-on-start: Config Server가 시작될 때 Git 저장소를 미리 clone 해두는 옵션
4️⃣ 클라이언트 서버 구축
Config 클라이언트는 Config 서버에서 설정을 받아오는 역할을 합니다.
- build.gradle 파일에 의존성을 추가합니다.
dependencies {
    implementation 'org.springframework.cloud:spring-cloud-starter-config'
}- 클라이언트의 application.yml 파일에서 Config 서버의 설정을 정의합니다.
spring:
  application:
    name: my-config-client
  cloud:
    config:
      discovery:
        enabled: true
        service-id: config-server

eureka:
  client:
    service-url:
      defaultZone: http://localhost:19090/eureka/
프로필을 사용하여 환경을 구분할 수도 있습니다.
spring:
  profiles:
    active: dev
5️⃣ 실시간 구성 변경
실시간 구성 변경을 반영하는 방법에는 여러 가지가 있습니다.
1. Spring Cloud Bus 사용 : 자동 전파 방식
2. /actuator/refresh 엔드포인트 호출 : 수동 방식
3. Webhook (Git 연동) : 변경 트리거 자동화
각 방법은 상황에 따라 적절히 선택하여 사용할 수 있습니다.
🔹 Spring Cloud Bus
Spring Cloud Bus는 메시지 브로커(Kafka, RabbitMQ 등)를 기반으로 설정 변경 이벤트를 모든 마이크로서비스에 전파하는 역할을 합니다. 다만 설정 변경을 자동으로 감지하는 기능은 없으며, /actuator/busrefresh 호출이나 Webhook 등의 트리거를 통해 변경 이벤트를 발생시켜야 각 서비스에 실시간으로 반영할 수 있습니다.
🔹수동 갱신
-
/actuator/refresh 엔드포인트 사용
Spring Cloud Bus를 사용하지 않는 경우, 클라이언트 애플리케이션에서 수동으로 설정을 갱신할 수 있습니다. 이를 위해 Spring Actuator의/actuator/refresh엔드포인트를 사용할 수 있습니다. -
설정 갱신 절차
- Config 서버에서 설정 파일을 변경합니다.
http[s]://{microservice host}/actuator/refresh를 POST 요청으로 호출하여 변경된 설정을 반영합니다.
이 방법은 간단하지만, 각 클라이언트 애플리케이션에서 수동으로 엔드포인트를 호출해야 합니다.
🔹 Webhook
Webhook은 Git 저장소에서 설정 파일이 변경되었을 때, 자동으로 특정 API를 호출하여 설정 갱신을 트리거하는 방식입니다.
실무에서는 Spring Cloud Bus, /actuator/refresh, Webhook을 단독으로 사용하기보다는 혼합하여 사용하는 경우가 많습니다. 동작 방식은 아래와 같습니다.
Git 변경 (commit & push)
        ↓
Webhook (자동 트리거)
        ↓
/actuator/busrefresh 호출
        ↓
Spring Cloud Bus
        ↓
Kafka / RabbitMQ
        ↓
모든 서비스에 이벤트 전파
        ↓
@RefreshScope Bean 재생성
        ↓
설정 반영 완료
🔹 역할 분리
| 구성 요소 | 역할 |
|---|---|
| Git | 설정 저장 |
| Webhook | 변경 감지 + 트리거 |
| /refresh | 개별 갱신 |
| /busrefresh | 전체 갱신 트리거 |
| Spring Cloud Bus | 이벤트 전파 |
| @RefreshScope | 실제 반영 |
6️⃣ @RefreshScope
위에서 설명한 /actuator/refresh, Spring Cloud Bus, Webhook 방식은 설정 변경을 트리거하고 전파하는 역할을 합니다.
하지만 여기서 한 가지 중요한 문제가 있습니다.
👉 설정이 변경되어도 실제 애플리케이션 내부의 값이 자동으로 바뀌지는 않습니다.
Spring의 Bean은 기본적으로 애플리케이션 시작 시 한 번 생성되면 이후에는 재생성되지 않습니다.
- 초기 실행
→ Config Server에서 설정 조회
→ Bean 생성 (값 주입 완료)
→ 이후 변경되어도 Bean은 그대로 유지
따라서 /actuator/refresh나 Spring Cloud Bus를 통해 설정 변경 이벤트가 발생하더라도, Bean이 다시 생성되지 않으면 값이 갱신되지 않습니다.
이를 해결하기 위해 @RefreshScope 어노테이션을 사용합니다. @RefreshScope는 설정 변경 시 해당 Bean을 재생성하여 최신 설정 값을 반영하도록 해줍니다.
동작 방식은 아래와 같습니다.
1. refresh 이벤트 발생 (/refresh 또는 /busrefresh)

2. Spring Context가 이벤트 감지

3. @RefreshScope가 붙은 Bean만 선택

4. 기존 Bean 제거

5. 다음 요청 시 새로운 Bean 생성

6. 최신 설정 값 적용
적용 예시는 아래와 같습니다.
@RefreshScope
@Component
public class MyService {
	@Value("${my.value}")
    private String value;

    public String getValue() {
    	return value;
    }
}
이렇게 사용하면 애플리케이션 재시작 없이 설정 변경이 가능합니다.
하지만 주의사항도 존재합니다.
-
성능 저하가 발생할 수 있으므로 모든 Bean에 적용하면 안됩니다.
-
트리거가 있어야 동작합니다. 따라서 /refresh, /busrefresh, Webhook 등이 필요합니다.
-
생성 비용 큰 Bean은 주의해야 합니다. 재생성 시 비용이 증가하기 때문입니다.
7️⃣ 실습
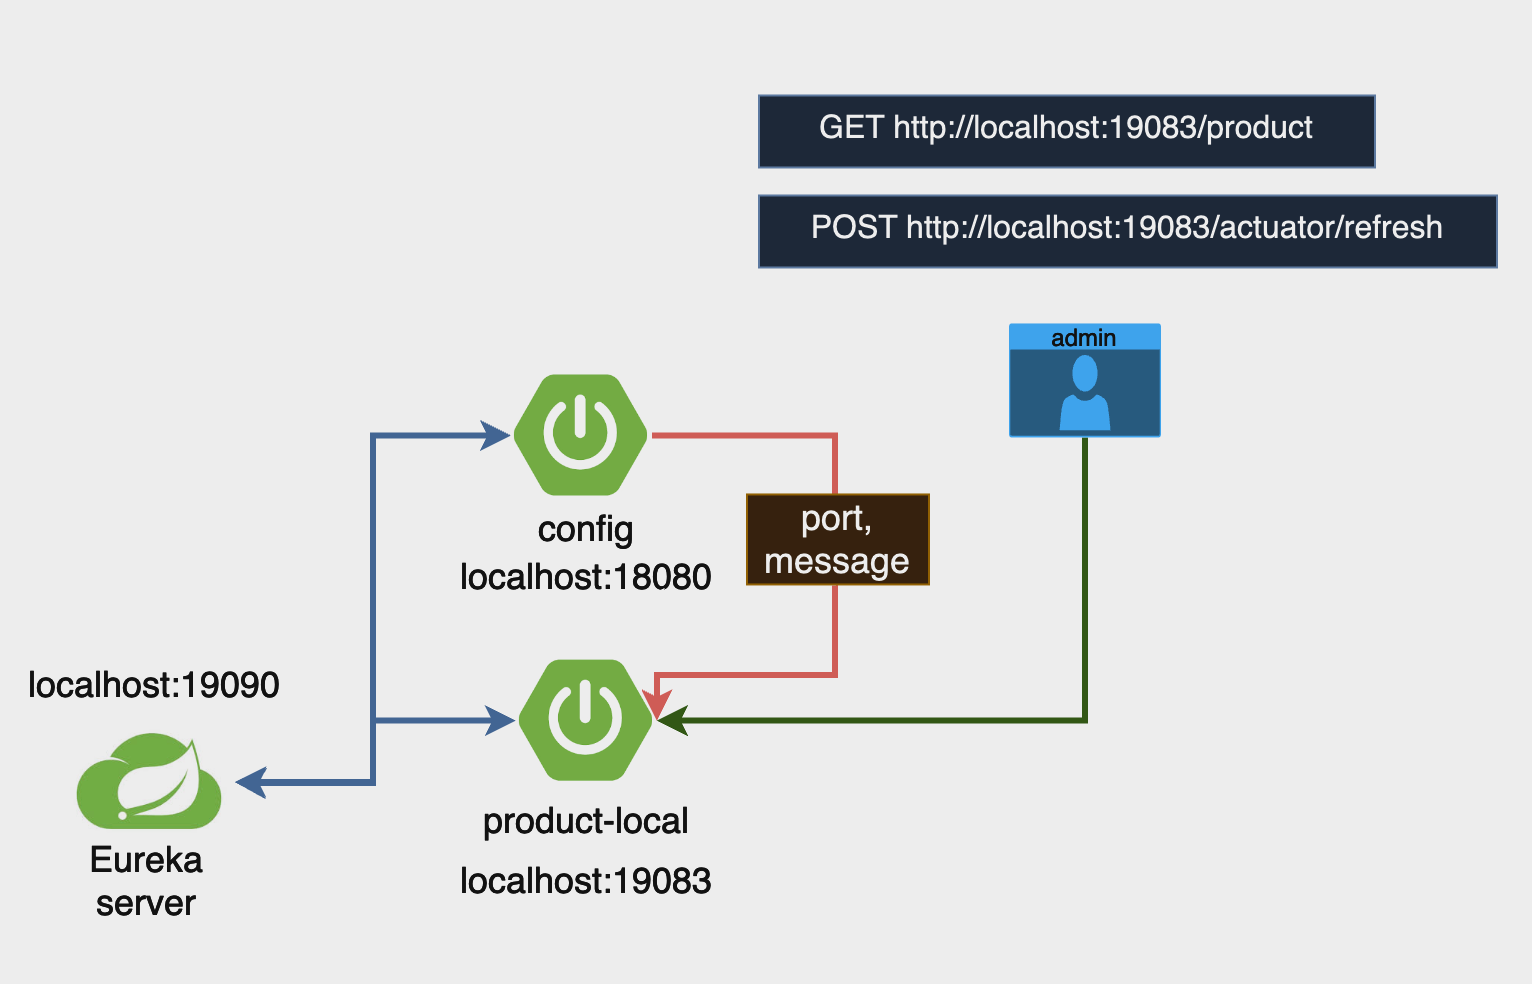
컨피그 서버를 생성하고 product 애플리케이션이 local 에서 동작할 때 포트 정보 및 메시지를 컨피그 서버에서 가져옵니다
컨피그 서버의 메시지를 변경하여 product 애플리케이션의 message가 갱신되는 모습을 확인합니다.
우선 API 게이트웨이에서 학습한 모든 프로젝트에서 이어서 작성하겠습니다.이번 실습에서는 리소스 서버에 있는 설정 파일을 사용해보겠습니다.
예전에 실습했던 유레카 서버, 상품 애플리케이션을 복사합니다. 새로 구성해도 좋습니다.
실습에서는 네이티브 모드를 사용하겠습니다.
로컬 환경 (네이티브 모드)에서는 설정 변경 후 반영하려면 애플리케이션을 재시작해야 합니다.
🔹 Config-server
-
start.spring.io 에서 프로젝트를 생성합니다.
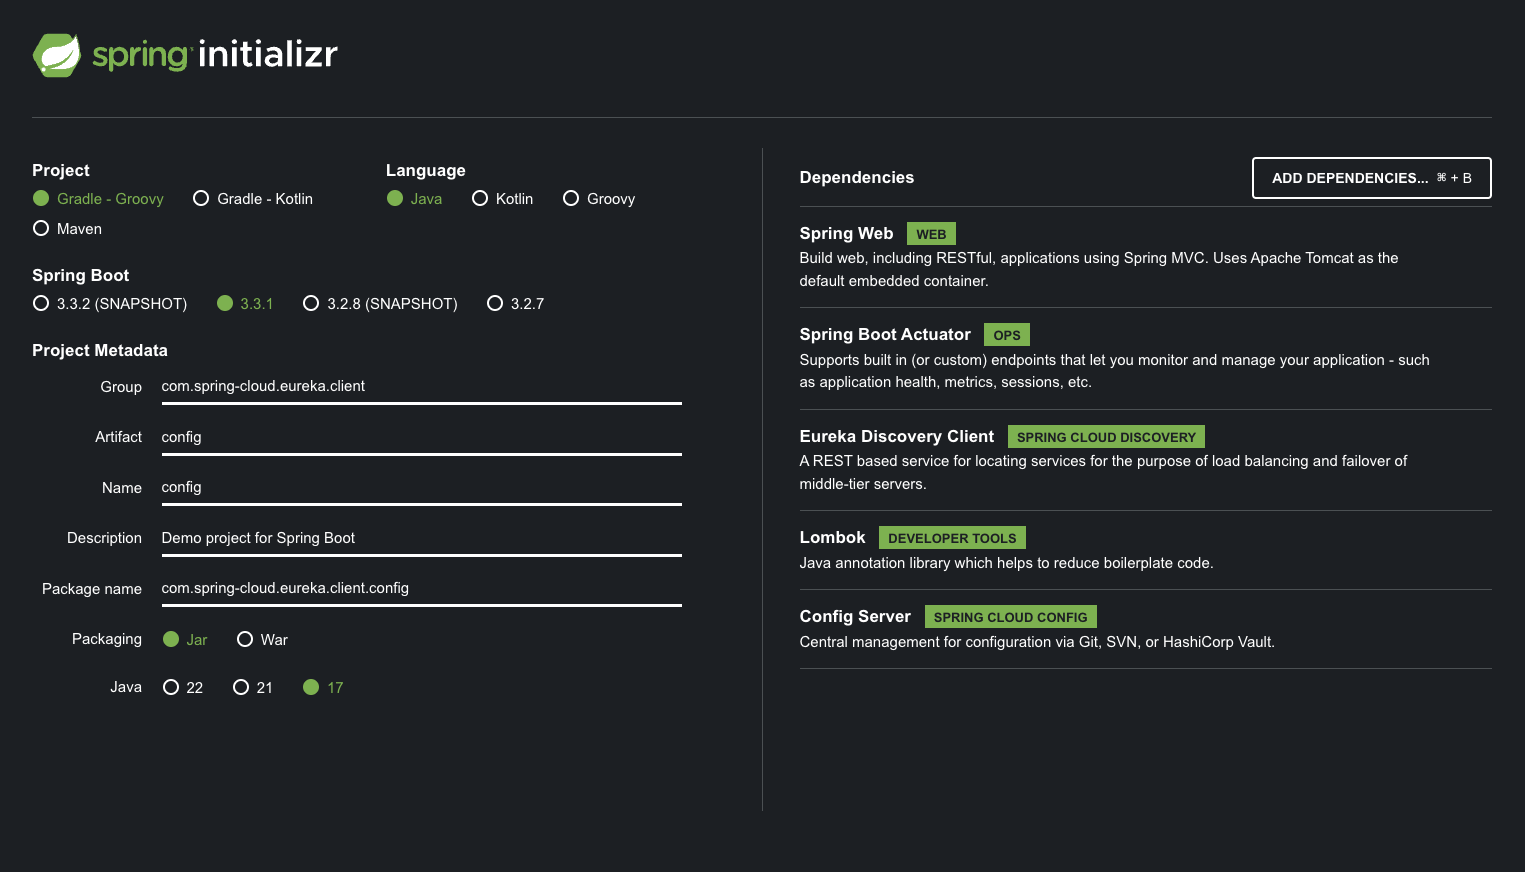
-
ConfigApplication.java
import org.springframework.boot.SpringApplication;
import org.springframework.boot.autoconfigure.SpringBootApplication;
import org.springframework.cloud.config.server.EnableConfigServer;

@SpringBootApplication
@EnableConfigServer
public class ConfigApplication {

	public static void main(String[] args) {
		SpringApplication.run(ConfigApplication.class, args);
	}

}- resources/appication.yml
server:
  port: 18080

spring:
  profiles:
    active: native
  application:
    name: config-server
  cloud:
    config:
      server:
        native:
          search-locations: classpath:/config-repo  # 리소스 폴더의 디렉토리 경로

eureka:
  client:
    service-url:
defaultZone: http://localhost:19090/eureka/- resources 안에 config-repo라는 폴더를 생성한 후 아래의 두 파일을 만듭니다.
- product-service.yml
server:
  port: 19093

message: "product-service message"- product-service-local.yml
server:
  port: 19083

message: "product-service-local message"
🔹 Product-service
- build-gradle의 디펜던시에 config 를 추가합니다.
dependencies {
	implementation 'org.springframework.boot:spring-boot-starter-actuator'
	implementation 'org.springframework.cloud:spring-cloud-starter-config'
	implementation 'org.springframework.boot:spring-boot-starter-web'
	implementation 'org.springframework.cloud:spring-cloud-starter-netflix-eureka-client'
	compileOnly 'org.projectlombok:lombok'
	annotationProcessor 'org.projectlombok:lombok'
	testImplementation 'org.springframework.boot:spring-boot-starter-test'
	testRuntimeOnly 'org.junit.platform:junit-platform-launcher'
}- application.yml
server:
  port: 0  # 임시 포트, 이후 Config 서버 설정으로 덮어씌움

spring:
  profiles:
    active: local
  application:
    name: product-service
  config:
    import: "configserver:"
  cloud:
    config:
      discovery:
        enabled: true
        service-id: config-server

management:
  endpoints:
    web:
      exposure:
        include: refresh

eureka:
  client:
    service-url:
      defaultZone: http://localhost:19090/eureka/

message: "default message"- ProductController.java
import org.springframework.beans.factory.annotation.Value;
import org.springframework.cloud.context.config.annotation.RefreshScope;
import org.springframework.web.bind.annotation.GetMapping;
import org.springframework.web.bind.annotation.RequestMapping;
import org.springframework.web.bind.annotation.RestController;

@RefreshScope
@RestController
@RequestMapping("/product")
public class ProductController {

    @Value("${server.port}") // 애플리케이션이 실행 중인 포트를 주입받습니다.
    private String serverPort;

    @Value("${message}")
    private String message;

    @GetMapping
    public String getProduct() {
        return "Product detail from PORT : " + serverPort + " and message : " + this.message ;
    }
}
🔹 RUN
유레카 서버 > 컨피그 서버 > 상품 순으로 실행합니다.
-
상품이 실행될때 로그의 포트를 확인합니다. 19083 으로 할당됨을 볼 수 있습니다.

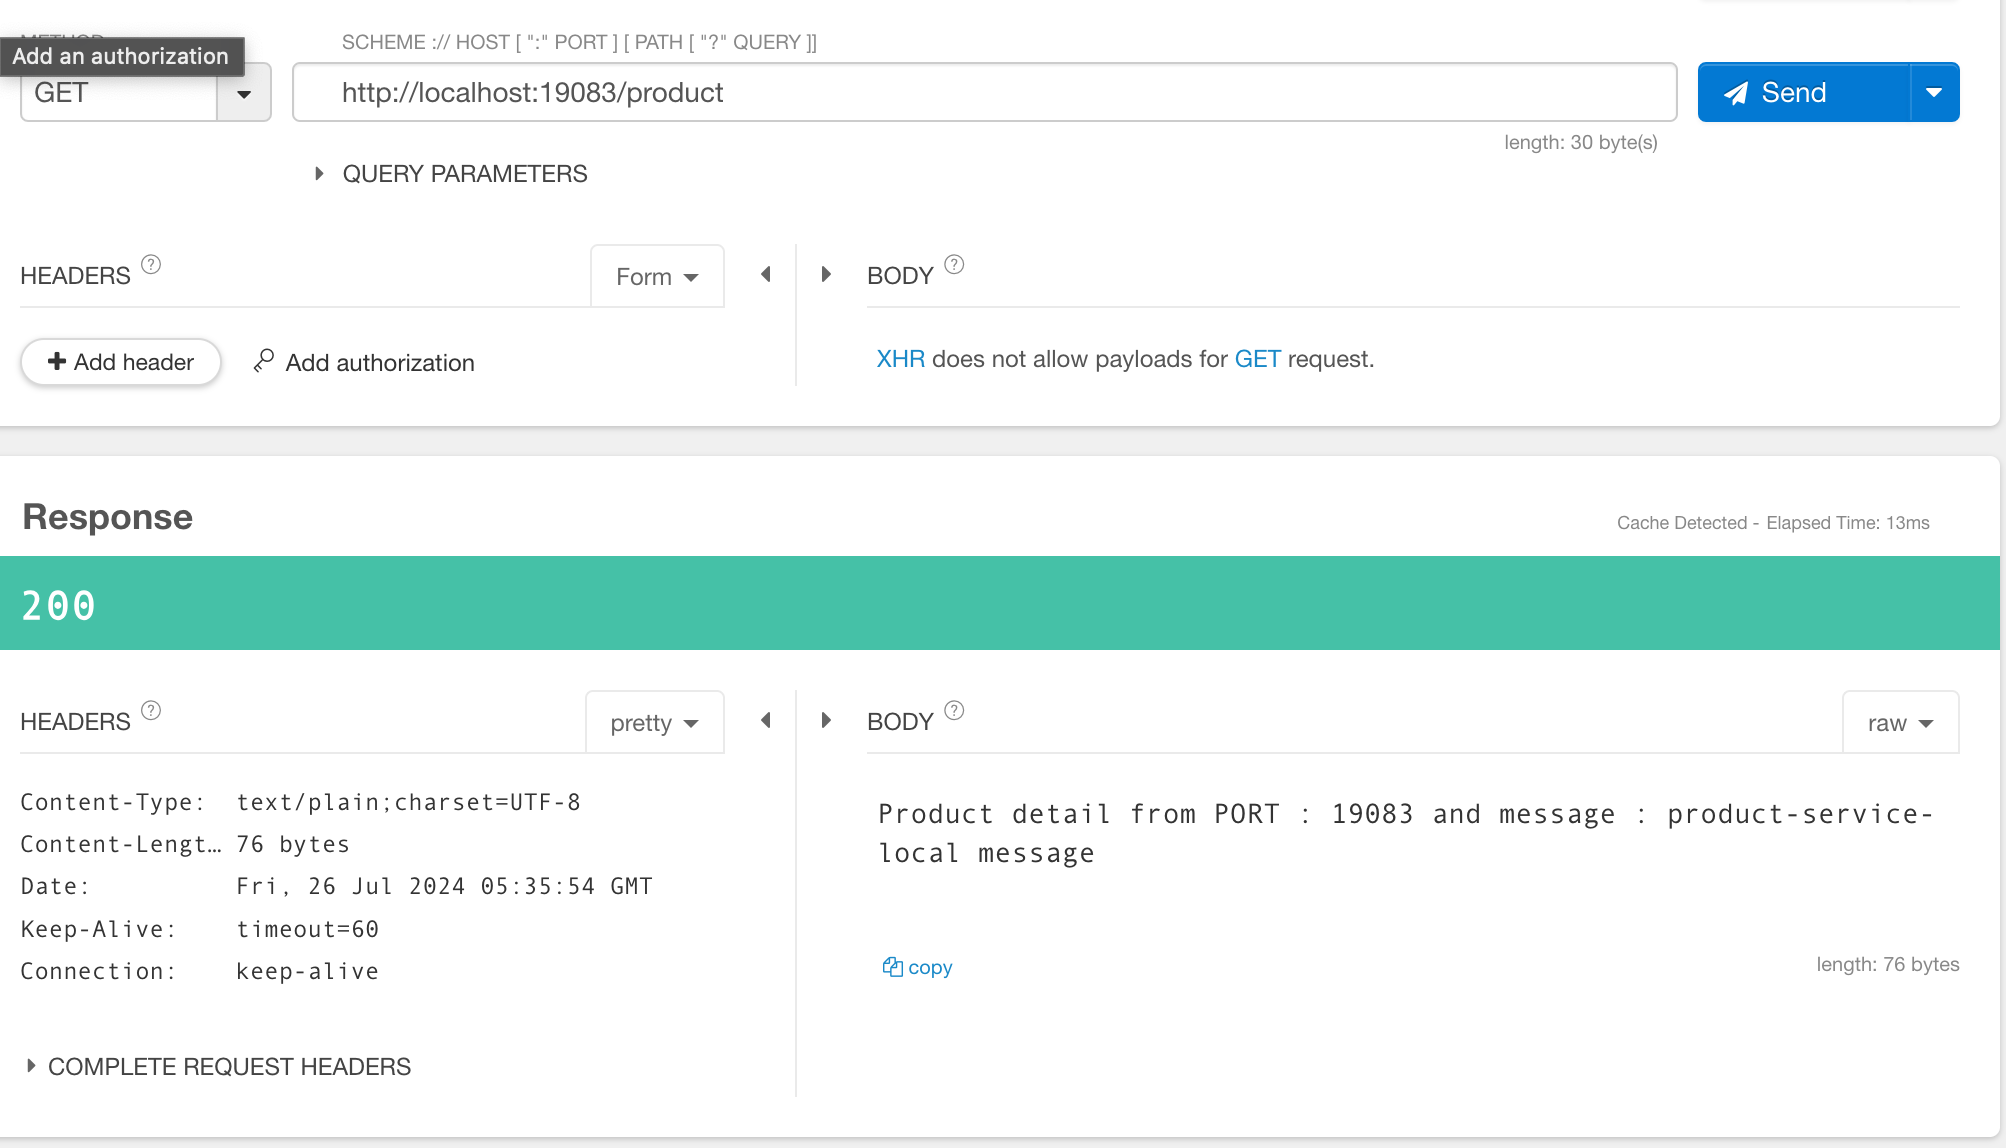
-
http://localhost:19083/product 을 호출하면 포트와 메시지를 확인 할 수 있습니다.
- config-server 의 product-service-local.yml 파일의 message를 수정하고 config-server 를 재시작 합니다.
server:
  port: 19083

message: "product-service-local message updated"-
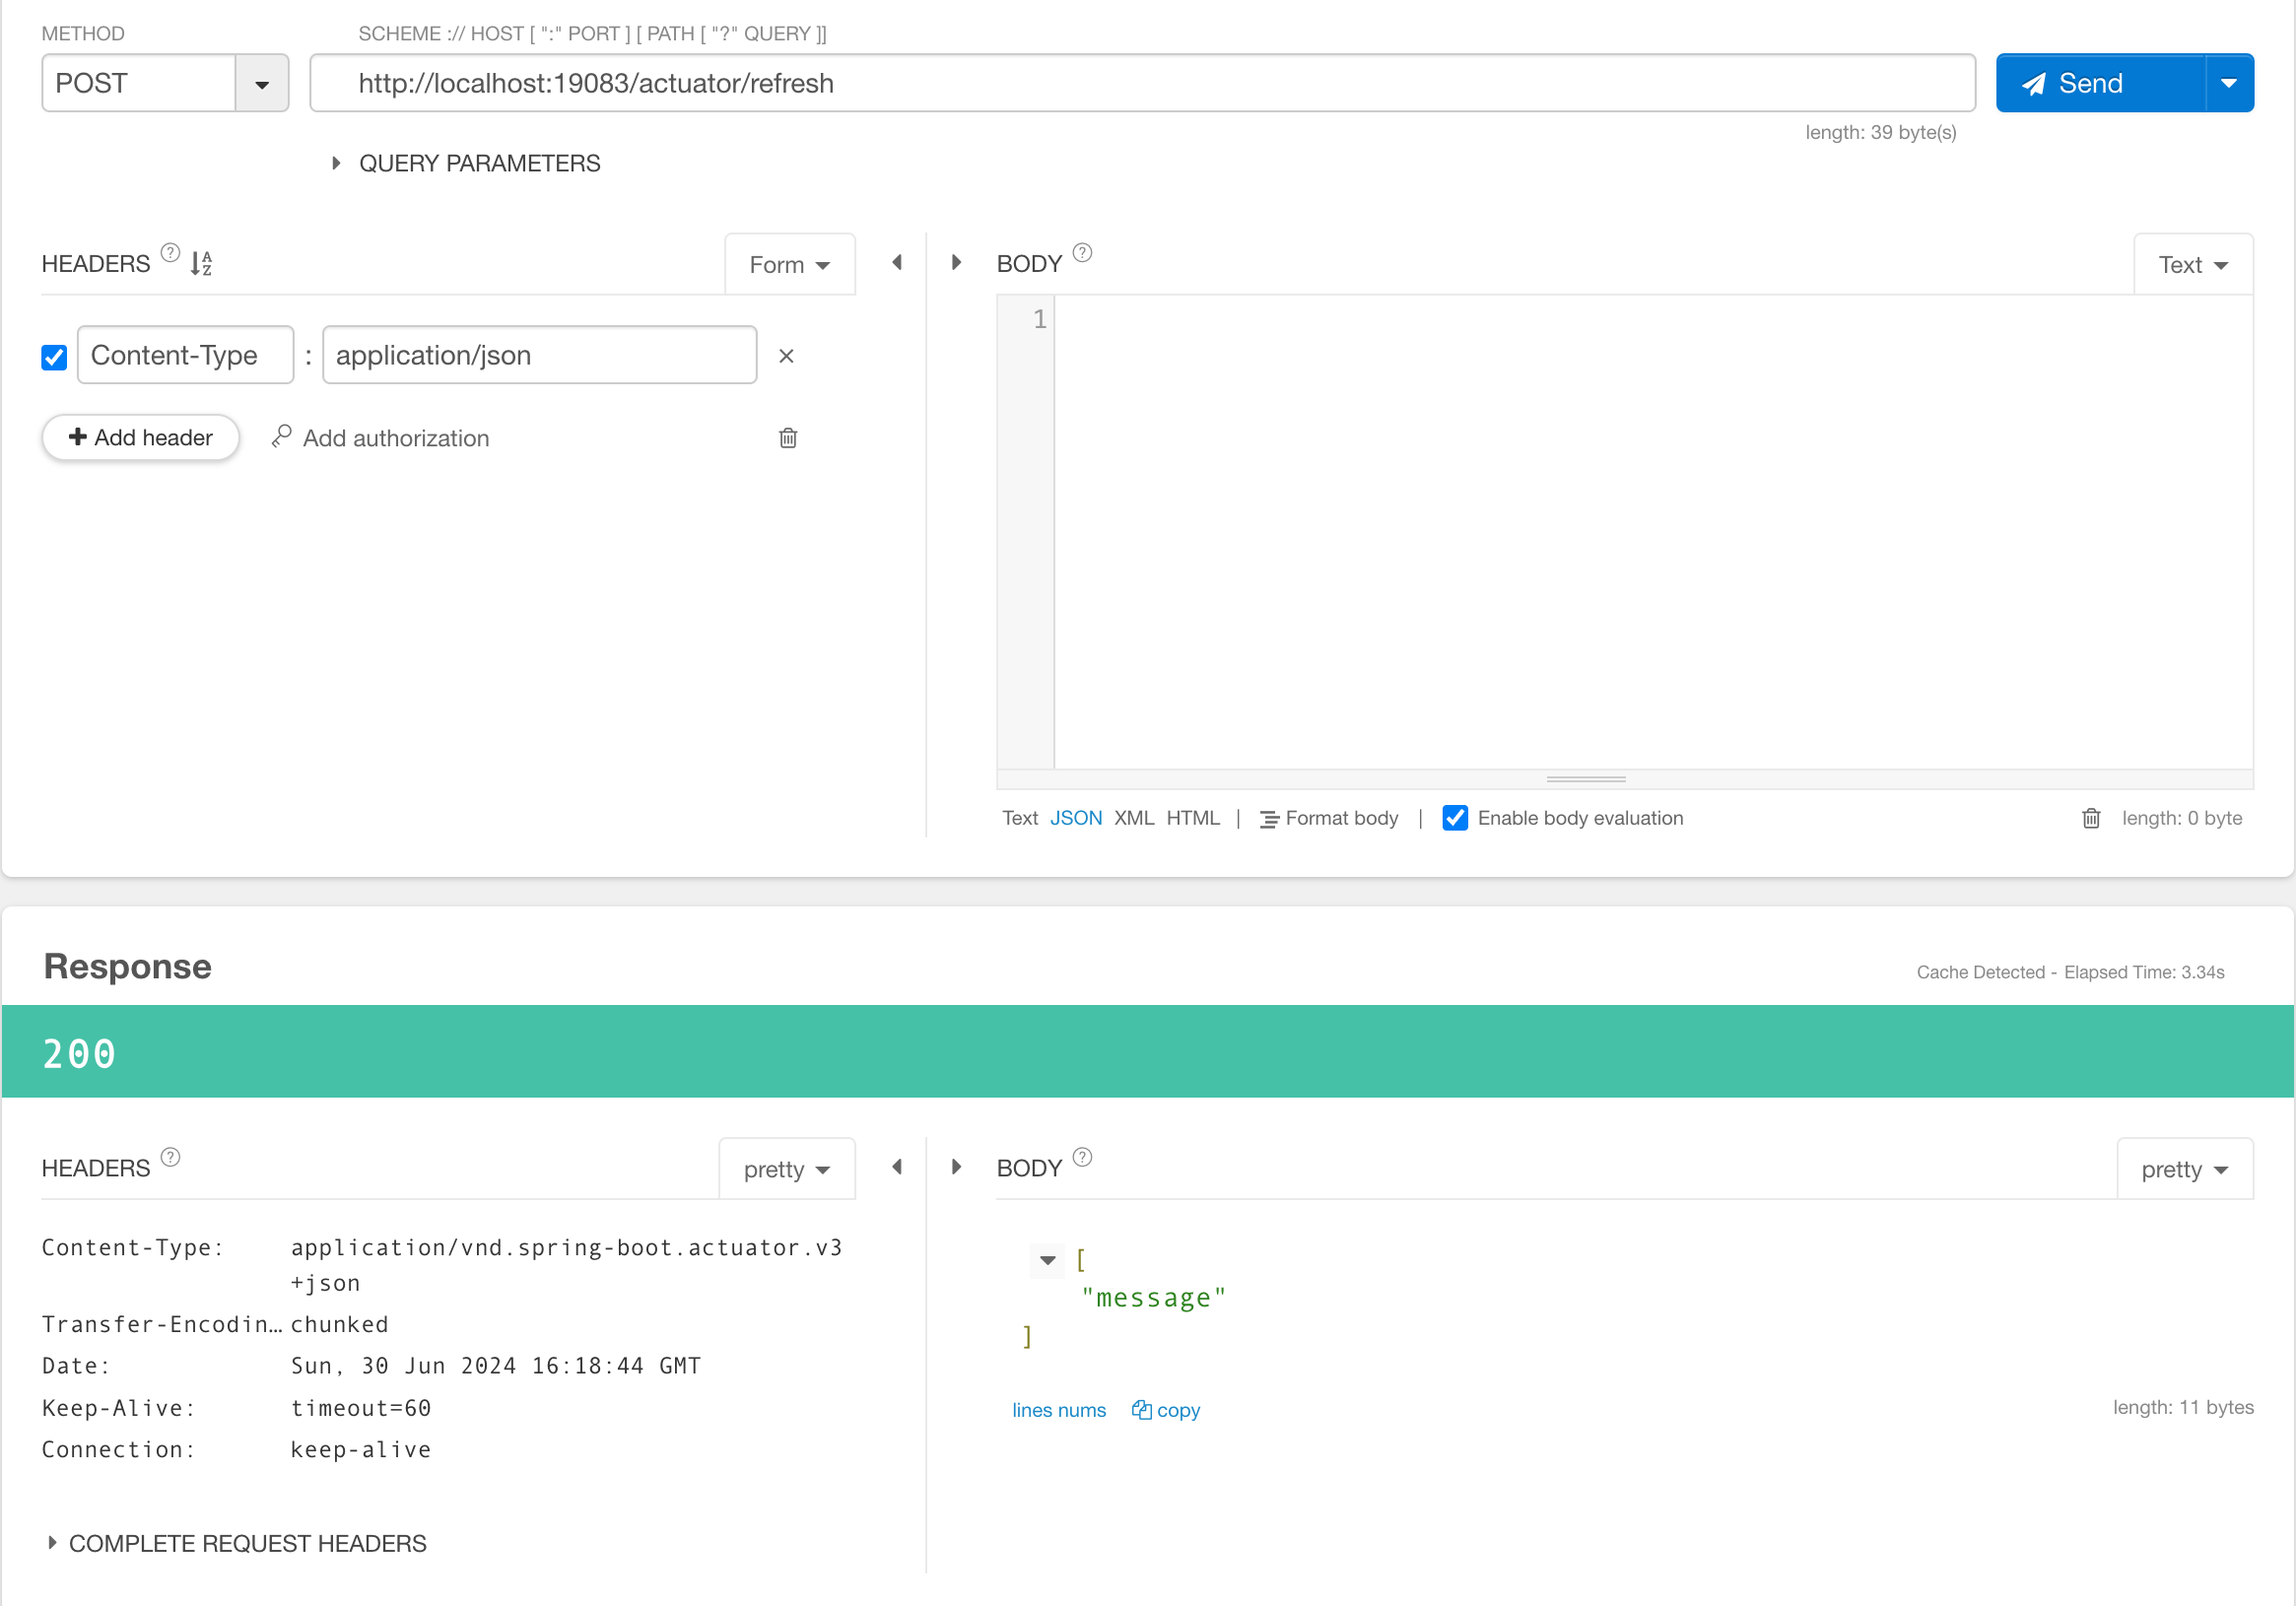
http://localhost:19083/actuator/refresh 로 post 요청을 합니다. 응답으로 메시지가 업데이트 됨을 확인 할 수 있습니다.
-
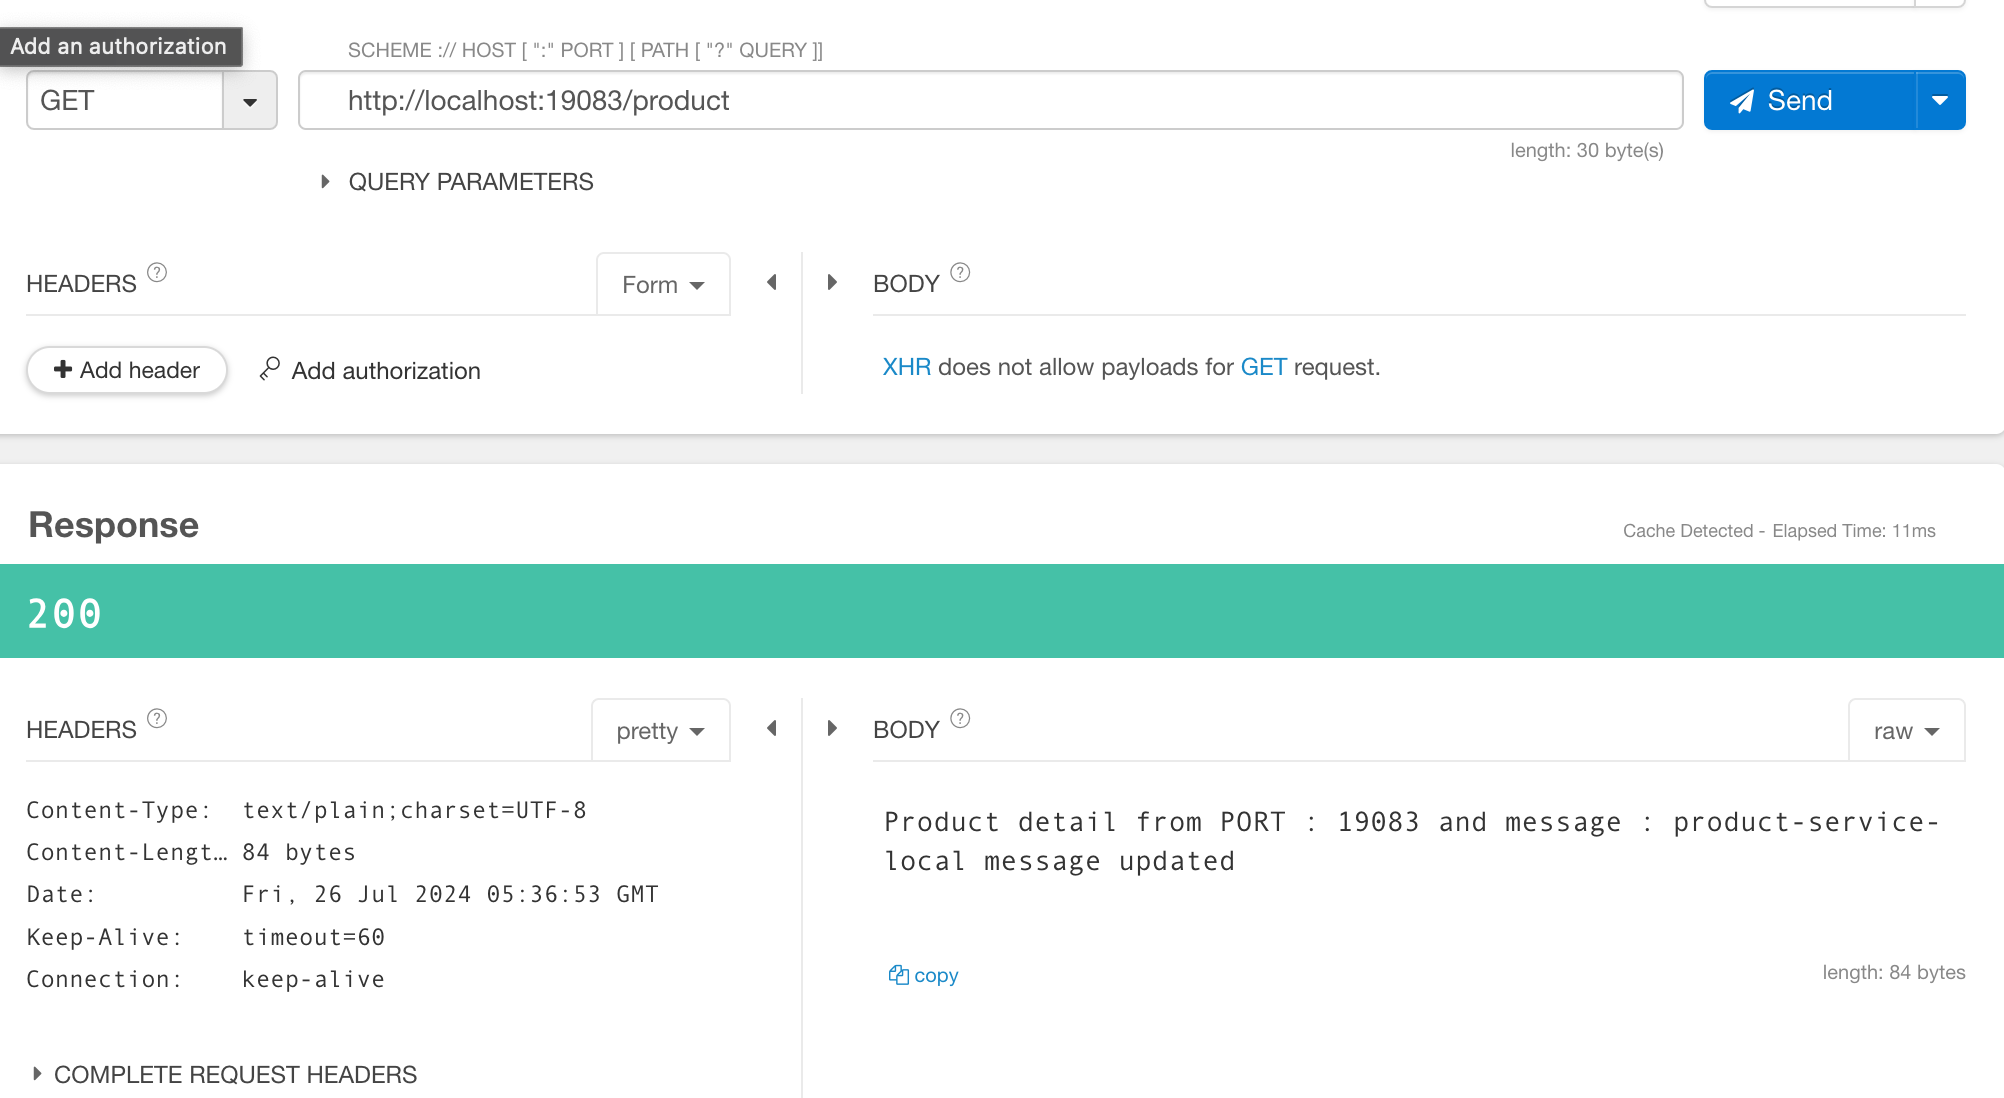
다시 http://localhost:19083/product 를 호출 하면 메시지가 변경된 것을 확인 할 수 있습니다.
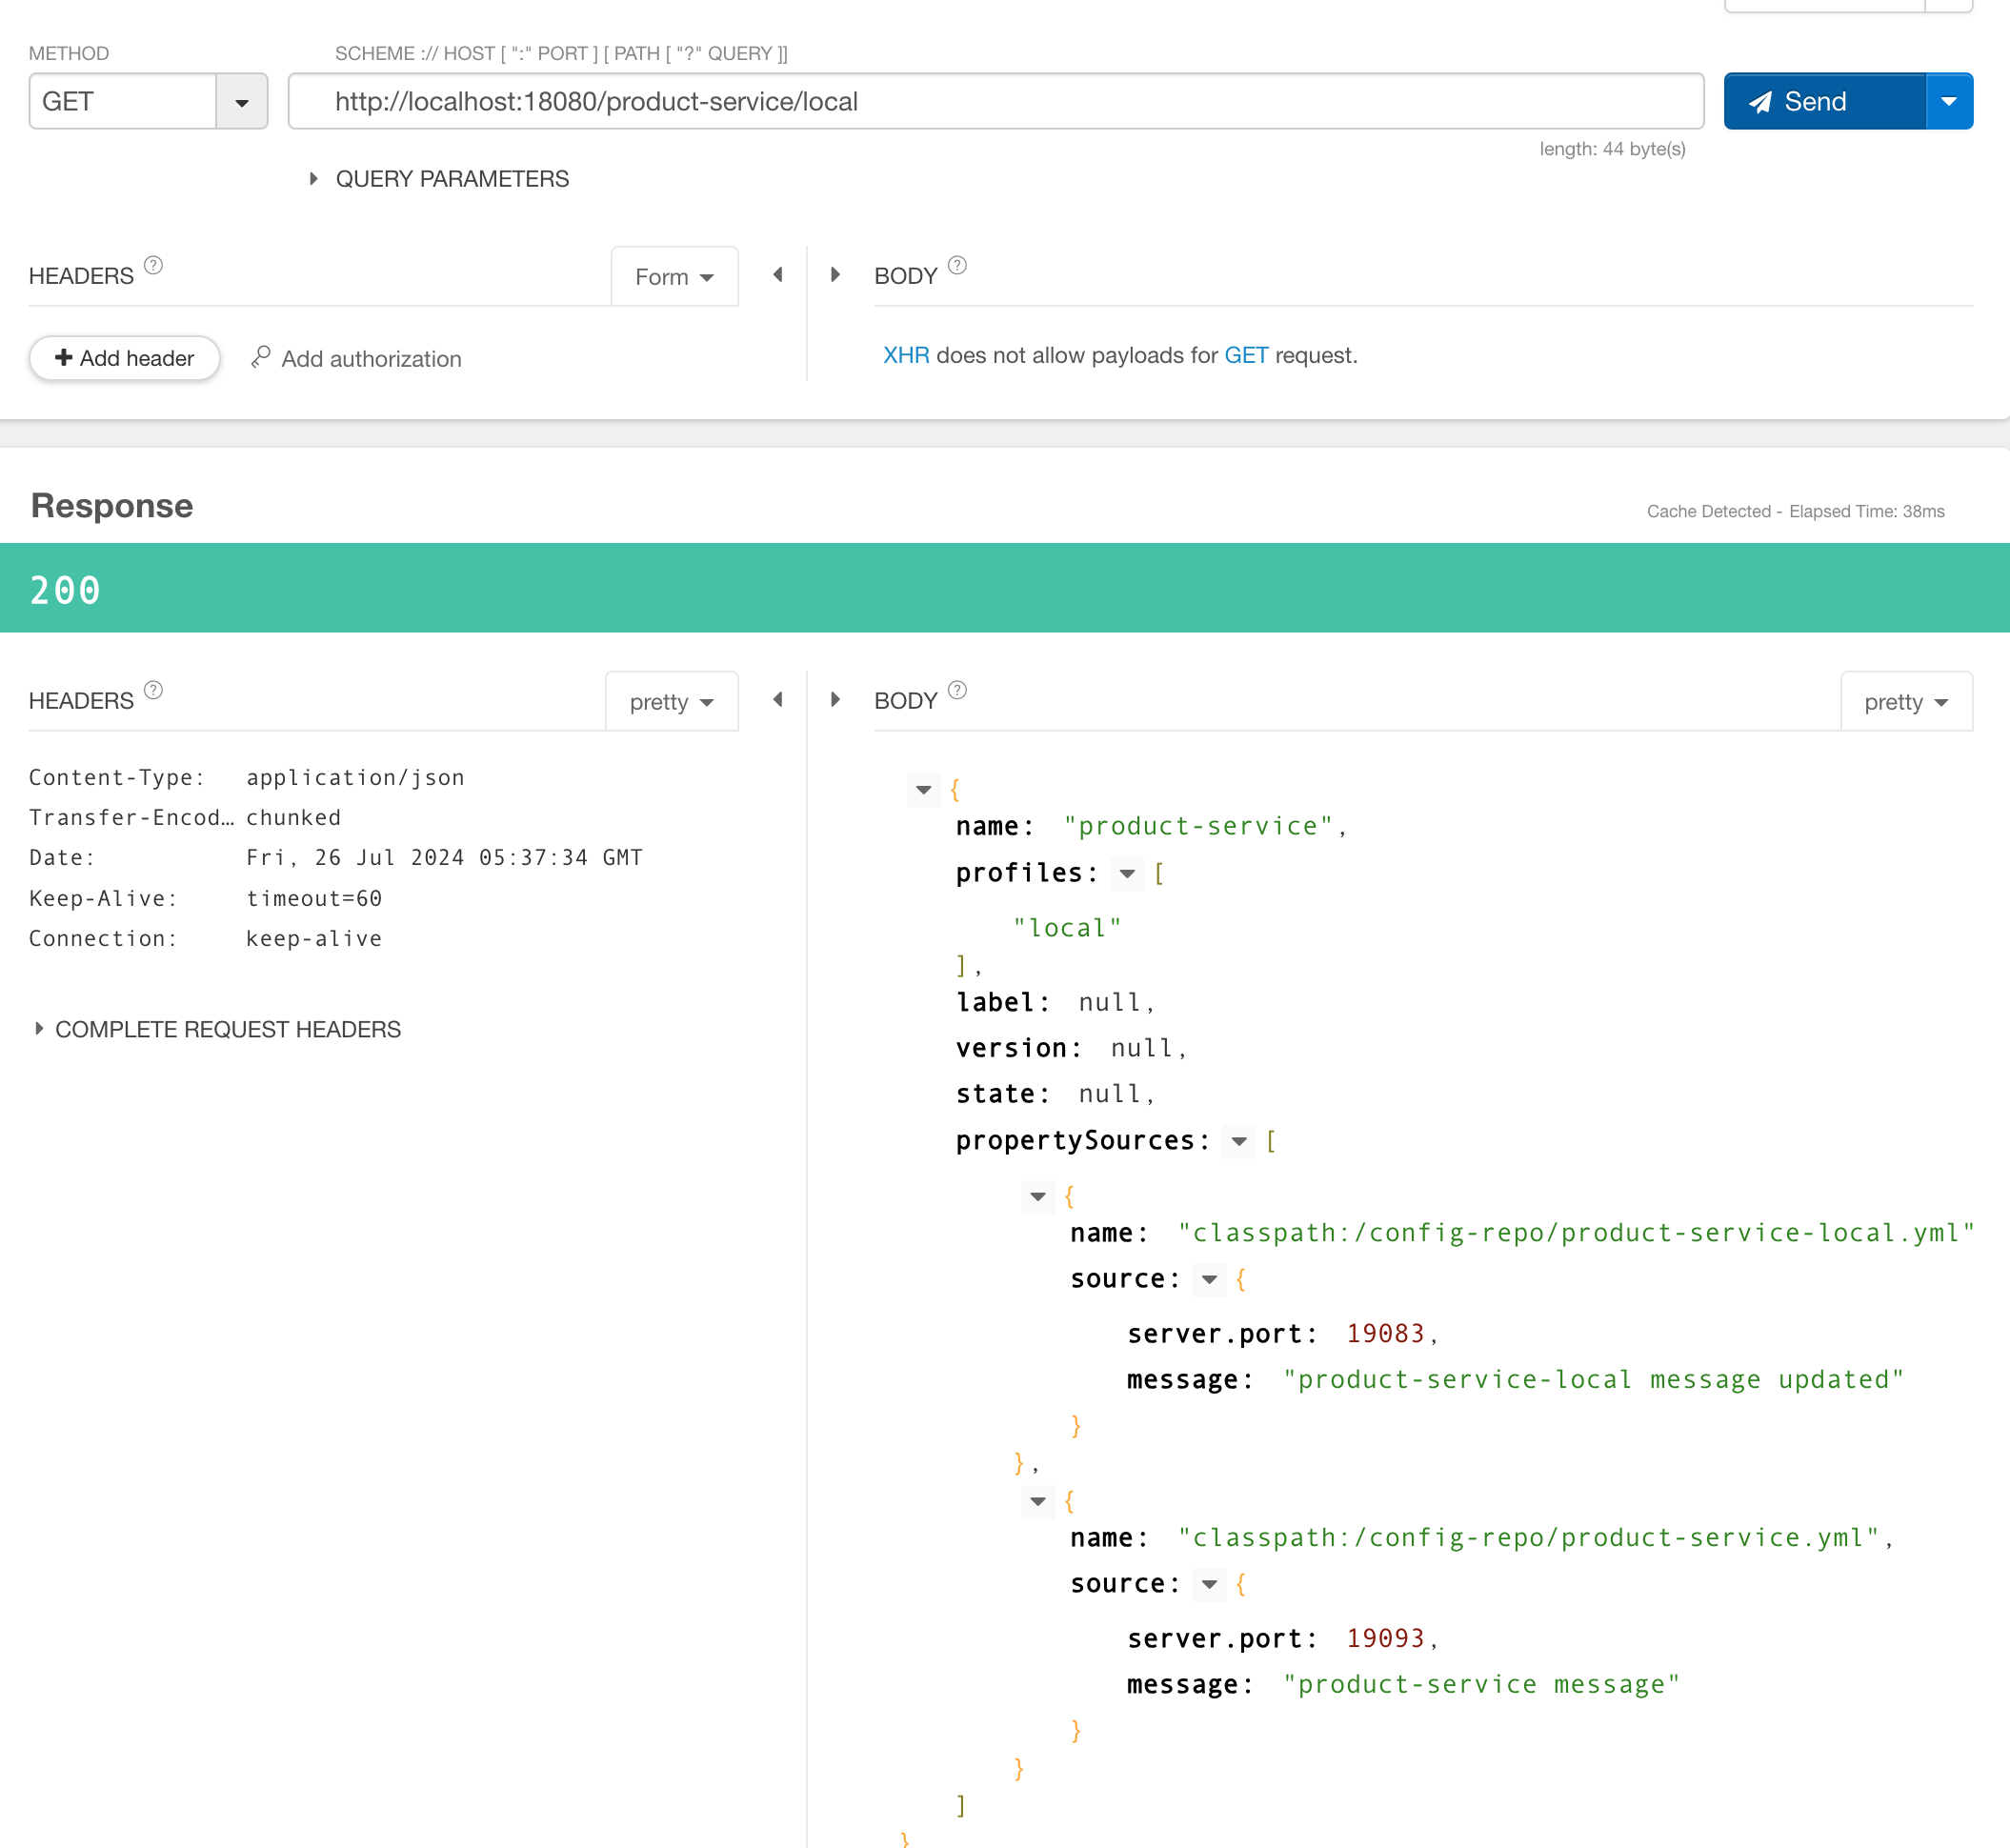
-
http://localhost:18080/product-service/local 로 접속하면 product-service의 설정 값들을 볼수 있습니다.(이를 통해 다른 설정값들도 확인할 수 있습니다.)