구글 로그인 API 연동
연동은 크게 3단계로 나눌 수 있다.
1. Google Developers 설정
2. 개발 환경 설정
3. 초기화 및 로그인 구현하기
이렇게 진행할거예요.
우선 Google Developers 설정은
https://notspoon.tistory.com/45 요기 참고하시면 돼요.
- 개발 환경 설정
dependencies {
    // Spring Data JPA
    implementation 'org.springframework.boot:spring-boot-starter-data-jpa'
    // Thymeleaf
    implementation 'org.springframework.boot:spring-boot-starter-thymeleaf'
    //Spring boot
    implementation 'org.springframework.boot:spring-boot-starter-web'
    // Lombok
    compileOnly 'org.projectlombok:lombok'
    annotationProcessor 'org.projectlombok:lombok'
    //Maria DB
    implementation 'org.mariadb.jdbc:mariadb-java-client:2.3.0'
    // Spring Security
    implementation 'org.springframework.boot:spring-boot-starter-security'
    //oauth2
	implementation 'org.springframework.boot:spring-boot-starter-oauth2-client'
	//google mail
	implementation 'org.springframework.boot:spring-boot-starter-mail'
    // Spring Boot Test
    testImplementation 'org.springframework.boot:spring-boot-starter-test'
//    testImplementation 'org.springframework.security:spring-security-test'
}
필요한 부분만 가져가세요
application.properties 설정
spring.security.oauth2.client.registration.google.client-id='내 아이디'
spring.security.oauth2.client.registration.google.client-secret='내 secrtet'
spring.security.oauth2.client.registration.google.scope=email
spring.security.oauth2.client.registration.google.redirect-uri=' 내 redirect-uri'
3. 초기화 및 로그인 구현하기
GoogleAPI class
@Component
@Getter
@Setter
@ToString
@ConfigurationProperties(prefix = "spring.security.oauth2.client.registration.google")
public class GoogleApi {

	private String clientId;

	private String clientSecret;

	private String redirectUri;

	private String scope;
}
@ConfigurationProperties(prefix = "spring.security.oauth2.client.registration.google")이거 쓰면 뷰리졸버나 템플릿 리졸버가 찾아가듯이 찾아가요
@Value 쓸 필요없이 알아서 매핑됩니다.
이제 이거 써먹어야겠죠?
저는 타임리프를 썼기 때문에 이걸 사용하기 위해 컨트롤러에서 모델에 담아서 요청을 보냈어요
LoginController
@GetMapping("/auth/login")
	public String LoginPage(Model model) {

		model.addAttribute("kakaoApiKey", kakaoApi.getKakaoApiKey());
		model.addAttribute("redirectUri", kakaoApi.getKakaoRedirectUri());
		model.addAttribute("googleClientId", googleApi.getClientId());
		model.addAttribute("googleRedirectUri", googleApi.getRedirectUri());
		model.addAttribute("googleScope", googleApi.getScope());

		System.out.println("googleClientId: " + googleApi.getClientId());
		System.out.println("googleRedirectUri: " + googleApi.getRedirectUri());
		System.out.println("googleScope: " + googleApi.getScope());
		return "client/login";
	}
로그인 페이지로 이동 시 model에 google 친구들 담아서 보냈어요.
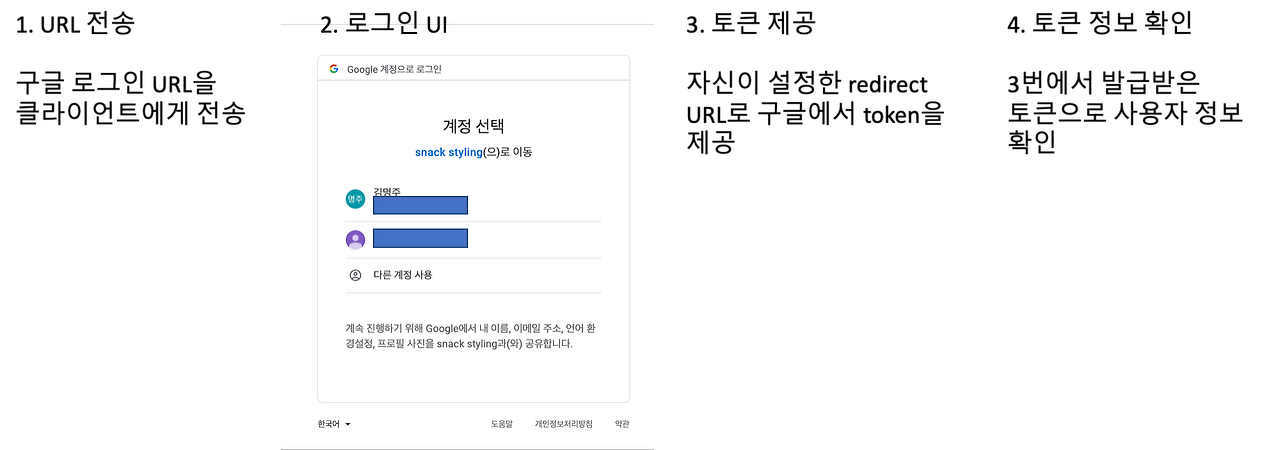
login.html
<a th:href="@{https://accounts.google.com/o/oauth2/v2/auth(client_id=${googleClientId}, redirect_uri=${googleRedirectUri}, response_type='code', scope=${googleScope})}">구글 로그인</a>눌렀을 때 구글 로그인 창 뜨면 성공!
이제 redirect-uri로 받은 토큰 값을 다시 보내서 사용자 정보를 확인해보겠습니다.
세 가지의 dto를 만들었어요. 첫 번째로는 token을 받기 위한 Request를 만들어 주어야하고, 두 번째로는 token을 받아 올 Response dto가 필요하다. 마지막으로는 해당 token을 바탕으로 개인 정보를 가져오기 위한 Response.
GoogleRequest
@Data
@Builder
public class GoogleRequest {
    private String clientId;    // 애플리케이션의 클라이언트 ID
    private String redirectUri; // Google 로그인 후 redirect 위치
    private String clientSecret;    // 클라이언트 보안 비밀
    private String responseType;    // Google OAuth 2.0 엔드포인트가 인증 코드를 반환하는지 여부
    private String scope;   // OAuth 동의범위
    private String code;
    private String accessType;  // 사용자가 브라우저에 없을 때 애플리케이션이 액세스 토큰을 새로 고칠 수 있는지 여부
    private String grantType;
    private String state;
    private String includeGrantedScopes;    // 애플리케이션이 컨텍스트에서 추가 범위에 대한 액세스를 요청하기 위해 추가 권한 부여를 사용
    private String loginHint;   // 애플리케이션이 인증하려는 사용자를 알고 있는 경우 이 매개변수를 사용하여 Google 인증 서버에 힌트를 제공
    private String prompt;  // default: 처음으로 액세스를 요청할 때만 사용자에게 메시지가 표시
}
GoogleResponse
@Data
@NoArgsConstructor
public class GoogleResponse {
    private String access_token; // 애플리케이션이 Google API 요청을 승인하기 위해 보내는 토큰
    private String expires_in;   // Access Token의 남은 수명
    private String refresh_token;    // 새 액세스 토큰을 얻는 데 사용할 수 있는 토큰
    private String scope;
    private String token_type;   // 반환된 토큰 유형(Bearer 고정)
    private String id_token;
}
GoogleInfResponse
@Data
@NoArgsConstructor
public class GoogleInfResponse {
    private String iss;
    private String azp;
    private String aud;
    private String sub;
    private String email;
    private String email_verified;
    private String at_hash;
    private String name;
    private String picture;
    private String given_name;
    private String family_name;
    private String locale;
    private String iat;
    private String exp;
    private String alg;
    private String kid;
    private String typ;
}
GoogleLoginController
//토큰, 사용자 정보 가져오기
	@GetMapping(value="/auth/login/google")
    public String loginGoogle(@RequestParam(value = "code") String authCode, HttpSession session){
        RestTemplate restTemplate = new RestTemplate();

        GoogleRequest googleOAuthRequestParam = GoogleRequest
                .builder()
                .clientId(googleApi.getClientId())
                .clientSecret(googleApi.getClientSecret())
                .code(authCode)
                .redirectUri("내가 만든 리다이렉트 uri ")
                .grantType("authorization_code").build();

        ResponseEntity<GoogleResponse> resultEntity = restTemplate.postForEntity("https://oauth2.googleapis.com/token",
                googleOAuthRequestParam, GoogleResponse.class);

        String jwtToken=resultEntity.getBody().getId_token();

        Map<String, String> map=new HashMap<>();

        map.put("id_token",jwtToken);

        ResponseEntity<GoogleInfResponse> resultEntity2 = restTemplate.postForEntity("https://oauth2.googleapis.com/tokeninfo",
                map, GoogleInfResponse.class);

        System.out.println("resultEntity2의 값은? : " + resultEntity2);

        String email=resultEntity2.getBody().getEmail();

        System.out.println("내 이메일은 : " + email);
        //이메일을 통해 비교 후 데이터베이스의 이메일과 일치하면 로그인을, 아니면 회원가입으로 이동
        UserEntity user = userService.checkUserByEmail(email);

        if(user != null) {

        	session.setAttribute("UId", user.getUId());

        	return "/";
        }else {
        	return "redirect:/auth/join";
        }
    }
구글로 로그인 후 해당하는 이메일을 받아서 데이터베이스에 저장 된 이메일이 맞다면 로그인을, 아니면 회원가입으로 넘어가게 했어요.
코드를 좀 살펴보자면
RestTemplate restTemplate = new RestTemplate();spring 프레임워크의 클래스 중 하나인데 간편하게 HTTP 요청을 보내고 응답을 처리할 수 있도록 도와줘요.
이걸로 구글 서버에 구글에서 요청한 값들을 쏴줄거예요.
GoogleRequest googleOAuthRequestParam = GoogleRequest
                .builder()
                .clientId(googleApi.getClientId())
                .clientSecret(googleApi.getClientSecret())
                .code(authCode)
                .redirectUri("내가 만든 리다이렉트 uri ")
                .grantType("authorization_code").build();
구글에서 토큰 값을 받기 위해 필요한 값들이에요. 구글이 이렇게 달라고 요청했으니 줘야겠죠?
ResponseEntity<GoogleResponse> resultEntity = restTemplate.postForEntity("https://oauth2.googleapis.com/token",
                googleOAuthRequestParam, GoogleResponse.class);
아까 구글 서버로 보내기 위해 열어둔 restTemplate 객체를 받아왔었죠? 이걸 이제 구글 서버로 진짜 쏠 거예요.
restTemplate에서 제공하는 porstForEntity 메서드를 사용할겁니다.
postForEntity(requestURI, 저희가 body에 담아둔 값, 반환 받을 값을 저장할 객체);
이런식으로 이루어져있습니다.
String jwtToken=resultEntity.getBody().getId_token();로그인이 성공했다면 token을 String으로 받아와요. body로 값을 전달받기 때문에 resultEntity 객체에서 getBody()를 가져온 후 저희가 생성해놨던 getId_token()값을 받아와요.
이후 구글은 토큰을 통해서 그 사람의 정보를 가져올 수 있습니다.
아까와 보내는 방식은 같은데 map<String, String> 키 값 방식으로 다시 요청을 쏴줘야 돼요.
Map<String, String> map=new HashMap<>();

        map.put("id_token",jwtToken);

        ResponseEntity<GoogleInfResponse> resultEntity2 = restTemplate.postForEntity("https://oauth2.googleapis.com/tokeninfo",
                map, GoogleInfResponse.class);
다시 보내고 만들어두었던 GoogleInfResponse로 값들을 반환받습니다.
그리고 다음 작업들은 위와 똑같아요.
참고자료
https://mjoo1106.tistory.com/entry/Spring-Google-Login-API-%EC%82%AC%EC%9A%A9%ED%95%98%EA%B8%B0