
본 포스팅은 김민태 님의 React와 Redux로 구현하는 아키텍처와 리스크관리의 'React로 구현하는 아키텍처와 리스크 관리법'을 듣고 정리한 내용입니다. 오타, 피드백 등은 댓글을 달아주세요!
React를 만들어보는 이유!
우리가 React를 어떻게 만들어? 라고 하실 수 있습니다.
하지만 실제로 React의 코어한 컨셉을 구현하는 코드는 길지 않습니다.
React를 구현해보면서 리액트가 어떻게 구현되어있는지 알고, 그게 이해가 되면 React의 나머지 다양한 스펙들도 왜 이런 제약사항들이 있고, 왜 이런 케이스에서는 이렇게 쓰라고 하는구나 등을 이해할 수 있게 됩니다.
공식 문서에 왜 이렇게 쓰여 있는지 이해가 안되던 것들을 하나씩 이해해 가면서 이를 통해 깊은 인사이트를 가질 수 있을 거에요.
환경 설정
우선 package.json부터 만들어 볼게요.
{
  "name": "tiny-react",
  "version": "1.0.0",
  "description": "",
  "main": "index.js",
  "scripts": {
    "build": "babel src -d build --plugins=@babel/proposal-class-properties -w",
    "test": "echo \"Error: no test specified\" && exit 1"
  },
  "keywords": [],
  "author": "",
  "license": "ISC",
  "devDependencies": {
    "@babel/cli": "^7.12.1",
    "@babel/core": "^7.12.3",
    "@babel/plugin-proposal-private-methods": "^7.12.1",
    "@babel/preset-env": "^7.12.1",
    "@babel/preset-react": "^7.12.5"
  }
}"scripts"의 build 를 보면 진입디렉토리는 src, 아웃풋은 build로 만들어 주었고, 매번 실행시킬 때마다 build하기 번거롭기 때문에 -w로 watch 옵션을 주었습니다.
다음은 babel.config.json 입니다.
{
  "presets": ["@babel/preset-react"]
}
특별한 점은 없고, @babel/preset-react를 쓴다 정도로 알고 있으면 될 것 같습니다.
그리고 src 폴더에 index.js를 하나 만들어 둘게요.
console.log('Tiny React');일단은 간단하게 이정도로만 해둘게요.
그리고 build 폴더에는 index.html을 만들어 줍시다.
<!DOCTYPE html>
<html>
  <head>
    <meta name="viewport" content="width=device-width, initial-scale=1" />
    <meta http-equiv="Cache-Control" content="no-cache, no-store, must-revalidate" />
    <meta http-equiv="Pragma" content="no-cache" />
    <meta http-equiv="Expires" content="0" />
    <title>Tiny React</title>
  </head>
  <body>
    <h1>Tiny React</h1>
    <div id="root"></div>
    <script src="index.js" type="module"></script>
  </body>
</html>
여기는 CRA로 만든 리액트 앱과 매우 비슷해요. 빈 div 태그 하나와 script 파일을 정해뒀다는 점. 이 정도만 보고 지나가셔도 될 것 같습니다.
이렇게 해주시고, npm install을 해주신 뒤, npm run build를 해주시면 아래와 같은 환경을 만들어 줄 수 있습니다.
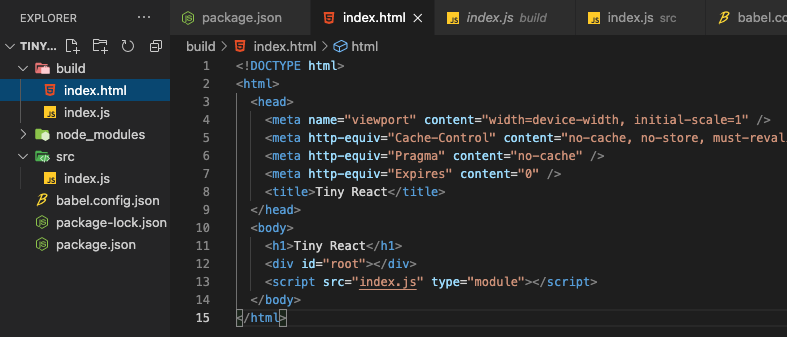
이제 웹서버를 하나 열어서 설정된 내용을 확인해볼게요. 새로운 콘솔을 열어서 build 폴더 안에서 http-server -c-1 -p 4001을 실행시켜 봅시다.
http-server가 없으시면
npm install -g http-server를 통해 설치할 수 있습니다.

그러면 이렇게 서버가 열리게 되고 해당 주소로 접속하여 콘솔을 확인해보면

이렇게 콘솔로 잘 출력하는 것을 볼 수 있습니다.
React를 만들어보자
리액트를 만들어보려면 우선 virtual DOM을 만들어야 합니다.
그렇게 하기 위해서는 virtual DOM이 어떻게 생겼을지 생각해봐야 합니다. virtual DOM은 기본적으로 HTML 태그를 변환하는 구조가 될 수 밖에 없을 거에요.
HTML 태그에는 태그이름이 있고, 속성이 있고, 그 태그 안에는 자식 태그가 올 수 있습니다.
자식으로 문자열을 가질 수도 있고, 자식을 다른 태그를 가질 수도 있습니다.
HTML을 자바스크립트 친화적인 데이터로 변환하는 과정이 필요할 거에요.
자바스크립트 친화적인 데이터는 객체가 있겠죠.
<div id="root">
  <span>blabla</span>
</div>
이런 HTML 코드가 있다고 할 때, 이 코드는 아래와 같이 바꿀 수 있을 겁니다.
{
  tagName: 'div',
  props: {
    id: 'root',
    className: 'container'
  },
  children: [
    {
      tagName: 'span',
      props: {},
      children: [
        'blabla',
      ]
    },
  ]
}
그리고 children 아래에서 다른 태그가 있다면 계속 재귀적으로 객체들이 안에 만들어지겠죠.
우리는 이게 virtual DOM이 아닐까? 하고 생각해볼 수 있습니다. 물론 더 복잡하겠지만 근본적으로는 같을 거에요.
src/react.js를 만들어 봅시다. 다만 우리는 React 패키지 그 자체를 만들지는 않고, 리액트가 제공하는 메서드들을 직접 한번 구현해보도록 할게요.
export function render() {

}

export function createElement() {

}
createElement는 리액트 공식문서에서 볼 수 있는 메서드로 JSX없이 리액트를 사용하고 싶을 때 사용할 수 있는 메서드입니다. 만약 이 함수만 사용한다면 추가적인 babel plugin 이 없이도 리액트를 사용할 수 있습니다.
결국 JSX 구문을 createElement로 바꿔주는 것이 babel 플러그인이 하는 역할인 거죠.
이제 함수들을 구현하기 전에 이 함수들이 어떻게 쓰일지를 먼저 생각해봅시다.
src/index.js를 다음과 같이 만들어 봅시다.
/* @jsx createElement */
import {createElement, render} from './react.js'

function Title() {
  return (
    <h2>정말 동작할까?</h2>
  );
}

render(<Title />, document.querySelector('#root'));
그리고 babel 컴파일을 한번 해볼게요.
놀랍게도 babel에서는 아무 에러도 발생하지 않고 있습니다.

자 그럼 어떻게 변환이 되었을까요? build/index.js를 봅시다.
/* @jsx createElement */
import { createElement, render } from './react.js';

function Title() {
  return createElement("h2", null, "\uC815\uB9D0 \uB3D9\uC791\uD560\uAE4C?");
}

render(createElement(Title, null), document.querySelector('#root'));
여기에서 createElement로 변환된 부분만 살펴볼게요.
createElement("h2", null, "\uC815\uB9D0 \uB3D9\uC791\uD560\uAE4C?");위 코드에서 볼 수 있듯, createElement에는 차례대로 태그 이름, null, 그리고 children 값이 들어가는 걸 알 수 있습니다. null은 예상할 수 있듯, props가 들어갈 자리에요.
자 이제, src/react.js의 createElement를 구현해볼게요.
export function createElement(tagName, props, children){
~~~
이렇게 구현을 할 수 있습니다. 자 이때, 여기서 children은 한개를 받을 수도 있고 여러개를 받을 수도 있죠. 그렇기 때문에 children은 가변인자로 받아야 합니다.
export function createElement(tagName, props, ...children){
~~~
그 다음, 내용을 구현해봅시다.
export function createElement(tagName, props, ...children){
  return { tagName, props, children };
}
이렇게 해보고 index.js의 render 구문은 주석처리를 한 뒤 Title 함수를 호출해봅시다.
/* @jsx createElement */
import {createElement, render} from './react.js'

function Title() {
  return (
    <h2>정말 동작할까?</h2>
  );
}

console.log(Title());

//render(<Title />, document.querySelector('#root'));
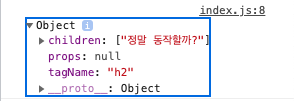
그리고 결과를 보면 이렇게 잘 나오는 것을 볼 수 있습니다.
Title을 좀 바꿔도 잘 되는지 한번 테스트해볼까요?
/* @jsx createElement */
import {createElement, render} from './react.js'

function Title() {
  return (
    <div>
      <h2>정말 동작 할까?</h2>
      <p>잘 동작하는지 보고 싶다.</p>
    </div>
  );
}

console.log(Title());

//render(<Title />, document.querySelector('#root'));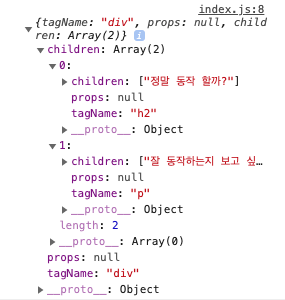
이렇게 잘 되는 것을 볼 수 있습니다!
굉장히 신기합니다. 왜냐하면 우리는 재귀적으로 호출하는 구문은 삽입하지 않았기 떄문이죠. 그 이유는 babel로 트랜스파일링된 코드를 통해 볼 수 있는데요,
/* @jsx createElement */
import { createElement, render } from './react.js';

function Title() {
  return createElement("div", null,
          createElement("h2", null, "\uC815\uB9D0 \uB3D9\uC791 \uD560\uAE4C?"),
          createElement("p", null, "\uC798 \uB3D9\uC791\uD558\uB294\uC9C0 \uBCF4\uACE0 \uC2F6\uB2E4.")
         );
}

console.log(Title()); //render(<Title />, document.querySelector('#root'));
이렇게 babel이 직접 모든 태그를 createElement로 변환해주기 때문에 마치 재귀적으로 동작하는 것처럼 보이는 것입니다. 생각해보면 별거 아닌 그런 내용입니다.
그러면 실제로 이제 render를 해줘야 겠죠.
export function render(component, container){
  console.log(component);
}
우선 이렇게 작성을 해줍시다. 그리고 index.js에서 console.log(Title())을 삭제한 뒤 render 의 주석을 해제하고 console을 확인해보면
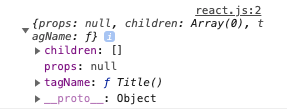
이렇게 나오는 것을 볼 수 있어요. 원하는 내용이 아니죠. 왜 이런 결과가 나왔는지 다시 한번 트랜스파일된 코드를 살펴볼게요.
/* @jsx createElement */
import { createElement, render } from './react.js';

function Title() {
  return createElement("div", null,
          createElement("h2", null, "\uC815\uB9D0 \uB3D9\uC791 \uD560\uAE4C?"),
          createElement("p", null, "\uC798 \uB3D9\uC791\uD558\uB294\uC9C0 \uBCF4\uACE0 \uC2F6\uB2E4.")
         );
}

render(createElement(Title, null), document.querySelector('#root'));
차이점이 보이시나요?
div 태그를 사용할 때는 createElement("div", ~ 이렇게 번역되었지만 Title태그는 createElement(Title, ~ 이렇게 번역된 것을 볼 수 있습니다.
즉 원시태그를 사용할 경우는 문자열로 넘어오고 그렇지 않은 경우에는 함수 자체를 넘겨주는 것이죠.
그러면 어떻게 이렇게 번역하는 것일까요?
그런 말을 본 적이 있을 거에요.
사용자가 만든 컴포넌트는 반드시 대문자로 시작하고 리액트가 제공하는 빌트인 컴포넌트는 모두 소문자다.
즉, JS를 컴파일할 때, 대문자로 시작하면 함수 자체만 넘겨주고 소문자로 시작하면 문자열로 넘겨주도록 디자인되어 있는 것을 알 수 있습니다.
그러면 이제 이를 createElement에 적용해줘야겠죠.
export function createElement(tagName, props, ...children){
  if(typeof tagName === 'function') {
    return tagName.apply(null, [props, ...children]);
  }
  return { tagName, props, children };
}
이제 다시 콘솔을 확인해보면
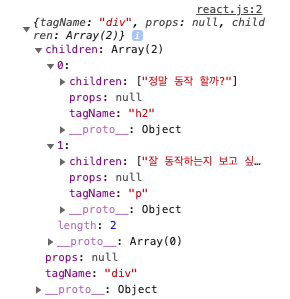
이렇게 잘 넘어온 것을 볼 수 있습니다.
그러면 이제 뭘 해야할까요? 이제 이 Virtual DOM을 Real DOM으로 변환해줘야겠죠.
이 부분은 간단하기 때문에 아래 코드로 바로 확인해볼게요.
function renderRealDOM(vdom) {
  if(typeof vdom === 'string'){
    return document.createTextNode(vdom);
  }

  if(vdom === undefined) return;

  const $el = document.createElement(vdom.tagName);
  vdom.children.map(renderRealDOM).forEach(node => {
    $el.appendChild(node);
  })
  return $el;
}

export function render(vdom, container) {
  container.appendChild(renderRealDOM(vdom));
}
이렇게 하면 아래 그림처럼 Real DOM으로 변환하는 과정이 아주 잘 구현된 것을 볼 수 있습니다!

이제 실제 virtual DOM의 구조를 거의 구현했다고 볼 수 있습니다.
virtual DOM을 완성해보자.
사실 지금까지 구현한 것은 virtual DOM이라고 하기 아쉬운 점이 있습니다. virtual DOM은 오직 변경된 부분만 Real DOM에서 다시 렌더링하는 것이 메인 컨셉이기 때문이죠. 이 점을 구현해봅시다.
실제로 이렇게 구현되진 않겠지만 대충이라도 컨셉을 구현해봅시다.
export function render(vdom, container) {
  if(prevVdom !== nextVdom) {

  }
  container.appendChild(renderRealDOM(vdom));
}
우선은 이렇게 써봅시다. 그런데 render는 함수기 때문에 이전 상태를 가질 수 없습니다. 그렇기 때문에 이를 클로저로 만들어봅시다.
export const render = (function() {
  let prevVdom = null;

  return function(nextVdom, container){
    container.appendChild(renderRealDOM(nextVdom));

  }
})();
이제 이전 상태를 저장할 수 있게 되었습니다.
export const render = (function() {
  let prevVdom = null;
  return function(nextVdom, container) {
    if(prevVdom === null) {
      prevVdom = nextVdom;
    }
    // diff

    container.appendChild(renderRealDOM(nextVdom));
  }
})();
이제 위와 같이 diff 로직을 삽입할 수 있습니다. diff로직은 너무 구현량이 많아지기 때문에 넘어가도록 할게요.
클래스 컴포넌트로의 적용
여기서 몇가지 의문이 생길 수 있을 것 같아요.
리액트 컴포넌트에는 함수 컴포넌트만 있지는 않죠. 클래스 컴포넌트도 있을 수 있습니다. 한번 예시를 작성해볼까요?
/* @jsx createElement */
import {createElement, render} from './react.js'

class YourTitle{
  render() {
    return (
      <p>나는 타이틀이 되고싶어!</p>
    );
  }
}

function Title() {
  return (
    <div>
      <h2>정말 동작할까?</h2>
      <YourTitle />
      <p>잘 동작하는지 보고 싶다.</p>
    </div>
  );
}

render(<Title />, document.querySelector('#root'));
이렇게 사용하면 지금은 동작하지 않을 겁니다. createElement에서 좀 더 추가적인 코드들이 필요할 거에요.
우선 createElement(tagName, props, ...children)이 받는 tagName이 문자열인지 함수인지, 클래스인지를 구분할 수 있어야 합니다.
그런데 기본적으로 자바스크립트에서는 함수와 클래스를 구분할 수 없습니다. 그렇기 때문에 상속관계를 만들어 이를 해결해봅시다. 우선 react.js에 아무것도 하지 않는 Component를 만들어줍니다.
export class Component {

}

function renderRealDOM(vdom) {
  ~~~
그리고 앞에서 만든 YourTitle 객체가 Component를 상속받을 수 있도록 만들어 줍니다.
/* @jsx createElement */
import {createElement, render, Component} from './react.js'

class YourTitle extends Component{
  render() {
    return (
      <p>나는 타이틀이 되고싶어!</p>
    );
  }
}

function Title() {
~~~
이제 주어진 tagName이 Component를 상속하는 클래스인지를 확인하는 코드를 넣어 해결할 수 있습니다.
export function createElement(tagName, props, ...children) {
  if(typeof tagName === 'function') {
    if(tagName.prototype instanceof Component) {
      const instance = new tagName({ ...props, children });
      return instance.render();
    } else {
      return tagName.apply(null, [props], ...children);
    }
  }
  return { tagName, props, children };
}
그러면 이처럼 클래스 컴포넌트도 잘 렌더링하는 모습을 볼 수 있습니다.
물론 이렇게 구현되어있지는 않을 거에요. instance를 매번 새로 만들지는 않을 거니까요. 그렇기 때문에 외부에 이 instance를 만들어 두고 그 instance를 가져오는 코드가 있을 겁니다.
그러면 이제 왜 함수형 컴포넌트는 상태를 가질 수 없고, 객체형 컴포넌트는 상태를 가질 수 있는지 알 수 있습니다.
다음 포스팅에서는 리액트의 또다른 매우 중요한 컨셉인 Hook을 구현하겠습니다.

좋은 글 감사합니다!