
기존의 Spring MVC에서는 xml을 활용하여 Bean을 등록
-> 프로젝트 규모가 커짐에 따라 사용하는 요소들을 xml에 등록하는 것이 번거로워 져서 어노테이션을 활용한 Bean 등록 방법이 탄생함
Spring Bean이란?
출처 : https://mangkyu.tistory.com/75, https://galid1.tistory.com/494
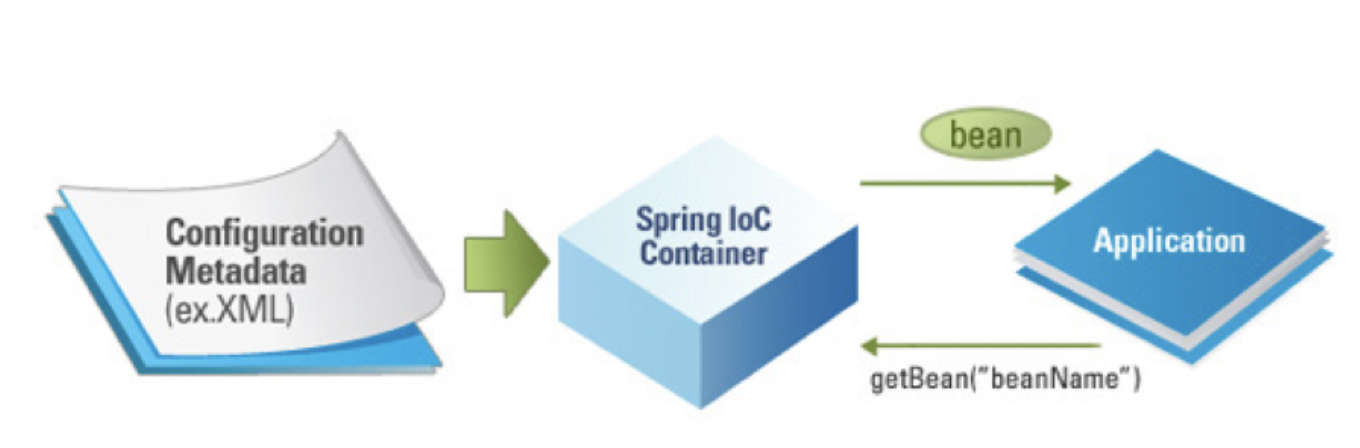
Spring의 DI Container에 의해 관리되는 POJO(Plain Old Java Object)를 Bean이라고 부른다
-> 이러한 Bean들은 Spring을 구성하는 핵심 요소이다.
- POJO(Plain Old Java Object)로써 Spring 애플리케이션을 구성하는 핵심 객체이다.
- Spring IoC 컨테이너(또는 DI 컨테이너)에 의해 생성 및 관리된다.
- class, id, scope, constructor-arg 등을 주요 속성으로 지닌다
Bean 구성요소
- class : Bean으로 등록할 자바 클래스
- id : Bean의 고유 식별자
- scope : 빈을 생성하기 위한 방법(singleton, prototype)
- constructor-arg : Bean 생성시 생성자에 전달할 파라미터
- property : Bean 생성 시 Setter에 전달할 인수
Spring에서는 위와 같은 Bean의 구성 요소를 바탕으로 등록되어 있는 Bean을 싱글톤 객체로 생성하여 관리
Spring Bean 등록 방법(@Bean, @Configuration, @Component)
@Configuration : 스프링 IOC Container에 해당 클래스가 Bean 구성 클래스임을 알리는 것
@Bean 어노테이션과 @Component 어노테이션은 서로 용도가 다름
@Bean
개발자가 직업 제어가 불가능한 외부 라이브러리등을 Bean으로 만들려 할 때 사용
@Configuration
public class ApplicationConfig{
	@Bean
    public ArrayList<String> array(){
    	return new ArrayList<String>();
    }
위는 @Bean 어노테이션을 통해 Bean을 생성한 예제
ArrayList와 같은 라이브러리를 Bean으로 등록하기 위해 별도로 해당 라이브러리 객체를 반환하는 Method를 만들고
@Bean 어노테이션을 붙여주었음
@Bean어노테이션에 name을 지정하지 않을 시에는 Method이름이 name에 들어감
이름을 직접 지정하고자 한다면 -> @Bean(name="myarray")
@Configuration
public class ApplicationConfig{

	@Bean
    public ArrayList<String> array(){
    	return new ArrayList<Integer>();
    }

    @Bean
    public Student student(){
    	return new Student(array());
    }
}
의존 관게가 필요한 경우
-> Student 객체의 경우 생성자에서 ArrayList를 주입받도록 코드를 짠다면 Bean에 선언된 array() 메서드를 호출하여 의존성 주입 가능
Component
개발자가 직접 작성한 Class를 Bean으로 등록하기 위한 어노테이션
@Component(value = "mystudent")
public class Student{
	public student(){
    	System.out.println("hi");
    }
}
Component 역시 아무런 추가 정보가 없다면 class이름을 카멜 케이스로 변경한것이 Bean id로 사용
-> @Bean의 name과 다르게 value를 이용해 Bean의 이름을 지정
@AutoWired
@Component
public class Pencil{
	...
}

@Component(value = "mystudent")
public class Student{
	@AutoWired
    private Pencil pencil;

    public student(){
    	System.out.println("hi);
    }
}
@Component를 사용한 Bean의 의존성 주입은 @AutoWired 어노테이션으로 진행
Student가 Pencil에 대한 의존성을 가지고 있는 경우 @AutoWired 어노테이션을 이용하여 의존성을 자동으로 주입 가능
이때 Pencil도 @Component 어노테이션을 가지고 있어야 함
-> 그래야 IOC Container에 빈으로 등록되기 때문
@AutoWired는 타입을 통해 해당 자리에 들어올 객체를 판별하여 주입하여 줌
-> 이때 해당 자리에 들어올 수 있는 객체가 여러개인 경우, 즉 다형성을 띄고있는 객체타입에는 @Qualifer("Bean이름")을 이용하여 해당 자리에 주입될 Bean을 명시해 주어야 함
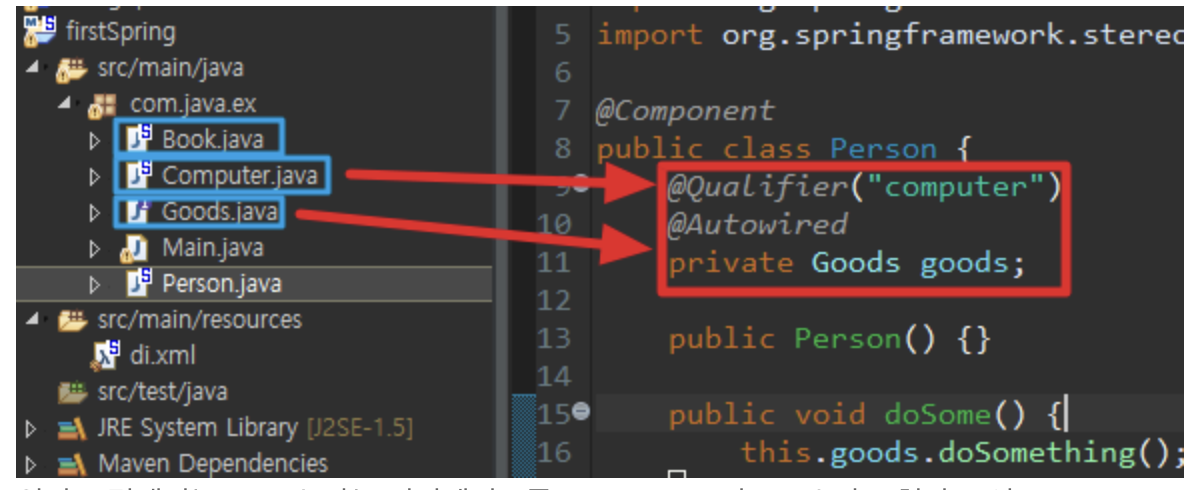
위에 그림을 보면 Goods라는 인터페이스를 Computer&Book이 구현하고 있는데 Person클래스의 goods 참조 변수에 위치할 수 있는 Bean이 2가지 이기에 computer 처럼 한개의 빈을 특정 해 주어야 됨
Bean 사용법
- 의존성 주입 대상 클래스 생성
public class Student{
	public Student(){
    	System.out.println("hi");
    }
}- Bean으로 등록하기 위해 Config class를 임의로 만들고 @Configuration 어노테이션 부여
이후 Student 객체를 반환하는 Method를 작정하고 @Bean 어노테이션 부여
@Configuration
public class ApplicationConfig{
	@Bean
    public Student student(){
    	return new Student();
    }
}- Annotation 기반으로 Bean을 등록했음으로 AnnotationConfigApplicationContext 객체 생성 후 매개변수로 @Configuration을 부여한 ApplicationConfig 클래스를 넘겨준 후 getBean 이용
public class Main{
	public static void main(String[] args){
    	ApplicationContext context = new
        AnnotationConfigApplicationcontext(ApplicationConfig.class);
        Student sutdent = context.getBean("student", Student.class)
    }
}
@Component 사용법
@Component("test)
public class ComBean1{

	public comBean1(){
    	System.out.println("comBean1클래스의 기본생성자);
   	}
}
AnnotationConfigApplicationConext ctx2 = new AnnotationConfigApplicationContext(ComBean1.class);
ComBean1 comBean1 = ctx2.getBean("test", comBean1.class);
System.out.printf("comBean1: %s\n, comBean1);
ctx2.close();위를 보면 test라는 이름을 통해 빈을 가져오는 것이 가능하다!
ApplicationContext는 다음페이지에서 상세히 알아보자!