웹 개발 기초
정적 컨텐츠
- welcome page와 같이 서버에서 따로 하는것 없이 파일을 그대로 웹브라우저에 올리는 것
MVC와 템플릿 엔진
- jsp, php 등의 html파일을 서버에서 렌더링을 통해 변경등을 하는 템플릿 엔진
- 템플릿 엔진을 구동하기 위한 Model, View(화면), Controller (MVC)
- View를 찾아서 템플릿 엔진을 통해 화면을 렌더링 후 웹브라우저에 html을 넘겨줘서 구현하는 방식에 사용된다
API
- json데이타 포맷을 통해 클라이언트에 데이터를 전달한 것을 보여주는 것
정적 컨텐츠 static content
By default, Spring Boot serves static content from a directory called /static in the classpath or from the root of the ServletContext.
기본적으로 static폴더 안에 위치한다
통신 개요
- localhost:8080/hello-static.html url을 입력
- 내장 톰캣 서버에서 해당 url을 우선적으로 스프링 컨테이너에 보내서 Controller에 hello-static 관련 컨트롤러가 존재하는지 확인한다
- Controller에 해당 파일이 존재하지 않는다면
resources:static/에서 hello-static.html파일을 찾아서 올려준다
MVC와 템플릿 엔진
MVC : Model, View, Controller
예전에는 3분류로 나뉘어져있지않고 view에 대부분의 기능을 넣어놨다
View : 화면을 그리는것을 담당
Controller, Model : 로직등 기술적인 것을 담당
형태
@GetMapping("hello-mvc") //url을 hello-mvc만 입력하면 오류가 발생한다
//MissingServletRequestParameterException 발생
//아래 @RequestParam을 통해 선언된 name에 인자를 넘겨 줘야 한다
public String helloMvc(@RequestParam("name") String name, Model model){
    model.addAttribute("name", name);
    return "hello-template";
}
<!--위에서 name이 url에서 넘겨받은 값으로 변경되어서 아래 name에 치환되어 들어간다-->
<html xmlns:th="http://www.thymeleaf.org">
<body>
<p th:text="'hello ' + ${name}">hello! empty</p>
</body>
</html>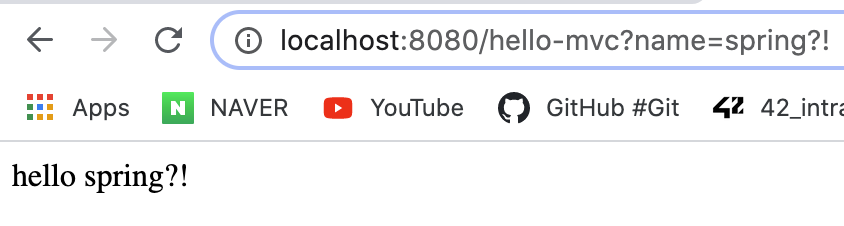
- 만약
name="내용"부분이 없다면 오류가 발생하게 된다
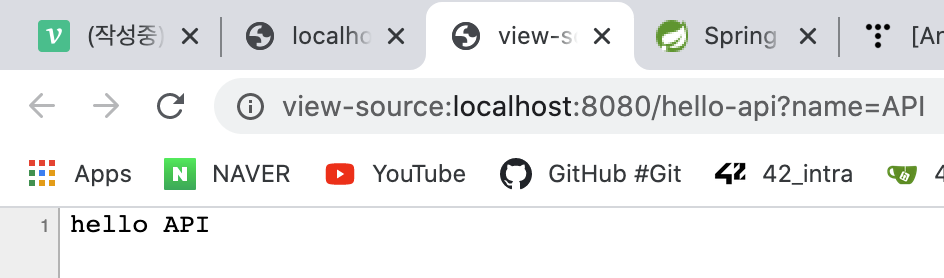
API
View와 같은 파일을 따로 조작하지 않고 주어진 입력 그대로를 화면에 출력해준다
@GetMapping("hello-api")
@ResponseBody //html의 body가 아닌 http에서의 body부분에 내가 직접 아래 내용을 넣겠다는 의미
public String helloApi(@RequestParam("name") String name) {
    return "hello " + name;
}- @ResponseBody를 사용하면 뷰 리졸버(ViewResolver)를 사용하지 않는다
- 따로 HTML파일이 필요가 없다 - View가 필요가 없으므로
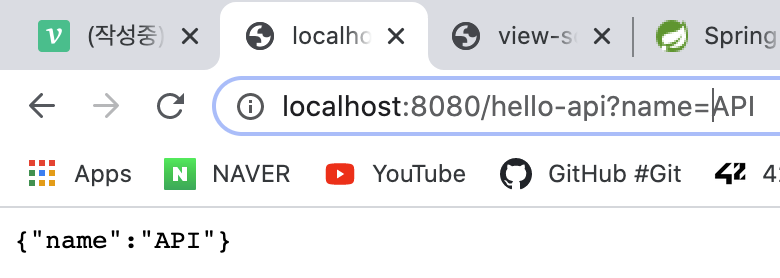
구현된 모습

json데이터 형태로 받은 api
@GetMapping("hello-api")
@ResponseBody //동일하게 url에서 값을 받지만 이를 key-value형태의 json데이터로 갖게 된다
public Hello helloApi(@RequestParam("name") String name){
    Hello hello = new Hello();
    hello.setName(name);
    return hello; <-- 객체를 json형태로 반환한다 (기본설정)
}

static class Hello {
    private String name;

    public String getName() {
        return name;
    }

    public void setName(String name) {
        this.name = name;
    }
}
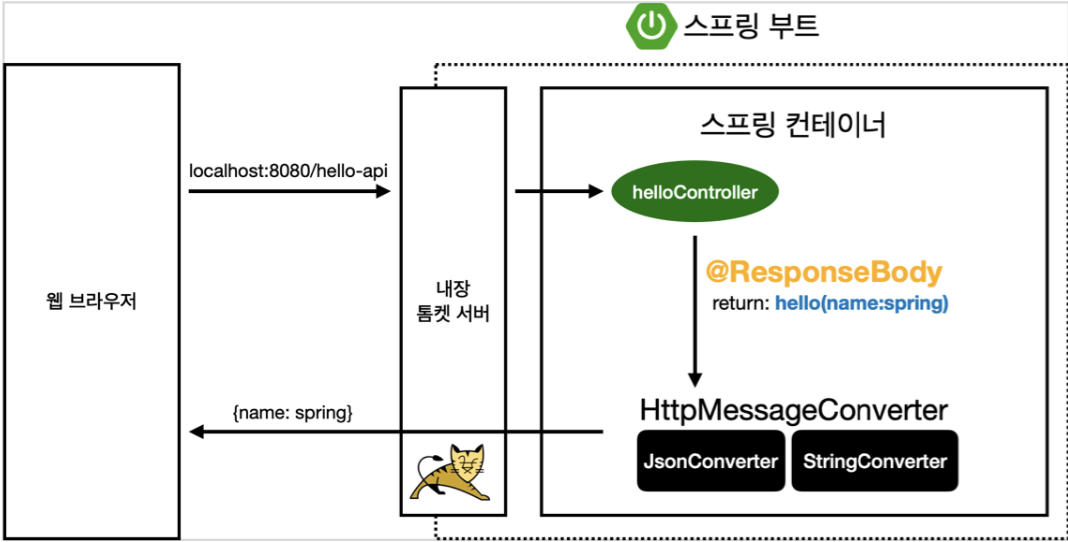
-
JsonConverter와 StringConverter가 대기하다가 객체냐 문자냐에 따라서 맞는 컨버터로 동작한다
-
@ResponseBody사용
- HTTP의 Body에 문자내용을 직접 반환한다, ViewResolver가 동작하지 않는다
기본 문자 처리 : StringHttpMessageConverter
기본 객체 처리 : MappingJackson2HttpMessageConverter

내꿈은 숲속의잠자는공주