ex03: Component - React Event & State
01. src/01: Inline Handler
02. src/02: Functional Handler (functional Component vs Class component)
03. src/03: SyntheticEvent
04. src/04: Some Examples of Event Handler & Event Handler Using 'ref' I (Functional Component-useRef Hook)
05. src/05: Event Handler Using 'ref' II (Class Component)
Run Examples
$ npm run debug src={no}READ
- 함수는 함수를 호출하는 주체가 this가 되며, 클래스는 객체를 가리킨다.
- 함수에서의 this는 콜하는 주체에 따라 달라지므로 사용에 주의해야하며 this는 클래스 컴포넌트에서 더욱 많이 사용된다.
- state가 변경되면 reder가 실행이 된다.
- render를 직접 호출하는 건 좋지 않은 방법이다.
- this안에 state 객체가 내장되어 있다.
- 데이터를 직접 변경시키지 않는다.
- Component 설계 규칙과 함수형 프로그래밍을 이해해야한다.
- 함수형 컴포넌트에서는 hook 함수를 사용한다.(useState)
- Component의 데이터는 바깥에서 건들면 안된다.
- Component의 데이터는 state를 통해 제어한다.(제어 컴포넌트)
Inline Handler
- JSX에서는 이벤트에 HTML과 달리 함수 혹은 함수 객체 자체가 들어가야 한다.
- HTML과 같이 코드가 들어가면 안된다.
- 꼭 !
기본 틀 예시
import React from 'react';

export default function () {
    return (
        <h1 onClick={ (e) => {} }>
            ex03 - Event Handler
        </h1>
    );
}
import React from 'react';
export default function () {
return (
<h1
onClick={ (e) => { console.log('click!!'); } }
style={ {
cursor:'pointer'
} } >
ex03 - Event Handler
</h1>
);
}- 이벤트는 함수로, 스타일은 객체로 만들어야한다.
Functional Handler
- 함수를 외부로 빼서 사용.
import React from 'react';

export default function TitelBar02() {

    const onClickHeader = () => {
        console.log('TitelBar02 click!!');
    }

    return (
        <h1
        onClick={ onClickHeader }
        style={ {
            cursor:'pointer'
        } } >
            ex03 -  Functional Event Handler(Functional Component)
    </h1>
    )
}- 함수형 컴포넌트에서 this는 사용하지 않는다.
- 함수에서는 호출하는 주체가 this가 되는데 전역일수도, 엘리먼트일 수도 있다.
- 함수형 컴포넌트에서는 hook 함수를 사용한다.(useState)
- 클로저를 사용하면 사용은 되지만, state에 들어가지 않기 때문
Class Handler
import React, {Component} from 'react';

export default class TitelBar01 extends Component {

    constructor(){
        super(...arguments);
        // this.no = 10;
        this.state = {
            no: 10
        }
    }

    onClickHeader(e){
        // this.no++;
        // console.log('TitelBar01 click!!', this.no);
        // this.render();
        console.log('TitelBar01 click!!', this.state.no);
        // this.state.no++;
        this.setState({
            no: this.state.no + 1
        })
    }

    render() {
        return (
            <h1
                onClick={ this.onClickHeader.bind(this) }
                style={ {
                    cursor:'pointer'
                } } >
                    ex03 -  Functional Event Handler(Class Component) { /* this.no */ this.state.no }
            </h1>
        )
    }
}- 여기서의 this는 객체를 가리킨다.
- 이벤트는 함수, 스타일은 객체여야한다.
- state가 변경되면 reder가 실행이 된다.
- render를 직접 호출하는 건 좋지 않은 방법이다.
- this안에 state 객체가 내장되어 있다.
- state을 변경시킬 때에는 새로운 객체를 만들어주는것이 좋다.
- engine이 내용의 변경을 파악하는 것보다 새로운 객체의 생성과 비교가 더 효율적이기에 새로운 객체를 만들어 사용한다.
SyntheticEvent
- form 안의 element도 접근할 수 있다.
import React, {Fragment} from 'react';

export default function App() {

    const onChangeMessageInput = function(e) {
        console.log(e.target.name, ":", e.target.value);
    }

    const onAddFormSubmit = function(e) {
        e.preventDefault();
        console.log(e.target.name, ":", e.target.hi.value, "Ajax 방식의 등록잡업을 해야한다.");
    }

    return (
        <Fragment>
            <h2>ex03 - SyntheticEvent</h2>
            <p>
                Native DOM Event 객체를 Wrapper 하고 있다.<br/>
                Native 이벤트 객체와 사용하는 방식이 같다(인테페이스 동일)
            </p>
            <form
                name='addForm'
                method='post'
                action='/do/not/go'
                onSubmit={ onAddFormSubmit }
                >
                <input
                    type='text'
                    name='hi'
                    placeholder='메세지를 입력 하세요'
                    onChange= { onChangeMessageInput }
                    />
                <br/>
                <br/>
                <input
                    type='submit'
                    value='등록' />
            </form>
        </Fragment>
    );
}
Some Examples of Event Handler
- Event는 만든 Component 자체에는 줄 수 없다.
- Component의 데이터는 바깥에서 건들면 안된다.
- onKeyPressInput은 onChange로 대체할 수 있다.
- state에 접근하고자할 때 bind(this)를 해주는 것이 좋다.
- 변경된 값을 적용하기 위해서는 state를 변경하여 render를 호출하게 한다.
import React, {Fragment} from 'react';
import logo from '../assets/images/react-logo.png';
// file-loader를 지금 안붙여도된다.
// 왜?
export default function App() {
    const onKeyPressInput = function(e){
        // 이름이 지정되어있다.
        // Virtual key 검색
        if(e.key = 'Enter')
        console.log(e.target.value);
    }
    const onFocusInput = function(e){
        console.log('onFocusInput');
    }
    const onBlurInput = function(e){
        console.log('onBlurInput');
    }

    const onMouseOverImage = function(e){
        // 마우스 위치
        console.log('onMouseOverImage');
    }
    const onMouseMoveImage = function(e){
        console.log('onMouseMoveImage',`x=${e.clientX}, y=${e.clientY}`);
    }
    const onMouseOutImage = function(e){
        console.log('onMouseOutImage');
    }
    const onMouseDownImage = function(e){
        console.log('onMouseDownImage');
    }
    const onMouseUpImage = function(e){
        console.log('onMouseUpImage');
    }

    const onClickImage = function(e){
        console.log('onClickImage');
    }

    const onDoubleClickImage = function(e){
        console.log('onDoubleClickImage');
    }


    return (
        <Fragment>
            <h2>ex03 - Some Examples of Event Handler</h2>
            <input
                type='text'
                placeholder='메세지를 입력 하세요'
                onKeyPress={ onKeyPressInput }
                onFocus={ onFocusInput }
                onBlur={ onBlurInput } />
                <br/>
                <br/>
            <img
                style={ {
                    cursor: 'pointer',
                    width: 190,
                    border: '1px solid #ccc'
                } }
                src={ logo }
                onMouseOver={ onMouseOverImage }
                onMouseMove={ onMouseMoveImage }
                onMouseOut={ onMouseOutImage }
                onMouseDown={ onMouseDownImage }
                onMouseUp={ onMouseUpImage }
                onClick={ onClickImage }
                onDoubleClick={ onDoubleClickImage }/>
        </Fragment>
    );
}
Ref
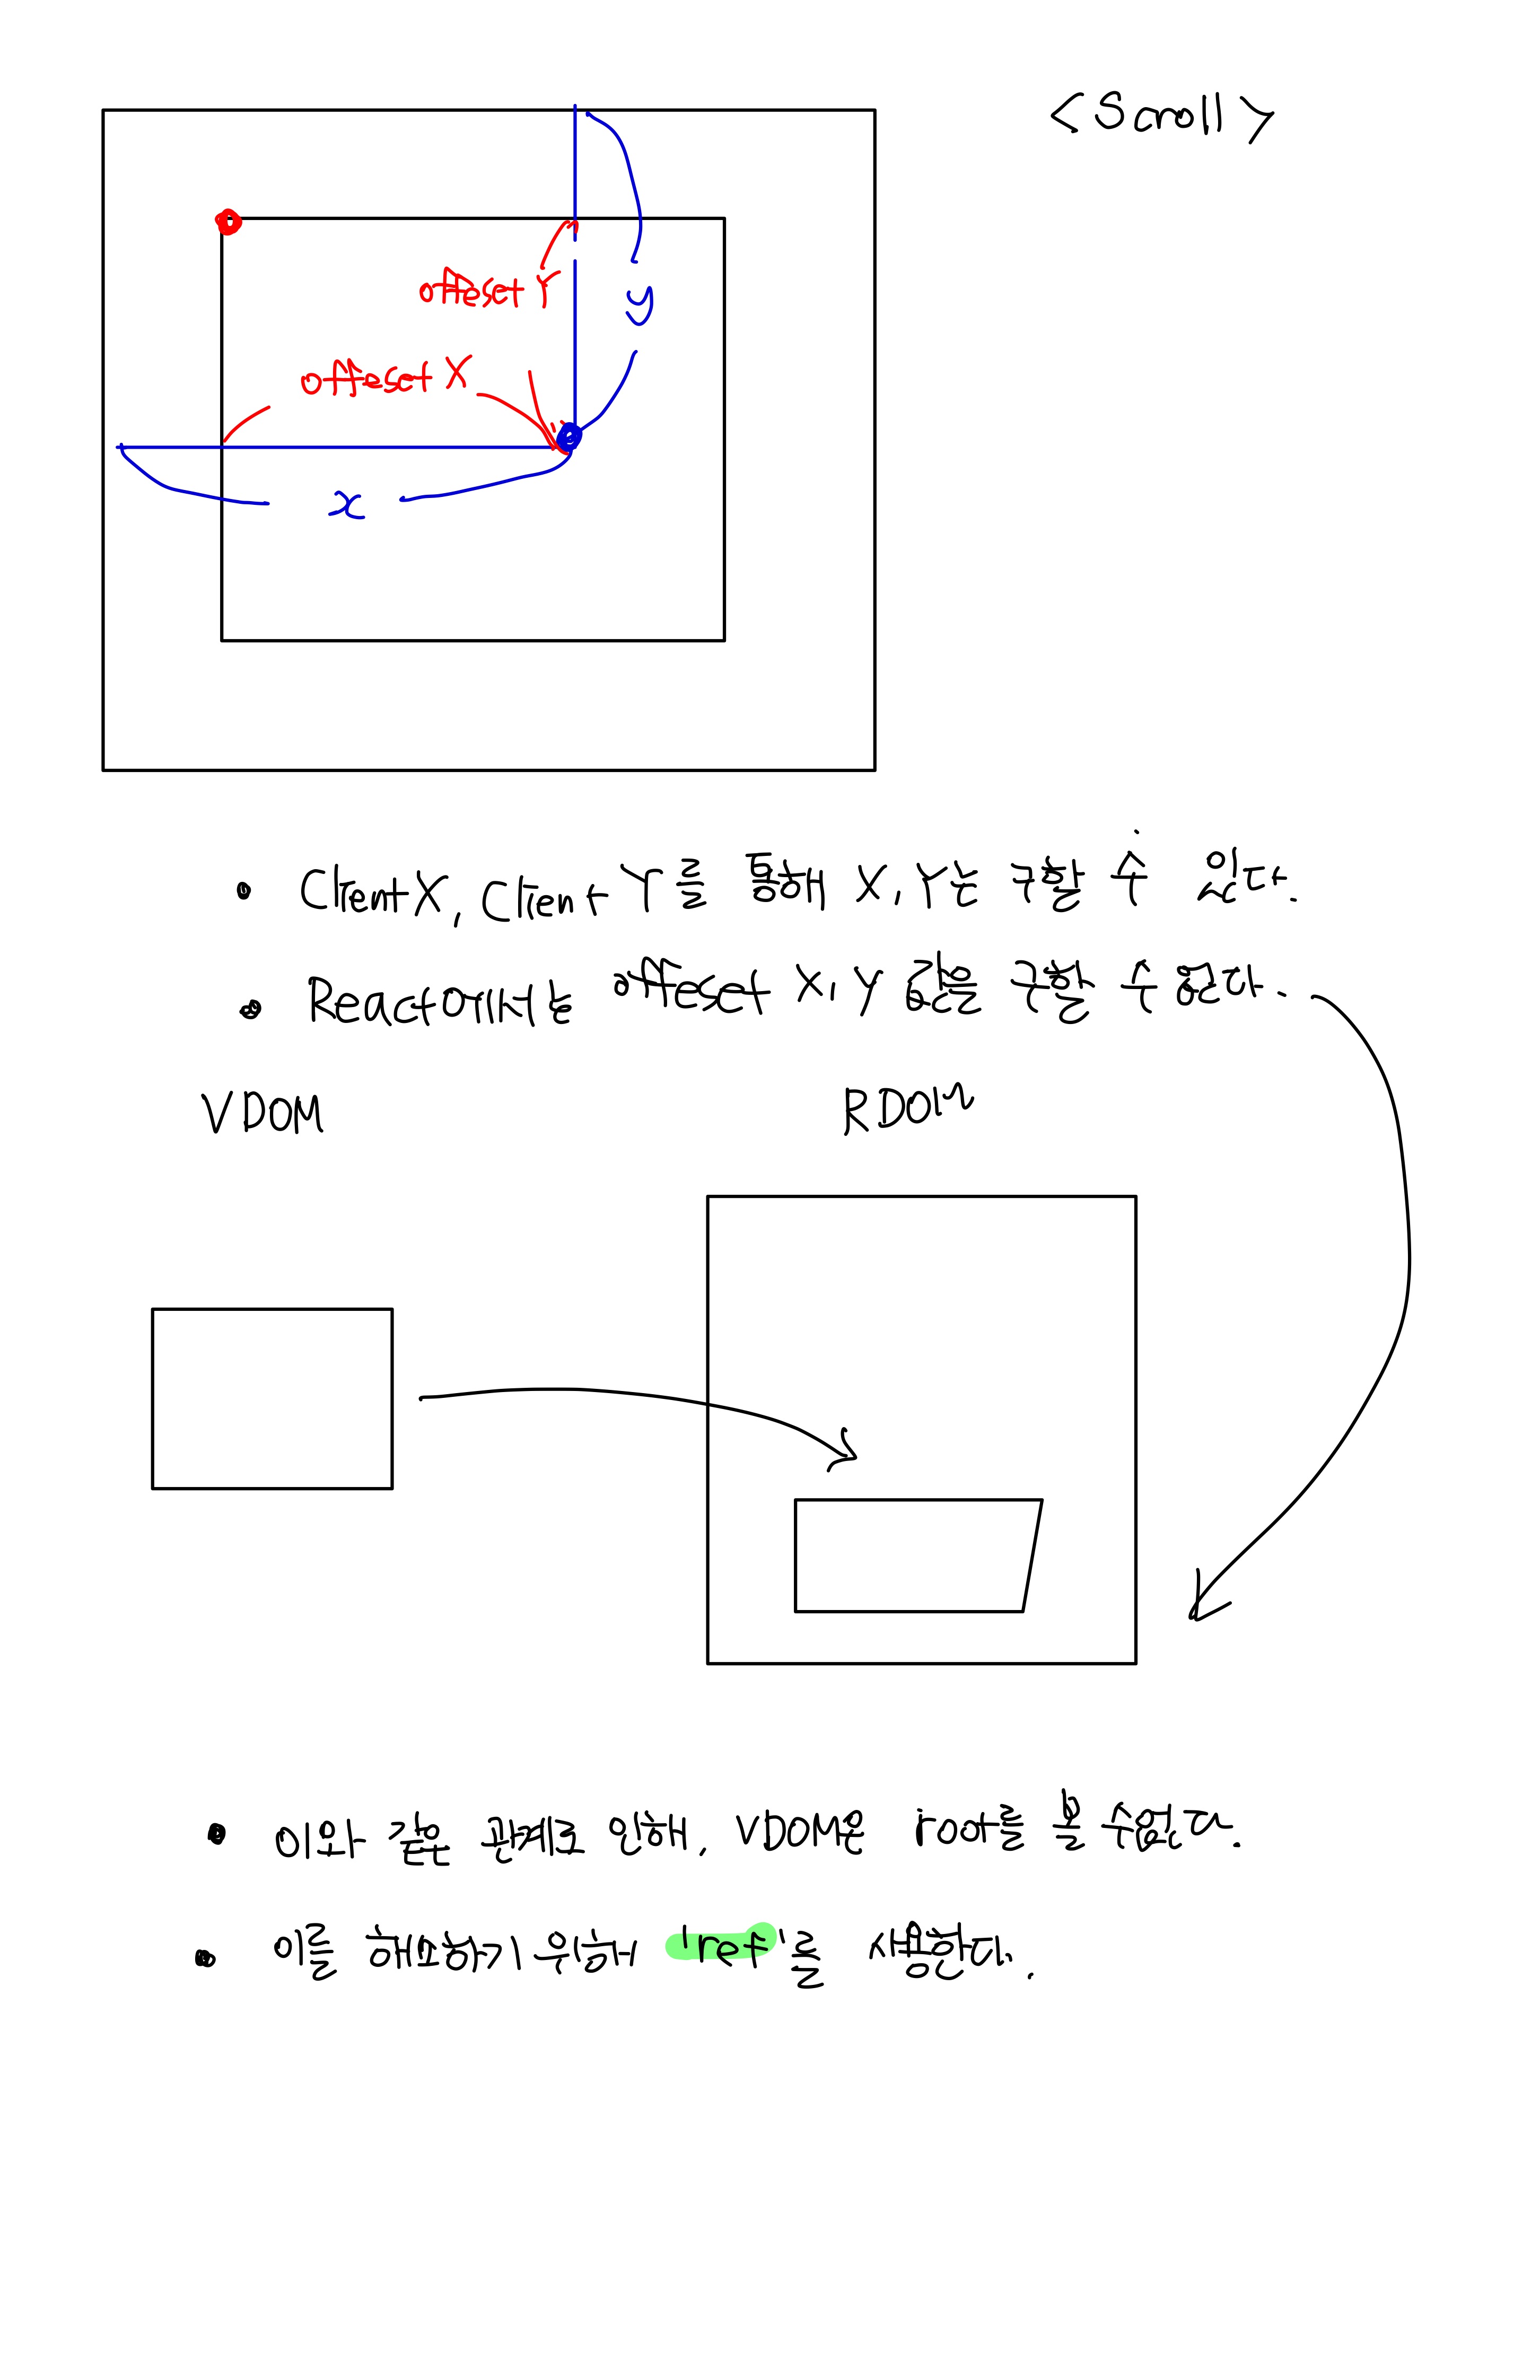
Scroll Event를 통한 예제
real DOM element에 접근
- useRef 사용
- 'ref'(react가 가지고 있는) 속성을 원하는 대상에 지정하고, 그 대상을 세팅하기 위한 변수를 지정한다.
- React에서는 document가 자신이 가지고 있는 영역 밖이기에 이와 같은 방법을 사용한다.
image의 좌표값 구하기
import React, { useRef, Fragment } from 'react';
import logo from '../assets/images/react-logo.png';
export default function App() {
const imageRef = useRef(null);
// ref를 쓰기위해 객체를 생성한다.
// 여기선 ref할 상대를 알 수 없다.
// 그렇기에 null로 세팅을한다.
const onKeyPressInput = function(e){
// 이름이 지정되어있다.
// Virtual key 검색
if(e.key = 'Enter')
console.log(e.target.value);
}
const onFocusInput = function(e){
console.log('onFocusInput');
}
const onBlurInput = function(e){
console.log('onBlurInput');
}
const onMouseOverImage = function(e){
// 마우스 위치
console.log('onMouseOverImage',`x=${e.clientX}, y=${e.clientY}`);
}
const onMouseMoveImage = function(e){
const offsetTop = imageRef.current.offsetTop;
const offsetLeft = imageRef.current.offsetLeft;
// image 안에서의 좌표 구하기
console.log('onMouseMoveImage',`x=${e.clientX - offsetLeft}, y=${e.clientY - offsetTop}`);
}
// document.getElementById('image').offsetTop
const onMouseOutImage = function(e){
console.log('onMouseOutImage',`x=${e.clientX}, y=${e.clientY}`);
}
const onMouseDownImage = function(e){
console.log('onMouseDownImage',`x=${e.clientX}, y=${e.clientY}`);
}
const onMouseUpImage = function(e){
console.log('onMouseUpImage',`x=${e.clientX}, y=${e.clientY}`);
}
const onClickImage = function(e){
console.log('onClickImage',`x=${e.clientX}, y=${e.clientY}`);
}
const onDoubleClickImage = function(e){
console.log('onDoubleClickImage',`x=${e.clientX}, y=${e.clientY}`);
}
return (
<Fragment>
<h2>ex03 - Some Examples of Event Handler</h2>
<input
type='text'
placeholder='메세지를 입력 하세요'
onKeyPress={ onKeyPressInput }
onFocus={ onFocusInput }
onBlur={ onBlurInput } />
<br/>
<br/>
<img
ref = { imageRef }
style={ {
cursor: 'pointer',
width: 190,
border: '1px solid #ccc'
} }
src={ logo }
onMouseOver={ onMouseOverImage }
onMouseMove={ onMouseMoveImage }
onMouseOut={ onMouseOutImage }
onMouseDown={ onMouseDownImage }
onMouseUp={ onMouseUpImage }
onClick={ onClickImage }
onDoubleClick={ onDoubleClickImage }/>
</Fragment>
);
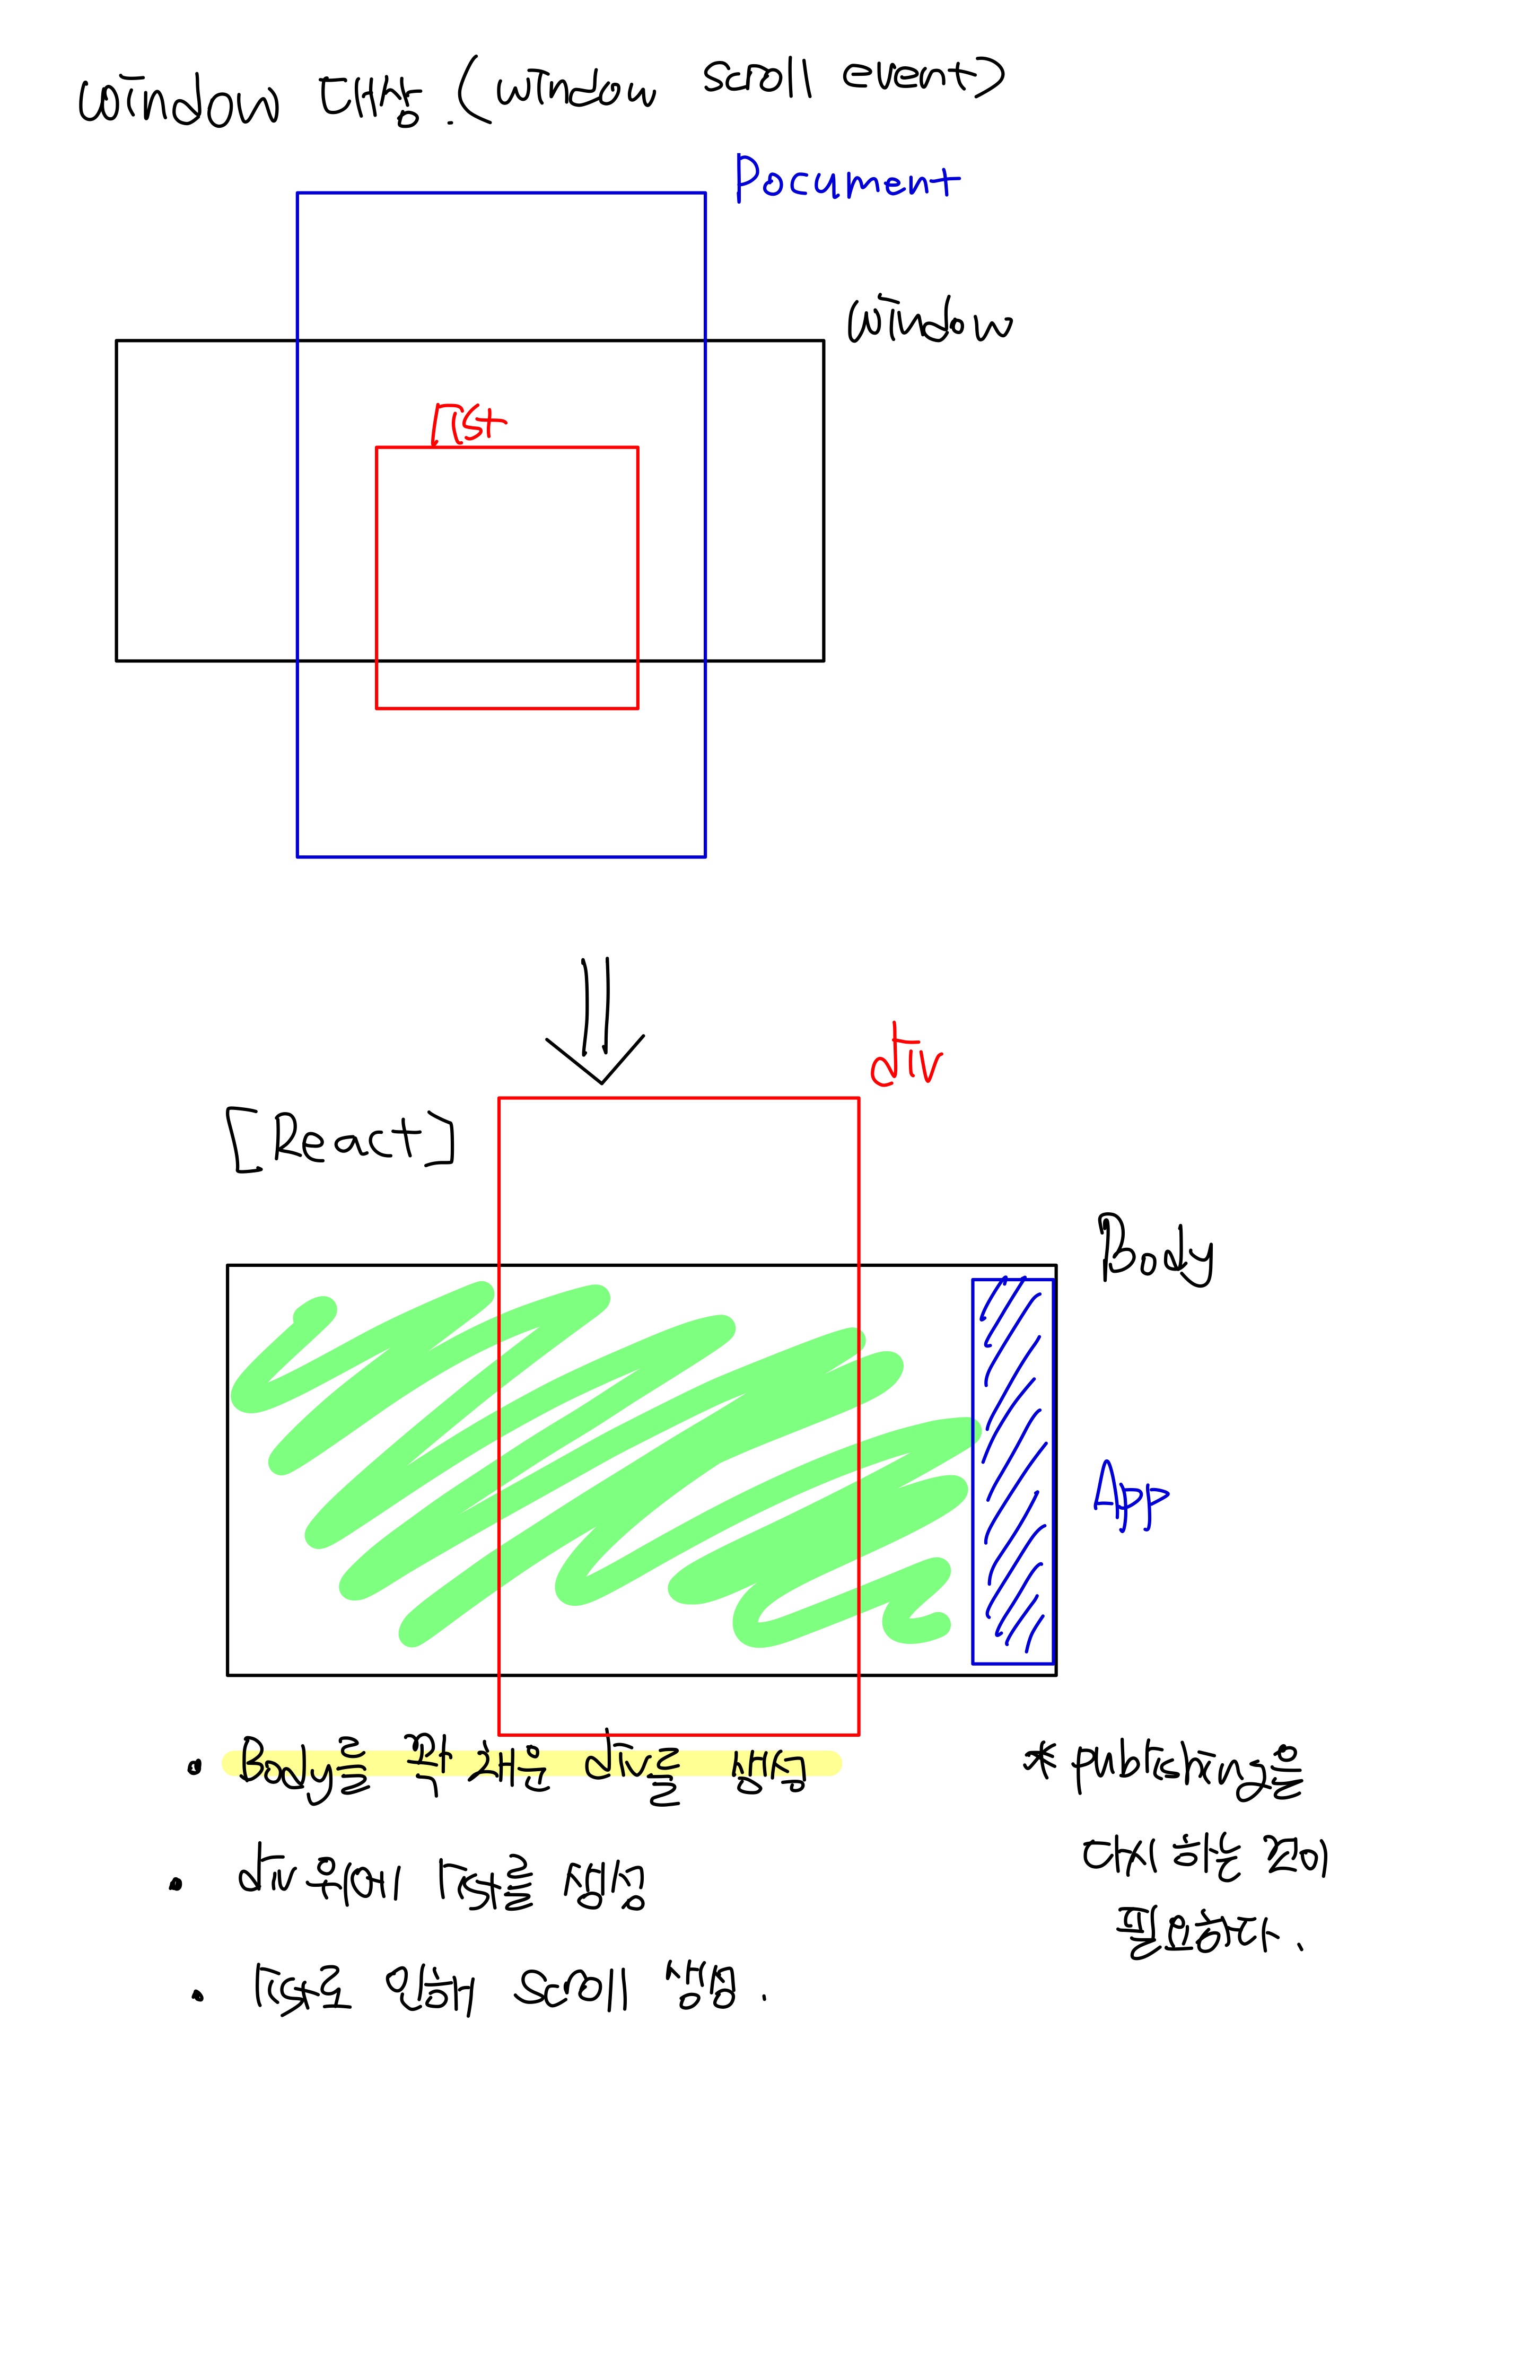
}Scroll(react)
-
body로부터 생성된 스크롤이 아닌, div 스크롤이다.
- 마치 body처럼 보일 수 있도록 하는 것이다. (window x)
-
outer -> App, inner -> div
-
outer의 height
-
inner의 height
-
scroll의 Top
-
inner = outer + top
:global(.App) { height: 100vh; width:100%; margin:0 auto; overflow-y: scroll }핵심
- 위와 같은 css코드를 통해 App를 body의 크기에 딱 맞추고, 그 위에 list를 올림으로써 window의 스크롤과 같이 만들 수 있다.
Functional Component
import React, { useRef } from 'react';
import './assets/scss/App.scss';

export default function App() {
    const outterRef = useRef(null);
    const innerRef = useRef(null);

    return (
        <div
            className={'App'}>
            <div
                ref={ innerRef }>
                <ul>
                    {/* length만 가지고 있는 가짜 배열
                        실제 값을 가지고 있진 않기 때문에 undefined와 index을 가진다.
                        [1,2,3,4,5,6,7,8,9...]을 만들기 위해
                        동적으로 할당한다.
                        즉, 스크롤 생성을 위해 많은 리스트를 생성하기 위함이고,
                        새로운 정수 배열을 만들어 이용한다. */}
                    { Array.from({length: 100}, (_, i) => i+1).map(i =>
                        <li key={ i }>
                            { `아이템 ${i} 입니다.` }
                        </li>
                    ) }
                </ul>
            </div>
        </div>
    );
}
Class Component
- App div의 this는 Component를 가리킨다.
- 람다는 함수라는 블럭에 감싸져 있기 때문에 일반 함수에서의 this와 다를 수 있다는것에 주의해야한다. 아래 코드에서 람다의 this는 Component를 가리키지만, function에서는 감싸져 있기 때문에 다르다. 이를 해결하기 위해서는 아래와 같이 바인드를 해주어야한다.
(function(e){
	this.outterRef = ref;
}).bind(this) // bind에서의 this는 Component를 가리킨다.
import React, { Component } from 'react';
import './assets/scss/App.scss';
export default class extends Component{
onScroll(e){
console.log( this.outterRef.scrollTop, ":", this.outterRef.clientHeight, ":", this.innerRef.clientHeight );
// clientHegith는 화면의 크기
// ScrollTop은 움직인 scroll의 크기
// 그러므로, inner = clientHeight + scrollTop
}
render(){
return (
<div
ref={ (ref) => this.outterRef = ref }
className={'App'}
onScroll={ this.onScroll.bind(this) }>
<div
ref={ (ref) => this.innerRef = ref }
>
<ul>
{/* length만 가지고 있는 가짜 배열
실제 값을 가지고 있진 않기 때문에 undefined와 index을 가진다.
[1,2,3,4,5,6,7,8,9...]을 만들기 위해
동적으로 할당한다.
즉, 스크롤 생성을 위해 많은 리스트를 생성하기 위함이고,
새로운 정수 배열을 만들어 이용한다. */}
{ Array.from({length: 100}, (_, i) => i+1).map(i =>
<li key={ i }>
{ `아이템 ${i} 입니다.` }
</li>
) }
</ul>
</div>
</div>
);
}
}