Google API 사용하기
-
google api console 접속
-
project 생성
-
oauth 동의 화면 구성
-
사용자 인증 정보 작성
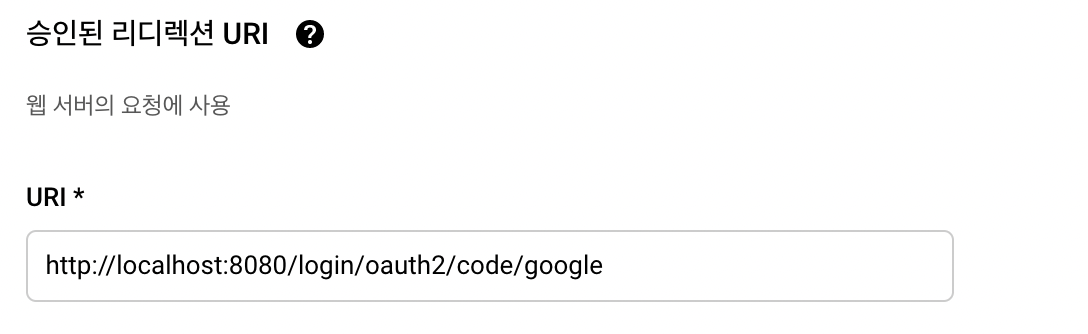
사용자 인증 정보 작성 중 URI
-
상기 부분은 구글 로그인을 완료하게되면 구글 서버쪽에서 우리쪽으로 인증이 되었단 코드를 보내준다.
-
우리는 이 코드를 받아서 이 코드로 access token을 요청한다.
-
이 access token을 받아서 사용자 대신, 구글 서버에 사용자의 정보를 접근할 수 있는 권한이 생긴다.
-
이 코드를 받을 수 있는 주소를 적는 곳이다.
-
oauthclient 라이브러리를 사용할 경우 이 주소는 고정되어있다.
(login/oauth2/code/google or facebook ...) -
앞의 localhost:8080는 도메인 주소로 변경이 가능하다.
-
그러므로 개발자는 이 부분을 직접 제어하지 않는다. 즉 controller에 구성할 필요가 없다. -> 라이브러리가 처리를 해주고, 이 주소로 리턴이 된다.
-
-
완료 후 나오는 클라이언트 ID, 클라이언트 보안 password를 안전하게 보관한다.
-
라이브러리 설치를 위해 maven repository 로 이동 및 검색
-
maven dependency 추가
<dependency>
   <groupId>org.springframework.boot</groupId>
   <artifactId>spring-boot-starter-oauth2-client</artifactId>
</dependency>- application.yml 파일에 config 추가
# oauth2 client config
  security:
    oauth2:
      client:
        registration:
          google:
              client-id: 클라이언트 아이디값
              client-secret: 클라이언트 패스워드값
              scope:
                - email
                - profile
- form 에 관련 url로 요청하는 태그 작성
<a href="/oauth2/authorization/google">구글 로그인</a>
<!-- 상기 url도 라이브러리를 사용하면 지정되어있기 때문에 마음대로 지정할 수 없다. -->- Security Config 추가
.and()
.oauth2Login()
.loginPage("/loginForm");
구글 로그인 완료 후 후 처리 작업
구글 로그인 후 후처리 작업이 필요하다.
- 코드 받기(인증완료)
- 액세스토큰(사용자 정보 접근 권한 생성)
- 사용자 프로필 정보 가져오기
- 그 정보를 토대로 회원가입 자동 진행 or 정보의 데이터가 원하는 데이터에 부족하다면, 추가적인 회원가입 정보를 입력할 수 있도록 안내
! Tip. 구글 로그인이 완료가 되면, 액세스 토큰 + 사용자 프로필 정보를 한번에 받는다. (oauth client 라이브러리 사용시)
--> 이미 코드를 받아서 이 코드를 통해 액세스 토근 + 사용자 프로필 정보를 받은 데이터를 리턴해준다.
구글을 통해 받은 사용자 정보를 토대로 강제 회원가입 진행
Spring Security config 추가
@Autowired
private PrincipalOauth2UserService principalOauth2UserService;
.
.
.

.userInfoEndpoint()
.userService(principalOauth2UserService); // 타입이 oauth2 userservice가 되어야한다.
oauth 패키지 생성 및 oauth2 타입 userservice 생성
@Service
public class PrincipalOauth2UserService extends DefaultOAuth2UserService {

}- getClientRegistration로 어떤 Oauth로 로그인 했는지 확인이 가능하다.
- userRequest 정보 : 구글 로그인 버튼 클릭 -> 구글 로그인 창 팝업 -> 로그인 진행 완료 -> 코드 리턴 완료 -> OAuth-Client 라이브러리가 코드를 받아줌 -> 받은 코드로 AccessToken 요청
- loadUser 함수 : userRequest 정보로 loadUser 함수를 이용하여 회원 프로필을 받는다.
로그인 한 유저 정보를 객체로 받아오는 2가지 방법(+ Oauth 인증 유저)
- 방법(1)
 @GetMapping("/test/login")
    public @ResponseBody String testLogin(Authentication authentication){
        // 방법 1 로그인한 유저 정보를 객체로 받아온다.
        PrincipalDetails principalDetails = (PrincipalDetails) authentication.getPrincipal();
        System.out.println(principalDetails.getUser());


        return "";
}- 방법(2)
- @AuthenticationPrincipal 를 통해서 session 정보에 접근할 수 있다.
 @GetMapping("/test/login")
    public @ResponseBody String testLogin(@AuthenticationPrincipal PrincipalDetails userDetails){
        // 방법 2
        System.out.println(userDetails.getUser());

        return "";
    }
OAuth 유저 정보 받기
- 방법 (1)
    @GetMapping("/test/oauth/login")
    public @ResponseBody String testOAuthLogin(Authentication authentication){
        OAuth2User oAuth2User = (OAuth2User) authentication.getPrincipal();
        oAuth2User.getAttributes();
        System.out.println( oAuth2User.getAttributes());

        return "";
    }
- 방법 (2)
@GetMapping("/test/oauth/login")
public @ResponseBody String testOAuthLogin(Authentication authentication, @AuthenticationPrincipal OAuth2User oAuth){
System.out.println(oAuth.getAttributes());
return "";
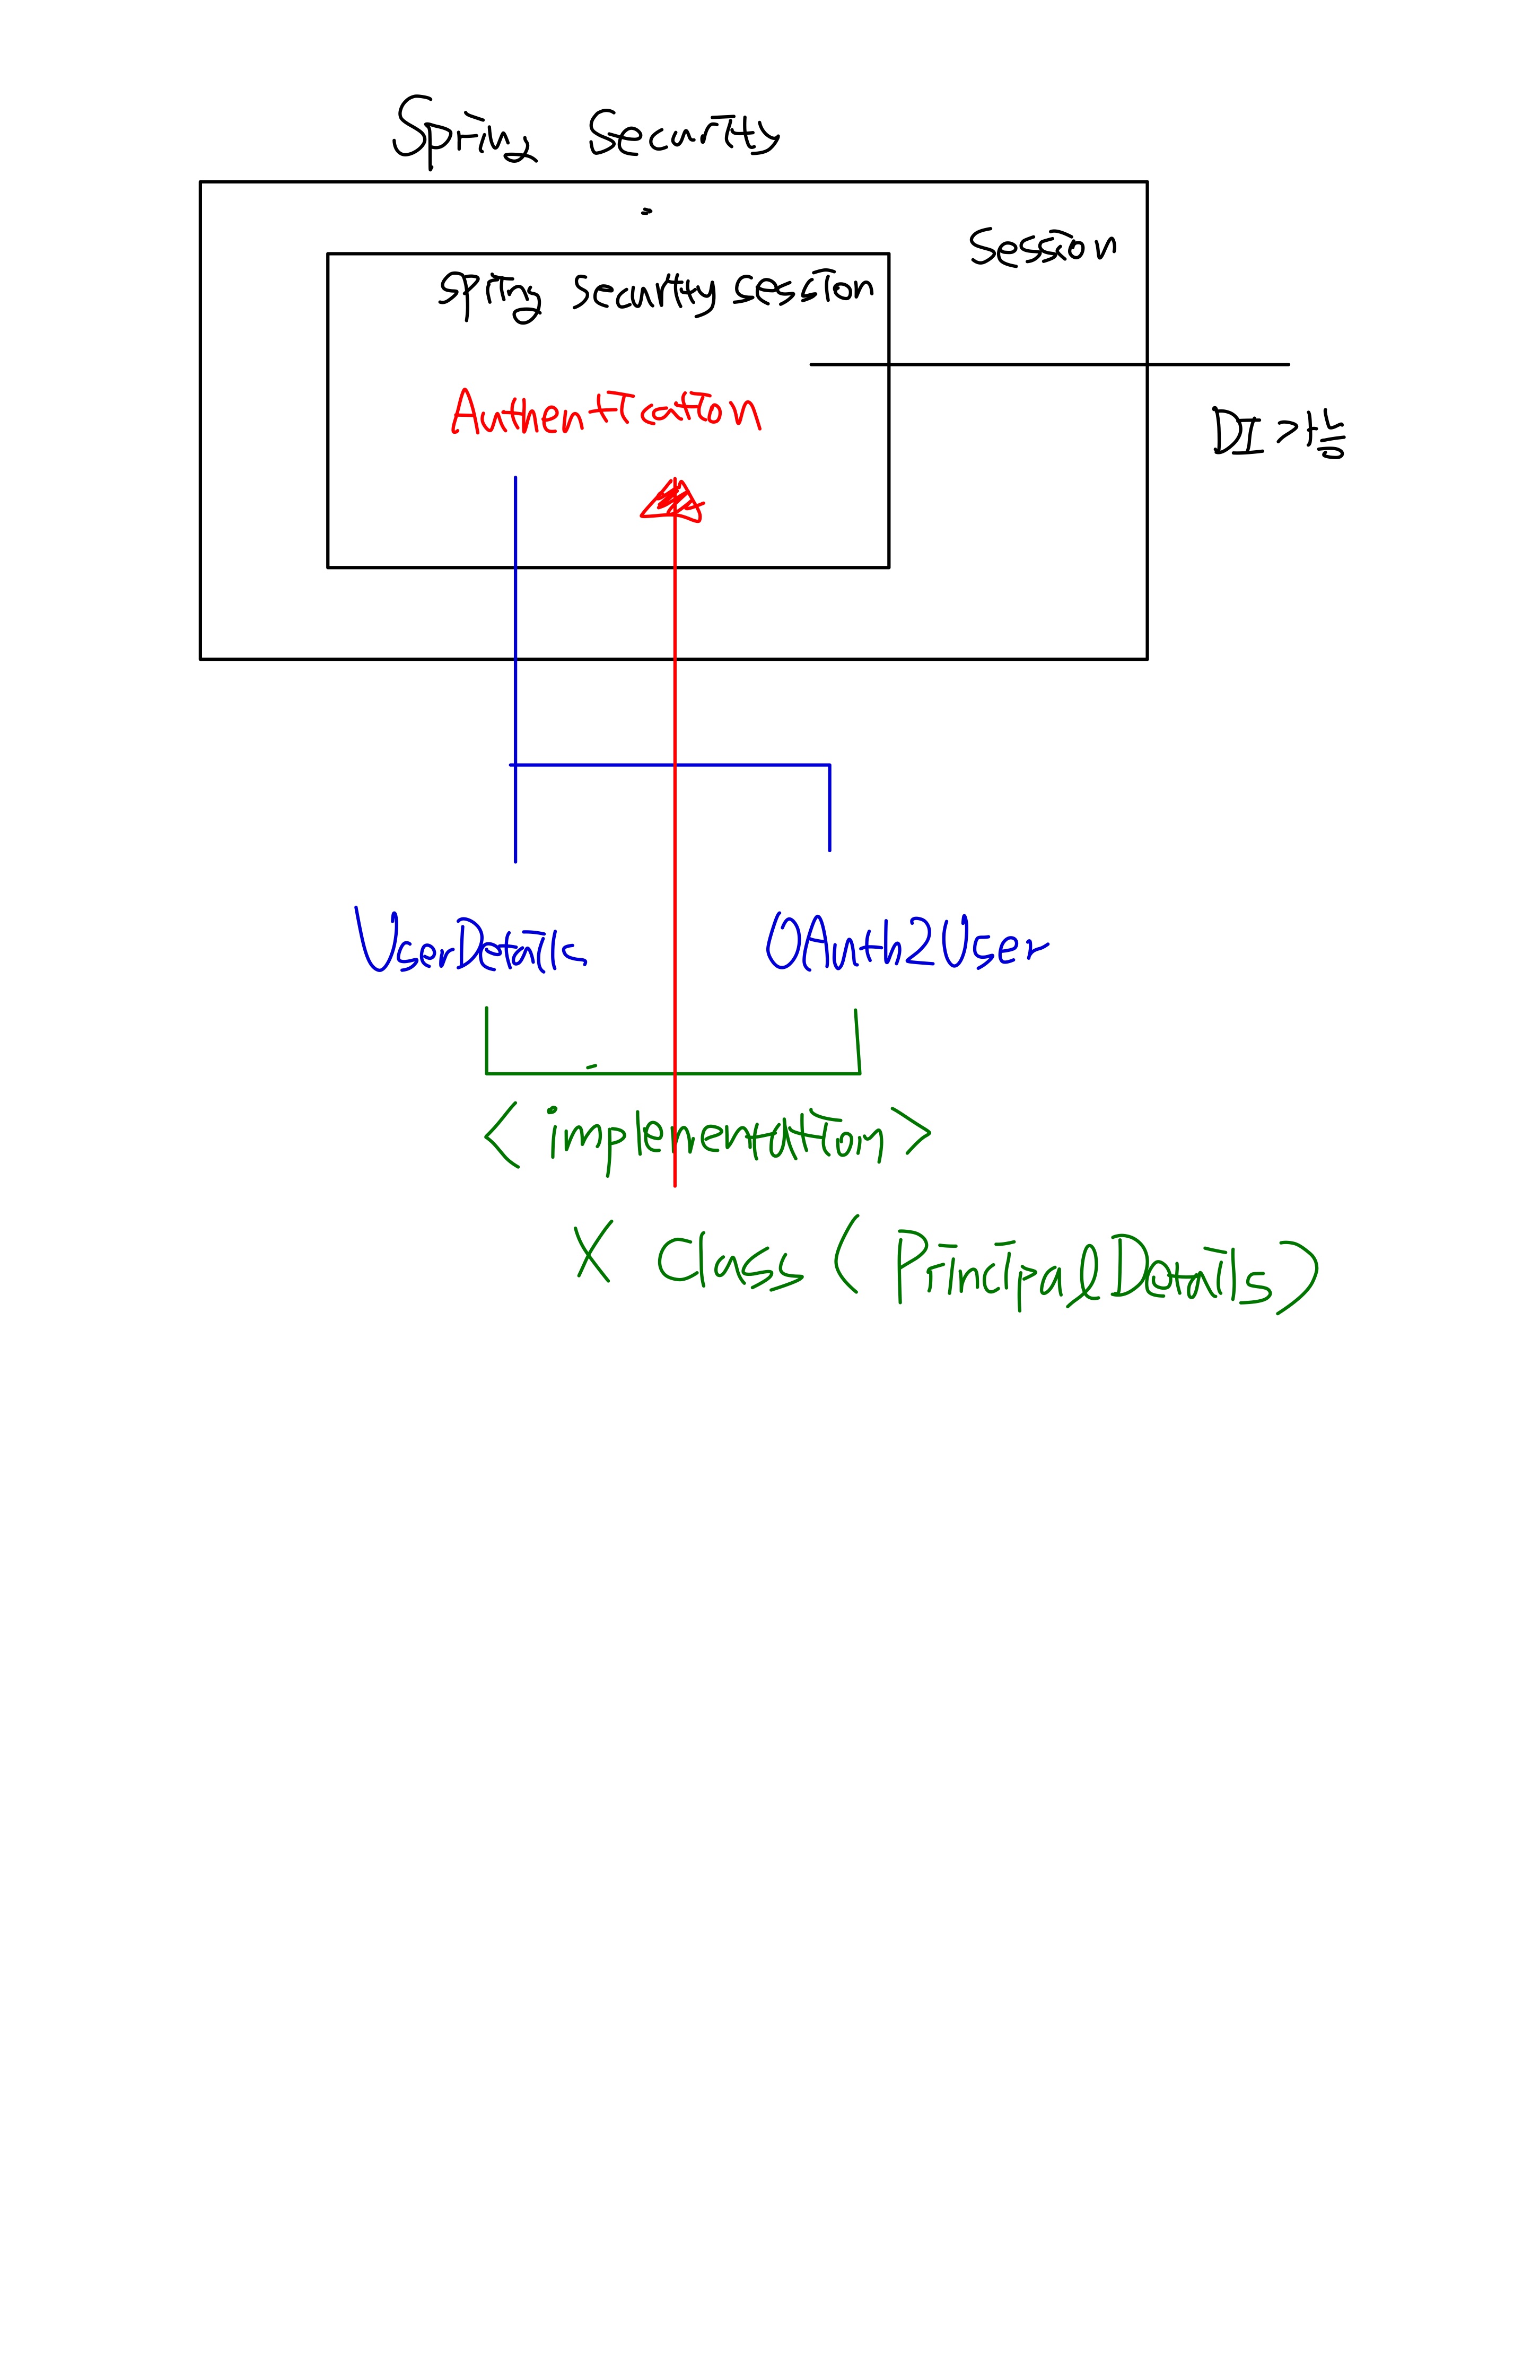
}통합하기 (UserDetails & OAuth2User)
단, 여기에서의 문제는 사용할 때에 있어 OAuth 로그인과 일반 유저 로그인에 따라서 다르게 사용을 해주어야 한다는 것이다.
-
Spring Security는 session안에 자신만의 Spring security session을 가지고 있다.
-
이 session 안에는 Authentication 객체만 넣을 수 있다.
-
이 Authentication 객체에는 UserDetails(일반 유저 정보),
OAuth2User(oauth 인증 유저)만 들어갈 수 있다. -
그러므로 이 두 객체를 상속받는 하나의 객체를 만들어 Authentication으로 넣는다.
-
결과적으로 이 새로운 객체는 두 가지 타입을 모두 가지므로 좀 더 포괄적으로 사용할 수 있다.
-
(UserDetails + OAuth2User)PrincipalDetails(새로운 객체) -> Authentication
- PrincipalDeteails(생성한) 객체에 UserDetails, OAuth2User implements & override
- Model User에 id를 제외한 생성자 생성(User에 @NoArgsConstructor //default constructor t설정하기)
   @Builder
    public User(String username, String password, String email, String role, String provider, String providerId, Timestamp createDate) {
        this.username = username;
        this.password = password;
        this.email = email;
        this.role = role;
        this.provider = provider;
        this.providerId = providerId;
        this.createDate = createDate;
}- 후처리 작업을 하는 PrincipalOauth2UserService 객체에 코드 작성
package com.coven.security1.config.oauth;

import ch.qos.logback.core.net.SyslogOutputStream;
import com.coven.security1.config.auth.PrincipalDetails;
import com.coven.security1.model.User;
import com.coven.security1.repository.UserRepository;
import org.springframework.beans.factory.annotation.Autowired;
import org.springframework.security.core.annotation.AuthenticationPrincipal;
import org.springframework.security.crypto.bcrypt.BCryptPasswordEncoder;
import org.springframework.security.oauth2.client.userinfo.DefaultOAuth2UserService;
import org.springframework.security.oauth2.client.userinfo.OAuth2UserRequest;
import org.springframework.security.oauth2.core.OAuth2AuthenticationException;
import org.springframework.security.oauth2.core.user.OAuth2User;
import org.springframework.stereotype.Service;
import sun.lwawt.macosx.CSystemTray;

@Service
public class PrincipalOauth2UserService extends DefaultOAuth2UserService {
    // 후 처리되는 함수
    // 구글로부터 받은 userRequest 데이터에 대한 후 처리 함수

    @Autowired
    private BCryptPasswordEncoder bCryptPasswordEncoder;

    @Autowired
    private UserRepository userRepository;

    @Override
    public OAuth2User loadUser(OAuth2UserRequest userRequest) throws OAuth2AuthenticationException {
//        System.out.println(userRequest.getClientRegistration());
//        System.out.println(userRequest.getAccessToken());
//        System.out.println(userRequest.getClientRegistration().getClientName());
//        System.out.println(super.loadUser(userRequest));
        OAuth2User oAuth2User = super.loadUser(userRequest);

        String provider = userRequest.getClientRegistration().getClientId(); // google
        String providerId = oAuth2User.getAttribute("sub");
        String username = provider + "_" + providerId;
        String password = bCryptPasswordEncoder.encode("woosung");
        // OAuth 로 로그인되기 때문에 사실상 비밀번호는 필요하지 않지만, 임의로 암호화한 패스워드 값을 넣어준다.
        String role = "ROLE_USER";
        String email = oAuth2User.getAttribute("email");

        // 해당 아이디로 이미 로그인이 되어있는지 확인하기
        User userEntity = userRepository.findByUsername(username);
        if(userEntity == null){
            userEntity = User.builder()
                    .username(username)
                    .password(password)
                    .email(email)
                    .role(role)
                    .provider(provider)
                    .providerId(providerId)
                    .build();
            userRepository.save(userEntity);
        }

        // 이 객체가 만들어져서 Authentication 객체 안에 들어가게 된다.
        return new PrincipalDetails(userEntity, oAuth2User.getAttributes());
    }
}
-
auth, oauth 의 loadUser, loadUserByUsername는 자동적으로 실행되며 PricipalDetails를 리턴하고, 그 리턴된 값은 Authentication 객체에 저장이 된다.
-
오버라이딩한 loadUser,loadUserByUsername 메소드가 종료될 때
@AuthenticationPrincipal 어노테이션이 생성된다.
overriding을 한 이유
1. PricipalDetails로 묶어서 리턴하기 위해서(OAuth2User, UserDetails로 리턴하고자 한다면 오버라이딩 필요 x)
2. OAuth 로 로그인시 바로 회원가입을 강제로 시키기 위해서 