Oauth(Open Authorization)란?
Oauth는 인증을 위한 프로토콜이다. 다른 인터넷 서비스의 기능을 다른 애플리케이션에서도 사용할 수 있게 해 준다.
OAuth 인증도 제공하지만, 주요 목적은 인증된 사용자에게 사용자의 이름이나, 이메일을 가져온다든지 하는 권한을 제공해주는 것이다.
🔧
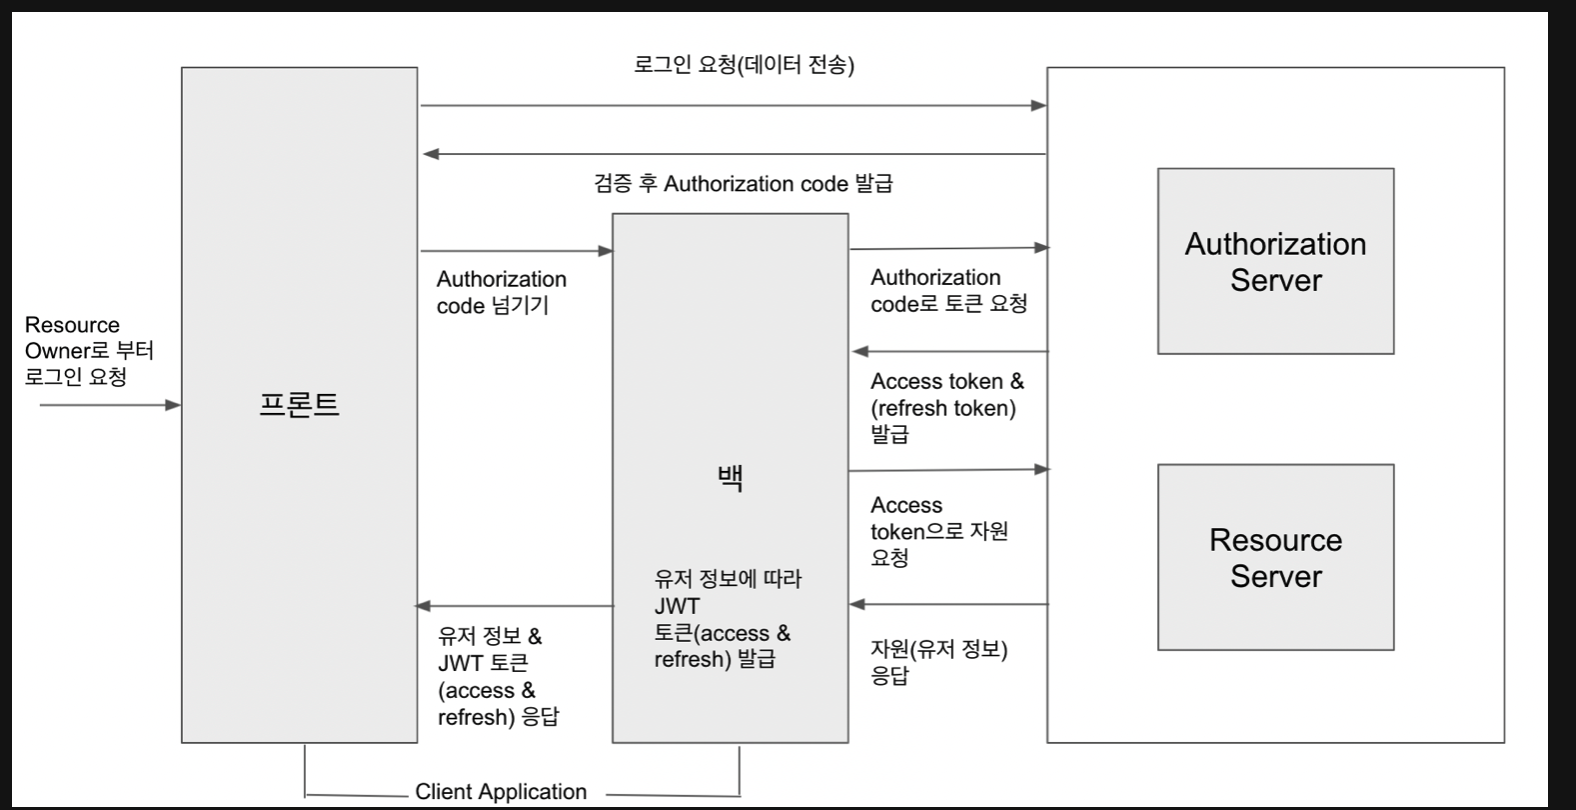
우선 필자의 경우 프론트엔드 개발자와 협업을 하기 때문에 Authorization Code Grant 방식으로 진행할 것이다.
Oauth 서버에서 client application에게 바로 access token을 넘겨주는 것이 아니라, Authorization code를 넘겨주고, client Application은 Authorization code를 통해 access token을 발급받아, access Token으로 허가된 리소스 요청을 하는 방식이다.
이렇게 Authorization code를 도입하게 되면 access token 자체는 백엔드에서만 존재하게 되므로, 중간에 access token을 탈취당하지 않게 된다.

위의 그림과 같이 흘러갈 것이다.
User도메인
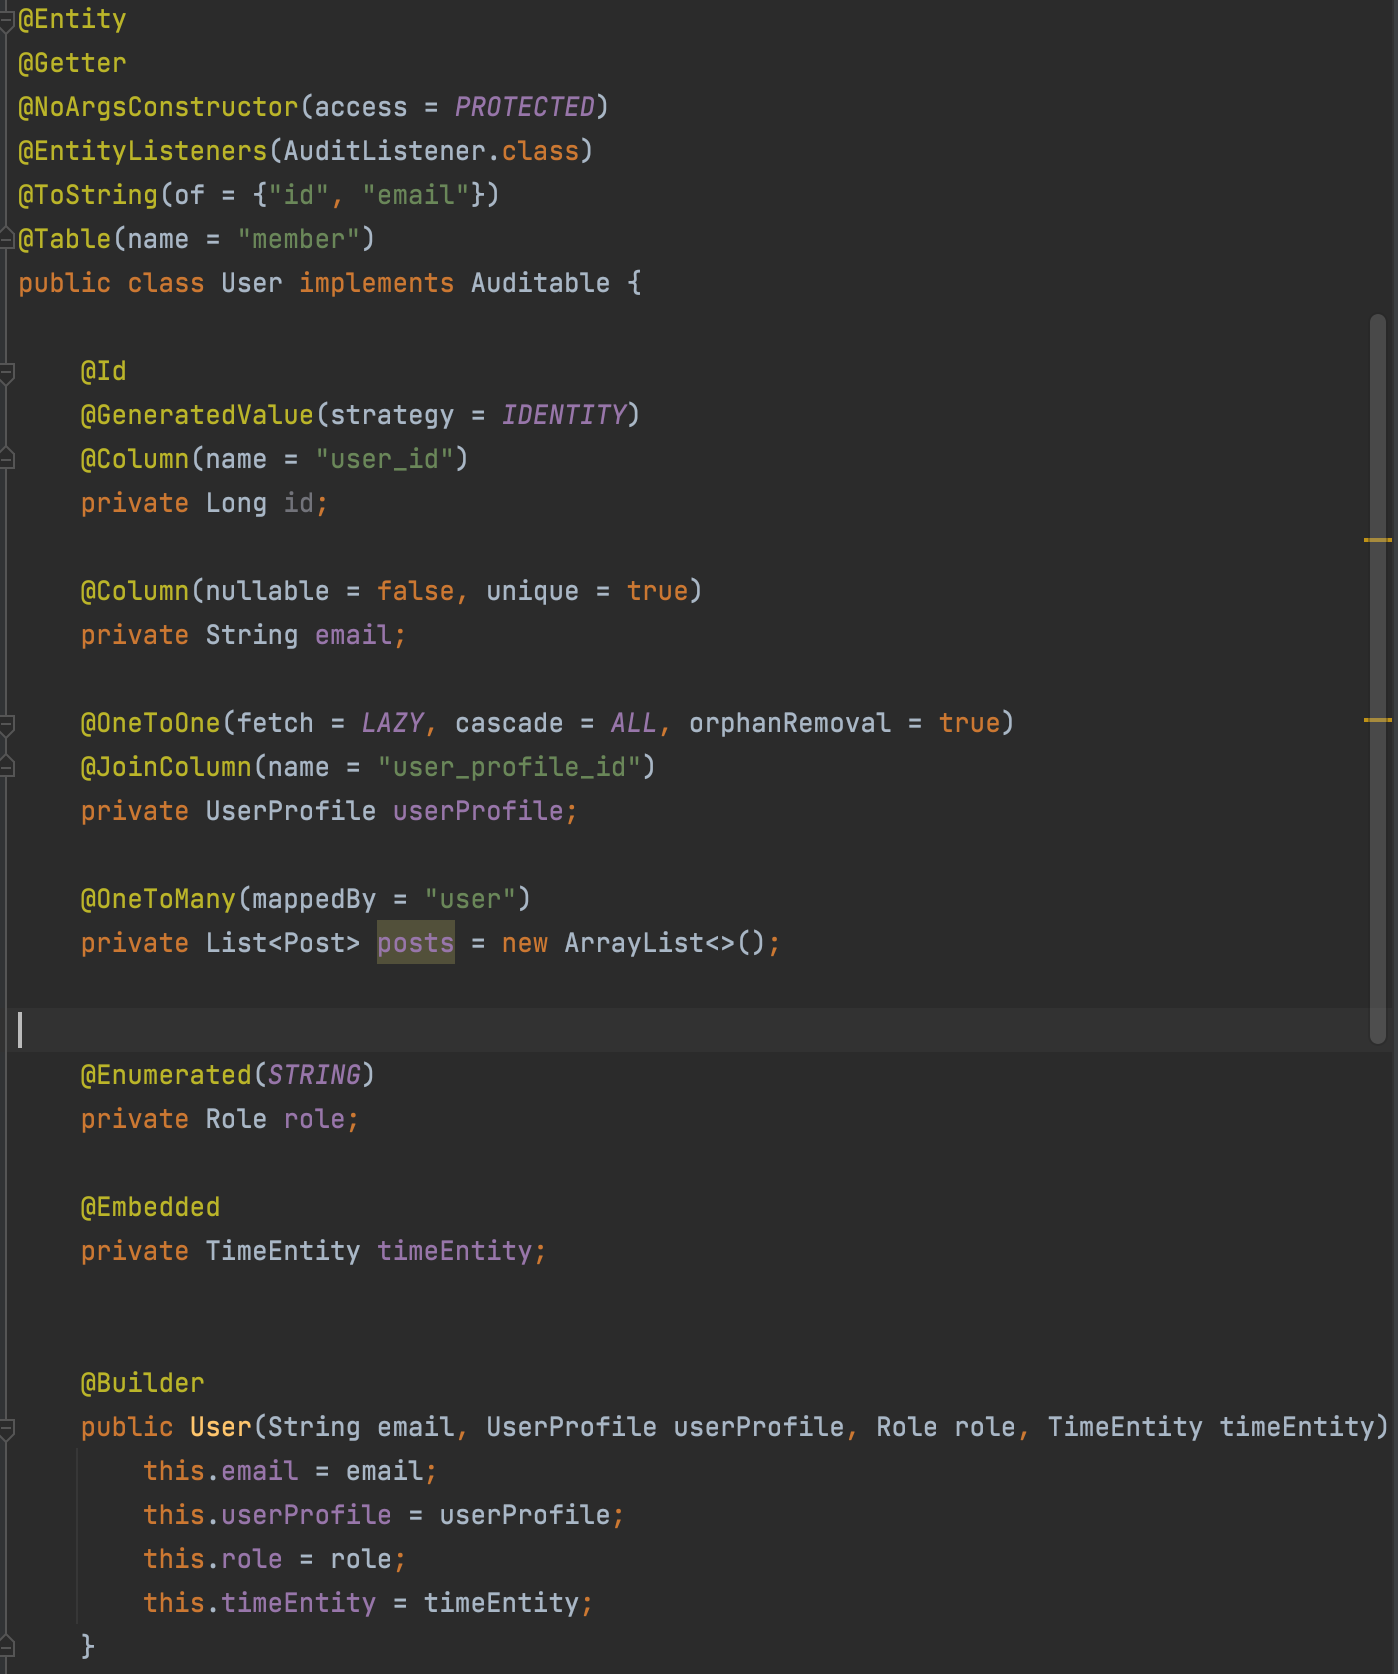
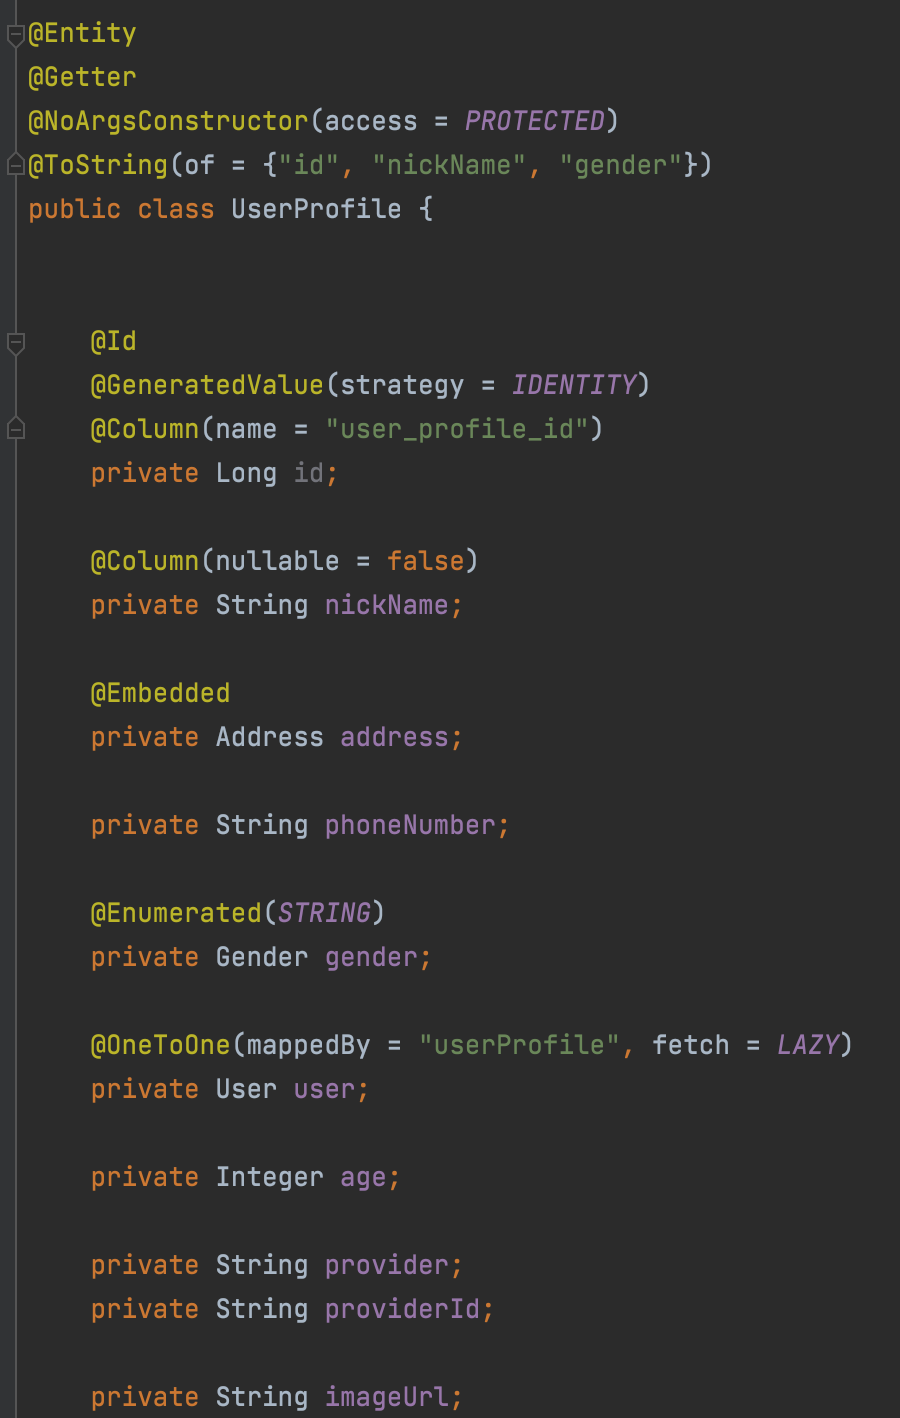
- DB는 PostgresSQL을 사용하고 있는데, User가 예약어라 Member로 테이블명을 변경하였다.
User테이블에서는 Email을 유니크 제약조건으로 사용하고 있으며, 주요 정보는 User_profile 엔티티에 저장한다.
- application-oauth.yml
spring:
security:
oauth2:
client:
registration:
kakao:
client-id: [client-id]
redirect-uri: http://localhost:3000/oauth/kakao
client-authentication-method: POST
client-secret: [secret-key]
authorization-grant-type: authorization_code
scope:
- profile_nickname
- profile_image
- account_email
- gender
- birthday
client_name: kakao
provider:
kakao:
authorization-uri: https://kauth.kakao.com/oauth/authorize
token-uri: https://kauth.kakao.com/oauth/token
user-info-uri: https://kapi.kakao.com/v2/user/me
user-name-attribute: id
jwt:
token:
secret-key: [secret-key]
access-token:
expire-length: 1800000
refresh-token:
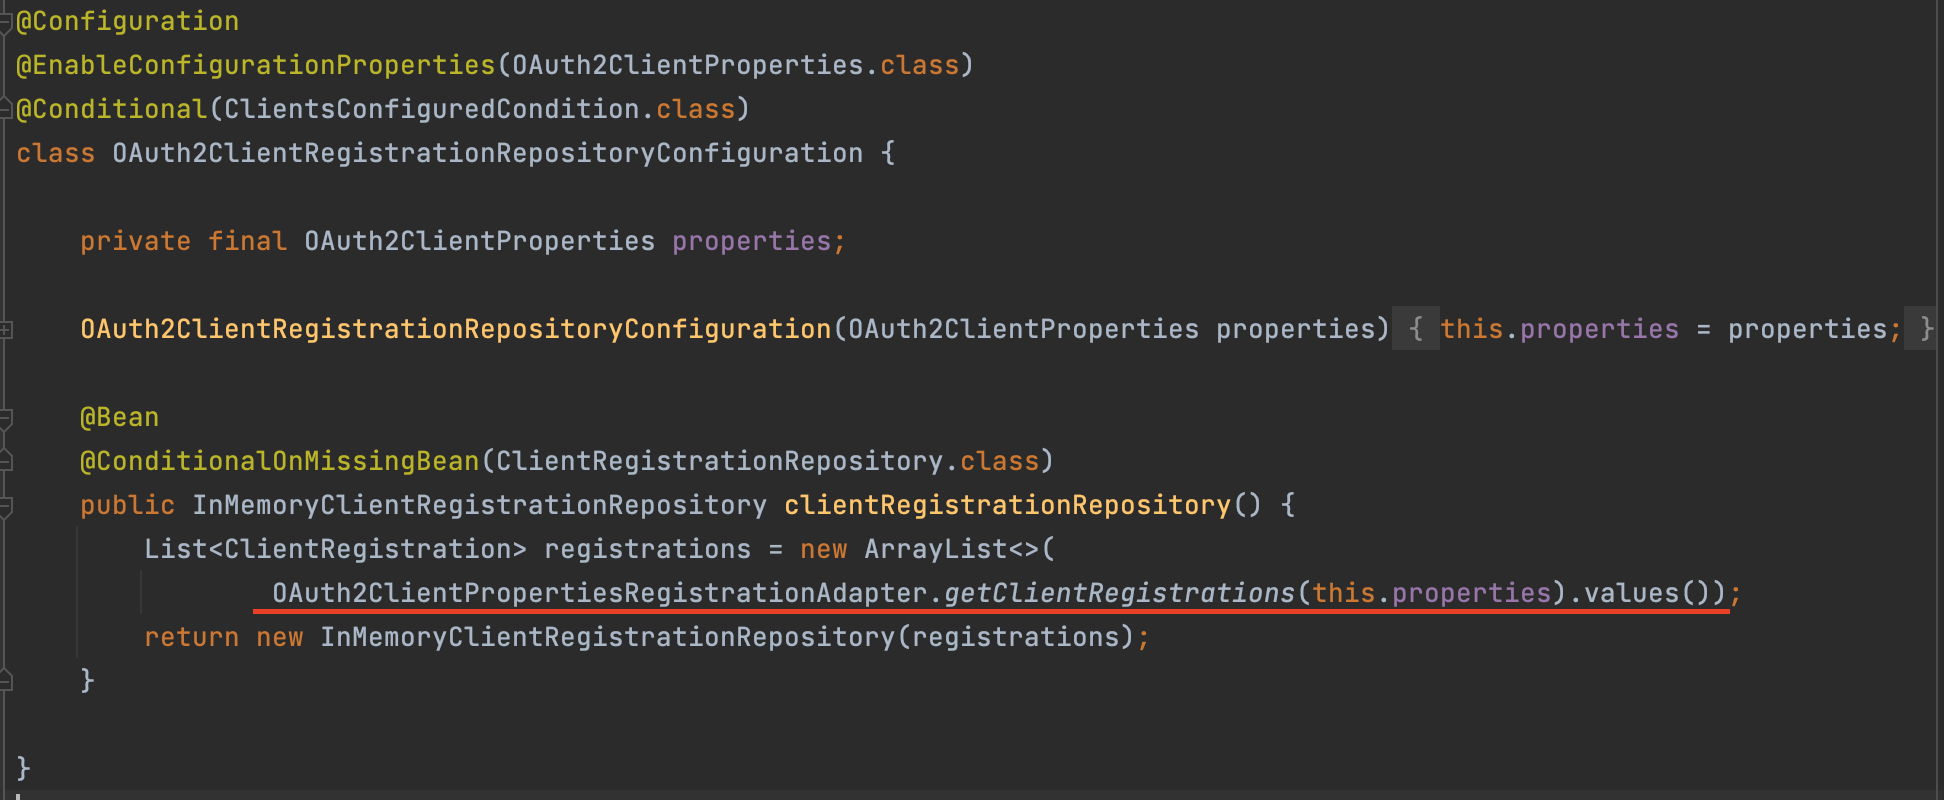
expire-length: 1209600000스프링 시큐리티를 사용하고 있다면 아래와 같이 설정 파일에 적어준 정보들로 애플리케이션 실행 시 Oauth2ClientProperties 객체를 생성한다.
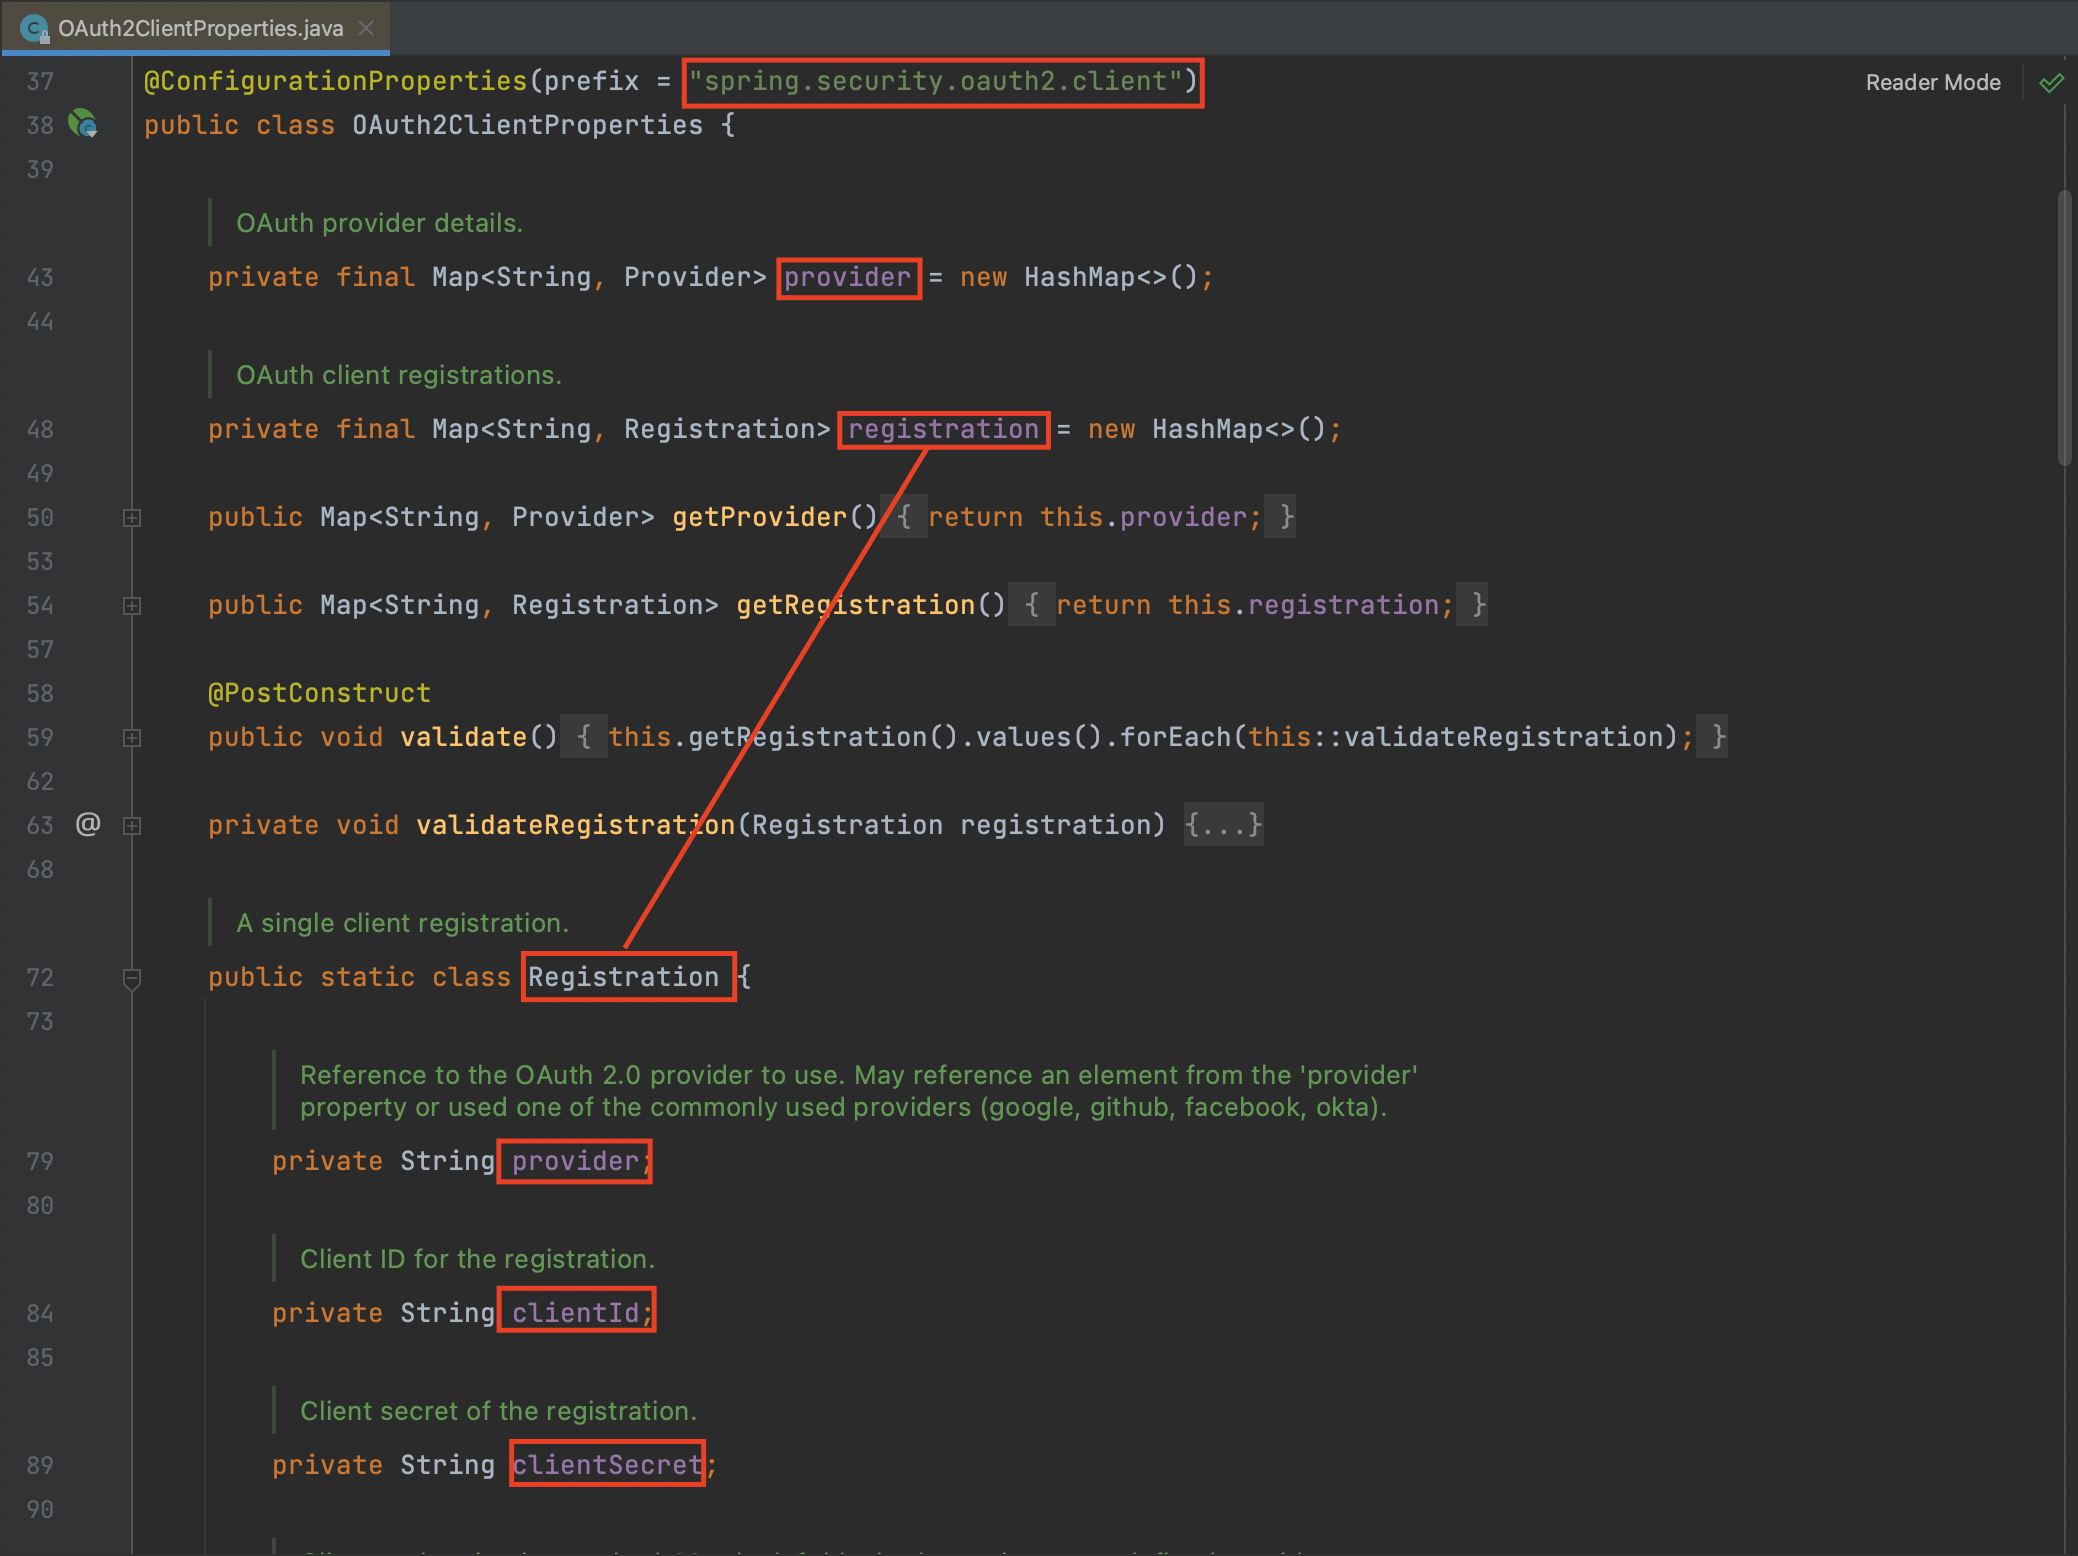
@ConfigurationProperties를 사용하려면 @EnableConfigurationProperties 어노테이션을 사용하여 설정 파일의 데이터를 바인딩할 클래스를 값으로 주면 된다. spring security에는 Oauth2ClientRegistrationRepositoryConfiguration에 아래와 같이 설정되어있다.
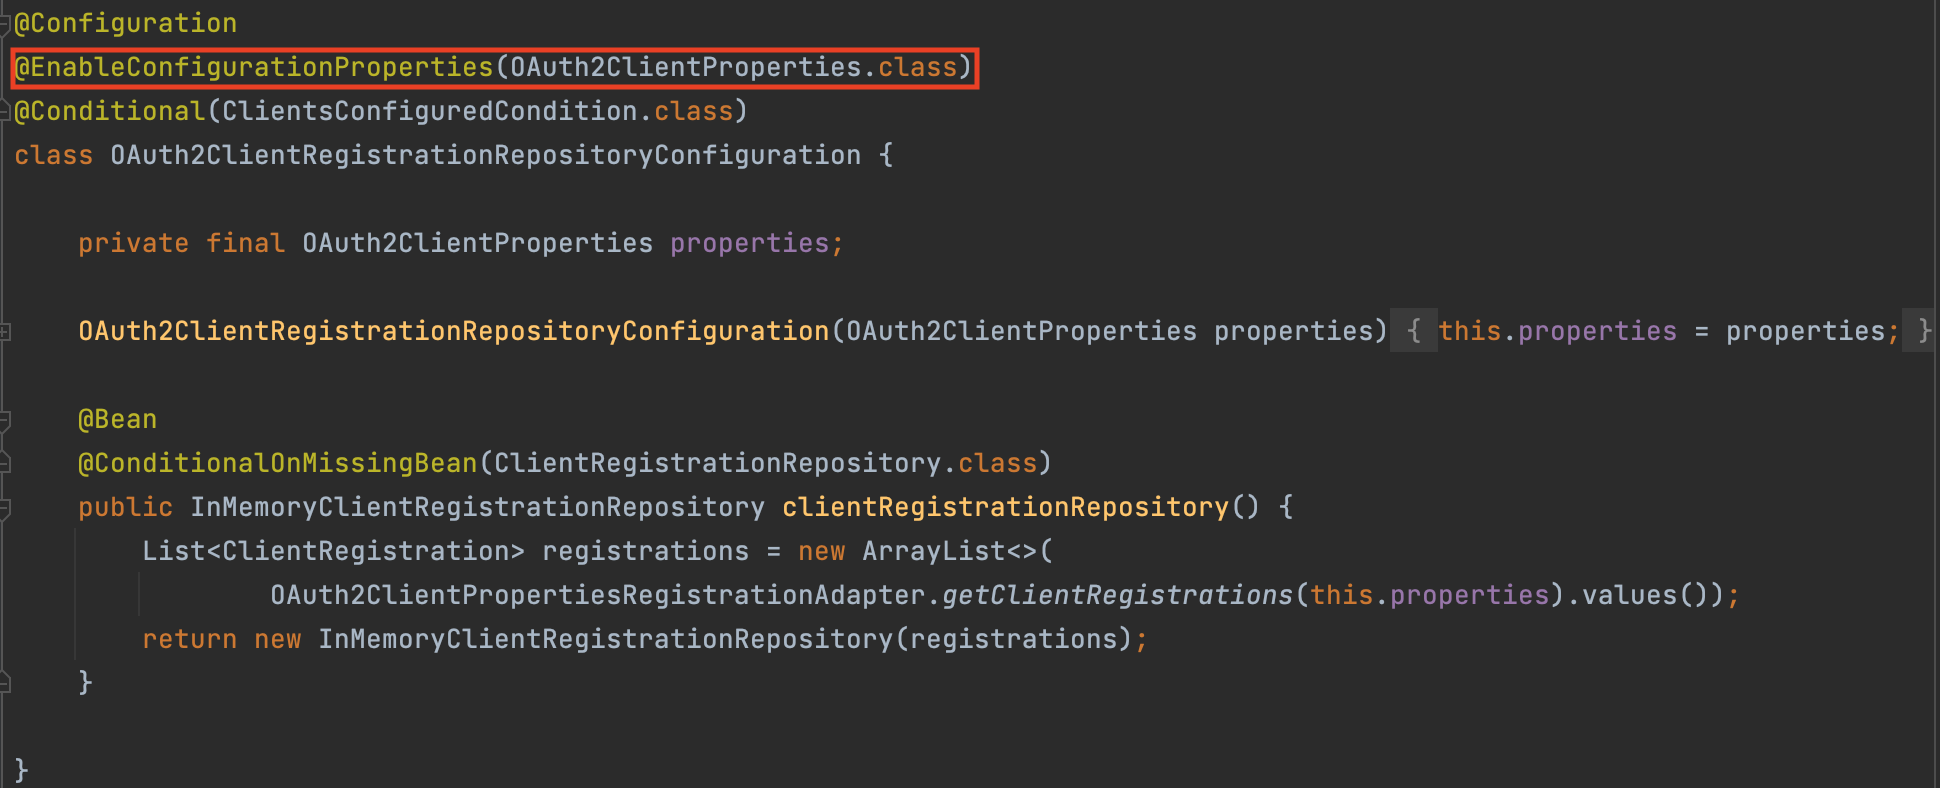
- InMemoryRepository
spring security에서는 애플리케이션 실행 시 위의 설정을 통해 OAuth2ClientProperties를 빈으로 등록하고, OAuth2ClientProperties 내부 값들을 통해 각 OAuth2 서버 별로 ClientRegistration라는 객체들을 만들어 각각 InMemoryRepository에 저장한다. 이런 과정이 바로 OAuth2ClientPropertiesRegistrationAdapter에서 이루어진다.
📝 set up 정리
즉, 우리가 스프링 애플리케이션을 실행할 때 크게 보면 아래의 작업이 일어난다.
- application.yml파일을 읽어 OAuth2ClientProperties 생성
- OAuth2ClientPropertiesRegistrationAdapter를 통해OAuth2ClientProperties에서 각 OAuth2 server 마다 ClientRegistration 생성
- ClientRegistration 리스트를 InMemoryClientRegistrationRepository에 저장
위의 그림에서 프론트에서code를 받아온 시점부터의 과정을 진행한다.
- Controller
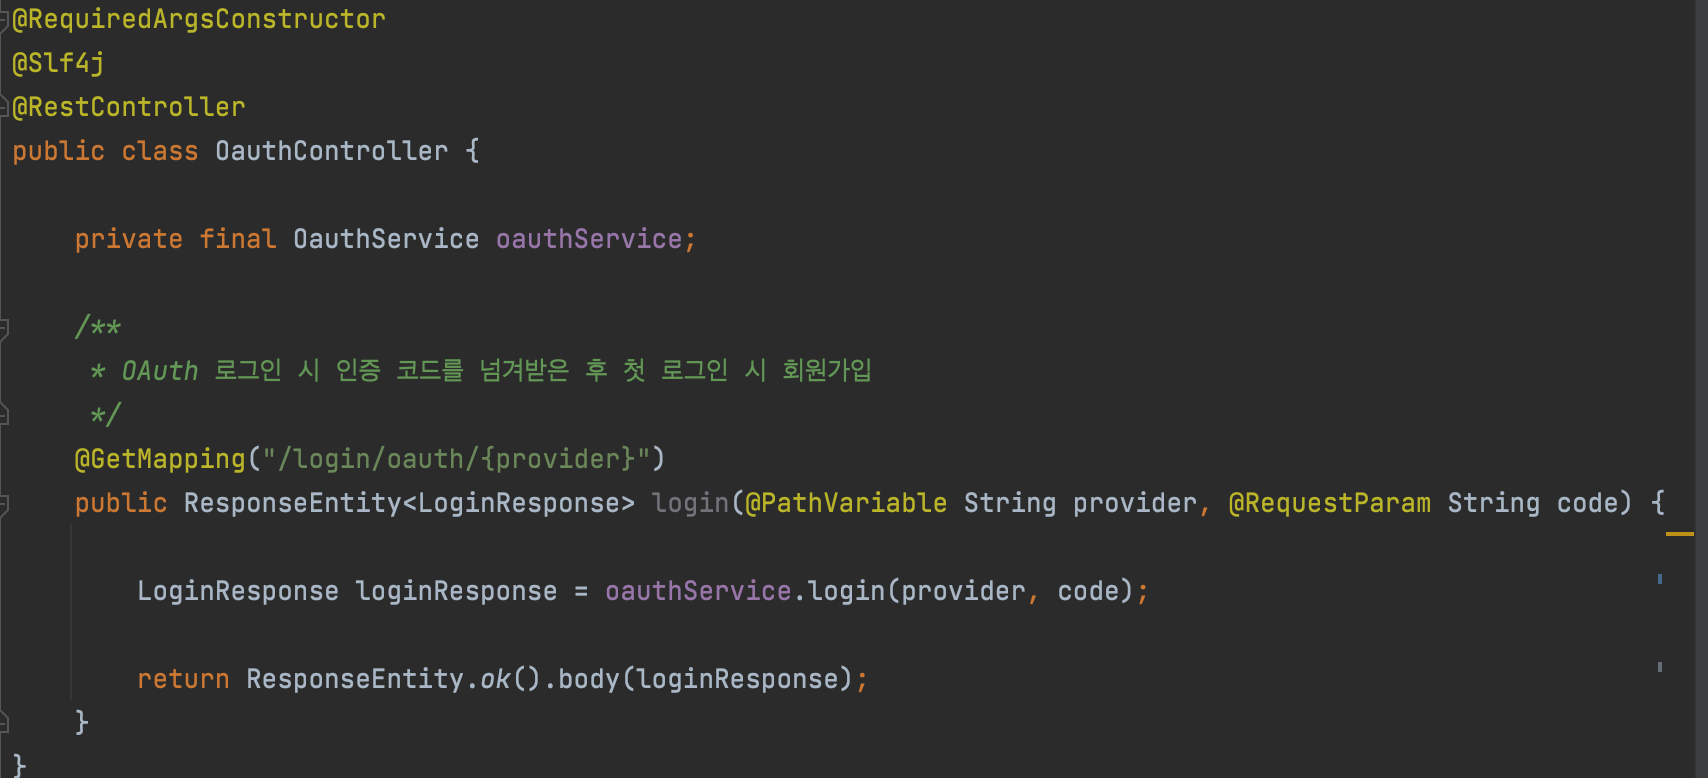
위의 코드는 프론트에서 code를 Get으로 보내면 실행된다.
ex)http://localhost:8080/login/oauth/kakao?code=********provider 이름과, authorization code를 받아서 실제로 로그인을 실행할 것이다. 실제 로직은 service 단에서 처리하도록 할 것이다.
- Service
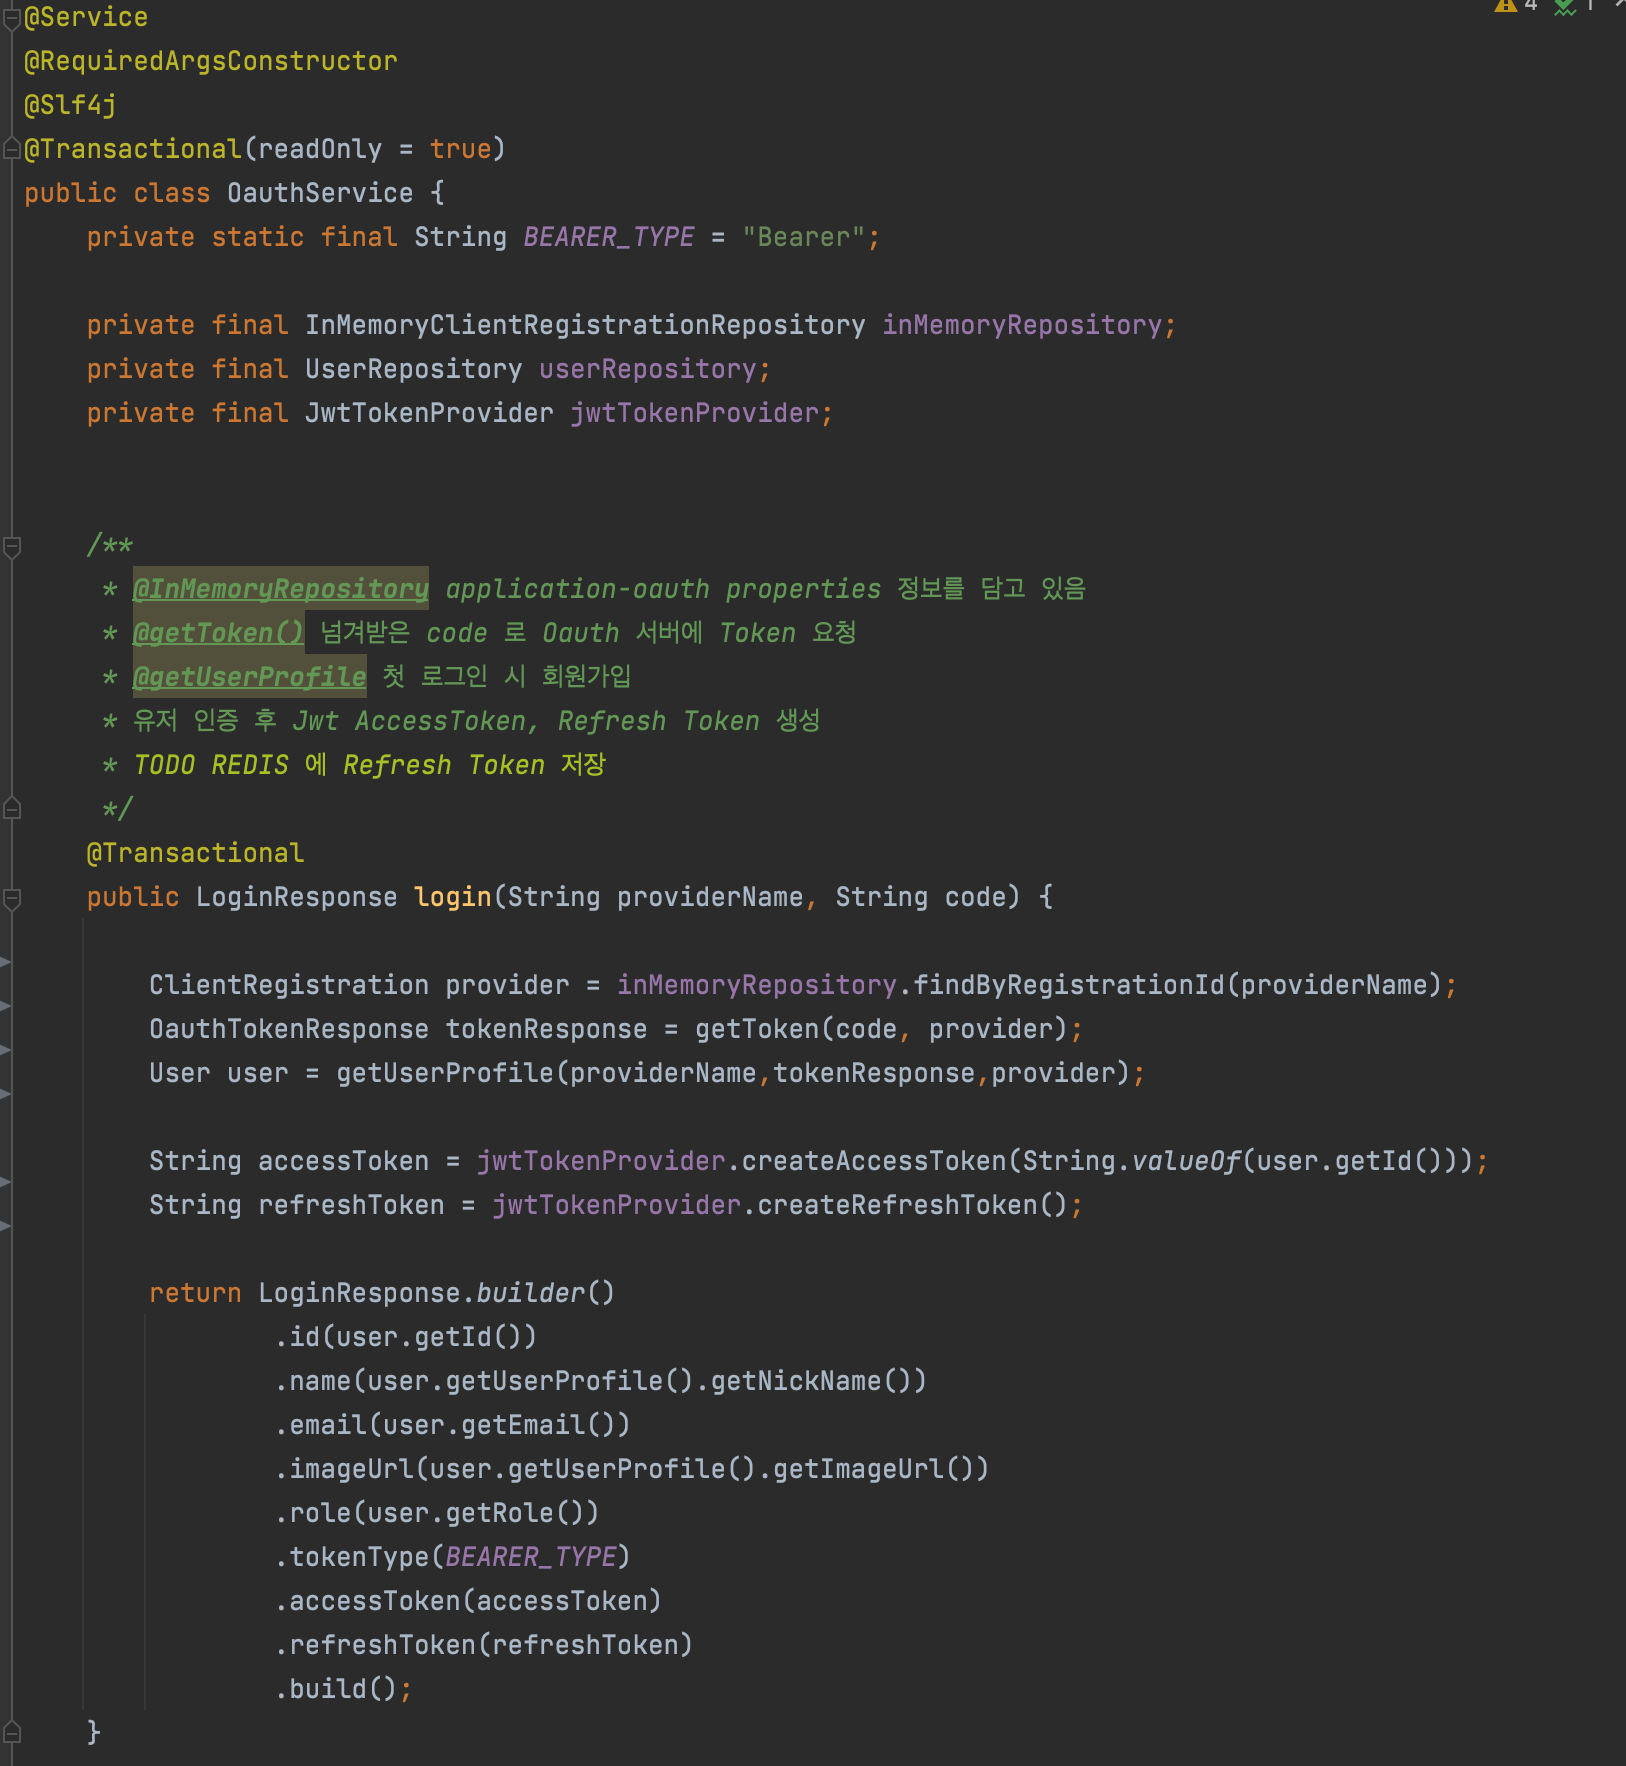
위에서 설명한 것처럼 inMemoryRepository 에는 우리가 설정한 application-oauth.yml 파일의 Registration이 저장되어있다.
먼저 진행하기 전에 다음과 같은 의존성을 추가해 주어야 한다.
implementation 'org.springframework.boot:spring-boot-starter-webflux'access token을 가져오거나, 유저 정보를 가져올 때는 실제로 Oauth 서버와 통신을 해야 하기 때문에 WebClient를 사용하여 통신을 하기 위해 위와 같은 webflux 의존성을 추가해준다 (Spring에서도 RestTemplate 보단 webflux를 권장한다.)
- getToken()
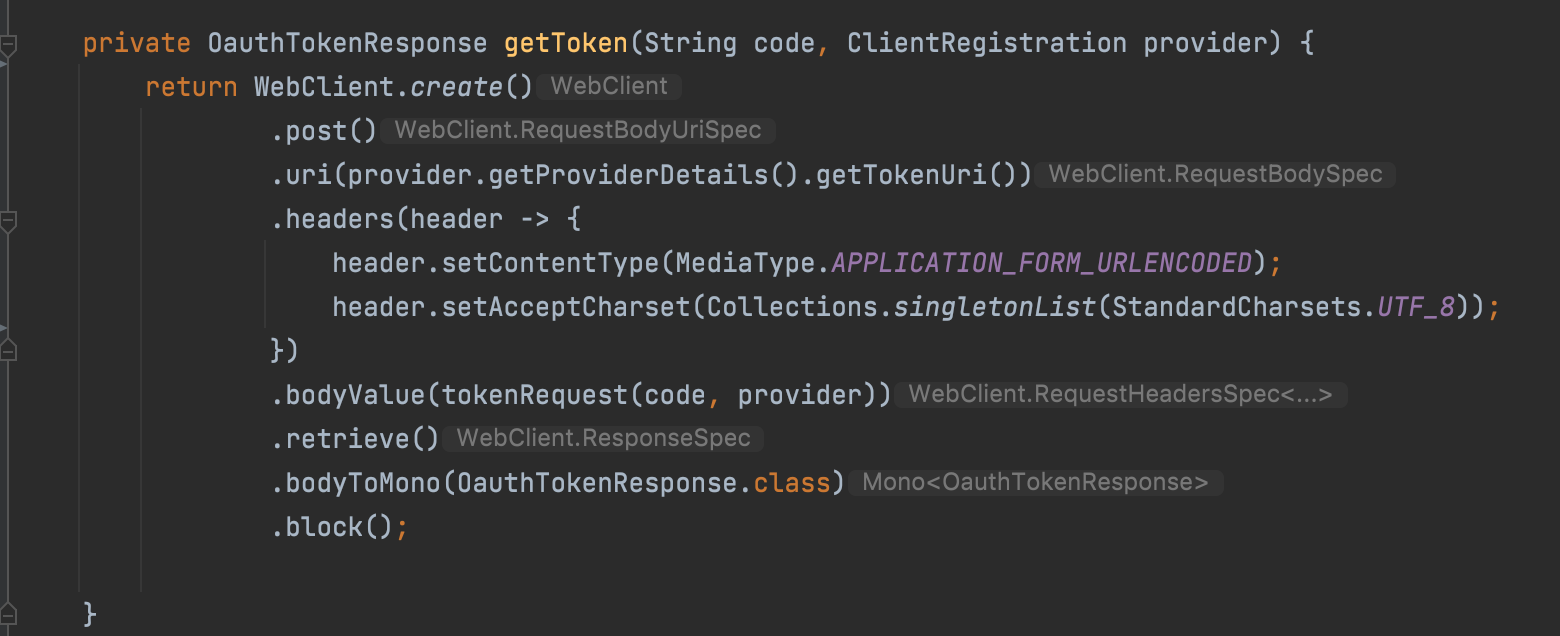
- tokenRequest()
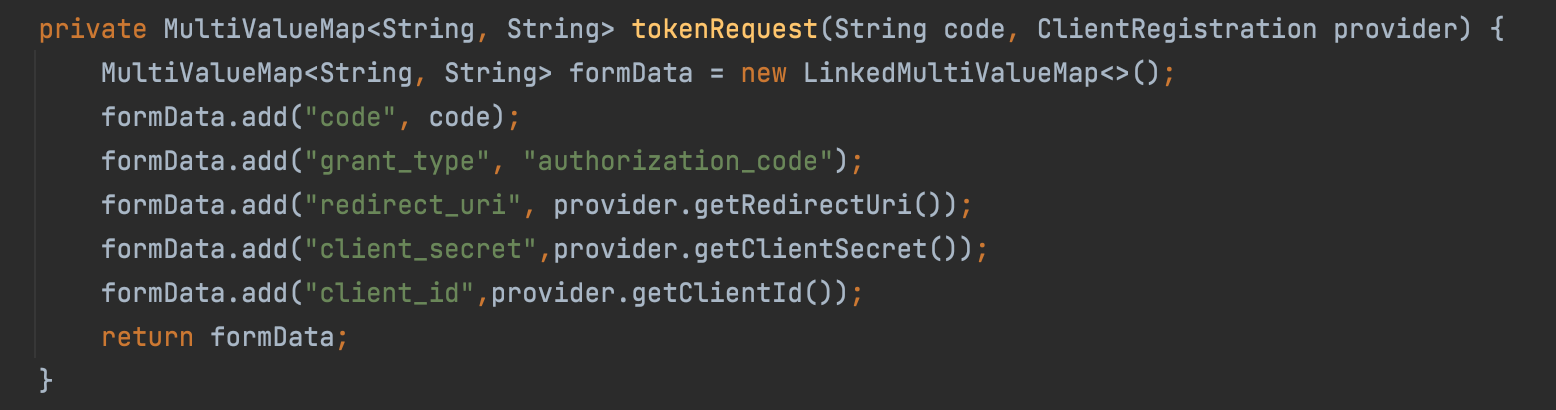
Oauth 서버에 Post 요청을 보내는데 헤더에 applicaiton_form_urlencoded을 보내주고 바디에는 받아온 code와, grant_type, redirect_uri, client_secret, client_id를 같이 보내 주면 된다.
이렇게 받아온 code로 Oauth 서버에 post 요청이 성공적으로 보내졌다면 Oauth 서버의 토큰을 아래와 같이 받아올 수 있다.

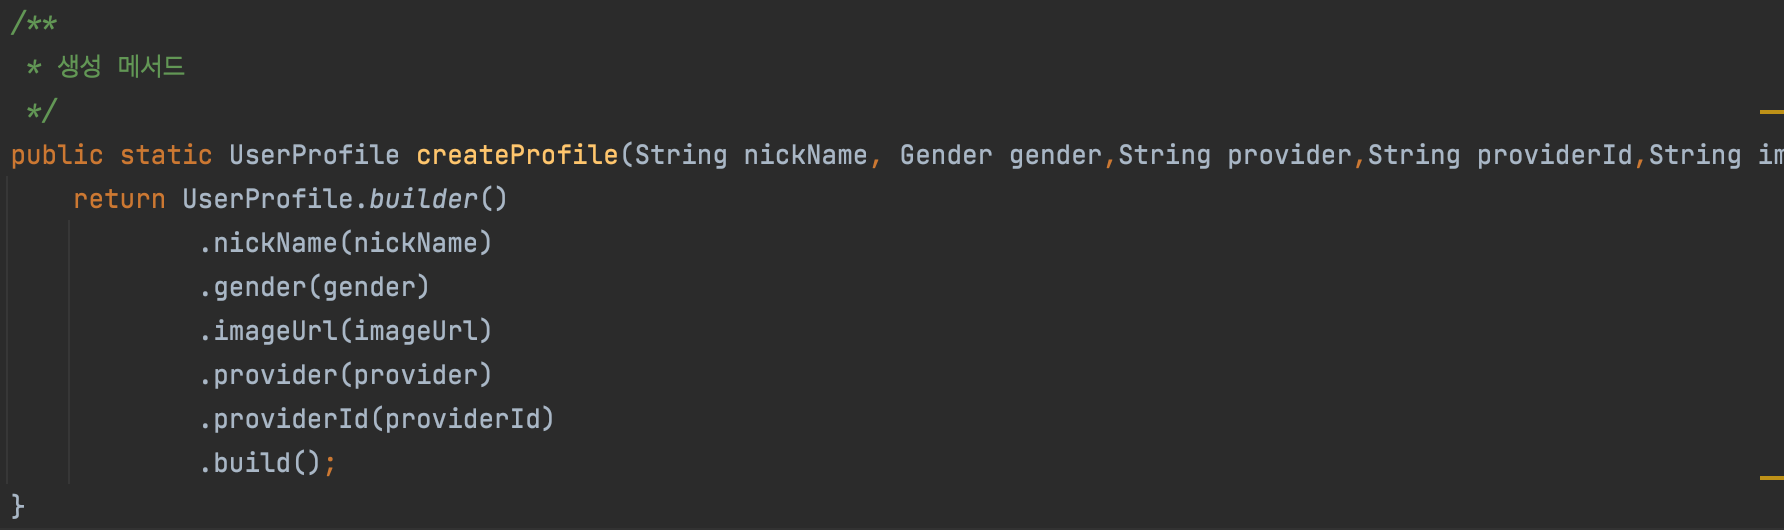
토큰을 받아왔다면 이 토큰으로 회원의 프로필을 가져올 수 있다. 카카오의 경우 카카오 자체에서 인증을 받지 않으면 nickname만 필수로 가져올 수 있고 나머지는 선택으로 받아올 수 있다.
필자의 경우 받아온 프로필은 회원의 이름, 이메일, 성별, 이미지 URL이다.
- getUserProfile

public class KakaoUserInfo implements Oauth2UserInfo {
    private Map<String, Object> attributes;


    public KakaoUserInfo(Map<String, Object> attributes) {
        this.attributes = attributes;
    }

    @Override
    public String getProviderId() {
        return String.valueOf(attributes.get("id"));
    }

    @Override
    public String getProvider() {
        return "kakao";
    }

    @Override
    public String getEmail() {
        return (String) getKakaoAccount().get("email");
    }

    @Override
    public String getNickName() {
        return (String) getProfile().get("nickname");
    }

    @Override
    public Gender getGender() {
        String gender = (String) getKakaoAccount().get("gender");

        if (gender.equals("male")) {
            return Gender.MAN;
        } else {
            return Gender.WOMAN;
        }
    }

    @Override
    public String getImageUrl() {
        return (String)getProfile().get("profile_image_url");
    }

    public Map<String, Object> getKakaoAccount(){
        return(Map<String, Object>) attributes.get("kakao_account");
    }

    public Map<String, Object> getProfile(){
        return (Map<String, Object>) getKakaoAccount().get("profile");
    }
}- getUserAttributes

회원의 프로필을 getUserAttributes 메서드에서 Oauth 서버의 UserInfo Uri로 access token과 같이 get 요청을 보낸다.
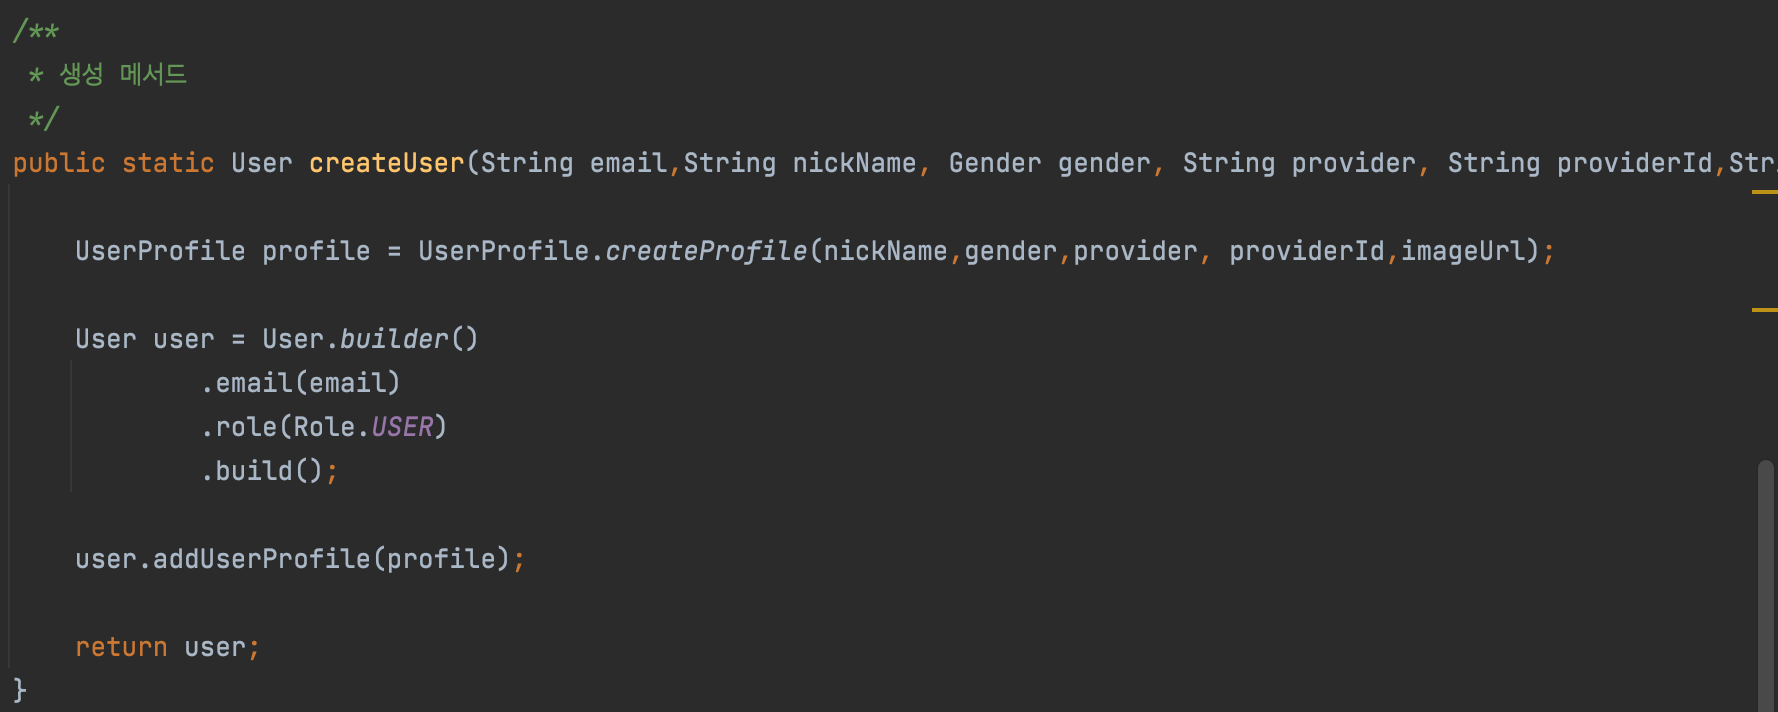
받아온 프로필을 kakaouserInfo에 담아주고, userRepository.findByEmail 메서드로 회원의 중복을 검사한다.
만약 findByEmail의 값이 null이라면 DB에 새로 생성해주고 없다면 그대로 반환해준다.
- JwtTokenProvider
@Component
@Slf4j
public class JwtTokenProvider {

    @Value("${jwt.access-token.expire-length}")
    private long accessTokenValidityInMilliseconds;

    @Value("${jwt.refresh-token.expire-length}")
    private long refreshTokenValidityInMilliseconds;

    @Value("${jwt.token.secret-key}")
    private String secretKey;

    public String createAccessToken(String payload) {
        return createToken(payload, accessTokenValidityInMilliseconds);
    }

    public String createRefreshToken() {
        byte[] array = new byte[7];
        new Random().nextBytes(array);
        String generatedString = new String(array, StandardCharsets.UTF_8);
        return createToken(generatedString, refreshTokenValidityInMilliseconds);
    }

    public String createToken(String payload, long expireLength) {
        Claims claims = Jwts.claims().setSubject(payload);
        Date now = new Date();
        Date validity = new Date(now.getTime() + expireLength);
        return Jwts.builder()
                .setClaims(claims)
                .setIssuedAt(now)
                .setExpiration(validity)
                .signWith(SignatureAlgorithm.HS256,secretKey)
                .compact();
    }

    public String getPayload(String token){
        try {
            return Jwts.parserBuilder()
                    .setSigningKey(secretKey)
                    .build()
                    .parseClaimsJws(token)
                    .getBody()
                    .getSubject();
        } catch (ExpiredJwtException e) {
            return e.getClaims().getSubject();
        } catch (JwtException e){
            throw new RuntimeException("유효하지 않은 토큰 입니다");
        }
    }

    public boolean validateToken(String token) {
        try {
            Jws<Claims> claimsJws = Jwts.parserBuilder()
                    .setSigningKey(secretKey)
                    .build()
                    .parseClaimsJws(token);
            return !claimsJws.getBody().getExpiration().before(new Date());
        } catch (JwtException | IllegalArgumentException exception) {
            return false;
        }
    }


}
User 정보를 DB에 저장하고 JwtToken을 생성했다면, LoginResponseDto를 만들어서 프론트로 반환해주면 끝이 난다.
@Getter
@NoArgsConstructor
public class LoginResponse {
    private Long id;
    private String name;
    private String email;
    private String imageUrl;
    private Role role;
    private String tokenType;
    private String accessToken;
    private String refreshToken;

    @Builder
    public LoginResponse(Long id, String name, String email, String imageUrl, Role role, String tokenType, String accessToken, String refreshToken) {
        this.id = id;
        this.name = name;
        this.email = email;
        this.imageUrl = imageUrl;
        this.role = role;
        this.tokenType = tokenType;
        this.accessToken = accessToken;
        this.refreshToken = refreshToken;
    }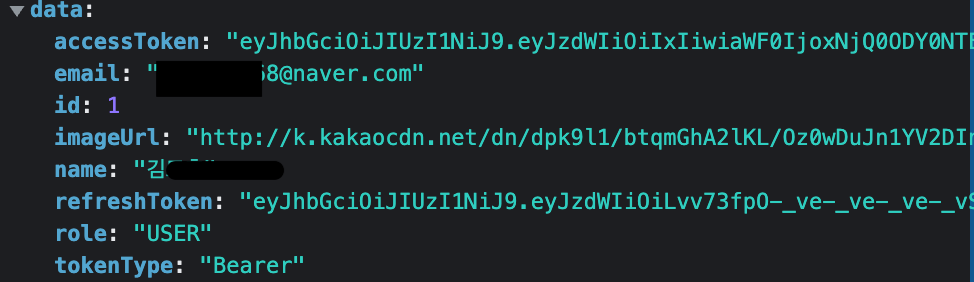
}- 응답 결과
- RefreshToken은 다음 글에서 Redis에 저장하는걸 알아보겠습니다.
출처 : https://velog.io/@max9106/OAuth

감사합니다 좋은 글 잘 봤습니다. 질문드릴게 있는데요
소셜 로그인은 작성해 주신 글처럼 로그인하면 될 것 같은데 일반 로그인은 따로 처리하신 방법이 있으실까요 ?