댕댕워크 프로젝트를 하며 소셜 로그인을 구현했는데 그 내용에 대해 정리한다. REST API로 개발했다.
📚OAuth 로그인 요청
-
Google, Kakao, Naver 별로 애플리케이션을 설정하는 방법을 정리해두었다.
👉 OAuth 사전 작업 -
OAuth provider별 로그인 요청은 다음과 같이 보낸다.
GET 요청이 아니라 해당 url로 페이지 이동을 해야함에 주의!let url = ''; switch (provider) { case 'google': url = `https://accounts.google.com/o/oauth2/v2/auth?client_id=${GOOGLE_CLIENT_ID}&redirect_uri=${REDIRECT_URI}/callback&response_type=code&access_type=offline&scope=https://www.googleapis.com/auth/userinfo.email https://www.googleapis.com/auth/userinfo.profile&prompt=select_account`; break; case 'kakao': url = `https://kauth.kakao.com/oauth/authorize?response_type=code&client_id=${KAKAO_CLIENT_ID}&redirect_uri=${REDIRECT_URI}/callback&prompt=select_account`; break; case 'naver': url = `https://nid.naver.com/oauth2.0/authorize?response_type=code&client_id=${NAVER_CLIENT_ID}&redirect_uri=${REDIRECT_URI}/callback&state=naverLoginState&auth_type=reauthenticate`; break; } window.location.href = url;
🤗로그인/회원가입 Flow
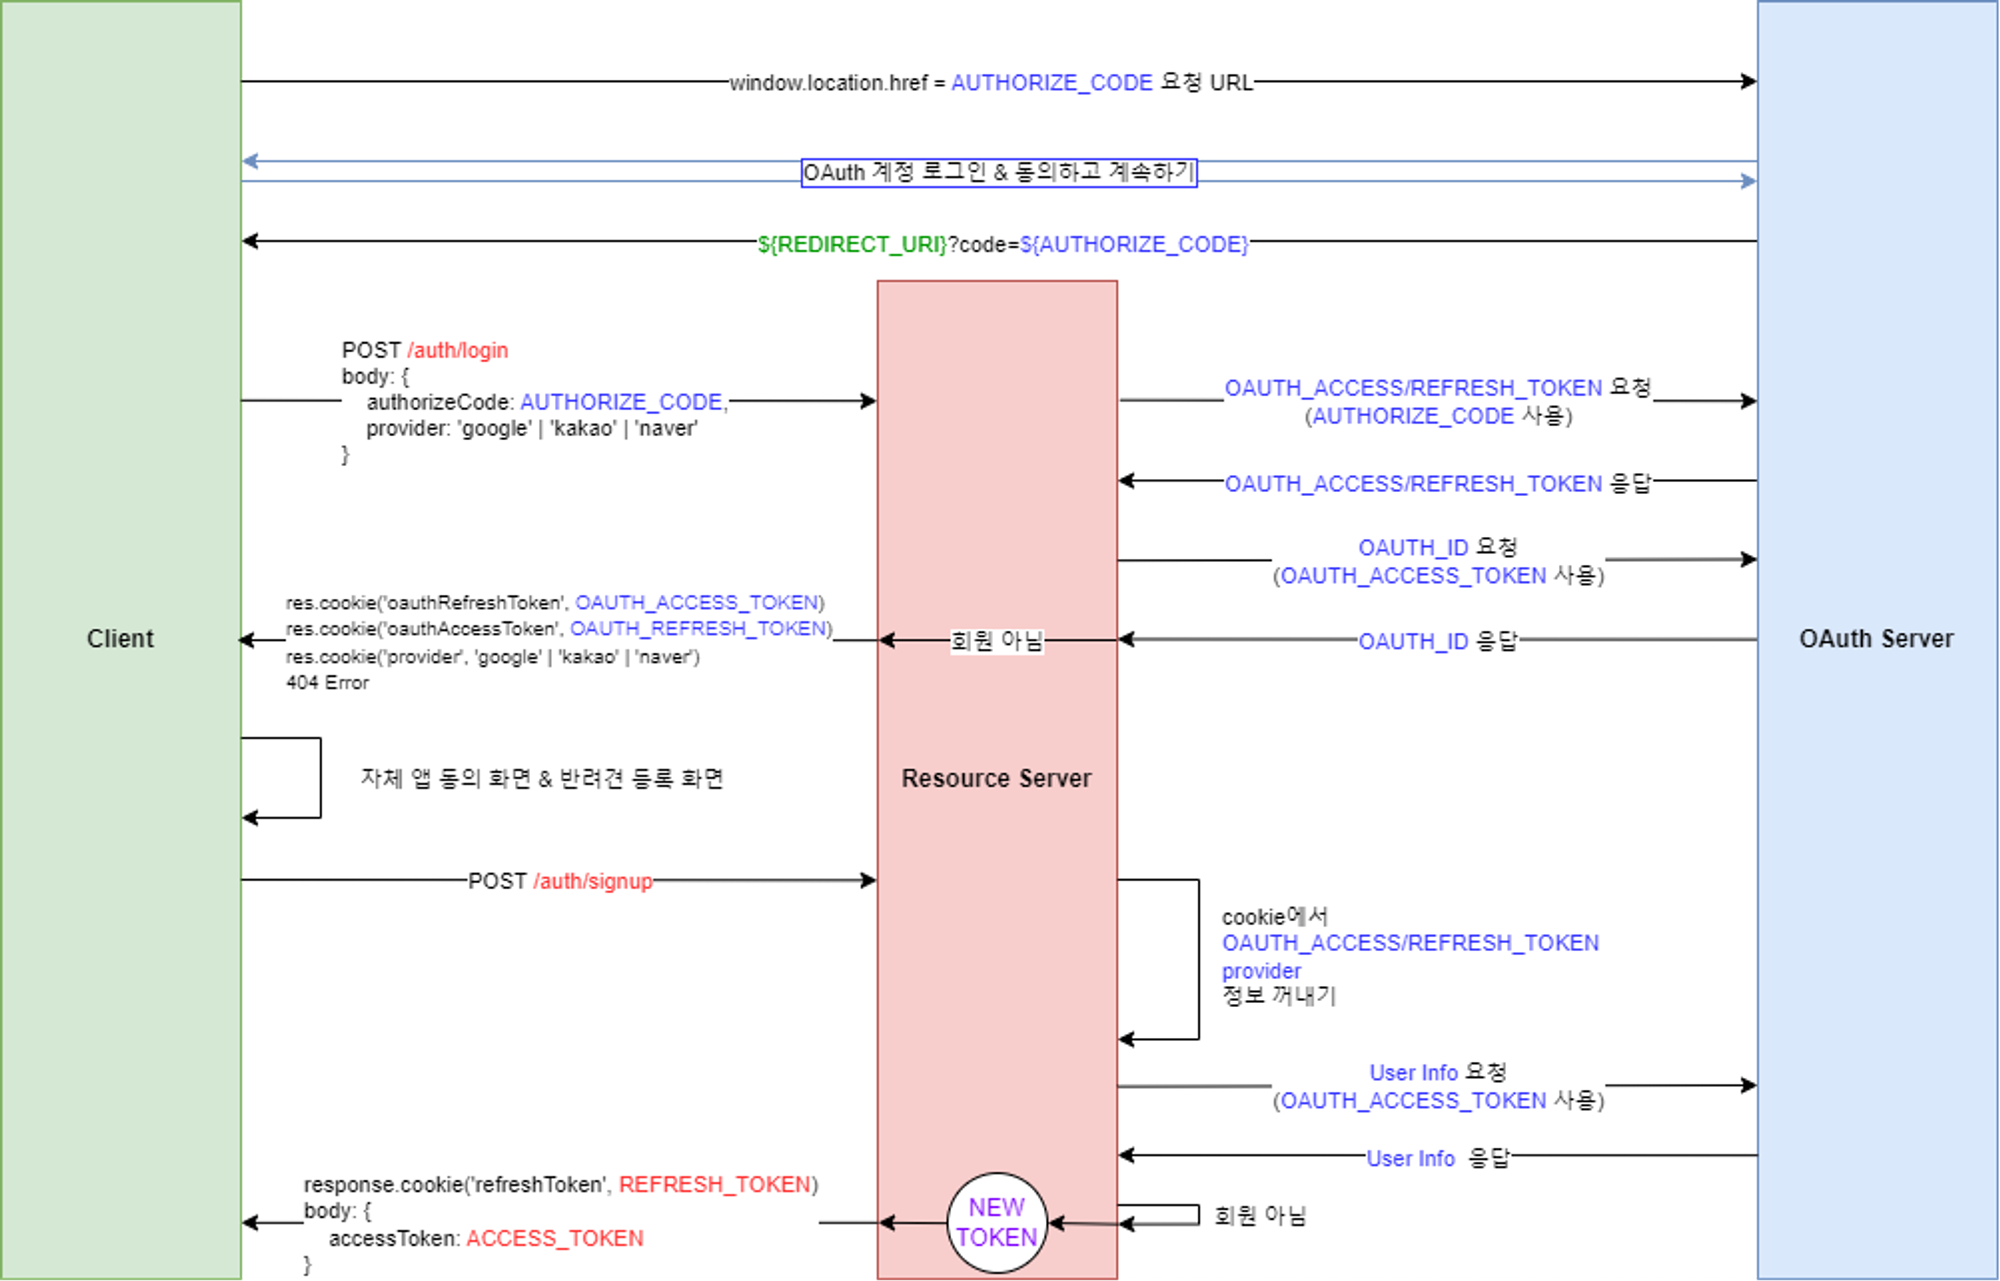
📍/auth/login Logic
1. 인가 코드로 OAuth Access/Refresh Token 얻기
-
POST https://oauth2.googleapis.com/token Content-type: application/x-www-form-urlencoded { client_id: ${CLIENT_ID}, client_secret: ${CLIENT_SECRET}, code: ${AUTHORIZE_CODE}, grant_type: ‘authorization_code’, redirect_uri: ${REDIRECT_URI} } -
POST https://kauth.kakao.com/oauth/token Content-type: application/x-www-form-urlencoded;charset=utf-8 { grant_type: ‘authorization_code’, client_id: ${CLIENT_ID}, redirect_uri: ${REDIRECT_URI}, code: ${AUTHORIZE_CODE}, client_secret: ${CLIENT_SECRET} } -
GET/POST https://nid.naver.com/oauth2.0/token?grant_type=authorization_code&client_id=${CLIENT_ID}&client_secret=${CLIENT_SECRET}&code=${AUTHORIZE_CODE}&state=${STATE}
2. oauthAccessToken으로 OAuth server로부터 oauthId 얻기 (사용자 정보 조회 API 사용)
- Google
GET https://www.googleapis.com/oauth2/v2/userinfo Authorization: Bearer ${OAUTH_ACCESS_TOKEN} - Kakao
GET https://kapi.kakao.com/v2/user/me Authorization: Bearer ${OAUTH_ACCESS_TOKEN} Content-type: application/x-www-form-urlencoded;charset=utf-8 - Naver
GET/POST https://openapi.naver.com/v1/nid/me
Authorization: Bearer ${OAUTH_ACCESS_TOKEN}
3. oauthId로 refresh token 발급
4. oauthId로 DB에서 사용자 조회
- 사용자가 존재하지 않으면 oauthAccessToken, oauthRefreshToken, provider 정보를 cookie에 저장 & 404 에러
- 사용자가 존재하면 로그인 (oauthAccessToken, oauthRefreshToken, refreshToken 업데이트)
5. 3에서 반환된 userId로 access token 발급
6. access token은 body에, refresh token은 cookie에 담아 응답
📍/auth/signup Logic
- cookie에 있는 oauthAccessToken, oauthRefreshToken, provider 정보 가져오기
- oauthAccessToken으로 사용자 정보 조회 → oauthId, oauthNickname, email, profileImage
- oauthId로 DB에서 사용자 조회
- 사용자가 존재하지 않으면 회원가입 (DB에 존재하는 nickname과 중복되지 않는
oauthNickname#randomId형태의 닉네임, email, profileImage, oauthAccessToken, oauthRefreshToken, refreshToken) - 사용자가 존재하면 409 에러
- 3에서 반환된 userId로 access token 발급
- 사용한 oauth 관련 cookie 삭제 & access token은 body에, refresh token은 cookie에 담아 응답
⏳OAuth token 수명
| OAuth Provider | Access Token 수명 | Refresh Token 수명 |
|---|---|---|
| 1시간 | 설정된 수명 X | |
| Kakao | 6시간 | 2달 (요청 시 사용된 refresh token의 남은 유효기간이 1개월 이하인 경우 access token 재발급 시 refresh token도 재발급됨) |
| Naver | 1시간 | 1년 (access token 갱신 시 해당 시점으로부터 1년 연장) |
🪙Token payload
- access token (
1h: OAuth access token 최소 수명){ userId: number, // DB에 저장된 회원 id provider: 'google' | 'kakao' | 'naver' } - refresh token (
14d){ oauthId: string, // OAuth server로부터 받은 회원 id provider: 'google' | 'kakao' | 'naver' }💡 왜 refresh token에는 userId가 아니라 oauthId인가?
DB에 refresh token을 저장해야 한다. 회원가입의 경우 새로운 row를 추가해야 하는데- refresh token에 userId를 넣으면 row를 추가한 후 생성된 userId를 가지고 refresh token을 만든 후 다시 해당 row를 업데이트해주어야 한다.
- refresh token에 oauthId를 넣으면 row를 추가할 때 함께 저장 가능하다. 즉, query가 한 번 줄어든다.
👋로그아웃 Flow
📍/auth/logout Logic
1. Authorization header에 있는 access token의 payload로부터 userId, provider 꺼내기
2. userId로 DB에서 사용자를 찾아 oauthAccessToken 꺼내기
3. oauthAccessToken으로 OAuth server로 로그아웃/토큰 삭제(취소) 요청 보내기
- Google
따로 로그아웃 api가 없다. - Kakao
POST https://kapi.kakao.com/v1/user/logout Authorization: Bearer ${OAUTH_ACCESS_TOKEN}- 카카오계정과 함께 로그아웃 api도 있는데 Logout Redirect URI를 등록해야 해서 그냥 로그아웃 api를 사용했다.
- Naver
따로 로그아웃 api가 없다.- 다음과 같은 방법이 존재한다.
http://nid.naver.com/nidlogin.logout으로 보내기- redirect 필요
- 재인증 API(기존 로그인 요청 URL에
auth_type=reauthenticatequery 추가)- 간편 로그인 사용 불가능
- 토큰 만료 (회원탈퇴/연동해제 요청과 동일하게 처리)
- 이 경우 재로그인 시 동의화면이 뜸
- 나는 2번 방법을 사용했다.
- 다음과 같은 방법이 존재한다.
4. refresh token cookie 삭제하기
😢회원탈퇴 Flow
📍/auth/deactivate Logic
1. Authorization header에 있는 access token의 payload로부터 userId, provider 꺼내기
2. userId로 DB에서 사용자를 찾아 oauthAccessToken 꺼내기
3. oauthAccessToken으로 OAuth server로 연결끊기/토큰 삭제(취소) 요청 보내기
- Google
POST https://oauth2.googleapis.com/revoke?token=${OAUTH_ACCESS_TOKEN} Content-type: application/x-www-form-urlencoded - Kakao
POST https://kapi.kakao.com/v1/user/unlink Authorization: Bearer ${OAUTH_ACCESS_TOKEN} - Naver
GET/POST https://nid.naver.com/oauth2.0/token?grant_type=delete&client_id=${CLIENT_ID}&client_secret=${CLIENT_SECRET}&access_token=${OAUTH_ACCESS_TOKEN}&service_provider=NAVER
4. DB에서 userId에 해당하는 사용자 삭제하기
5. refresh token cookie 삭제하기
🔄토큰 재발급 Flow
📍/auth/token Logic
1. cookie에 있는 refresh token의 payload로부터 oauthId, provider 꺼내기
2. oauthId로 DB에서 사용자를 찾아 userId와 oauthRefreshToken 꺼내기
3. oauthRefreshToken으로 OAuth server로 토큰 갱신 요청 보내기
-
POST https://oauth2.googleapis.com/token Content-type: application/x-www-form-urlencoded { client_id: ${CLIENT_ID}, client_secret: ${CLIENT_SECRET}, grant_type: ‘refresh_token’, refresh_token: ${OAUTH_REFRESH_TOKEN} } -
POST https://kauth.kakao.com/oauth/token Content-type: application/x-www-form-urlencoded;charset=utf-8 { grant_type: ‘refresh_token’, client_id: ${CLIENT_ID}, refresh_token: ${OAUTH_REFRESH_TOKEN}, client_secret: ${CLIENT_SECRET} } -
GET/POST https://nid.naver.com/oauth2.0/token?grant_type=refresh_token&client_id=${CLIENT_ID}&client_secret=${CLIENT_SECRET}&refresh_token=${OAUTH_REFRESH_TOKEN}
4. 새로운 access token과 refresh token 발급 (RTR(Refresh Token Rotation) 기법 사용)
5. OAuth server로부터 받은 새로운 OAuthAccessToken과 OAuthRefreshToken(optional), 새로 발급한 refresToken으로 DB에 사용자 정보 업데이트
6. 새로운 access token은 body에, 새로운 refresh token은 cookie에 담아 응답

이것저것 관심 많은 개발자👩💻