이 글은 스프링부트의 RestTemplate 라이브러리를 사용하여 다른 서버와 통신을 하는 개발 과정을 기록했습니다.
부제 : API 호출하기.
개요
현재 개발 중인 서비스는 아래와 같다.
- 웹서버(Springboot)와 API서버(Flask)가 있다.
- API 서버는 Yolov5로 이미지 객체 분석을 하는 기능이 있다.
- 요구사항은 웹서버에서 받은 클라이언트의 음식 사진에서 음식을 검출하여 칼로리를 얻는 것이다.
해당 요구사항을 위해 웹서버에서 클라이언트로부터 사진을 받으면 이를 API 서버에 요청해 객체 분석 결과를 응답받는 기능이 필요하다.
RestTemplate?
서버 간 통신을 위해 이것저것 찾아보던 중 RestTemplate 라이브러리를 발견
RestTemplate은 HTTP 통신 + RESTful API를 지켜준다.
해당 모듈을 사용하기 위해서는 HTTP 메세지를 잘 이해해야 한다.
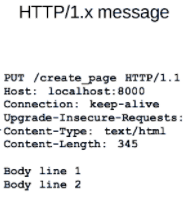
반드시 필요한 요청 메세지 정보는 다음과 같다.
Start Line
- method : 어떤 메소드로 데이터를 조작할 것인가 (Manipulation of resources through representation)
- URI : 어떤 자원을 요청할 것인가 (Identification of resources)
Header
- Host : 어디 서버로 요청할 것인가.
- content-type : 요청할 데이터의 타입은 어떤 것인가(self-descriptive message)
Body
- Body : 무슨 데이터와 함께 요청할 것인가.
이제 해당 메세지를 RestTemplate를 통해 서버에 요청을 하면 된다.
구현
먼저 RestTemplate 객체를 생성한다.
RestTemplate restTemplate = new RestTemplate();RestTemplate의 postForEntity 메소드를 통해 post 요청을 해 줄 것이다.
postForEntity(String url, Object request, Class<T> responseType, Map<String,?> uriVariables)
주어진 객체를 URI 템플릿에 POST하여 새 리소스를 만들고 응답을 로 반환합니다 HttpEntity.
요청을 위해 필요한 파라미터는
URI- 요청 메세지인
request - 응답 타입(어떤 형식으로 응답 받을 것인지)
responstType
(uriVariables는 템플릿을 확장하는 변수..라는데 아직 이 내용에 대해서는 잘 모르겠다.)
1) URI, startline
먼저 URI, 어디 서버로 어떤 자원을 요청할 지 정의한다.
나는 로컬 서버에서 동작하는 Flask API서버에 요청을 할 것이므로 다음과 같이 정의했다.
String url = "http://localhost:5000/calorie/binary";Host : localhost:5000
URI : /calorie/binary
이런 형식을 띌 것이다.
이렇게 요청 메세지의 Startline 설정이 된다.
2) request message, header & body
다음으로 요청 메세지 request를 정의한다.
메세지는 Header, Body를 포함하는 HTTP Entity 객체로 만들어주면 된다.
문서를 보니 파라미터로 Body와 Header를 받는다.
HttpEntity<?> requestMessage = new HttpEntity<>(body, httpHeaders);Header
먼저 헤더를 만들어보자
HttpHeaders로 헤더 객체를 생성한다.
HttpHeaders httpHeaders = new HttpHeaders();그리고 setContentType 메소드로 content-type을 설정해준다.
httpHeaders.setContentType(MediaType.APPLICATION_JSON);나는 JSON 데이터로 요청할 것이므로 APPLICATION_JSON으로 설정했다.
(대부분 API 통신 시 데이터는 JSON 형식으로 주고받는다.)
Body
다음으로 Body를 만든다.
Body를 위한 객체는 JSON형식으로 요청하기 위해서 MultiValueMap을 통해 생성해줬다.
(JSON이 key-value 형식이므로)
MultiValueMap<String, String> body = new LinkedMultiValueMap<>();해당 객체를 Body에 담아서 요청하면 서버는 content-type을 보고 JSON으로 이해할 것이다.
Body에 데이터를 추가한다.
body.add("filename", fileName);
body.add("image", imageFileString);
요구사항은 이미지 파일을 전송하면 되는데, JSON형식으로 보내기 위해 이미지파일을 base64로 인코딩하여 담아줬다.
이렇게 Body까지 모두 설정해주었다.
Request Message
최종적으로 메세지 형식을 보면 다음과 같겠다.
Request Message
-------------------------------
POST /calorie/binary HTTP/1.1

Host: localhost:5000
Connection: keep-alive
Content-Type: application/json
Content-Length: 200

{
    "filename": 파일이름,
    "image": 이진화된_문자열
}
-------------------------------
요청하기
생성한 메세지(HttpEntity)로 API 서버에 요청을 해보자.
HttpEntity<String> response = restTemplate.postForEntity(url, requestMessage, String.class);- 응답 또한 마찬가지로
HttpEntity로 받아오면 된다. (HTTP 통신이므로) url로requestMessage를 요청하고 반환은 문자열 형식으로 받겠다.
해당 라인이 실행되면 RestTemplate에서 HttpMessageConverter를 통해 requestMessage 객체를 HTTP 메세지로 변환하여 요청을 할 것이다.
서버 응답은 response에 담기고 응답 데이터는 Body에 담겨 올 것이다.
참고로 API서버의 응답은 다음과 같다.
{
    "name": ["apple", "banana", ...],
    "calorie: [120, 100, ...]
}- 객체 분석 후 음식이름과 칼로리를 응답한다.
Body에 담긴 응답 데이터는 getBody() 메소드로 받아올 수 있다.
ObjectMapper objectMapper = new ObjectMapper();
objectMapper.configure(DeserializationFeature.ACCEPT_EMPTY_STRING_AS_NULL_OBJECT, true);

FlaskResponseDto dto = objectMapper.readValue(response.getBody(), FlaskResponseDto.class);
JSON형식의 String타입으로 응답을 받아왔다.
이를 ObjectMapper의 파싱을 통해 응답 객체에 저장해주었다.
전체적인 코드
API 호출(요청) 객체
@Component
public class ClientUtil {

    @Value("${flask.url}")
    private final String url;

    private String getBase64String(MultipartFile multipartFile) throws Exception {
        byte[] bytes = multipartFile.getBytes();
        return Base64.getEncoder().encodeToString(bytes);
    }

    public FlaskResponseDto requestToFlask(String fileName, MultipartFile file) throws Exception {
        RestTemplate restTemplate = new RestTemplate();

        // Header set
        HttpHeaders httpHeaders = new HttpHeaders();
        httpHeaders.setContentType(MediaType.APPLICATION_JSON);

        // Body set
        MultiValueMap<String, String> body = new LinkedMultiValueMap<>();
        String imageFileString = getBase64String(file);
        body.add("filename", fileName);
        body.add("image", imageFileString);

        // Message
        HttpEntity<?> requestMessage = new HttpEntity<>(body, httpHeaders);

        // Request
        HttpEntity<String> response = restTemplate.postForEntity(url, requestMessage, String.class);

        // Response 파싱
        ObjectMapper objectMapper = new ObjectMapper();
        objectMapper.configure(DeserializationFeature.ACCEPT_EMPTY_STRING_AS_NULL_OBJECT, true);
        FlaskResponseDto dto = objectMapper.readValue(response.getBody(), FlaskResponseDto.class);

        return dto;
    }

}
응답 객체 FlaskResponseDto.class
@AllArgsConstructor
@NoArgsConstructor
@Getter
@Data
public class FlaskResponseDto {

    private List<String> name;
    private List<Integer> calorie;

    @Override
    public String toString(){
        StringBuilder result = new StringBuilder();
        for(String i : this.name){
            result.append(", ").append(i);
        }
        return result.toString();
    }

}