최근에Spring security 6 (이하 시큐리티)을 사용해서 RESTful API방식의 로그인 기능을 구현하였습니다.
구글링을 해보면 Form 방식의 예제는 많이 찾아볼 수 있지만 RESTful API방식의 포스팅은 찾아보기 힘들어서 제 경험을 기록으로 남기고자 합니다.
벨로그가 시리즈 기능을 제공해줘서 아이디, 비밀번호 방식의 인증과 OAuth 2.0 기반 카카오 소셜 로그인까지 단계적으로 다룰 예정입니다.
이번 포스팅에서는 아이디, 비밀번호를 사용한 인증을 다뤄보겠습니다.
제가 작성한 방식이 정답은 아닙니다.
구현하면서 최대한 Spring security가 제공하는 기능 위에서 작동할 수 있도록, 관련된 것들을 한 곳에서 관리 할 수 있는데 집중하였습니다.
프로젝트 환경
- Spring Boot 3.3
- Spring Security 6.3
- Java 17
- Spring Data JPA 3.3
요구사항
[x] 사용자 로그인 RESTful API를 설계한다.
[x] Spring security 6 기반으로 로그인 기능이 구현되어야한다.
[x] 아이디, 비밀번호 로그인을 제공한다.
[ ] 카카오 소셜 로그인을 제공한다.
[x] 사용자 정보(아이디, 비밀번호)는 DB에서 조회해온다.
[ ] 인증이 실패한 경우 400에러를 반환한다.
[ ] 인증이 성공한 경우 access token을 쿠키로 발급해줘야한다.
[ ] 인증 완료 후 HTTP 200 응답을 내려준다.
구현하기
아이디, 비밀번호 방식의 로그인을 구현하기 위해 개발자가 커스터마이징을 해야하는 것은 총 4가지입니다.
- AbstractAuthenticationProcessFilter
- Spring security에서 제공하는 HTTP 기반 인증 요청 처리 필터입니다. HTTP Body와 인증 URL을 커스터마이징하기 위해 서브 클래스를 구현하였습니다.
- UserDetailsService
- 사용자 정보를 인증 필터에 제공하는 목적의 클래스입니다. 저는 H2 데이터베이스에서 사용자 정보를 조회하는 용도로 커스터마이징 하였습니다.
- AuthenticationSuccessHandler
- 사용자 인증 요청이 성공한 다음 실행되는 클래스입니다. 기본설정은 인증 요청 이전의 요청으로 그게 없다면
/URL로 리다이렉트 하도록 되어있습니다.RESTful API방식에서는 리다이렉트 없이 HTTP 200 응답을 제공해주기 위해 커스터마이징 하였습니다. 이후 포스팅에서 JWT 토큰을 발행도 추가될 예정입니다.
- 사용자 인증 요청이 성공한 다음 실행되는 클래스입니다. 기본설정은 인증 요청 이전의 요청으로 그게 없다면
- AuthenticationFailureHandler
- 사용자 인증 요청이 실패했을 때 실행되는 클래스입니다. 기본설정은 로그인 실패 URL로 리다이렉트 하도록 되어있습니다.
RESTful API방식에서는 리다이렉트 없이 HTTP 400 응답을 반환해주도록 커스터마이징 하였습니다.
- 사용자 인증 요청이 실패했을 때 실행되는 클래스입니다. 기본설정은 로그인 실패 URL로 리다이렉트 하도록 되어있습니다.
SecurityFilterChain 빈에서 위 커스터마이징 한 것들을 관리할 수 있지만, 그렇게 할 경우 나중에 여러 설정이 붙으면 어느 목적에서 쓰는지 보기 어려워지는 문제가 있습니다. 그래서 Configurer 클래스를 하나 만들어 아이디, 비밀번호 인증과 관련된 것들을 한번에 관리해주도록 하겠습니다.
CustomLoginConfigurer
public final class CustomLoginConfigurer<H extends HttpSecurityBuilder<H>> extends
    AbstractHttpConfigurer<CustomLoginConfigurer<H>, H> {

    private AuthenticationFailureHandler failureHandler;

    private AuthenticationSuccessHandler successHandler;

	@Override
    public void configure(H http) {
        CustomLoginFilter authenticationFilter = createAuthenticationFilter(http);
        http.addFilterBefore(postProcess(authenticationFilter),
            UsernamePasswordAuthenticationFilter.class);
    }

    public CustomLoginFilter createAuthenticationFilter(H http) {
        CustomLoginFilter authenticationFilter = new CustomLoginFilter();
        // (1) AuthenticationManager
        authenticationFilter.setAuthenticationManager(
            http.getSharedObject(AuthenticationManager.class));

		authenticationFilter.setAuthenticationSuccessHandler(this.successHandler);
        authenticationFilter.setAuthenticationFailureHandler(this.failureHandler);
		 // (2)	SecurityContextHolderStrategy
        authenticationFilter.setSecurityContextHolderStrategy(getSecurityContextHolderStrategy());

        return authenticationFilter;
    }

	// (3) AuthetnicationSuccessHandler
    public CustomLoginConfigurer<H> successHandler(AuthenticationSuccessHandler successHandler) {
        this.successHandler = successHandler;
        return this;
    }

    public CustomLoginConfigurer<H> failureHandler(AuthenticationFailureHandler failureHandler) {
        this.failureHandler = failureHandler;
        return this;
    }
}
CustomLoginFilterConfigurer 클래스는 CustomLoginFilter를 생성해 필요한 필드들을 설정해주고, 필터 체인에 CustomLoginFilter를 추가해주는 역할을 합니다.
AuthenticationManager
실질적인 인증 요청을 수행하는 AuthenticationProvider들을 관리하는 클래스입니다.
AuthenticationProvider들은 인증 요청에 사용되는 토큰인 Authentication의 타입으로 자신이 처리할 인증 요청을 구분하여 처리합니다.
자세한 내용은 공식 문서 에서 확인하실 수 있습니다.
for (AuthenticationProvider provider : getProviders()) {
	if (!provider.supports(toTest)) {
    	continue;
	}
    ...
    try {
    	result = provider.authenticate(authentication);
	}
    catch (AccountStatusException | InternalAuthenticationServiceException ex) {
		...
	}
    catch (AuthenticationException ex) {
		...
	}
}
SecurityContextHolderStrategy
SecurityContextHolder를 통해 로드될 전략을 설정하는 부분입니다. 해당 부분은 공식 문서에서 자세히 확인할 수 있습니다.
AuthenticationSuccessHandler
Spring security는 6버전부터 함수형 프로그래밍을 지향하고 있습니다. 그러면서 기존의 apply()는 deprecated되었고, with(C configurer, Customizer<C> customizer)을 사용하도록 권장되고 있습니다.
외부에서 lambda 형식으로 successHandler와 failureHandler를 주입할 수 있도록 public 메서드로 정의하였습니다.
예시 코드는 아래와 같습니다.
.with(new CustomLoginConfigurer<>(), config -> config
	.successHandler(authenticationSuccessHandler())
    .failureHandler(authenticationFailureHandler())
)
AbstractAuthenticationProcessFilter
스프링 시큐리티는 HTTP 기반 인증 요청 처리를 위해 시큐리티는 AbstractAuthenticationProcessFilter를 제공하고 있습니다.
이 필터는 요청 URL이 정의한 URL 패턴과 일치한다면 인증 처리를 진행하게 합니다.
인증 작업은 이 필터의 서브 클래스에서 attempAuthentication 메서드를 재정의하여 처리하며, Authentication 객체를 반환하도록 정의 되어있습니다.
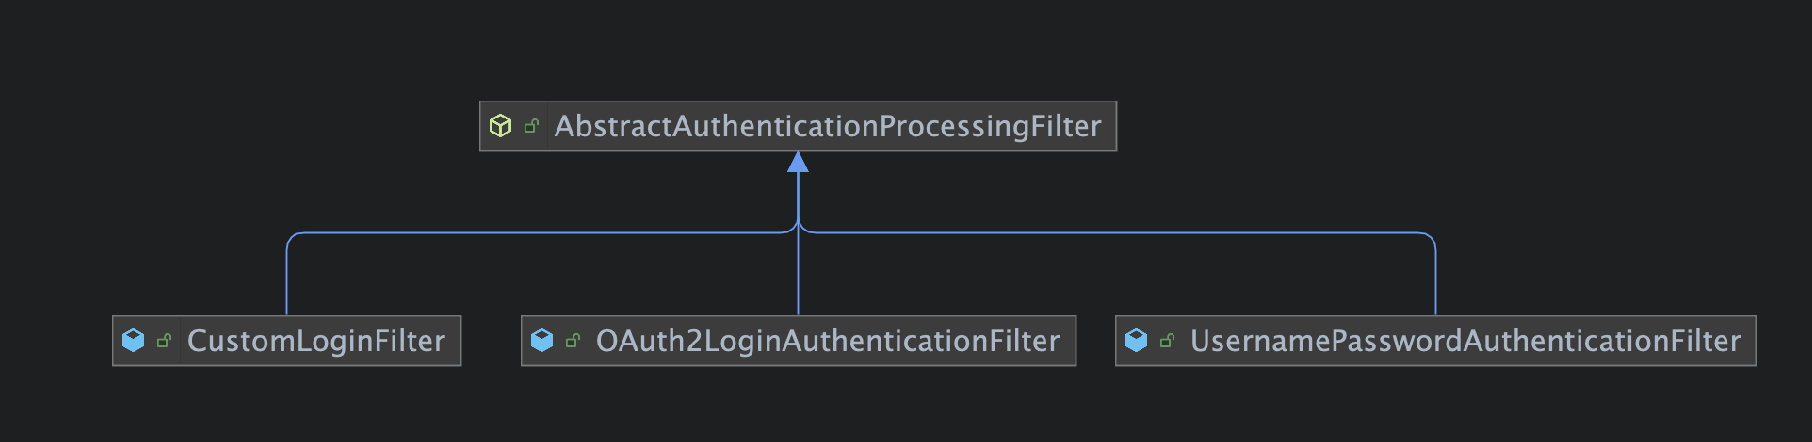
UsernamePasswordAuthenticationFilter는 form 방식의 인증 요청을 처리하는 필터이기 때문에 RESTful API방식의 인증 요청을 처리하는 CustomLoginFilter를 새롭게 정의하였습니다.
@Slf4j
public class CustomLoginFilter extends AbstractAuthenticationProcessingFilter {

    public static final String DEFAULT_FILTER_PROCESSING_URL = "/auth/login";
    private static final String FILTER_PROCESSING_URL_METHOD = "POST";
    private static final AntPathRequestMatcher DEFAULT_ANT_PATH_REQUEST_MATCHER = new AntPathRequestMatcher(
        DEFAULT_FILTER_PROCESSING_URL, FILTER_PROCESSING_URL_METHOD);

    private final ObjectMapper objectMapper = new ObjectMapper();

    public CustomLoginFilter() {
        super(DEFAULT_ANT_PATH_REQUEST_MATCHER);
    }

    @Override
    public Authentication attemptAuthentication(HttpServletRequest request,
        HttpServletResponse response)
        throws AuthenticationException {
        // (1) Login은 POST 방식만 가능해야한다.
        if (isNotPostMethod(request)) {
            throw new AuthenticationServiceException(
                String.format("Authentication method not supported : %s", request.getMethod()));
        }
		// (2) HTTP Body를 DTO로 변환한다.
        LoginRequest loginRequest = convertRequestDto(request);
        UsernamePasswordAuthenticationToken authToken = UsernamePasswordAuthenticationToken.unauthenticated(
            loginRequest.id(), loginRequest.password());
       	// (3) 인증처리
        return this.getAuthenticationManager().authenticate(authToken);
    }

    public boolean isNotPostMethod(HttpServletRequest request) {
        return !request.getMethod().equals(FILTER_PROCESSING_URL_METHOD);
    }

    public LoginRequest convertRequestDto(HttpServletRequest request) {
        try {
            return objectMapper.readValue(request.getInputStream(), LoginRequest.class);
        } catch (IOException e) {
            log.error("Failure convert http request body to LoginRequest", e);
            throw new AuthenticationServiceException("Failure convert http request body");
        }
    }
}- Login API를 POST Method로 강제
- 표준에서 인증을 위한 HTTP Method를 제한하고 있지는 않습니다. 하지만 GET메서드를 사용해 url parameter에 아이디, 비밀번호를 담아서 요청을 보낼 경우 사용자 인증 정보가 노출될 수 있는 위험이 있기 때문에 POST 방식을 사용하였습니다.
- HTTP Body를 DTO로 변환한다.
- 일반적으로
RESTful API방식에서는Content-Type: application/json을 사용하고 있습니다. 그렇기 때문에 아이디, 비밀번호 json key값을 하드코딩 하는 방법 보다는 DTO로 정의 하여 역직렬화 하는 방법을 선택하였습니다.
- 일반적으로
- 실질적인 인증 처리는
AuthenticationProvider에서 수행하고 있기에AuthenticationManager에 인증 처리를 위탁하였습니다.
UsernamePasswordAuthenticationToken
사용자의 아이디, 비밀번호를 간단하게 표현하기 위한 목적의 Authentication 인터페이스의 구현체입니다. Object의 타입으로 이 값을 사용할 때에는 Object.toString()같이 사용하고 있습니다.
public class UsernamePasswordAuthenticationToken extends AbstractAuthenticationToken {

	private static final long serialVersionUID = SpringSecurityCoreVersion.SERIAL_VERSION_UID;
	private final Object principal;
	private Object credentials;

	@Override
	public Object getCredentials() {
		return this.credentials;
	}

	@Override
	public Object getPrincipal() {
		return this.principal;
	}
}
Authentication
Authentication 인터페이스는 조금 유의깊게 봐야하는데요.
인증 요청에 대한 토큰, AuthenticationManager가 인증한 principal에 대한 토큰입니다. isAuthenticated() 메서드가 true가 아니라면 메서드를 호출하는 모든 보안 인터셉터에서 인증이 진행됩니다.
요청이 인증된다면 SecurityContextHolder가 관리하는 스레드 로컬 SecurityContext에 저장됩니다.
이후 인가를 담당하는 AuthorizationFilter는 SecurityContext에서 인증 토큰을 빼 인증이 되었는지, 권한을 갖고 있는지를 검사하게 됩니다.
UserDetailsService
UserDetailsService는 DaoAuthenticationProvider에서 사용자의 정보를 불러오는 인터페이스입니다.
이 인터페이스를 스프링 빈으로 등록하면 스프링 시큐리티에서 기본으로 주입하는 InitializeUserDetailsBeanManagerConfigurer에서 UserDetailsService가 빈으로 등록되어있다면, 빈으로 등록된 UserDetailsService를 가진 DaoAuthenticationProvider를 생성하고 AuthenticaionManager에 등록해줍니다.
그래서 사용자는 DaoAuthenticationProvider와 AuthenticationManager구현체를 생성하지 않고 UserDetailsService만 재정의해서 사용할 수 있습니다.
public class CustomUserDetailsService implements UserDetailsService {

    private final AuthUserRepository repository;

    public CustomUserDetailsService(AuthUserRepository repository) {
        this.repository = repository;
    }

    @Override
    public UserDetails loadUserByUsername(String username) throws UsernameNotFoundException {
        AuthUser authUser = repository.findByUsername(username)
            .orElseThrow(() -> new UsernameNotFoundException(
                String.format("username not found : %s", username))
            );
        // 권한은 나중에 설정하기 위해 잠시 List.of()로 넘겨준다.
        return new User(authUser.getUsername(), authUser.getPassword(), List.of());
    }
}CustomUserDetailsService.loadUserByUsername()는 사용자 아이디로 DB에서 사용자 정보를 조회 후 반환해주는 역할을 합니다. AuthUser, AuthUserRepository는 제가 임의로 정의한 Entity, JpaRepository 입니다. 개개인의 요구사항에 따라 DB에서 사용자 아이디, 비밀번호를 조회해서 반환해주면 됩니다.
조금 더 살펴본다면, DaoAuthenticationProvider.additionalAuthenticationChecks()에서 비밀번호 일치여부를 검증하고 다르다면 BadCredentialsException 예외를 터뜨립니다.
AuthenticationSuccessHandler
인증이 성공한 이후 처리를 담당합니다. 이번 포스팅에서는 응답으로 200 상태만 반환해주기 때문에 아래와 같이 정의합니다.
public class CustomAuthenticationSuccessHandler implements AuthenticationSuccessHandler {

    @Override
    public void onAuthenticationSuccess(HttpServletRequest request, HttpServletResponse response,
        Authentication authentication) throws IOException, ServletException {

    }
}
onAuthenticationSuccess 메서드는 AbstractAuthenticationProcessingFilter.successfulAuthentication() 메서드에서 호출해주고 있습니다.
protected void successfulAuthentication(HttpServletRequest request, HttpServletResponse response, FilterChain chain,
			Authentication authResult) throws IOException, ServletException {
	SecurityContext context = this.securityContextHolderStrategy.createEmptyContext();
    context.setAuthentication(authResult);
	this.securityContextHolderStrategy.setContext(context);
	this.securityContextRepository.saveContext(context, request, response);
	...
    // AuthenticationSuccessHandler 호출
    this.successHandler.onAuthenticationSuccess(request, response, authResult);
}
AuthenticationFailureHandler
인증 요청이 실패한 경우 처리를 담당합니다. Spring security에서 기본으로 로그인 실패 페이지로 리다이렉트 하는 식으로 설정이 되어있으나 RESTful API방식에서는 잘못된 요청이라는 의미인 HTTP 400 상태값을 반환해 주도록 설정하였습니다.
public class CustomAuthenticationFailureHandler implements
    AuthenticationFailureHandler {

    @Override
    public void onAuthenticationFailure(HttpServletRequest request, HttpServletResponse response,
        AuthenticationException exception) {
        ServletServerHttpResponse httpResponse = new ServletServerHttpResponse(response);
        httpResponse.setStatusCode(HttpStatus.BAD_REQUEST);
    }
}AbstractAuthenticationProcessingFilter에서 인증 처리 중 InternalAuthenticationServiceException 혹은 AuthenticationException 예외가 던져질 때 호출됩니다. 호출 코드는 아래와 같습니다.
protected void unsuccessfulAuthentication(HttpServletRequest request, HttpServletResponse response,
			AuthenticationException failed) throws IOException, ServletException {
	this.securityContextHolderStrategy.clearContext();
	...
    this.failureHandler.onAuthenticationFailure(request, response, failed);
}
ProviderManager
ProviderManager는 AuthenticationManager인터페이스의 구현체입니다. 이 클래스는 List<AuthenticationProvider> providers 를 필드로 가지고 있습니다.
AuthenticationProvider들은 Authentication 토큰으로 자신이 처리할 요청인지를 판단 후 인증 처리를 진행하게 됩니다.
샘플로 DaoAuthenticationProvider를 간단하게 살펴보겠습니다.
public class DaoAuthenticationProvider extends AbstractUserDetailsAuthenticationProvider {
	@Override
	protected final UserDetails retrieveUser(String username, UsernamePasswordAuthenticationToken authentication)
			throws AuthenticationException {
		...
		try {
			UserDetails loadedUser = this.getUserDetailsService().loadUserByUsername(username);
			if (loadedUser == null) {
				throw new InternalAuthenticationServiceException(
						"UserDetailsService returned null, which is an interface contract violation");
			}
			return loadedUser;
		}
		catch (UsernameNotFoundException ex) {
        	...
		}
	}
}

public abstract class AbstractUserDetailsAuthenticationProvider
		implements AuthenticationProvider, InitializingBean, MessageSourceAware {
	@Override
	public Authentication authenticate(Authentication authentication) throws AuthenticationException {
		Assert.isInstanceOf(UsernamePasswordAuthenticationToken.class, authentication,
				() -> this.messages.getMessage("AbstractUserDetailsAuthenticationProvider.onlySupports",
						"Only UsernamePasswordAuthenticationToken is supported"));
		...
		boolean cacheWasUsed = true;
		UserDetails user = this.userCache.getUserFromCache(username);
		if (user == null) {
			...
			try {
				user = retrieveUser(username, (UsernamePasswordAuthenticationToken) authentication);
			}
			catch (UsernameNotFoundException ex) {
				...
			}
		...
		return createSuccessAuthentication(principalToReturn, authentication, user);
	}

	@Override
	public boolean supports(Class<?> authentication) {
		return (UsernamePasswordAuthenticationToken.class.isAssignableFrom(authentication));
	}
}
DaoAuthentionProvider 는 다른 프로바이더들과는 다르게 AbstractUserDetailsAuthenticationProvider를 상속받아 유저 탐색 하는 부분만 재정의 해주고 있습니다.
부모 클래스의 내용을 같이 살펴보면 UsernamePasswordAuthenticationToken이 매개변수로 들어왔을 때 인증 로직을 구현한다. 정도로만 이해하고 넘어가겠습니다.
DaoAuthenticationProvider는 UserDetailsService에서 사용자 정보를 가져오고 있습니다.
그래서 DB 조회 로직을 구현하는 경우 UserDetailsService를 구현해서 주입해주면 이후 인증 부분은 시큐리티 자체 기능으로 해결할 수 있습니다.
SecurityFilterChain
시큐리티 6버전부터는 WebSecurityConfigurerAdapter 대신 SecurityFilterChain을 사용하도록 변경되었습니다.
@EnableWebSecurity
@Configuration
public class SecurityConfig {

    @Bean
    public SecurityFilterChain securityFilterChain(HttpSecurity http) throws Exception {
        http
            .formLogin(AbstractHttpConfigurer::disable)
            .httpBasic(AbstractHttpConfigurer::disable)
            .csrf(AbstractHttpConfigurer::disable)
            // (1) 로그인 커스터마이징 설정
            .with(new CustomLoginConfigurer<>(), config -> config
                .successHandler(authenticationSuccessHandler())
                .failureHandler(authenticationFailureHandler())
            )
            // (2) API 인증 여부 설정
            .authorizeHttpRequests(request -> request
                .requestMatchers(CustomLoginFilter.DEFAULT_FILTER_PROCESSING_URL).permitAll()
                .anyRequest().authenticated())
        ;

        return http.build();
    }

    @Bean
    public UserDetailsService userDetailsService(AuthUserRepository authUserRepository) {
        return new CustomUserDetailsService(authUserRepository);
    }

    @Bean
    public AuthenticationFailureHandler authenticationFailureHandler() {
        return new CustomAuthenticationFailureHandler();
    }

    @Bean
    public AuthenticationSuccessHandler authenticationSuccessHandler() {
        return new CustomAuthenticationSuccessHandler();
    }
}
저는 SecurityConfig 클래스에서 UserDetailsService, AuthenticationFailureHandler, AuthenticationSuccessHandler 빈을 수동으로 생성해주고, SecurityFilterChain 빈 또한 수동으로 생성하도록 하였습니다.
- 로그인 커스터마이징 설정
AuthenticaionSuccessHandler와AuthenticationFailureHandler는 이후 소셜 로그인을 위한OAuthClient설정에서도 사용하기 위해Configratuion에서 빈으로 생성 및 주입하도록 설계하였습니다.
- API 인증 여부 설정
UsernamePasswordAuthentiationFilter같은 스프링 내장 필터들은 접근 제한자를 통해 필터 내부에서 인증과 관련된 URL들은 인증이 필요하지 않도록permitAll()해주고 있습니다. 하지만 커스텀한 필터의 경우 default 접근 제한자를 가진 메서드를 호출할 수 없을 뿐더러, 어떤 URL인지 잘 보이지 않기 때문에SecurityFilterChain에서permitAll()해주도록 하였습니다.
permitAll() : URL을 아무나 호출할 수 있도록 설정
authenticated() : 인증된 유저만 URL을 호출할 수 있다.
hasRole() : 명시된 Role을 가진 유저만 URL을 호출할 수 있다.
테스트
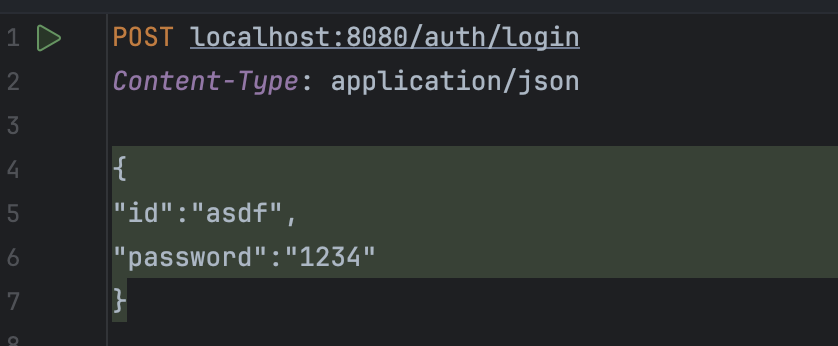
Intellij HTTP Client를 통해 로그인 API를 호출해보도록 하겠습니다.
curl -X POST --location "http://localhost:8080/auth/login" \
    -H "Content-Type: application/json" \
    -d '{
        "id":"asdf",
        "password":"1234"
        }'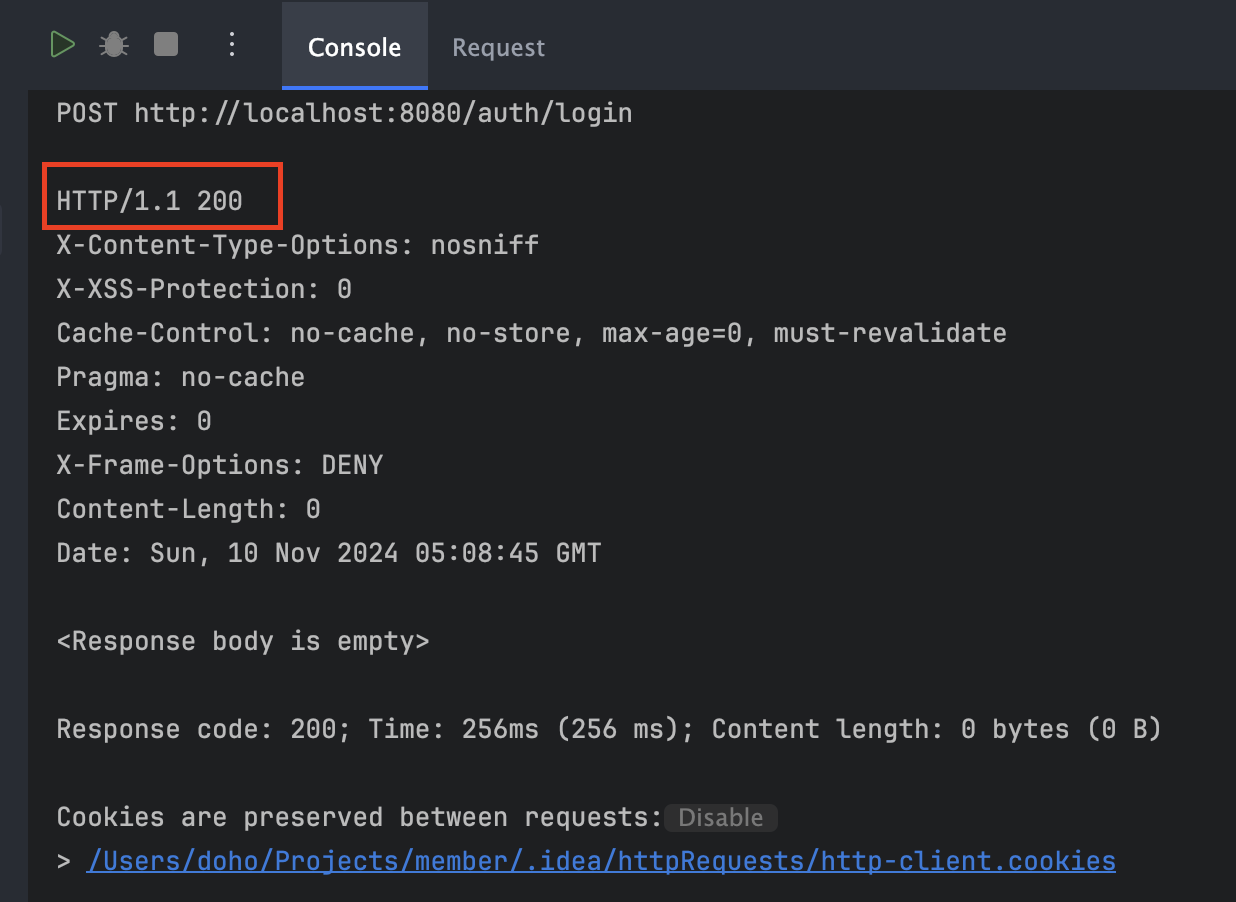
200으로 정상 처리된 것을 확인할 수 있었습니다.
그렇다면 아이디나 비밀번호를 틀리게 보내면 어떻게 될까요?
[요청] 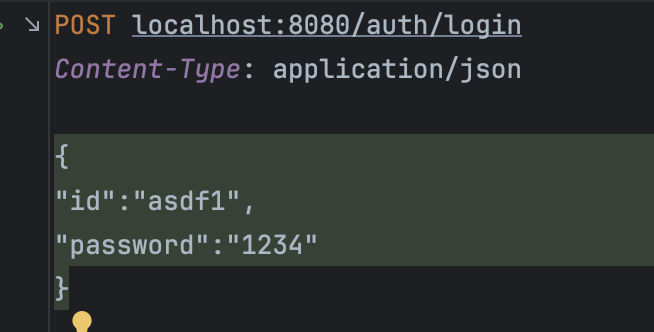
[응답]
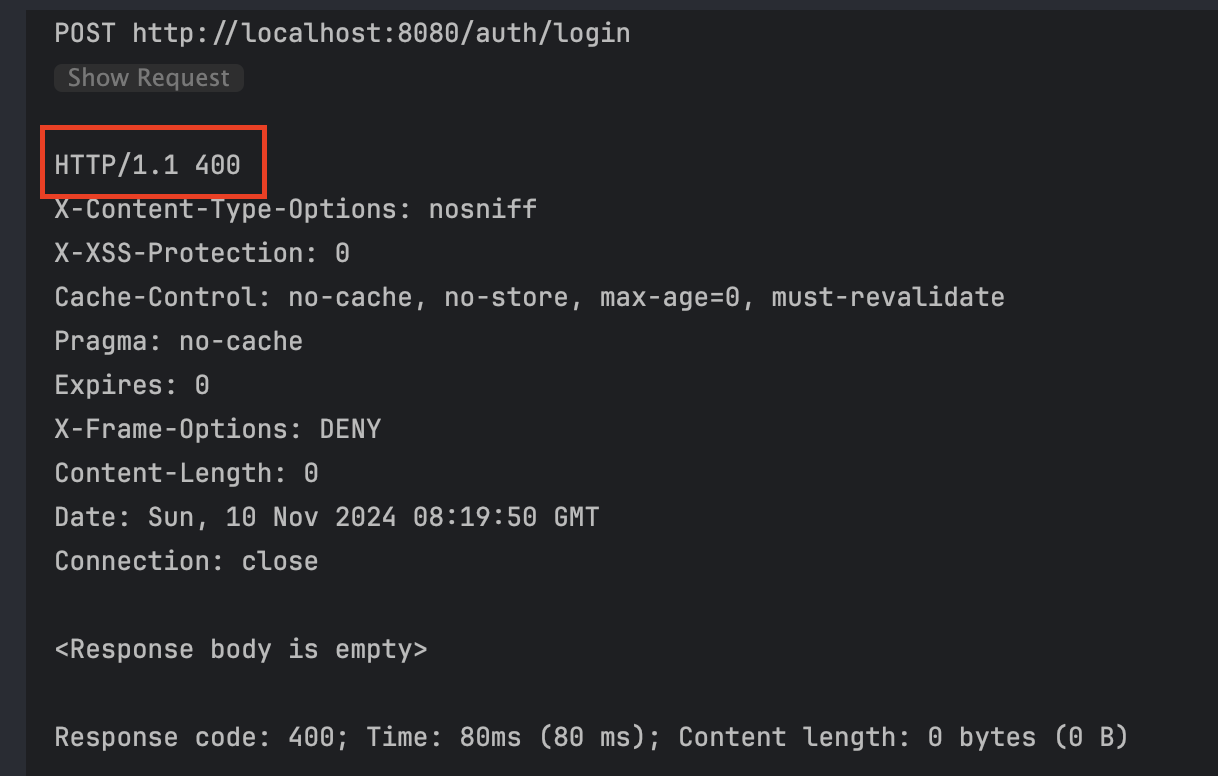
400으로 의도한 대로 반환되는 것을 확인했습니다. 만약 공통된 에러 핸들링을 하고 싶다면 시큐리티의 필터에서 발생한 에러를 핸들링 해주는 필터를 추가해주면 됩니다.
@RestControllerAdivce로 에러 핸들링을 정의해주었다 해도 시큐리티 필터에서 발생한 예외를 핸들링하지 못합니다. 이유는 @RestControllerAdvice는 dispatcherServlet 내부에서 작동하지만 시큐리티 필터는 dispathcherSevlet 전에 처리되기 때문이죠.
마무리
이번 포스팅에서는 RESTful API 방식의 아이디, 비밀번호 인증을 구현해보았습니다.
RESTfulAPI방식이기 때문에 인증 프로세스 중 리다이렉트 부분을 무효화 하는 작업이 제일 오래걸렸습니다.
잘못된 내용에 대한 지적은 언제든지 환영합니다.
다음 포스팅에서는 인증 성공시 JWT Token을 발급해주는 부분을 다뤄보도록 하겠습니다.