Netty - Java network app Framework
Netty 공부에 앞서, socket을 이용한 간단한 server-client 구현 예제와 메서드를 살펴보자.
그리고 MultiProcess, MultiThread, MultiPlexing 기반 서버에 대해 알아보고 차이점을 살펴보자.
(Ref - 서동우 님의 Tistory 취준생 일지)
hello_server.c#include <stdio.h>
#include <stdlib.h>
#include <string.h>
#include <unistd.h>
#include <arpa/inet.h>
#include <sys/socket.h>
void error_handling(char *message);
int main(int argc, char *argv[]){
int serv_sock; // 서버 소켓
int clnt_sock; // client 소켓
struct sockaddr_in serv_addr;
struct sockaddr_in clnt_addr;
// sockaddr_in은 주소 체계가 ipv4인 AF_INET 인 경우의 소켓주소를 담는 구조체.
socklen_t clnt_addr_size;
// sys/socket.h 에 정의. socklen_t라는 type의 client_addr길이를 저장할 변수.
char message[] = "Hello World!";
if(argc != 2) // 추가 인자 하나(port)가 없으면 예외처리.
{
printf("Usage: %s <port>\n", argv[0]);
exit(1);
}
serv_sock = socket(PF_INET, SOCK_STREAM, 0); // socket 생성. (PF_INET == ProtocolFamily Internet) 성공시 socket descriptor(file descriptor, fd)를 반환.
if(serv_sock == -1)
error_handling("Socket() error");
//주소 초기화, IP Addr, Port 지정
memset(&serv_addr, 0, sizeof(serv_addr));
serv_addr.sin_family=AF_INET; // type: IPV4
serv_addr.sin_addr.s_addr = htonl(INADDR_ANY); // htol: Host to Network Long(Host system의 Byte Order에 맞게 data변 환) ip address set to 사용가능한 랜카드의 IP주소 아무거나 지정.
serv_addr.sin_port = htons(atoi(argv[1])); // 실행 시 입력했던 port 지정.
if(bind(serv_sock, (struct sockaddr*) &serv_addr, sizeof(serv_addr)) == -1)
// fd와 server 주소를 binding
error_handling("bind() error");
if(listen(serv_sock, 5) == -1) // queue len == 5인 대기열 생성.
error_handling("listen() error");
clnt_addr_size = sizeof(clnt_addr);
clnt_sock = accept(serv_sock, (struct sockaddr*)&clnt_addr, &clnt_addr_size);
// accept()로 client가 connect요청한 것을 받음. server socket에 client를 연결. 후 clnt_sock fd에 할당.
if(clnt_sock == -1)
error_handling("accept() error");
write(clnt_sock, message, sizeof(message)); // client fd에 write (client에 메세지 보냄.)
close(clnt_sock);
close(serv_sock);
// client, server socket 닫음.
return 0;
}
void error_handling(char *message){
fputs(message, stderr);
fputc('\n',stderr);
exit(1);
}hello_client.c#include <stdio.h>
#include <stdlib.h>
#include <unistd.h>
#include <string.h>
#include <arpa/inet.h>
#include <sys/socket.h>
void error_handling(char *message);
int main(int argc, char* argv[])
{
int sock;
struct sockaddr_in serv_addr;
char message[30];
int str_len;
if(argc!=3)
{
printf("Usage: %s <IP> <Port> \n", argv[0]);
exit(1);
}
sock = socket(PF_INET, SOCK_STREAM, 0);
if(sock == -1)
error_handling("socket() err");
memset(&serv_addr, 0, sizeof(serv_addr));
serv_addr.sin_family = AF_INET;
serv_addr.sin_addr.s_addr = inet_addr(argv[1]);
// 실행 시 입력한 첫번째 인자(server ip 주소)로 Ip 지정.
serv_addr.sin_port = htons(atoi(argv[2]));
// 실행 시 입력한 두번째 인자로 server port 지정.
if(connect(sock, (struct sockaddr*)&serv_addr, sizeof(serv_addr)) == -1)
// connect 메서드로 Server와 연결.
error_handling("connect() err!");
str_len = read(sock, message, sizeof(message) - 1);
if(str_len == -1)
error_handling("read() err!");
printf("Message from server: %s \n", message);
close(sock);
return 0;
}
void error_handling(char * message){
fputs(message, stderr);
fputc('\n',stderr);
exit(1);
}중요하게 살펴볼 개념은
socket()메서드로 소켓을 생성, 성공시 해당 소켓을 가리키는 File Descriptor(socket descriptor) 번호를 반환.bind()메서드로 소켓과 서버를 바인딩.listen()메서드로 소켓 대기열을 생성하며 client의 연결 요청에 대기accept()메서드로 client의 연결 요청을 받음. return 값을 client_socket FD에 할당.
socket 또한 file descriptor 로 관리된다는 점이고, 파일과 동일하게 read, write 하여 data를 전달한다. client 가 서버의 주소와 ip로 연결 요청, server가 그것을 받으면 client_socket fd 에 할당하고 그것을 이용해서 read, write 동작함.
MultiProcess 기반 서버
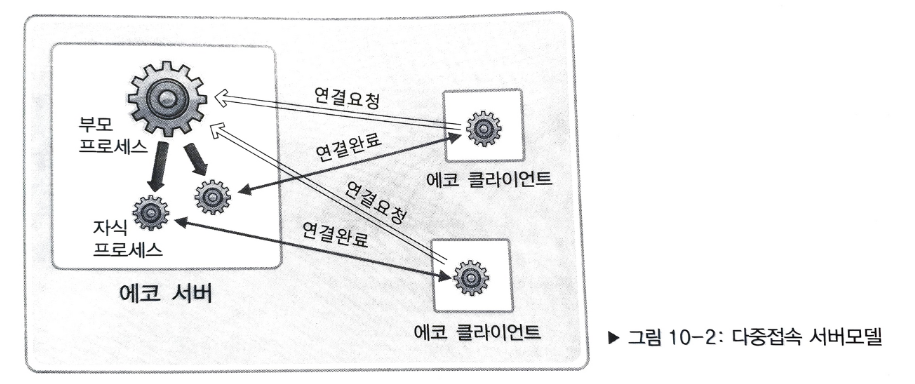
fork() 를 통해 process 복사, 새롭게 process를 처음부터 생성하는 것이 아니라 이미 실행중인 process를 복사한다.
Process를 복사하여 1client - 1process로 요청을 처리하는 방식이다.
그러나 이 방식은 zombie process(실행이 끝났는데도 종료가 정상적으로 되지 않아 계속 남아있는 상태, System에 큰 부담을 줌) 등 문제가 있다.
zombie process가 생성되는 이유는 Process가 fork로 복사될 때 부모, 자식간 process 소멸이 recursive 한 nested 구조이기 때문. (자식 process가 exit되어도 부모에게 전달될 때 까지 죽지 않는다. 부모는 자식 process에게 계속적인 함수 호출로 return값을 요청해야만 함. )
이러한 문제로 멀티프로세스 기반 서버는 한꺼번에 다수의 client에게 서비스를 제공할 수는 있으나, client 요청 시 마다 자식 process를 생성해야 한다는 점 (많은 Context Switching - 비효율적), zombie process 등의 문제가 발생한다.
MultiThread 기반 서버
멀티 프로세스의 context switching 단점을 극복하기 위해 여러 프로세스를 생성하는 것이 아닌 여러 쓰레드에서 처리. (Thread의 생성 및 context switching은 process보다 빠르기 때문, Thread는 process보다 메모리 공유 영역 --ex.Data, Heap 영역을 공유하고 Stack영역만 분리.-- 이 크다.)
Thread의 생성과 실행흐름을 구성하기 위해 사용되는 method
pthread_create(pthread_t* restrict thread, const pthread_attr_t* restrict attr,
void*(*start_routine)(void*), void* restrict arg);- thread: 생성할 thread의 ID저장(thread 식별자)
attr: thread에 부여할 특성 정보의 전달을 위한 param
start_routine: 개별 thread의 main함수 역할을 하는 함수(별도의 실행흐름 시작)
arg: 함수 호출 시 함께 전달할 parameter 정보의 주소값
thread 생성 예제
#include <unistd.h>
#include <stdio.h>
#include <pthread.h>
void* thread_main(void *arg);

int main(int argc, char *argv[])
{
    pthread_t t_id;
    int thread_param = 5;

    if(pthread_create(&t_id, NULL, thread_main, (void*)&thread_param) != 0)
    {
        puts("pthread_create() error");
        return -1;
    };
    sleep(10);
    puts("end of main");
    return 0;
}

void *thread_main(void *arg)
{
    int i;
    int cnt = *((int*)arg);
    for(i = 0; i < cnt; i++)
    {
        sleep(2);
        puts("running thread");
    }
    return NULL;
}
이와 같은 예제에서 보면, main함수에서 sleep을 통해 process는 thread가 끝까지 실행되기를 보장하고 있다. (또는 main에서 sleep 시간에 따라 보장하지 않을 수 있음.)
=> thread기반 programming에서는 sleep 함수의 호출로 thread의 실행을 관리? X
main process에서 sleep의 호출을 통해 thread의 실행을 관리하는 것은 thread의 흐름과 동작시간을 예측한다는 뜻인데, 그것은 불가능함!!!
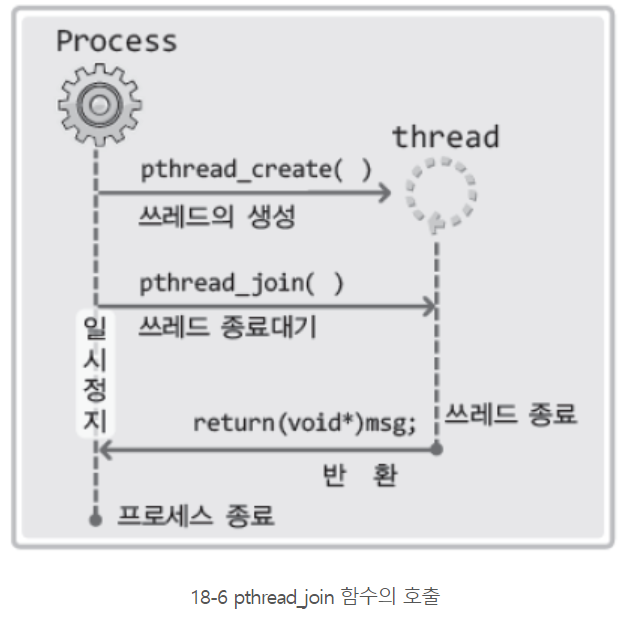
-> pthread_join() 메서드로 해결. int pthread_join(pthread_t thread, void **status);
thread - 해당 param의 thread id를 가진 thread가 종료될 때 까지 함수는 계속 sleep. (no return)
status - status에 thread의 return값이 저장됨.
thread parameter로 전달되는 ID의 thread가 종료되기 전까지 함수는 return하지 않고 process를 계속 붙잡아 둔다.(종료되지 못하게)
-
thread의 임계영역
둘 이상의 thread가 돌아갈 때 thread에 안전한 함수가 있고 불안전한 함수가 있음. (불안전한 함수는 동시호출시 문제가 발생할 수 있는 함수.) -
Worker Thread 모델
1~10까지 덧셈을 진행하는 process가 있다고 가정. 이를 process의 main함수에서 진행하는 것이 아니라, 2개 (혹은 3개,...)의 thread를 생성해서 각 thread에서 1~5, 6~10까지 덧셈연산을 돌리도록 하는 것.
#include <stdio.h>
#include <pthread.h>
#include <unistd.h>
void * thread_summation(void * arg);
int sum = 0;

int main(int argc, char *argv[])
{
    pthread_t id_t1, id_t2;
    int range1[] = {1, 5};
    int range2[] = {6, 10};

    pthread_create(&id_t1, NULL, thread_summation, (void *)range1);
    pthread_create(&id_t2, NULL, thread_summation, (void *)range2);

    pthread_join(id_t1, NULL);
    pthread_join(id_t2, NULL);
    printf("result : %d \n", sum);
    return 0;
}

void * thread_summation(void * arg)
{
    int start = ((int*)arg)[0];
    int end = ((int*)arg)[1];

    while(start <= end)
    {
    	sleep(1);
        printf("%d",start);
        sum += start;
        start++;
    }
    return NULL;
}
이처럼 worker thread 모델에서는 Global 변수인 sum을 공유하기 때문에 정상 동작이 가능하다.
(printf 다음 puts 함수를 써줘야 sleep이 예상대로 동작함. 아마 버퍼 관련 ~~인듯)
이 코드는 괜찮은데, 쓰레드 개수가 많아지고 동작이 복잡해 지면 어떠할지?
#include <stdio.h>
#include <unistd.h>
#include <stdlib.h>
#include <pthread.h>
#define NUM_THREAD 100

void * thread_inc(void * arg);
void * thread_des(void * arg);
long long num = 0;   // long long형은 64비트 정수 자료형

int main(int argc, char *argv[])
{
   pthread_t thread_id[NUM_THREAD];
   int i;

   printf("sizeof long long : %ld \n", sizeof(long long)); // long long 크기확인
   for(i = 0; i < NUM_THREAD; i++)
   {
      if(i % 2)
         pthread_create(&(thread_id[i]), NULL, thread_inc, NULL);
      else
         pthread_create(&(thread_id[i]), NULL, thread_des, NULL);
   }

   for(i = 0; i < NUM_THREAD; i++)
      pthread_join(thread_id[i], NULL);

   printf("result: %lld \n", num);
   return 0;
}

void * thread_inc(void *arg)
{
   int i;
   for(i = 0; i<50000000; i++)
      num += 1;
   return NULL;
}

void * thread_des(void * arg)
{
   int i;
   for( i = 0; i < 50000000; i++)
      num -= 1;
   return NULL;
}
이전 예제와 마찬가지로 Global변수 num을 공유하고 있는데, 예상 결과값 0 이 나오지 않고 실행 시 마다 상이한 결과가 출력됨. -> num변수에 2개 이상의 thread가 동시 접근하면서 발생되는 문제. (동시접근은 항상 문제를 유발..)
-> Synchronizing(동기화) 의 개념이 필요해짐. 하나의 thread가 num변수에 접근해서 동작하고 있을 때, 다른 thread가 접근하지 못하도록 막는 것.(BlockingIO)
동기화는 Mutex의 lock()과 unlock() 함수를 통해 구현.(또는 Semaphore의 sem_post(), sem_wait()) 단 반드시 작업이 끝난 후에 thread가 임계영역을 빠져나가기 전에 unlock()을 해줘야만 함.(그렇지 않을 시 계속해서 blocking 상태로 존재하는 Dead-lock 발생)
위 예제코드에서 lock(), unlock()호출 시점에 따라, lock, unlock 함수 호출 횟수가 많아지거나 또는 적게 호출할 경우, 해당 작업을 진행할 동안 다른 thread의 접근을 막는다는 일장일단이 존재한다.
thread의 소멸과 MultiThread기반 서버 구현
thread의 소멸은 pthread_join()(return됨과 동시에 소멸)과 pthread_detach()(호출로써 소멸)로 구현 가능.
이전에 만들었던 hello-server를 MultiThread기반 서버로 바꿔보자.
detach()는 쓰레드가 종료되었을 때 자원 회수를 위한 것. Thread를 바로 소멸시켜버린다거나 하는 것이 아님!!!
MultiPlexing 기반 서버
select()를 이용한 단일 실행흐름에서 여러 client요청을 처리하는 Mux server 구현
select 함수는 FD(FileDescriptor == SocketDescriptor)를 관찰하는 역할. 관찰 대상인 FD를 FD_SET()을 통해 FD번호를 1로 setting. 관찰하지 않는 FD는 0으로 설정한다.
fd_set 자료형은 fd를 모아놓은 배열. (수신, 전송, 예외)에 따라 구분해서 모은다.
fd0(read), fd1(write), fd2(error)
fd_set 자료형 변수의 조작 함수들
- FD_ZERO(fd_set) : fd_set형 변수의 모든 bit를 0으로 초기화
- FD_SET(fd, fd_set) : fd를 fd_set에 등록
- FD_CLR(fd_set) : fd를 fd_set에서 삭제
- FD_ISSET(fd_set) : fd_set에서 fd의 정보가 있으면 양수 return
이 때, FD_ISSET()은 select()의 호출결과를 확인하는 용도로 사용!! (select 자체가 fd를 관찰하는 것이기 때문에, FD_ISSET()을 사용해서 조회한다.)
int select(int maxfd, fd_set *readset, fd_set *writeset, fd_set *exceptset, const struct timeval *timeout)
maxfd - 검사 대상의 FD수
readset - fd_set배열에 '수신된 data의 존재여부'에 관심 있는 fd정보를 등록한 변수
writeset - fd_set배열에 'Non-blocking data의 전송 가능여부'에 관심있는 fd정보를 등록한 변수
exceptset - fd_set배열에 '예외상황 발생여부'에 관심있는 fd정보를 등록한 변수
timeout - select함수 호출 후 무한히 기다리는 blocking 상황을 막기 위한 타이머 값
select() 호출 시에는, fd_set 배열의 fd가 모두 0으로 변경되었다가, 변화가 존재하는 fd에 해당하는 비트만 1로 설정됨.
따라서 1로 설정된 fd에서 변화가 발생했다고 간주함.
(https://github.com/dohyunKim12/SocketProgramming/blob/master/c_projects/multiPlexing_select_server/echo_selectserv.c)[https://github.com/dohyunKim12/SocketProgramming/blob/master/c_projects/multiPlexing_select_server/echo_selectserv.c]
코드 구현 로직은 select()를 이용해서 FD를 관찰하고 변화가 있는 FD들에 대하여
- FD값이 ServerSocket과 동일하다면 연결 요청이 있다고 간주, server_socket과 client_socket을 연결해주고
- 다른 값의 FD에 대해서는 read하고 write함(socket으로부터 읽고, data방출)으로써 echo server를 구현함.
포인트는 select()함수의 동작인데, select()를 호출할 때 마다 변화가 있는 fd들을 가져온다는 점을 통해 변화가 있는 fd들을 대상으로 계속해서 socket을 연결하고 메세지를 읽어와 echo로 출력하고, client에서 연결 취소 요청을 하면 socket을 닫고 하는 작업을 반복한다.
select함수로 구현하였을 때, 결국 이벤트 기반으로 무언가 변화가 있는 FD들에게만 반응할 수 있다는 것처럼 보이나, 계속적으로 FD를 쳐다봐야 한다는(select 함수의 지속적인 호출) 단점이 존재한다. 또한 검사할 수 있는 FD 수가 최대 1024개로 제한됨. (+ select 함수의 구현이 FD_ISSET() 함수의 호출로 인한 것이기 때문에, 각 FD를 일일히 조회해 봐야 하는 불필요함)
select & epoll
select는 process가 kernel로 지속적으로 요청하는 형태인데 process와 kernel이 서로 동기화가 필요함. Synchronizing한 방식이다. 또한 select로 멀티플렉싱 서버 구현 시, non-blocking을 구현할 때에는 timeout param에 의존성을 갖는다.
이를 epoll로 대체할 수 있음.
epoll은 select의 대체기법으로, 전체 FD에 대해 반복적으로 조회하지 않는다.
관찰 대상인 fd들의 정보를 담은 fd_set 같은 저장공간을 kernel이 직접 운영.
kernel에게 관찰대상의 fd 저장공간 생성을 요청하면 해당 저장공간인 epoll_fd를 return.
epoll_fd를 통해 변경사항을 체크 등 확인한다. (select 함수의 문제점이었던 전체FD를 순회하면서 FD_ISSET 호출 등 뻘짓을 하지 않아도 됨)
-
int epoll_create(int size)epoll_fd의 크기를 size로 전달하고 실패 시 -1 return, 성공 시 epoll_fd값 return. -
int epoll_ctl(int epoll_fd, int operate_enum, int enroll_fd, struct epoll_event* event)관찰 대상이 되는 FD를 등록하고 삭제
epoll_fd값을 전달하고, 생성, 삭제, 이벤트 변경 등의 수행을 결정하는(어떤 작업을 할지) enum, 등록할 fd, 관찰 대상의 이벤트 유형 을 parameter로 전달한다.epoll_event 구조체
epoll_event 구조체에 정의된 Event들로는- EPOLLIN(수신할 data가 있음) - EPOLLOUT(송신 가능함) - EPOLLPRI(중요한 data(OOB)가 발생함) - EPOLLRDHUD(연결 종료 or Half-close 발생) - EPOLLERR(에러 발생) - EPOLLET(엣지 트리거 방식으로 설정) - EPOLLONESHOT(한번만 이벤트 닫음) -
int epoll_wait(int epoll_fd, struct epoll_event* event, int maxevents, int timeout)실제 변경된 fd들의 집합을 요청하는 함수는 epoll_wait. (select()처럼 동작)
epoll 예제
int epoll_fd = epoll_create(EPOLL_SIZE);
struct epoll_event* events = malloc(sizeof(struct epoll_event)*EPOLL_SIZE);
struct epoll_event init_event;
init_event.events = EPOLLIN; // event는 EPOLLIN(수신할 data가 있음)으로 정의.
init_event.data.fd = server_socket; // fd값은 server_socket으로 할당.
epoll_ctl(epoll_fd, EPOLL_CTL_ADD, server_socket, &init_event); // epoll_fd에 관찰 대상인 server_socket을 등록.

while(TRUE)
{
   int event_count = epoll_wait(epoll_fd, events, EPOLL_SIZE, -1); // 대기. 이벤트 발생하면(epoll_fd에 변화가 생기면, 즉 수신할 data가 생기면) 이벤트 발생한 fd수 반환. or timeout으로 -1반환.
   if( event_count = -1 )
      break;
   for( int i = 0 ; i < event_count; ++i )
   {
      if(events[i].data.fd == server_socket) //서버 소켓에 이벤트
      {
         //accept 처리 (연결)
         ...
         init_event.events = EPOLLIN;
         init_event.data.fd = new_client_socket;
         epoll_ctl(epoll_fd, EPOLL_CTL_ADD, new_client_socket, &init_event);
      }
      else //이벤트가 도착한 소켓들
      {
         //read, write, closesocket처리
      }
   }
}
closesocket(server_socket);
close(epoll_fd);
return 0;
핵심은, select에서 불필요한 지속적 조회(FD를 계속 쳐다보는 것)을 kernel단에서 관리해줌으로써 Overhead가 많이 줄어들고 지속적인 FD_ISSET()함수 호출 없이 변화가 발생함에 따라 이벤트 기반으로 동작하는 멀티플렉싱 지원.
그러나, epoll 역시 본질은 select와 같다. 결국 어짜피 process가 kernel에게 물어보는 구조이므로 Syncrhonize한 모델임은 변화가 없음. 또한 timeout param에 따라 non-blocking이 될 수도 있고 아닐 수도 있다는 점도 여전히 같다.
Java NIO - Selector
NIO(New IO) 라는 것을 Java 에서 지원하기 시작함. NIO는 Blocking IO방식과 Non-Blocking IO방식을 모두 지원한다.
(kernel단의 select() 함수와 다름. NIO의 selector는 Async한 Multiplexing을 지원한다.)
java.nio package 내에 selector가 존재하는데, 이 selector를 통해 여러 채널에서 사용 가능한 채널이 존재하는지 알아차릴 수 있다. (채널은 Non-blocking 방식의 Socket과 같다.)

NIO Selector를 사용해 NonBlocking Server를 구현한 예
package NettyCh2;

import java.io.IOException;
import java.net.InetSocketAddress;
import java.nio.ByteBuffer;
import java.nio.channels.SelectionKey;
import java.nio.channels.Selector;
import java.nio.channels.ServerSocketChannel;
import java.nio.channels.SocketChannel;
import java.util.*;

public class NonBlockingServer {
    private Map<SocketChannel, List<byte[]>> keepDataTrack = new HashMap<>();
    private ByteBuffer buffer = ByteBuffer.allocate(2 * 1024);

    private void startEchoServer(){
        try(
            Selector selector = Selector.open();
            // Java Nio의 selector 생성. 자신에게 등록된 fd에 변경이 있는지 확인하고 변경이 발생한 fd로 접근이 가능하게 해줌.
            ServerSocketChannel serverSocketChannel = ServerSocketChannel.open();
            // Non-blocking socket인 server socket channel 생성. (채널이면 논블로킹)(생성 후 바인딩)
         ){
            if((serverSocketChannel.isOpen()) && (selector.isOpen())) {
                serverSocketChannel.configureBlocking(false);
                // Socket Channel의 Default blocking모드는 true. Non-blocking mode를 위해서는이를 false로 변경해 줘야 함.
                serverSocketChannel.bind(new InetSocketAddress(8888));

                serverSocketChannel.register(selector, SelectionKey.OP_ACCEPT);
                // server socket channel 객체를 Selector에 등록. Selector가 감지할 이벤트는 OP_ACCEPT(Client와 연결)로 설정.
                System.out.println("Waiting for connect...");

                while(true){
                    selector.select(); // Selector 객체의 select 함수로 fd들에 변경이 발생했는지 검사.
                    // IO event가 발생하지 않으면 여기서 blocking.. 만약 Non-blocking 방식을 택하려면 selectNow() 사용.!!!

                    Iterator<SelectionKey> keys = selector.selectedKeys().iterator();
                    // Selector에 등록된 채널 중 IO event가 발생한 채널들의 목록 조회.

                    while(keys.hasNext()){
                        SelectionKey key = (SelectionKey)keys.next();
                        keys.remove(); // 동일한 Event 감지되는 것을 방지하기 위해 key에서 제거(pop같은..)

                        if(!key.isValid()){
                            continue;
                        }

                        if(key.isAcceptable()){
                            this.acceptOP(key, selector); // 연결 요청이면 연결처리 메서드로
                        }
                        else if (key.isReadable()){
                            this.readOP(key); // Data 수신이면 읽기 처리 메서드로
                        }
                        else if (key.isWritable()) {
                            this.writeOP(key); // Data 송신이면 쓰기 처리 메서드로
                        }
                    }
                }
            }
            else{
                System.out.println("Couldn't create Server Socket");
            }
        }
        catch(IOException ex){
            System.err.println(ex);
        }
    }
    private void acceptOP(SelectionKey key, Selector selector) throws IOException {
        ServerSocketChannel serverChannel = (ServerSocketChannel) key.channel();
        // 연결요청 event가 발생하는 Channel은 무조건 Server socket channel이므로 이벤트가 발생한 channel을 server socket channel로 캐스팅.
        SocketChannel socketChannel = serverChannel.accept();
        // Client 연결 요청을 수락하고 연결된 socket channel을 가져온다.
        socketChannel.configureBlocking(false);
        // Client socket channel을 Non-blocking mode로 설정.

        System.out.println("Client Connected" + socketChannel.getRemoteAddress());

        keepDataTrack.put(socketChannel, new ArrayList<byte[]>());
        socketChannel.register(selector, SelectionKey.OP_READ);
    }
    private  void readOP(SelectionKey key){
        try{
            SocketChannel socketChannel = (SocketChannel) key.channel();
            buffer.clear();
            int numRead = -1;
            try{
                numRead = socketChannel.read(buffer);
            }
            catch(IOException e){
                System.err.println("Error in read data!");
            }

            if(numRead == -1){
                this.keepDataTrack.remove(socketChannel);
                System.out.println("Quit Client connected: " + socketChannel.getRemoteAddress());
                socketChannel.close();
                key.cancel();
                return;
            }
            byte[] data = new byte[numRead];
            System.arraycopy(buffer.array(),0,data,0,numRead);
            System.out.println(new String(data,"UTF-8") + " from " + socketChannel.getRemoteAddress());

            doEchoJob(key, data);
        }catch(IOException ex){
            System.err.println(ex);
        }
    }
    private void writeOP(SelectionKey key) throws IOException {
        SocketChannel socketChannel = (SocketChannel) key.channel();

        List<byte[]>channelData = keepDataTrack.get(socketChannel);
        Iterator<byte[]> its = channelData.iterator();

        while(its.hasNext()){
            byte[] it = its.next();
            its.remove();
            socketChannel.write(ByteBuffer.wrap(it));
        }
        key.interestOps(SelectionKey.OP_READ);
    }
    private void doEchoJob(SelectionKey key, byte[] data){
        SocketChannel socketChannel = (SocketChannel) key.channel();
        List<byte[]> channelData = keepDataTrack.get(socketChannel);
        channelData.add(data);

        key.interestOps(SelectionKey.OP_WRITE);
    }
    public static void main(String[]args){
    NonBlockingServer main = new NonBlockingServer();
    main.startEchoServer();
    }
}- Java NIO의 Selector를 생성하고 오픈한 수, Socket Channel(여기서 channel은 non-blocking 방식으로 구현할 때 channel이라는 객체를 사용한다.) 과 바인딩.
- Socket Channel을 Selector에 등록하고(Register), Selector가 감지할 이벤트를 정의한다.(OP_ACCEPT)
- While loop를 돌며 Selector의
select()메서드를 통해 감시하는 fd들에 이벤트가 발생했는지 검사함. (default mode로는 IO event가 발생하지 않을 시 select()에서 blocking. Non-blocking mode로 하려면selectNow()메서드를 사용해야 한다.) - Selector 객체에
selectedKeys()를 통해 이벤트가 발생한 채널들을 조회하고 keys에 할당. keys 배열에는 이벤트가 발생한 채널들이 담기게 된다. - keys 배열의 각 원소들에 대하여 while loop를 돌면서 key가 어떤 종류 (연결 요청 / Data 수신 / Data 송신)인지에 따라 각 메서드를 호출한다.
- while loop를 계속 돌며 Client 요청을 반복 처리. (Echo return)
Netty
- select()
- epoll
- NIOSelector
- Netty docs - Classes
- Sync, Async
- Netty 전체 아키텍쳐
- Netty 동작 방식(흐름)
- Client - Server 구현 예제
- SuperObject 프로젝트와 차이
Netty Server-Client 구현 예제
Environment
- gradle version: 7.4
- IDE: Intellij
- Runtime: jdk11.0.15
- netty version: 'io.netty:netty-all:4.1.78.Final'
Gradle을 이용해서 io.netty dependency library들을 땡겨와 프로젝트 생성.
하나의 Java package 안에 Server와 Client코드를 모두 작성하고 각각 main 함수를 만들어서 localhost에서 동시에 실행.
https://github.com/dohyunKim12/SimpleNetty/tree/master/src/main/java/org/example
Event 기반 Network programming
이벤트 기반 프로그래밍을 제공하려면
- Event가 발생할 주체를 정의(Socket)
- Event의 종류를 정의(Socket 연결 / Data 수신 / Data 송신)
전체 동작구조
- Server socket 생성
- Port를 Server socket에 바인딩
- Client의 연결 수락, Client의 Data를 송수신할 소켓 생성
- Data 읽기(수신), Data 쓰기(송신) 이벤트 발생 시, 각 이벤트를 처리하는 Handler를 통해 송수신 구현 (각 Event에 따라 Logic을 분리한다.)
Netty - Bootstrap architecture
Serverbootstrap Class (Builder pattern)
public class ServerBootstrap extends AbstractBootstrap<ServerBootstrap, ServerChannel> {
...

    @Override
    public ServerBootstrap group(EventLoopGroup group) {
        return group(group, group);
    }

    /**
     * Set the {@link EventLoopGroup} for the parent (acceptor) and the child (client). These
     * {@link EventLoopGroup}'s are used to handle all the events and IO for {@link ServerChannel} and
     * {@link Channel}'s.
     */
    public ServerBootstrap group(EventLoopGroup parentGroup, EventLoopGroup childGroup) {
        super.group(parentGroup);
        if (this.childGroup != null) {
            throw new IllegalStateException("childGroup set already");
        }
        this.childGroup = ObjectUtil.checkNotNull(childGroup, "childGroup");
        return this;
    }

    /**
     * Allow to specify a {@link ChannelOption} which is used for the {@link Channel} instances once they get created
     * (after the acceptor accepted the {@link Channel}). Use a value of {@code null} to remove a previous set
     * {@link ChannelOption}.
     */
    public <T> ServerBootstrap childOption(ChannelOption<T> childOption, T value) {
        ObjectUtil.checkNotNull(childOption, "childOption");
        synchronized (childOptions) {
            if (value == null) {
                childOptions.remove(childOption);
            } else {
                childOptions.put(childOption, value);
            }
        }
        return this;
    }

    /**
     * Set the specific {@link AttributeKey} with the given value on every child {@link Channel}. If the value is
     * {@code null} the {@link AttributeKey} is removed
     */
    public <T> ServerBootstrap childAttr(AttributeKey<T> childKey, T value) {
        ObjectUtil.checkNotNull(childKey, "childKey");
        if (value == null) {
            childAttrs.remove(childKey);
        } else {
            childAttrs.put(childKey, value);
        }
        return this;
    }

    /**
     * Set the {@link ChannelHandler} which is used to serve the request for the {@link Channel}'s.
     */
    public ServerBootstrap childHandler(ChannelHandler childHandler) {
        this.childHandler = ObjectUtil.checkNotNull(childHandler, "childHandler");
        return this;
    }
Event Loop
Event Loop Group - Parent(할당), Worker(수행)
Netty가 이벤트를 처리하는 방식
Event loop가 지원하는 thread 종류에 따라 (single thread event loop, multi thread event loop) 로 나뉘고
Event loop가 처리한 이벤트의 결과를 돌려주는 방식에 따라 (Callback pattern, Future pattern)으로 나뉜다.
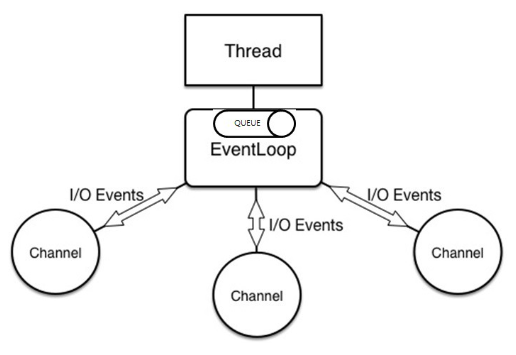
- 각 채널은 개별 event loop thread에 등록되고 채널에서 발생한 event는 항상 동일한 event loop thread에서 처리됨. (이벤트 발생 순서와 처리 순서가 일치)
- 하나의 event loop thread는 여러 개의 channel을 등록할 수 있음. - 다중 channel에 대한 효율적인 thread 구조
- 이벤트 처리를 위해 SingleThreadEventExecutor를 사용.
public abstract class SingleThreadEventExecutor extends AbstractScheduledEventExecutor {

...

private final Queue<Runnable> taskQueue;

...

protected Queue<Runnable> newTaskQueue() {
    return newTaskQueue(maxPendingTasks);
}

...

protected Runnable pollTask() {
    assert inEventLoop();
    return pollTaskFrom(taskQueue);
}

protected static Runnable pollTaskFrom(Queue<Runnable> taskQueue) {
    for (;;) {
        Runnable task = taskQueue.poll();
        if (task != WAKEUP_TASK) {
            return task;
        }
    }
}

...