Spring Legacy Project 만들기 (1)
박매일 님의 스프 1탄을 들으면서 스프링 레거시 프로젝트를 만들어보았다. 강의에서는 이클립스 기반 전자정부 프레임워크를 썼는데 나는 맥북 M2라 인텔리제이에서 빌드했다.
많이 헤맸어서 과정을 자세히 기록해 둔다. 사용한 버전은 아래와 같다 :
Java 8(JDK 1.8)Servlet 3.1Spring framework 5.0.2.RELEASElog4j
1) 프로젝트 생성
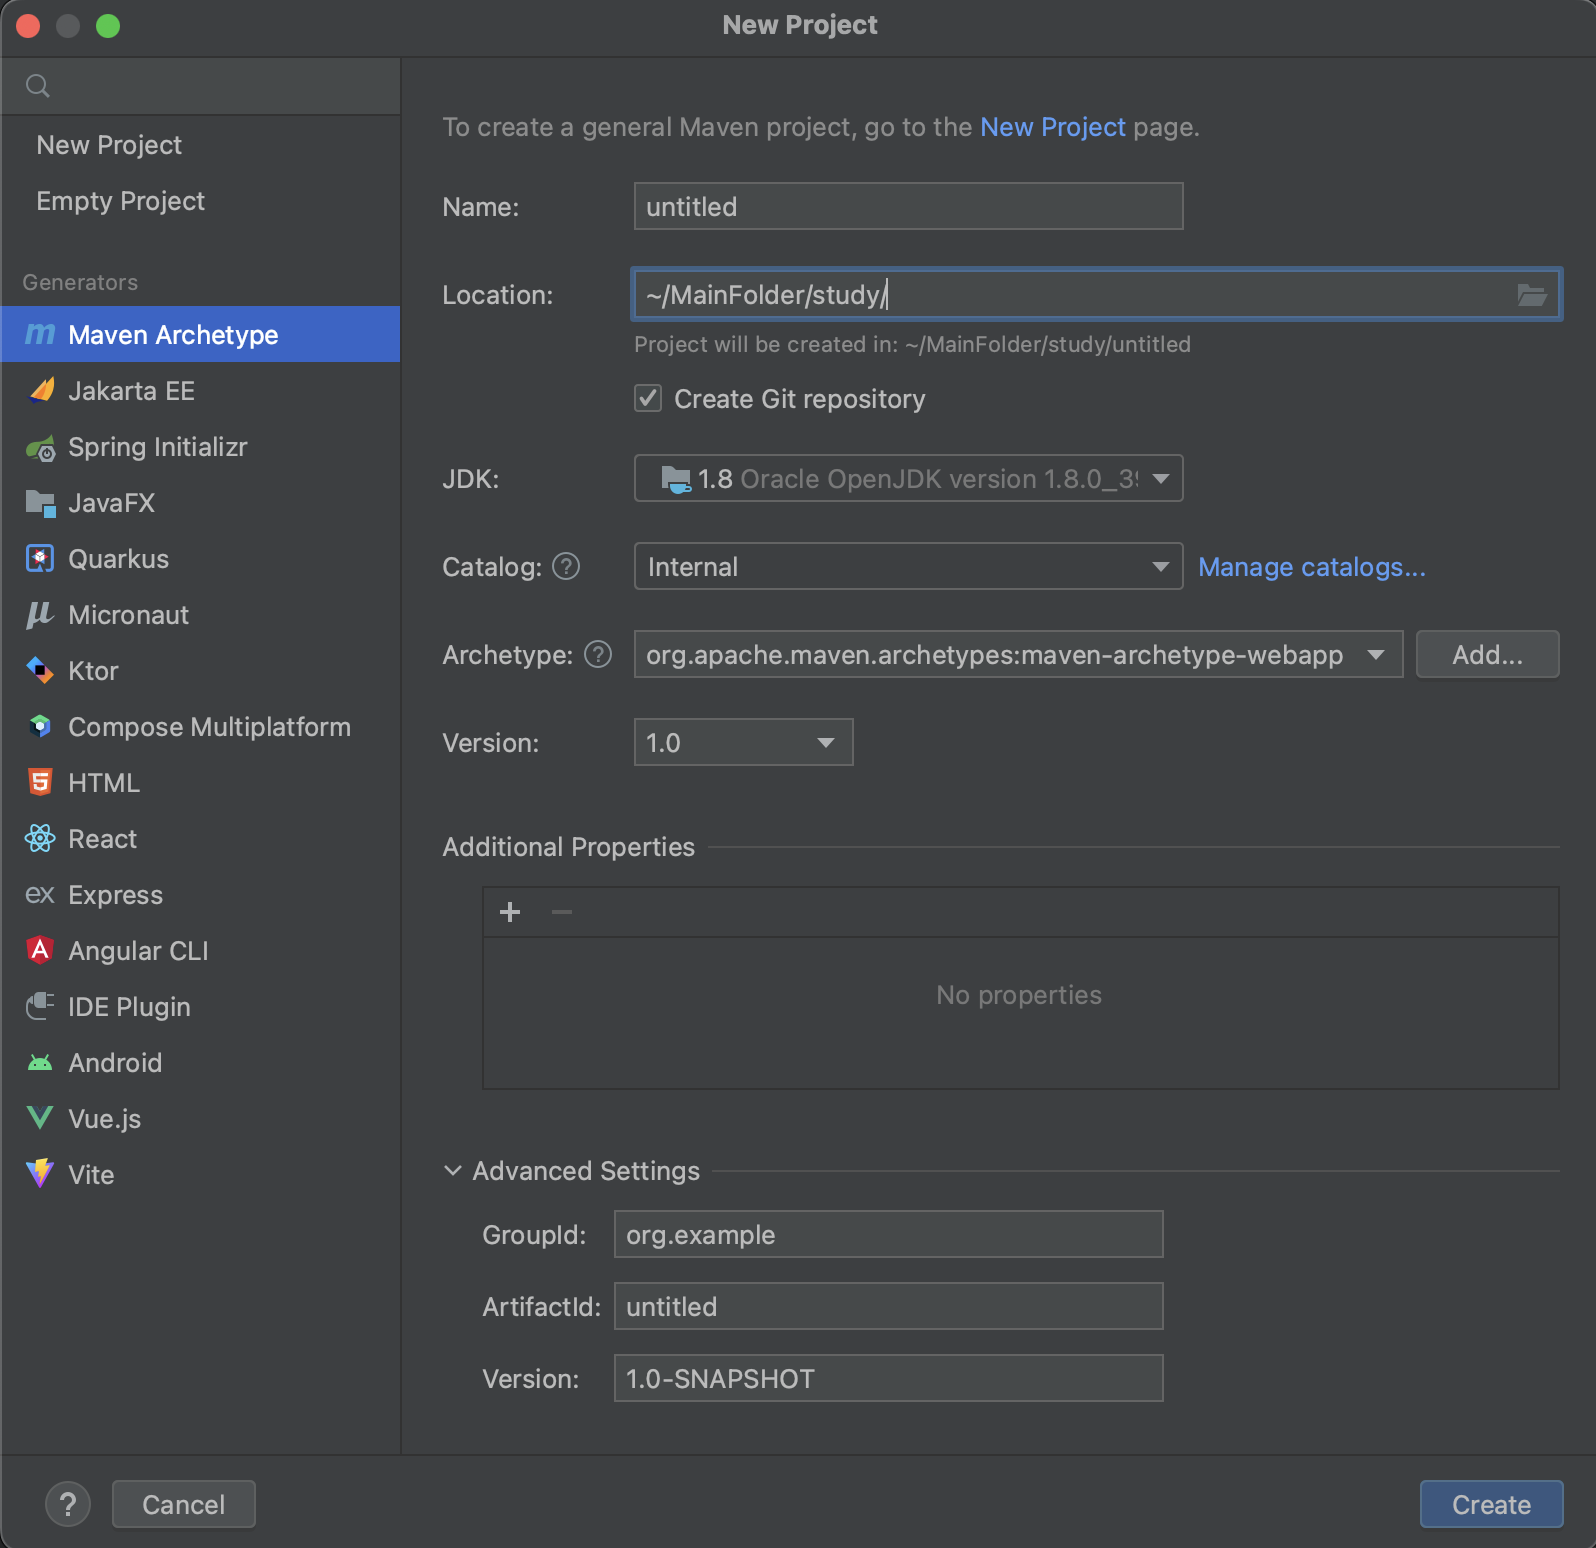
프로젝트 생성 창에서 Maven Archetype을 선택하고 archetype-webapp을 선택해준다.
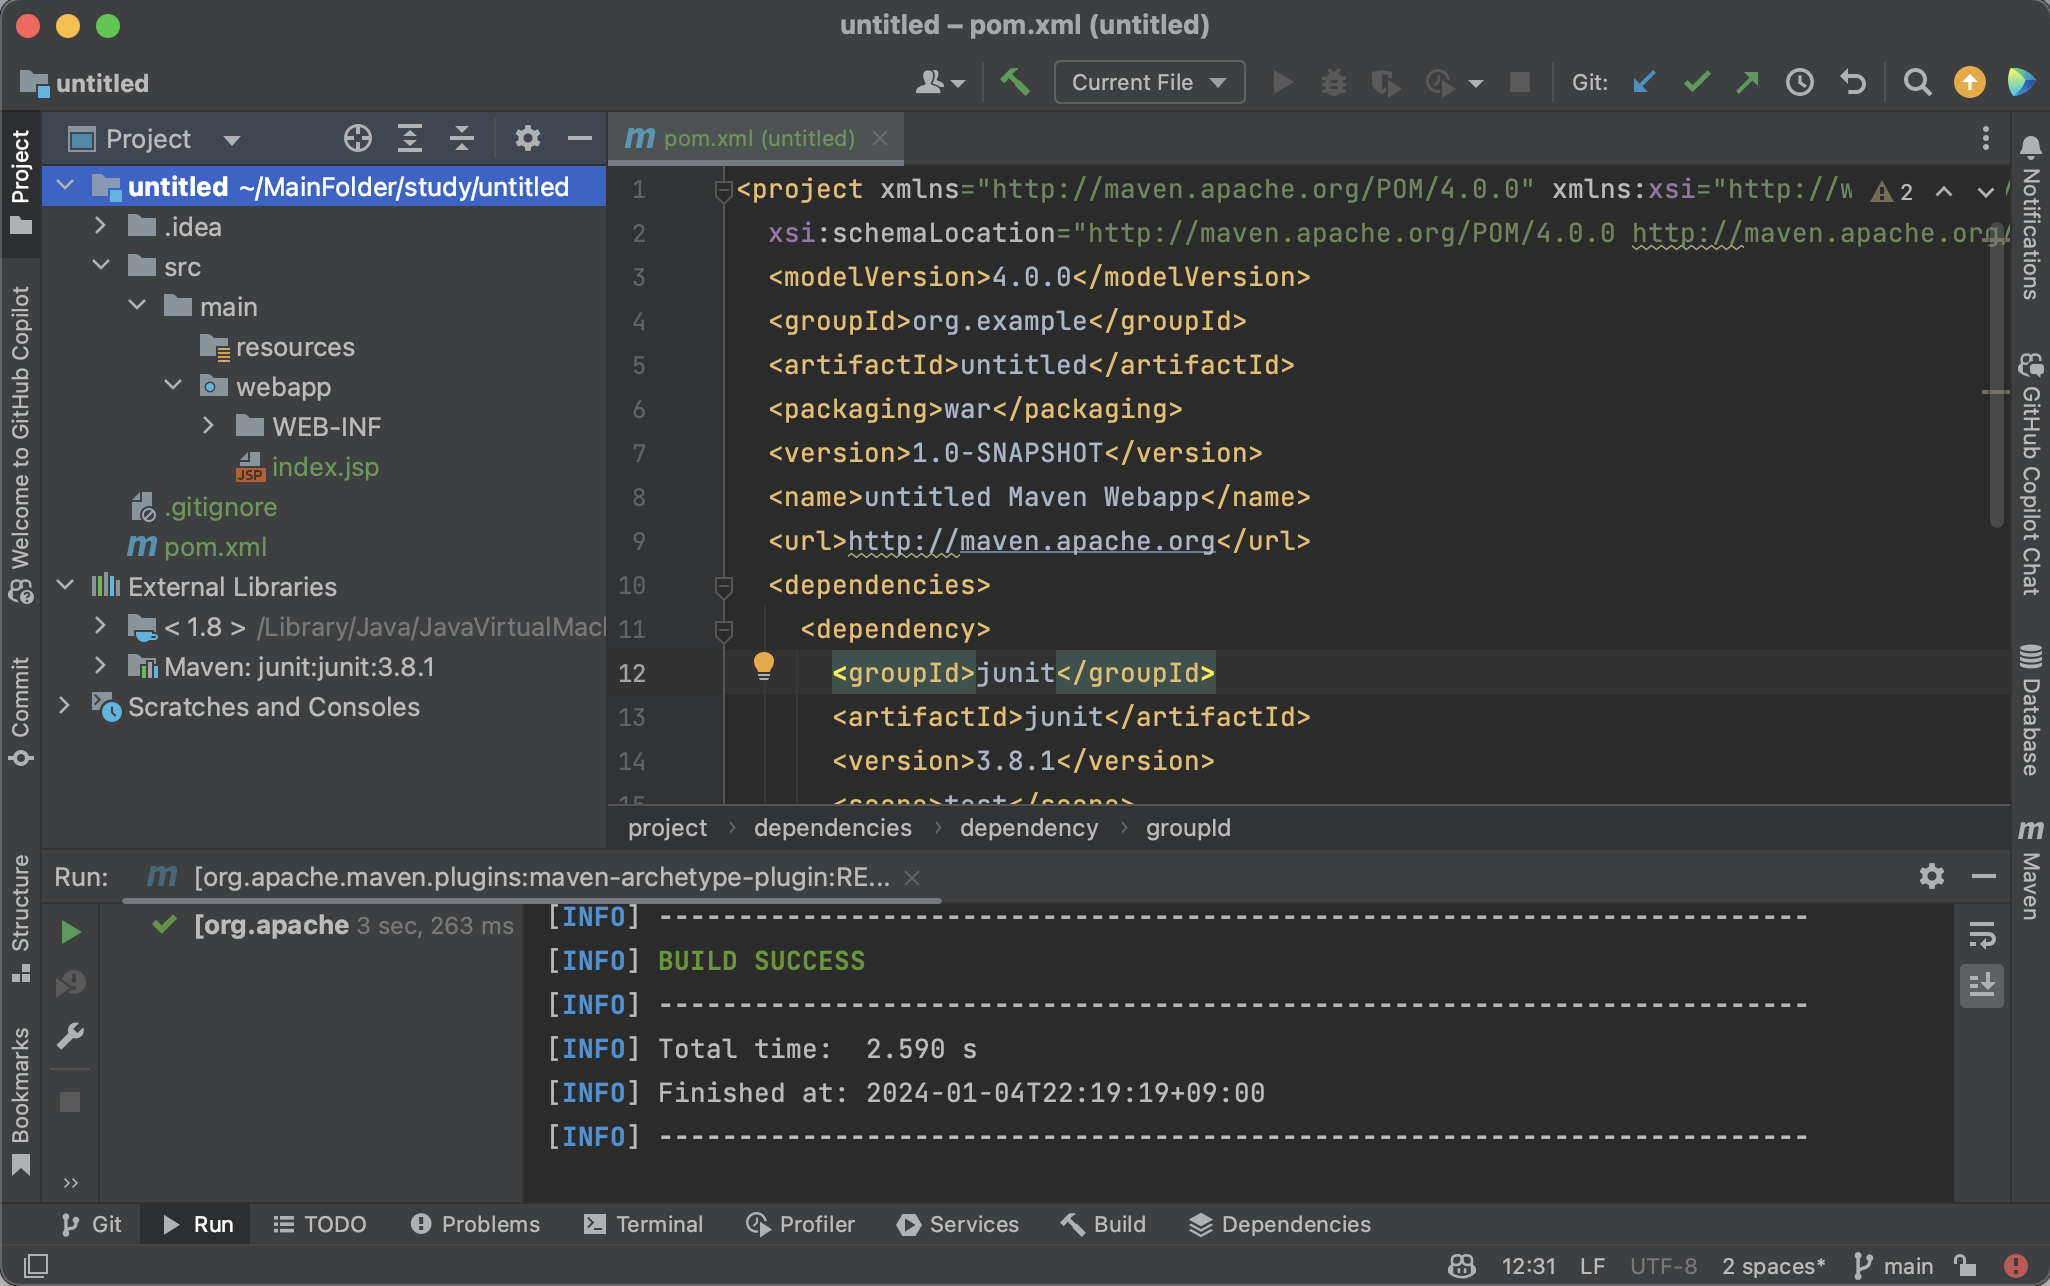
첫 빌드가 완료되면 위와 같이 pom.xml, webapp, WEB-INF를 포함하는 웹 애플리케이션 디렉토리 구조가 만들어진다.
라이브러리를 보면 기본으로 추가된 JDK와 JUnit만 존재한다. 스프링 MVC 애플리케이션을 위한 라이브러리를 추가해야 한다.
2) 라이브러리 추가
pom.xml
POM은 Project Object Model의 약자이다. Maven은 pom.xml이라는 XML 파일에 개발자, 조직명, 라이센스 등 부가적인 부분부터 플러그인, 종속성 등 코드와 직접 관련있는 부분까지 프로젝트 정보를 담고 인식하여 동작한다.
pom.xml - properties
<properties>
  <project.build.sourceEncoding>UTF-8</project.build.sourceEncoding>
  <org.springframework-version>5.0.2.RELEASE</org.springframework-version>
  <org.slf4j-version>1.6.6</org.slf4j-version>
  <org.aspectj-version>1.6.10</org.aspectj-version>
</properties>
중앙 제어를 위해 <properties>를 추가해준다. 여기에서 버전 정보를 지정해주면 POM 내의 어디서든 ${}를 통해서 참조할 수 있다.
pom.xml - dependencies
    <dependencies>
    	<!-- Spring -->
        <dependency>
            <groupId>org.springframework</groupId>
            <artifactId>spring-context</artifactId>
            <version>${org.springframework-version}</version>
            <exclusions>
                <!-- Exclude Commons Logging in favor of SLF4j -->
                <exclusion>
                    <groupId>commons-logging</groupId>
                    <artifactId>commons-logging</artifactId>
                </exclusion>
            </exclusions>
        </dependency>
        <dependency>
            <groupId>org.springframework</groupId>
            <artifactId>spring-webmvc</artifactId>
            <version>${org.springframework-version}</version>
        </dependency>

        <!-- Servlet -->
        <dependency>
            <groupId>javax.servlet</groupId>
            <artifactId>javax.servlet-api</artifactId>
            <version>3.1.0</version>
            <scope>provided</scope>
        </dependency>

        <dependency>
            <groupId>javax.servlet.jsp</groupId>
            <artifactId>javax.servlet.jsp-api</artifactId>
            <version>2.3.1</version>
            <scope>provided</scope>
        </dependency>

        <dependency>
            <groupId>javax.servlet</groupId>
            <artifactId>jstl</artifactId>
            <version>1.2</version>
        </dependency>

        <!-- Logging -->
        <dependency>
            <groupId>org.slf4j</groupId>
            <artifactId>slf4j-api</artifactId>
            <version>${org.slf4j-version}</version>
        </dependency>
        <dependency>
            <groupId>org.slf4j</groupId>
            <artifactId>jcl-over-slf4j</artifactId>
            <version>${org.slf4j-version}</version>
            <scope>runtime</scope>
        </dependency>
        <dependency>
            <groupId>org.slf4j</groupId>
            <artifactId>slf4j-log4j12</artifactId>
            <version>${org.slf4j-version}</version>
            <scope>runtime</scope>
        </dependency>
        <dependency>
            <groupId>log4j</groupId>
            <artifactId>log4j</artifactId>
            <version>1.2.15</version>
            <exclusions>
                <exclusion>
                    <groupId>javax.mail</groupId>
                    <artifactId>mail</artifactId>
                </exclusion>
                <exclusion>
                    <groupId>javax.jms</groupId>
                    <artifactId>jms</artifactId>
                </exclusion>
                <exclusion>
                    <groupId>com.sun.jdmk</groupId>
                    <artifactId>jmxtools</artifactId>
                </exclusion>
                <exclusion>
                    <groupId>com.sun.jmx</groupId>
                    <artifactId>jmxri</artifactId>
                </exclusion>
            </exclusions>
            <scope>runtime</scope>
        </dependency>
    </dependencies>
Spring, Servlet, 로깅에 관한 <dependencies>를 추가해준다.
pom.xml - plugins
<plugins>
	<plugin>
		<groupId>org.apache.maven.plugins</groupId>
			<artifactId>maven-compiler-plugin</artifactId>
			<version>2.5.1</version>
			<configuration>
				<source>1.8</source>
				<target>1.8</target>
				<compilerArgument>-Xlint:all</compilerArgument>
				<showWarnings>true</showWarnings>
				<showDeprecation>true</showDeprecation>
		</configuration>
	</plugin>
</plugins>
Java 8(JDK 1.8)을 사용하기 때문에 위와 같이 <source>, <target>을 1.8로 지정해준다. 참고로 <plugins>는 <build> 내에 위치해야 한다.
3) 디렉토리 구조 만들기
.
├── pom.xml
└── src
    └── main
        ├── java <--
        │   └── kr <--
        │       └── board <--
        │           ├── controller <--
        │           │   └── BoardController.java <--
        │           └── entity <--
        │               └── Board.java <--
        ├── resources
        └── webapp
            ├── WEB-INF
            │   ├── spring <--
            │   │   ├── appServlet <--
            │   │   │   └── servlet-context.xml <--
            │   │   └── root-context.xml <--
            │   └── views <--
            ├── web.xml
            └── index.jsp
위와 같이 간단한 스프링 MVC 구조를 완성해보자. <-- 표시가 있는 부분은 새로 만들어주어야 할 디렉토리 또는 파일이다.
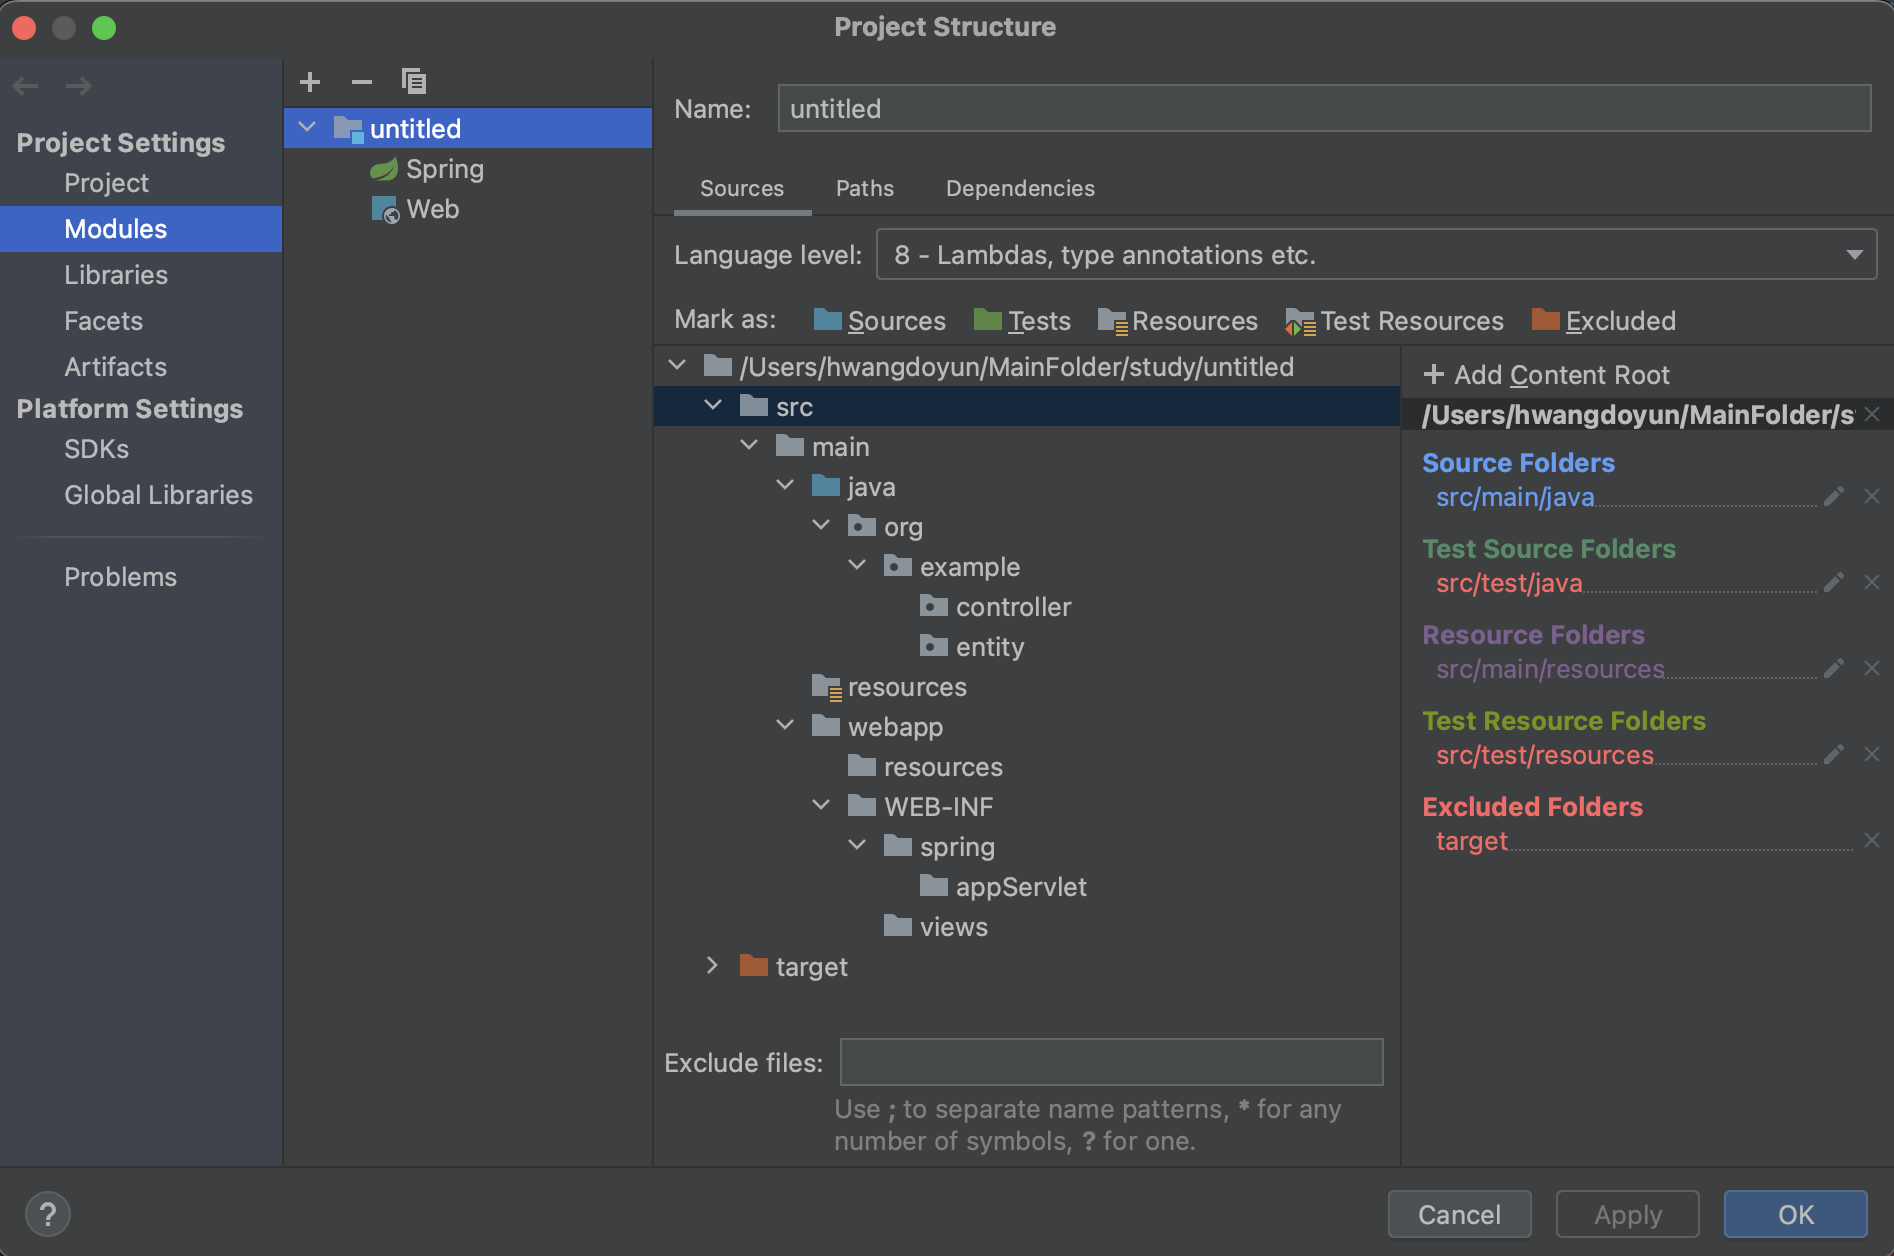
Project Structure - Modules에서 위와 같은 디렉토리 구조를 만들어준다. 특히 Source Folders, Resource Folders의 루트가 잘 지정되었는지 확인한다. 폴더의 아이콘을 보면 쉽게 알 수 있다.
- 참고)
target폴더는 자동으로 생성된다. - 참고)
Web위의Spring모듈은 이후에 추가
4) 설정 파일 생성
root-context.xml
pom.xml에서 스프링 의존성을 추가해 다시 빌드해주었기 때문에 이제 위와 같이 Spring Config XML 파일을 추가할 수 있다.
WEB-INF/spring 디렉토리에 root-context.xml 설정 파일을 만들어준다. 이 설정 파일은 주로 DB와 관련된 설정을 다루기 때문에 지금은 생성만 해 둔다.
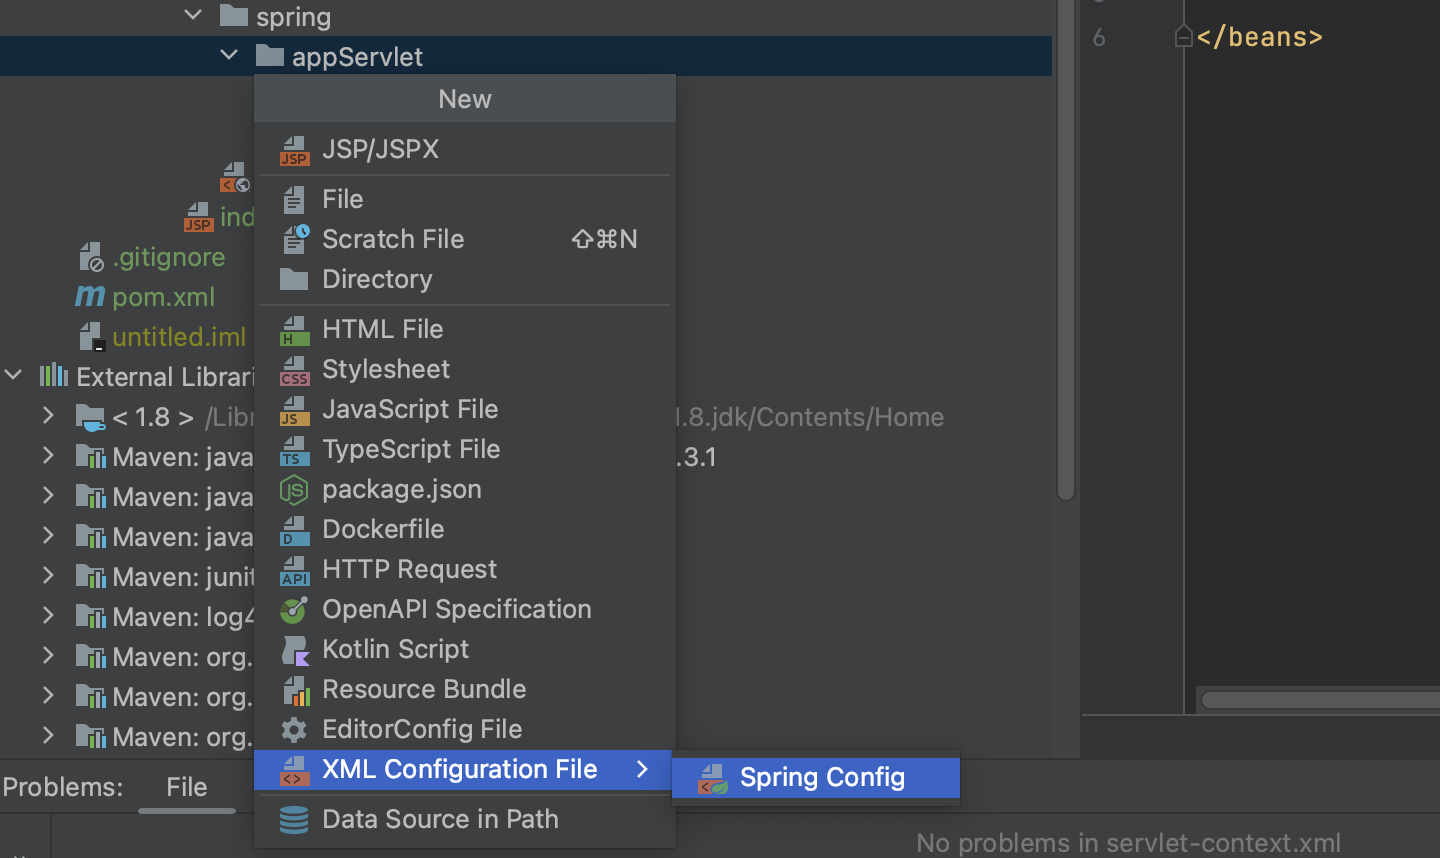
servlet-context.xml
WEB-INF/spring/appServlet 디렉토리 내에는 servlet-context.xml을 만들어주고 아래와 같이 코드를 추가한다.
<?xml version="1.0" encoding="UTF-8"?>
<beans:beans xmlns="http://www.springframework.org/schema/mvc"
             xmlns:xsi="http://www.w3.org/2001/XMLSchema-instance"
             xmlns:beans="http://www.springframework.org/schema/beans"
             xmlns:context="http://www.springframework.org/schema/context"
             xsi:schemaLocation="http://www.springframework.org/schema/mvc https://www.springframework.org/schema/mvc/spring-mvc.xsd
		http://www.springframework.org/schema/beans https://www.springframework.org/schema/beans/spring-beans.xsd
		http://www.springframework.org/schema/context https://www.springframework.org/schema/context/spring-context.xsd">

    <!-- Enables the Spring MVC @Controller programming model -->
    <annotation-driven/>

    <!-- Handles HTTP GET requests for /resources/** by efficiently serving up static resources in the ${webappRoot}/resources directory -->
    <resources mapping="/resources/**" location="/resources/"/>

    <!-- Resolves views selected for rendering by @Controllers to .jsp resources in the /WEB-INF/views directory -->
    <beans:bean class="org.springframework.web.servlet.view.InternalResourceViewResolver">
        <beans:property name="prefix" value="/WEB-INF/views/"/>
        <beans:property name="suffix" value=".jsp"/>
    </beans:bean>

    <context:component-scan base-package="org.example"/>
</beans:beans><annotation-driven/>:@Controller기반 스프링 MVC 모델 사용<resources>: 애플리케이션이 정적 리소스를 처리할 수 있도록 설정한다./resources/**라는 URL 패턴에 대한 요청들을 받으며/resources/경로에서 실제 자원을 찾는다.InternalResourceViewResolver: 뷰 리졸버. 컨트롤러가 뷰의 논리 이름을 반환했을 때/WEB-INF/views/라는 경로와.jsp라는 확장명을 결합해 뷰의 물리적 경로를 완성하여 반환한다.<context:component-scan>:@Controller,@Component등 빈으로 등록할 컴포넌트를 스캔할 경로를 지정해준다.
web.xml
<!DOCTYPE web-app PUBLIC
        "-//Sun Microsystems, Inc.//DTD Web Application 2.3//EN"
        "http://java.sun.com/dtd/web-app_2_3.dtd" >

<web-app xmlns:xsi="http://www.w3.org/2001/XMLSchema-instance">
  <display-name>Archetype Created Web Application</display-name>

  <filter>
    <filter-name>encodingFilter</filter-name>
    <filter-class>org.springframework.web.filter.CharacterEncodingFilter</filter-class>
    <init-param>
      <param-name>encoding</param-name>
      <param-value>UTF-8</param-value>
    </init-param>
    <init-param>
      <param-name>forceEncoding</param-name>
      <param-value>true</param-value>
    </init-param>
  </filter>
  <filter-mapping>
    <filter-name>encodingFilter</filter-name>
    <url-pattern>/*</url-pattern>
  </filter-mapping>

  <!-- Creates the Spring Container shared by all Servlets and Filters -->
  <listener>
    <listener-class>org.springframework.web.context.ContextLoaderListener</listener-class>
  </listener>

  <!-- The definition of the Root Spring Container shared by all Servlets and Filters -->
  <context-param>
    <param-name>contextConfigLocation</param-name>
    <param-value>/WEB-INF/spring/root-context.xml</param-value>
  </context-param>

  <!-- Processes application requests -->
  <servlet>
    <servlet-name>appServlet</servlet-name>
    <servlet-class>org.springframework.web.servlet.DispatcherServlet</servlet-class>
    <init-param>
      <param-name>contextConfigLocation</param-name>
      <param-value>/WEB-INF/spring/appServlet/servlet-context.xml</param-value>
    </init-param>
    <load-on-startup>1</load-on-startup>
  </servlet>

  <servlet-mapping>
    <servlet-name>appServlet</servlet-name>
    <url-pattern>/</url-pattern>
  </servlet-mapping>


</web-app>
톰캣이 실행되면 톰캣은 web.xml을 읽고 스프링 컨테이너(메모리 공간)를 생성하고 필요한 객체들도 생성한다. web.xml의 역할은 크게 두 가지다. 스프링 컨테이너 생성과 디스패처 서블릿 생성이 그것이다.
루트 웹 애플리케이션 컨텍스트
스프링 레거시 프로젝트의 모든 웹 애플리케이션은 연관된 루트 애플리케이션 컨텍스트를 갖는다. 이 컨텍스트는 애플리케이션이 시작할 때 생성되어 애플리케이션과 함께 종료된다. 이러한 생명주기를 담당하는 것이 spring-web 모듈의 ContextLoaderListener이다.
<listener>는 <bean>처럼 객체를 생성해주는 태그인데, 보통 가장 먼저 실행이 되는 것들을 생성할 때 사용된다. 생성된 ContextLoaderListener 객체는 root-context.xml의 설정을 따라 역할을 수행한다.
디스패처 서블릿
디스패처 서블릿은 모든 HTTP 요청을 선두에서 받는 프론트 컨트롤러이다. 디스패처 서블릿은 핸들러 매핑을 통해 @RequestMapping의 URL 정보와 일치하는 컨트롤러를 찾아 실행한다.
스프링 MVC는 하나 이상의 디스패처 서블릿을 가지며 애플리케이션 컨텍스트와 연결되어 있다. 여기서는 servlet-context.xml을 컨텍스트로 지정했다.
- 디스패처 서블릿을 등록하는
<servlet>을 보자. 파라미터contextConfigLocation의 값으로 민들어 둔 설정 파일인servlet-context.xml을 지정하고 있다. - 핸들러 매핑의 동작은 개발자에게 직접적으로 보이지는 않는다.
- 루트 컨텍스트는 모든 디스패처 서블릿 컨텍스트의 부모이다.
5) 스프링 모듈 등록
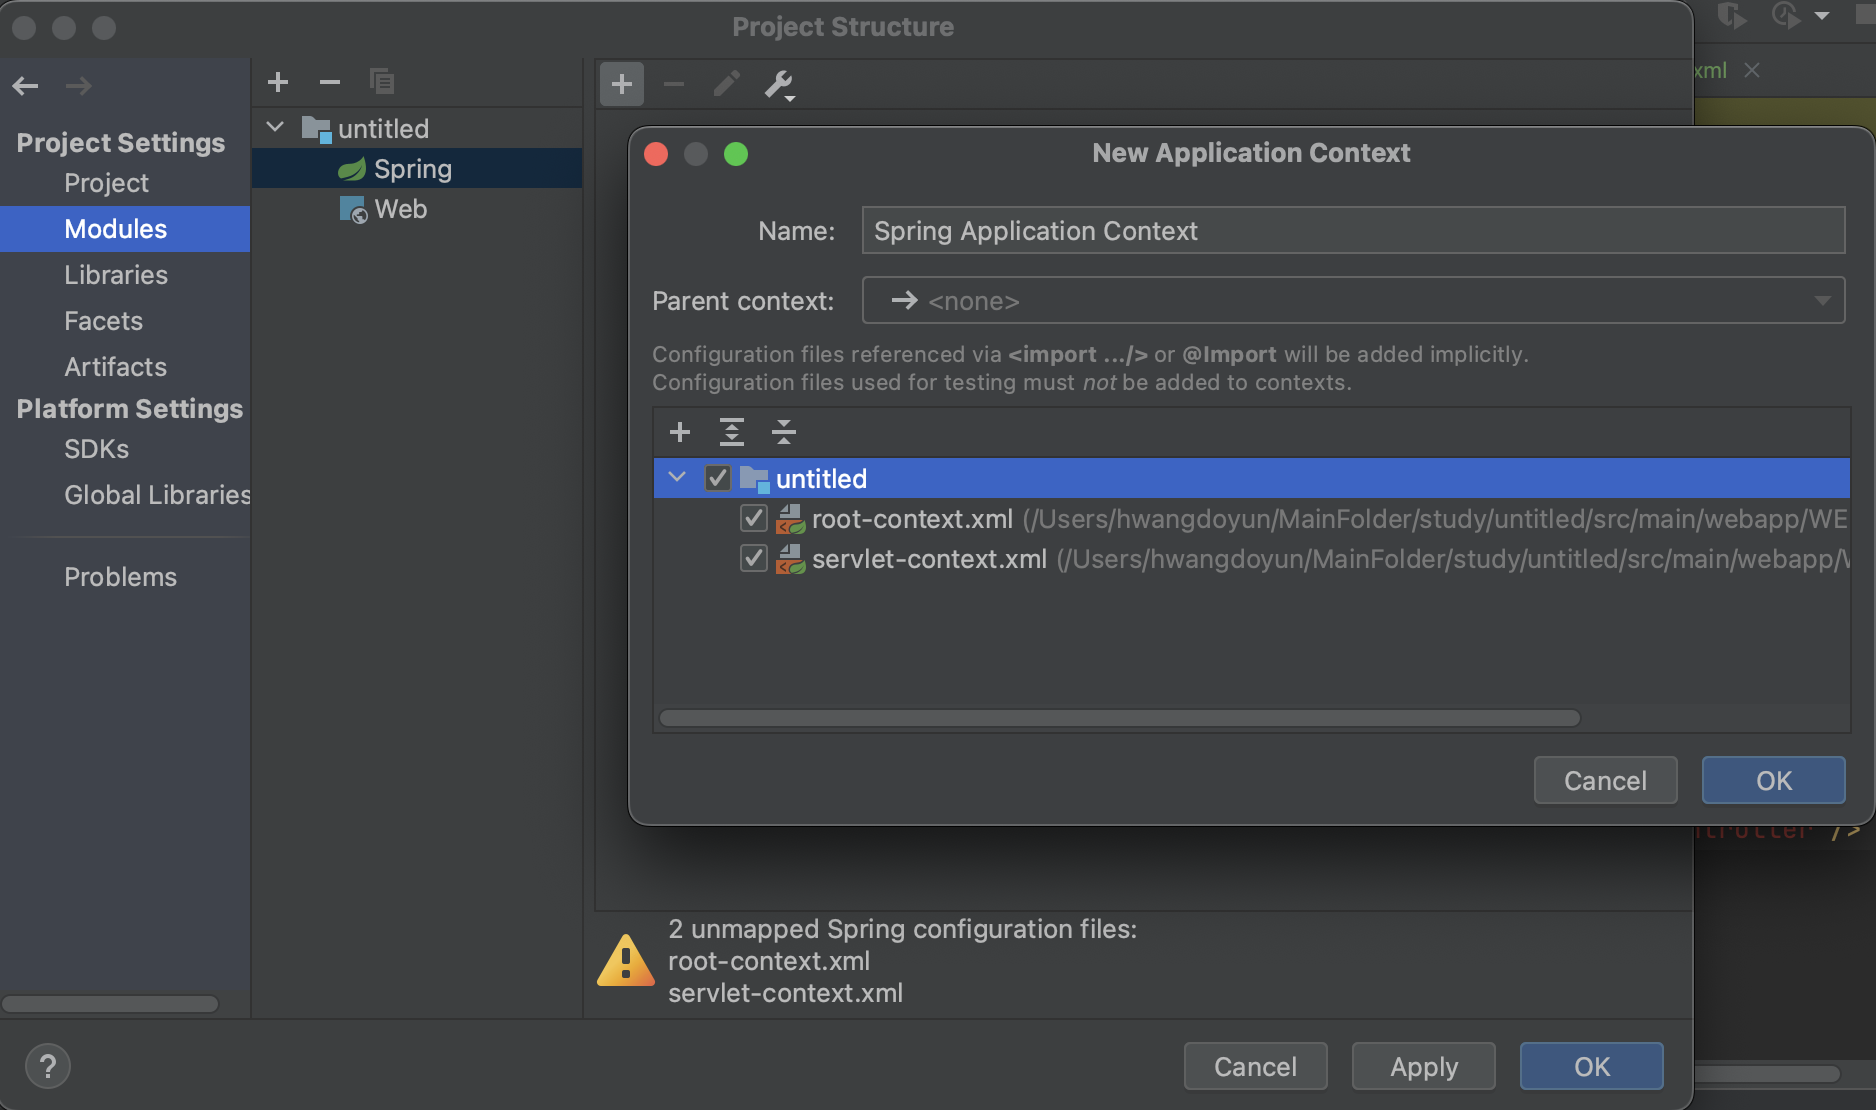
Project Structure - Modules에서 + 버튼을 눌러 Spring 모듈을 추가해준다. 그리고 오른쪽의 +(New Application Context)를 눌러 설정 파일들을 등록해준다.
6) 테스트
이제 스프링 MVC 기반으로 웹 애플리케이션이 잘 동작하는지 확인해보자.
엔터티, 컨트롤러 생성
@Controller
public class BoardController {

    @RequestMapping("/boardList.do")
    public String boardList(Model model) {

        System.out.println("boardList.do 실행");

        Board vo = new Board();
        vo.setIdx(1);
        vo.setTitle("제목");
        vo.setContent("내용");
        vo.setWriter("작성자");
        vo.setIndate("2021-01-01");
        vo.setCount(0);

        List<Board> list = new ArrayList<>();  //DB 연결 안했으므로 임의로 리스트 객체 생성
        list.add(vo);
        list.add(vo);
        list.add(vo);

        model.addAttribute("list", list); //객체 바인딩

        return "boardList";
    }
}Board라는 엔터티 객체를 생성해준다. 컨트롤러에서 이 객체를 모델에 담아 뷰로 전달할 것이다. Getter, Setter가 모두 필요하다.
HTTP 요청을 처리할 BoardController를 만들고 boardList에 @RequestMapping("boardList.do")를 달아준다. 아직 DB 연결을 하지 않았으므로 컨트롤러에서 board객체를 생성하고 model에 list라는 이름의 리스트로 담는다. 그리고 BoardList라는 뷰로 model을 전송한다.
뷰 생성
<c:forEach var="vo" items="${list}">
	<tr>
		<td>${vo.idx}</td>
		<td>${vo.title}</td>
		<td>${vo.writer}</td>
		<td>${vo.indate}</td>
		<td>${vo.count}</td>
	</tr>
</c:forEach>boardList.jsp에서는 위와 같이 JSTL을 사용하여 모델에 담긴 값을 반복문으로 출력한다.
톰캣 연결


Edit Configurations...에서 로컬 톰캣을 선택한다. Application server로는 톰캣이 설치된 경로에서 libexec 디렉토리를 선택해주면 된다.
포트는 8080을 사용하는 다른 톰캣이 있어 8081로 바꾸어 설정해주었다.
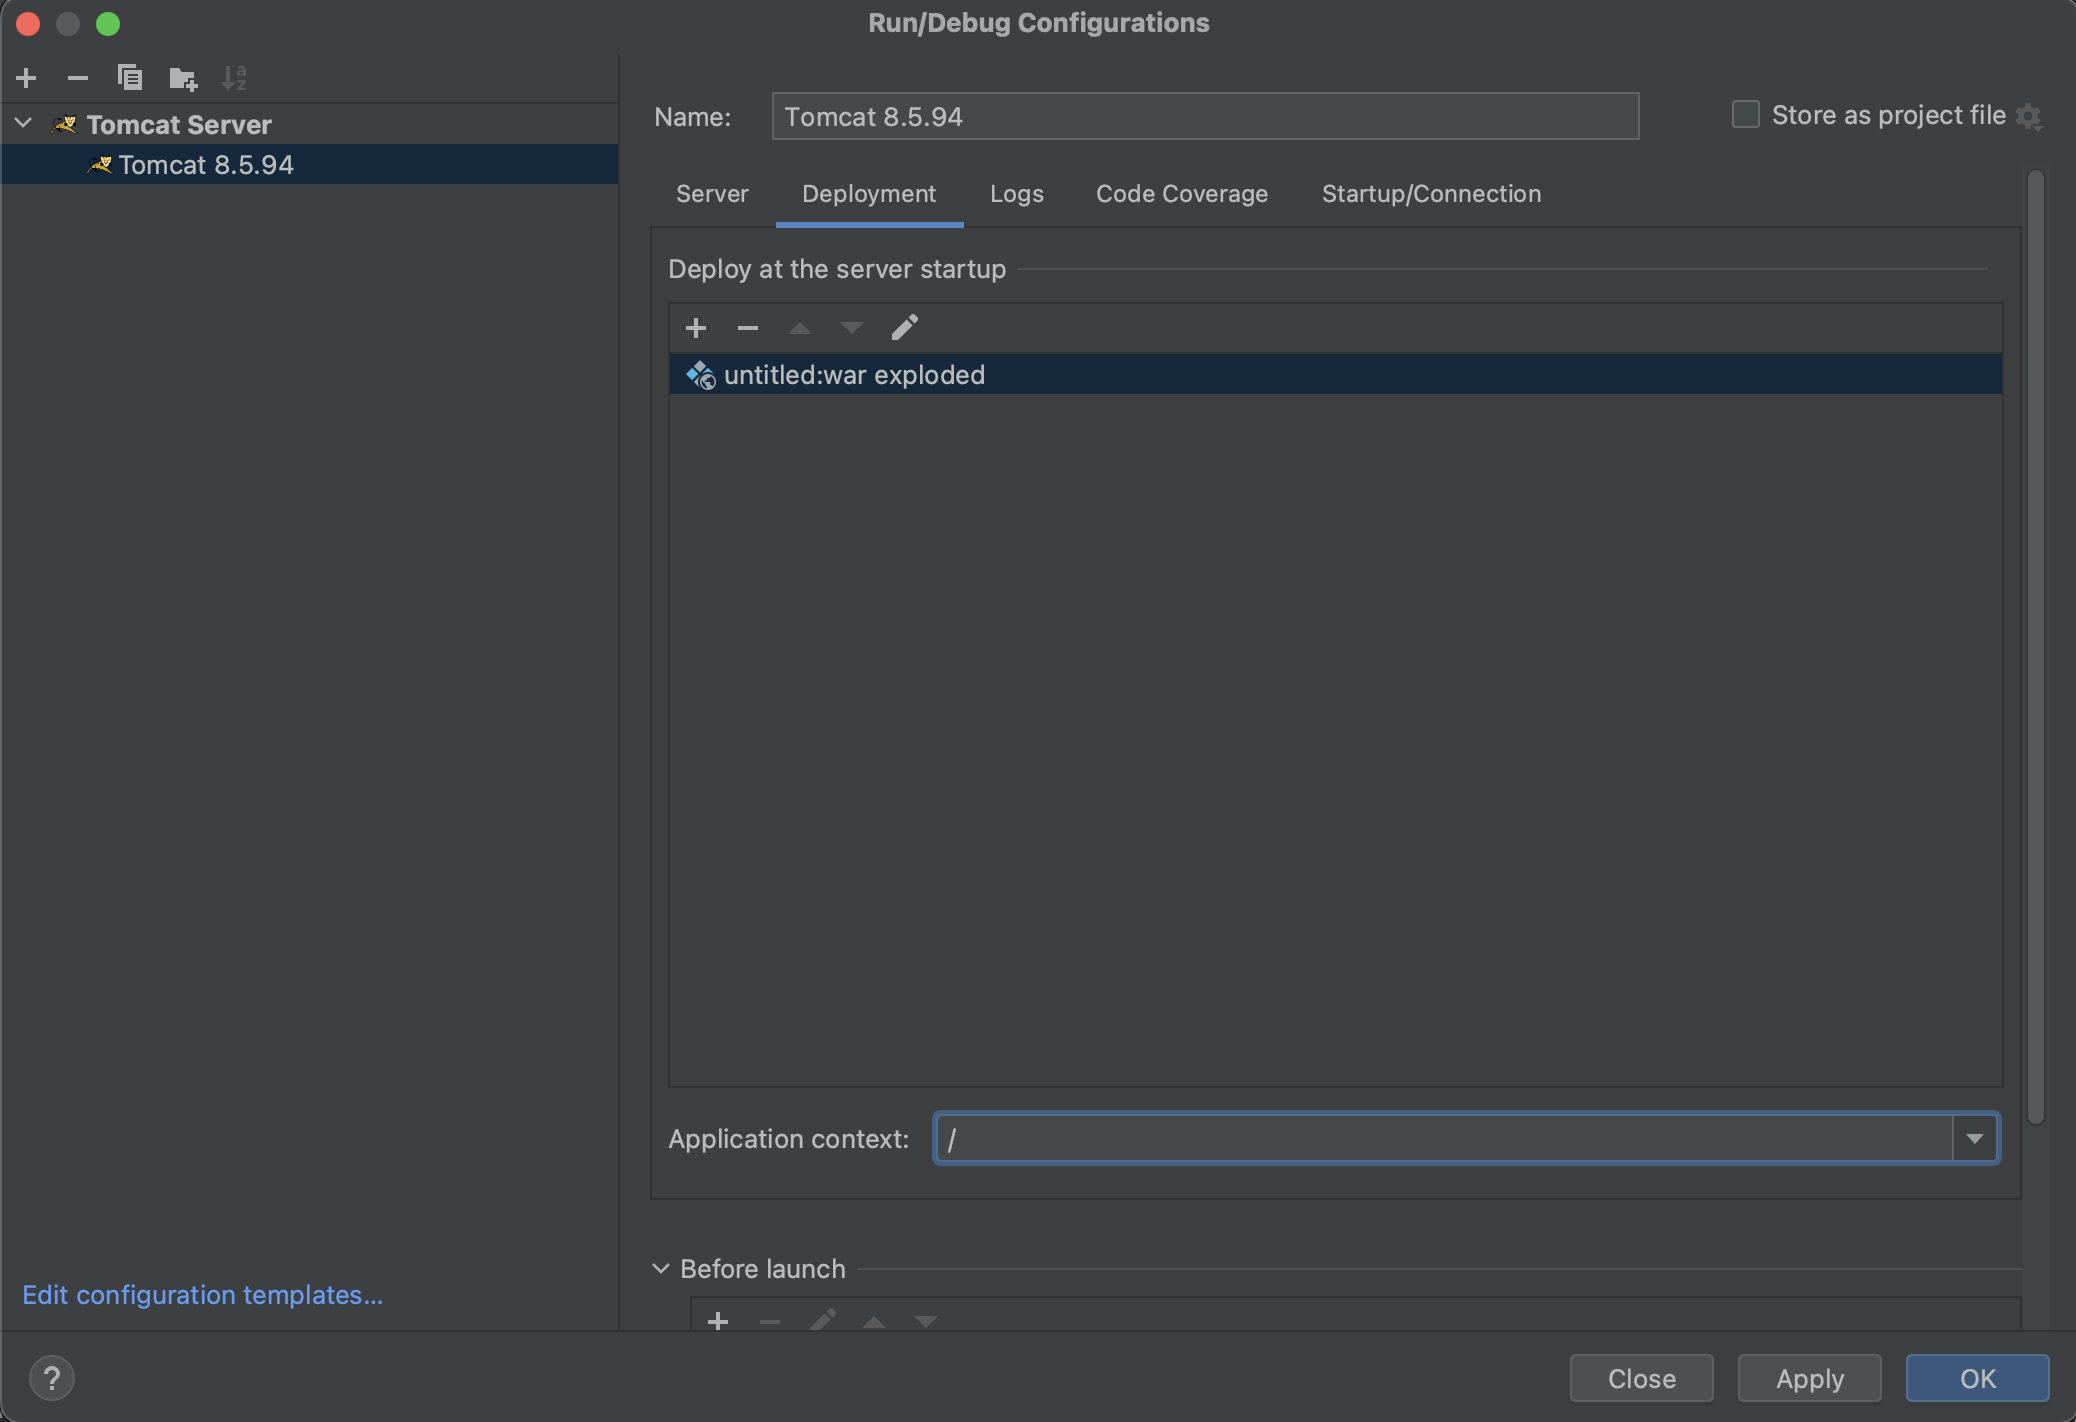
Deployment에서 artifact(untitled:war exploded)를 추가해주고 Application context도 알맞게 변경해준다. 나는 /로 설정했다.
실행
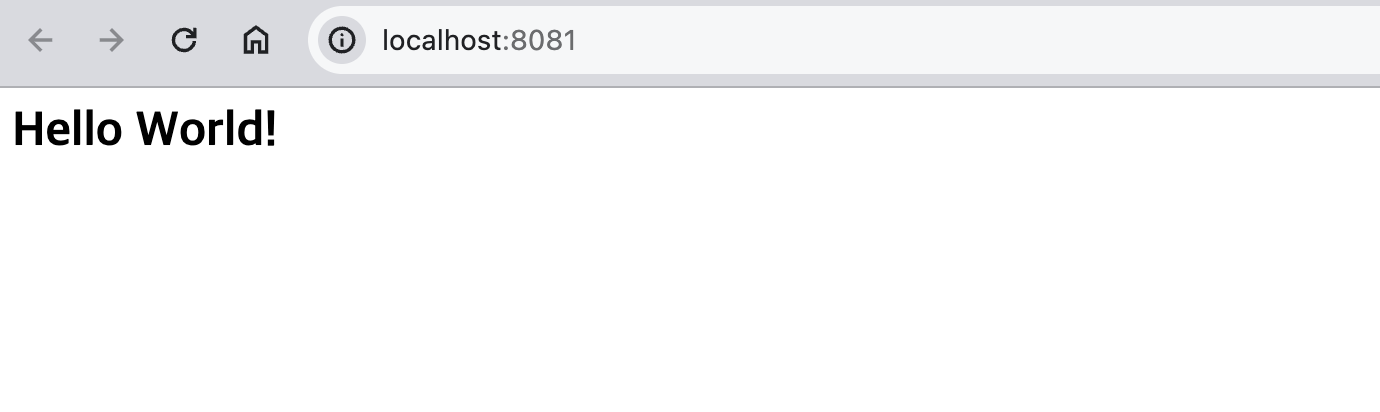
애플리케이션을 실행시켜보자. 기본 경로(/)이기 때문에 처음 프로젝트를 생성했을 때 만들어져 있던 index.jsp가 자동으로 인식되어 열리게 된다.
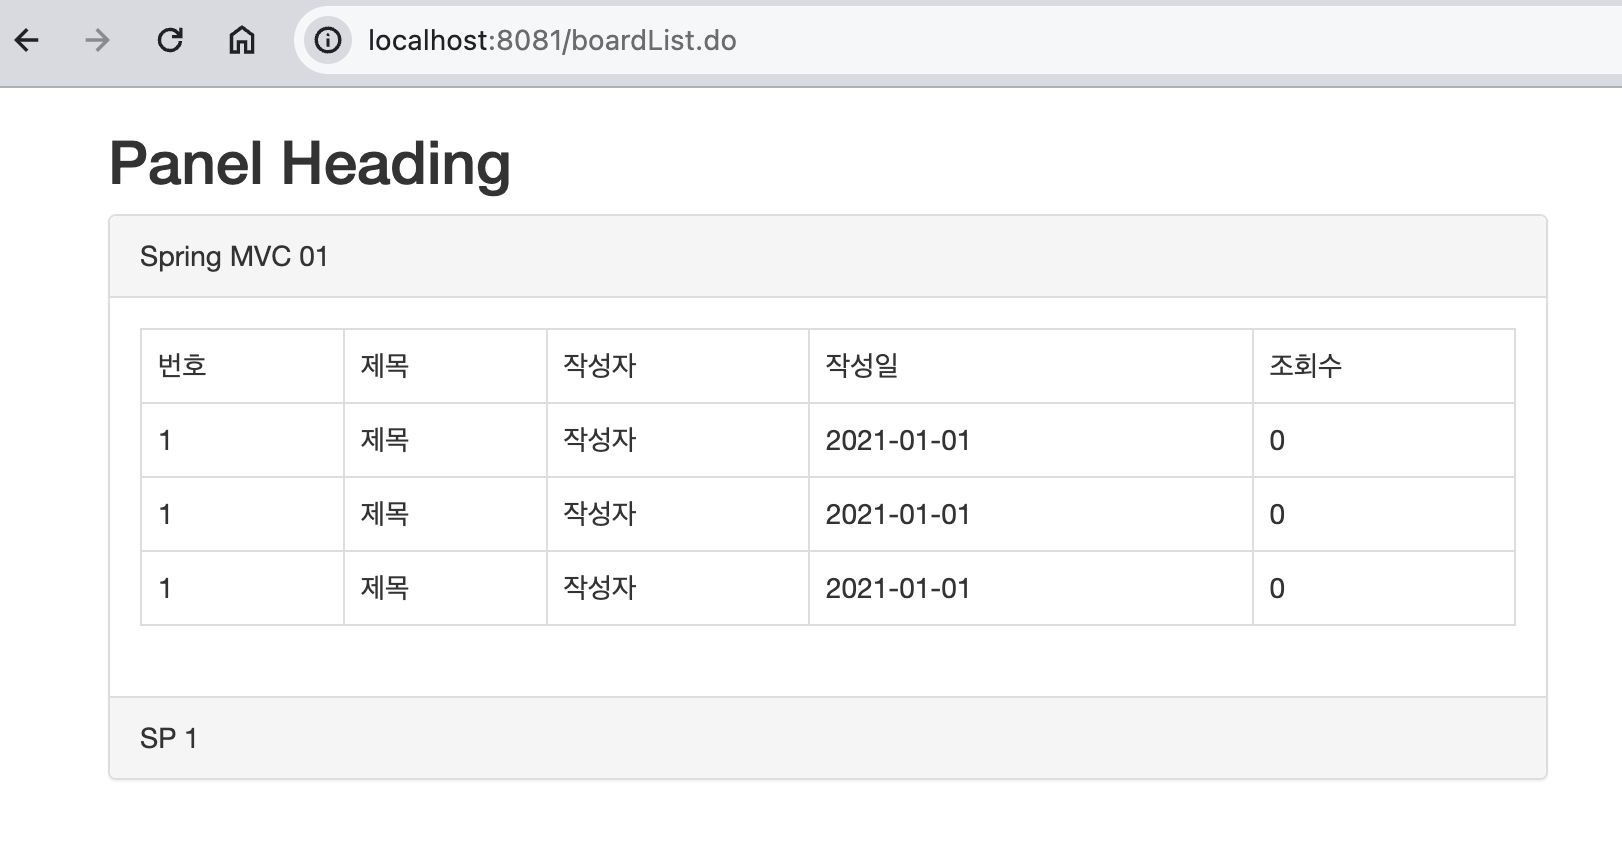
컨트롤러에서 @RequestMapping한 대로 localhost:8081/boardList.do를 입력해보자. 모델에 담아 보냈던 값이 잘 출력되었다. MVC가 잘 작동하고 있음이 확인되었다.
- 참고) UI는 부트스트랩을 사용했다.
글이 길어져서 DB 연결은 다음 포스트로 나눴다. (링크)