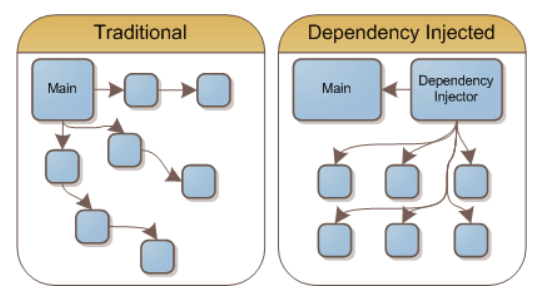
DI가 무엇인지 그리고 왜 사용해야 하는지 대략적으로 이전 포스팅을 통해 학습했습니다.
그렇다면 실제로 스프링에서 사용되는 IOC와 Bean이 무엇인지 학습하도록 하겠습니다!!
IOC란?

IOC
Inversion Of Control의 약자로서 번역어로제어의 역전이라고 합니다.웹 어플리케이션 또는 기타 어플리케이션에서 개발자가 아닌, 프레임워크가 적절한 시점에 클래스의 오브젝트를 생성하고, 전달해주는 역할을 진행하는 것을 의미합니다.

- 일반적인 프로그램
public class Application {
	public static void main(String[] args){
    	new Game(new Coin());
    }
}
일반적인 프로그램에서는 개발자가 원하는 시점에 객체를 전달하여 프로그램의 흐름을 변경하거나, 수정하고 관리할 수 있습니다. 그렇기 때문에 개발자는 객체에 대한 생성, 초기화, 실행, 소멸 등에 대한 모든 관리와 책임을 가지게 됩니다.
- 스프링 프레임워크
@SpringBootApplication
public class GameApplcation(){
	public static void main(String[] args){
    	SpringApplication.run(GameApplication.class, args);
    }
}
반대로 프레임워크에서는 개발자가 원하는 객체에 대한 생성, 초기화, 실행, 소멸 등의 기능을 프레임워크의 컨테이너가 자동으로 처리해 줍니다. 이렇게 개발자가 아니라 프레임워크가 객체에 대한 관리를 대신해주는 것을 IOC라고 하며, 스프링에서는 이런 기능을 Bean Factory와 ApplicationContext를 통해 제공합니다.
Bean 등록하기
Bean Factory 또는 ApplicationContext를 통해 등록된 Bean을 가져오기 전, 먼저 Bean을 등록하는 작업이 필요합니다
- xml 기반 Bean 등록
<?xml version="1.0" encoding="UTF-8"?>
<beans xmlns="http://www.springframework.org/schema/beans"
       xmlns:xsi="http://www.w3.org/2001/XMLSchema-instance"
       xsi:schemaLocation="http://www.springframework.org/schema/beans http://www.springframework.org/schema/beans/spring-beans.xsd">

    <bean id="game"
          class="spring.ex.model.Game" />
</beans>
xml 설정 파일을 통해 Game이라는 클래스를 Bean으로 등록할 수 있습니다.
Bean의 id값과 해당 class의 위치 정보를 표기함으로써 Bean을 등록할 수 있습니다.
- component-scan 기반 Bean 등록
<?xml version="1.0" encoding="UTF-8"?>
<beans xmlns="http://www.springframework.org/schema/beans"
       xmlns:xsi="http://www.w3.org/2001/XMLSchema-instance"
       xmlns:context="http://www.springframework.org/schema/context"
       xsi:schemaLocation="http://www.springframework.org/schema/beans http://www.springframework.org/schema/beans/spring-beans.xsd http://www.springframework.org/schema/context https://www.springframework.org/schema/context/spring-context.xsd">

    <context:component-scan base-package="spring.ex.model" />

</beans>
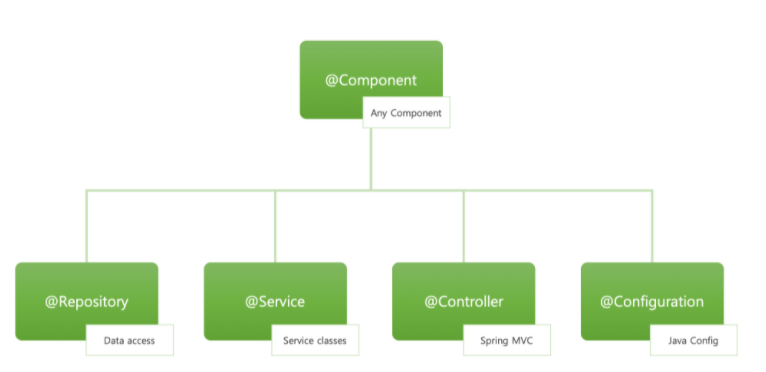
Bean으로 등록할 객체에 @Component 어노테이션을 주기하면, 스프링은 해당 어노테이션을 확인하고, component-scan을 통해 해당 객체를 Bean으로 등록합니다!
@Service 또는 @Respository와 같은 어노테이션을 들어가면, 최종적으로 @Component가 들어있음을 확인할 수 있습니다.
여기서 @Component는 @Bean과 유사하다고 느껴지지만, 조금의 차이점이 존재합니다.
@Bean의 경우에는 개발자가 컨트롤이 불가능한 외부 라이브러리를 Bean으로 등록하고 싶은 경우에 사용됩니다. 컬렉션과 같이 제공되는 라이브러리를 Bean으로 등록할 때 사용됩니다. 메서드 기반으로 Bean을 등록하게 되어 있습니다.
@Bean
public ObjectMapper objectMapper(){
	return new ObjectMapper();
}
반대로, @Component의 경우에는 개발자가 직접 컨트롤 가능한 클래스에 사용됩니다. 여기서 직접 컨트롤 가능하다는 것은, 개발자 직접 구현한 클래스를 의미합니다. 해당 방식의 경우에는 class 기반으로 Bean을 등록하게 됩니다.
@Component
public class Game {

}
개발자가 임의로 @Bean 또는 @Component를 설정하는게 아니라, 각각의 type에 맞추어 어노테이션을 설정해야 합니다. 만약 type에 맞추어 설정하지 않는 경우에는 컴파일 에러가 발생할 수 있습니다.
@Target({ElementType.METHOD, ElementType.ANNOTATION_TYPE})
@Retention(RetentionPolicy.RUNTIME)
@Documented
public @interface Bean {
}@Target(ElementType.TYPE)
@Retention(RetentionPolicy.RUNTIME)
@Documented
@Indexed
public @interface Component {
}@Bean과 @Component를 들어가보면, 해당 어노테이션이 어떤 Type을 가져야 되는지 확인할 수 있습니다!
public class GameApplication {

    public static void main(String[] args) {

        ApplicationContext context = new ClassPathXmlApplicationContext("application.xml");
    }
}application.xml에 등록한 Component들을 ClassPathXmlApplicationContext을 통해 읽어들여서 해당 Component 정보를 ApplicationContext로 가지고 있게 됩니다.
- Config
import org.springframework.context.annotation.Bean;
import org.springframework.context.annotation.Configuration;

@Configuration
public class ApplicationConfig {

    @Bean
    public PasswordEncoder passwordEncoder() {
        return new BCryptPasswordEncoder();
    }

}
config 파일을 통해 PasswordEncoder를 Bean으로 등록할 수 있습니다.
등록하고 싶은 객체를 메서드를 통해 Bean으로 등록하겠다고 표기를 진행합니다.
이후에 해당 ApplicationConfig.class에 @Configuration 어노테이션을 명시하여 해당 클래스에서 1개 이상의 Bean을 생성하고 있음을 명시해야 합니다!
@Configuration 어노테이션을 통해 해당 클래스가 스프링에서 Bean 등록을 위해 사용된 Config라는 것을 명시할 수 있게 됩니다! 더불어 해당 클래스의 싱글톤을 유지시킬 수 있습니다
- component-scan 과 Config
import org.springframework.context.annotation.ComponentScan;
import org.springframework.context.annotation.Configuration;

@Configuration
@ComponentScan(basePackageClasses = GameApplication.class)
public class ApplicationConfig {

}
@ComponentScan(basePackageClasses = GameApplication.class) 특정 위치의( 특정 패키지)에 대한 Component를 스캔하여 Bean으로 등록할 수 있는 기능을 제공합니다.
하나의 class가 될 수 있고, 또는 패키지 위치를 지정하여 패키지 안에 있는 모든 컴포넌트들을 Bean으로 등록할 수 있습니다.
- SpringBootApplication
@SpringBootApplication
public class GameApplication {
    public static void main(String[] args) {
        SpringApplication.run(GameApplication.class, args);
    }
}
이전까지 개발자가 직접 Config 파일을 통해서 등록하거나, 혹은 Component-scan을 돌려서 해당 패키지 또는 id값을 통해 읽어들이는 과정을 SpringBoot에서는 @SpringBootApplication이라는 어노테이션을 통해 제공하게 됩니다.

결론적으로, 별다른 Config 파일 없이 @Component가 등록된 파일을 모두 스캔할 수 있는 기능을 제공합니다.
Spring Container
Bean에 대한 관리를 수행하는 곳을 Spring Container라고 합니다. Bean의 생성, 연결, 설정 그리고 생명주기를 관리하는 역할을 맡습니다.
자세하게는 애플리케이션에 대해 정의한 메타데이터를 읽어 인스턴스화, 구성 및 관리할 개체에 대한 정보를 얻을 수 있습니다! 여기서 메타데이터는 스프링 컨테이너가 애플리케이션의 객체를 어떻게 인스턴스화하고, 설정하고, 조합해야 하는지 지시하기 위한 정보를 의미합니다. 위에서 자가성한 xml, annotation 그리고 java 파일 등이 메타데이터의 일환입니다!
스프링 컨테이너의 기능을 제공하는 인터페이스는 BeanFactory와 ApplicationContext가 존재합니다.
Bean Factory
인스턴스를 생성하면서 설정하고 많은 수의 Bean을 관리하는 실질적인 컨테이너를 의미합니다. Bean들은 일반적으로 서로 의존성을 가진 협력관계이며, BeanFactory에 의해 사용된 설정 데이터가 반영되게 됩니다.
여기서 컨테이너는 특정 클래스를 상속하거나 인터페이스를 구현하지 않는 POJO를 이용해 EJB의 기능을 유지하면서 복잡성을 제거하고, 라이프 사이클을 관리해주면서 개발자가 작성한 코드 또는 외부 라이브러리 등에 대한 처리과정을 위임받아 Bean을 관리합니다
주요 메서드는 아래와 같습니다!
// 애플리케이션 전체에서 공유되거나 독립적일 수 있는 지정된 bean의 인스턴스를 리턴
getBean()

// 빈 팩토리에 주어진 이름의 빈이 포함되어 있는지 확인
containsBean()

// 해당 빈이 동일한 인스턴스를 반환하는지 확인
isSingleton()

// 해당 빈이 항상 독립된 인스턴스를 반환하는지 확인
isPrototype()

// 지정된 이름의 빈이 지정된 유형과 일치하는지 확인
isTypeMatch()

// 주어진 이름이 어떤 빈의 유형을 가졌는지 확인
getType()

// 주어진 이름이 어떤 별칭을 가졌는지 확인
getAliases()
ApplicationContext
EnvironmentCapable, ListableBeanFactory, HierarchicalBeanFactory, MessageSource, ApplicationEventPublisher, ResourcePatternResolver 을 implement하여 Bean Factory 보다 더 많은 기능을 제공합니다.
ApplicationContext를 통해 Bean에 대한 관리를 더욱 용이하게 진행할 수 있습니다.
공통적으로 BeanFactory와 ApplicationContext가 비슷한 기능을 제공하게 됩니다.
Bean Factory와 ApplicationContext 차이점
BeanFactory는 요청 시 빈을 로드하는 반면ApplicationContext는 시작 시 모든 빈을 로드
Game이라는 class를 생성하고 Bean 로드를 확인하기 위한 표기를 위해 isBeanInstantiated 필드를 선언합니다.
public class GameBeanFactoryPostProcessor implements BeanFactoryPostProcessor {
    private static boolean isBeanFactoryPostProcessorRegistered = false;

    @Override
    public void postProcessBeanFactory(ConfigurableListableBeanFactory beanFactory){
        setBeanFactoryPostProcessorRegistered(true);
    }

    public static boolean isBeanFactoryPostProcessorRegistered() {
        return isBeanFactoryPostProcessorRegistered;
    }

    public static void setBeanFactoryPostProcessorRegistered(boolean isBeanFactoryPostProcessorRegistered) {
        GameBeanFactoryPostProcessor.isBeanFactoryPostProcessorRegistered = isBeanFactoryPostProcessorRegistered;
    }
}
Bean에 대한 등록을 위해 id와 class위치 그리고 init-method 방법을 기입합니다.
<bean id="game" class="spring.ex.model.Game" init-method="postConstruct"/>Game의 필드값이 true로 변경되었는지 test를 통해 확인을 진행합니다!
@Test
@Display("BeanFactory를 통한 초기화 확인 실패")
public void whenBFInitialized_thenGametNotInitialized_FAIL() {
    BeanFactory factory = new XmlBeanFactory(new ClassPathResource("bean-factory.xml"));

    assertThat(Game.isBeanInstantiated(), is(false));
}
실제로 Test를 돌린 결과, Game에 대한 초기화는 진행되지 않았습니다.
그 이유는 BeanFactory에 대한 초기화만 진행되었고, xml에 정의된 Game에 대해서는 진행되지 않았기 때문입니다. BeanFactory는 getBean()통해서 Bean에 대한 초기화가 가능하기 때문입니다.
@Test
@Display("BeanFactory를 통한 초기화 확인 성공")
public void whenBFInitialized_thenGameNotInitialized_SUCCESS() {
    BeanFactory factory = new XmlBeanFactory(new ClassPathResource("bean-factory.xml"));

    Game game = (Game) factory.getBean("game");

    assertThat(Game.isBeanInstantiated(), is(true));
}
BeanFactory에 경우에는 진짜 해당 Bean이 필요한 경우에 요청에 의해서 초기화가 진행됩니다. 이러한 초기화를 지연 로딩 Lazy Loading이라고 합니다.
반대로, ApplicationContext의 경우에는 즉시 로딩 Eager Loading을 통해 Bean을 관리합니다.
@Test
public void whenAppContInitialized_thenGameInitialized() {
    ApplicationContext context = new ClassPathXmlApplicationContext("bean-factory.xml");

    assertThat(Game.isBeanInstantiated(), is(true));
}
ApplicationContext는 즉시로딩을 통해 runtime시 모든 bean을 확인합니다.
그렇기 때문에, ApplicationContext는 BeanFactory에 비해 개발자가 직접 관리해야 되는 부담은 적지만 한번에 전체 Bean을 로드하기 때문에 메모리를 많이 잡아 먹는 문제가 존재합니다.
반대로 BeanFactory의 경우에는 개발자가 원하는 타임에 Bean을 로드할 수 있는 장점이 존재하고 메모리에 대한 관리를 진행할 수 있게 됩니다. 하지만 getBean()을 통해서 로드를 해야 한다는 문제가 존재합니다.
하지만, Spring에서는 ApplicationContext를 사용하는 것을 지향합니다. 그 이유는 BeanFactory의 경우에는 Singleton과 Prototype에 해당하는 두 가지 Type만을 지원하지만, ApplicationContext는 웹 어플리케이션에서 사용되는 대다수의 type을 지원하기 때문입니다.
- ApplicationContext는 시작시
BeanFactoryPostProcessor와BeanPostProcessor를 로드, Beanfactory는 요청시 로드
postProcessBeanFactory와 BeanPostProcessor가 즉시 로딩이 되는지 확인하기 위해 해당 클래스를 정의합니다.
public class Game {
    private static boolean isBeanFactoryPostProcessorRegistered  = false;

    @Override
    public void postProcessBeanFactory(ConfigurableListableBeanFactory beanFactory){
        setBeanFactoryPostProcessorRegistered(true);
    }

    public static boolean isBeanFactoryPostProcessorRegistered() {
        return isBeanInstantiated;
    }

    public static void setBeanFactoryPostProcessorRegistered(boolean isBeanInstantiated) {
        Game.isBeanInstantiated = isBeanInstantiated;
    }
}
public class GameBeanPostProcessor implements BeanPostProcessor {
private static boolean isBeanPostProcessorRegistered = false;
@Override
public Object postProcessBeforeInitialization(Object bean, String beanName){
setBeanPostProcessorRegistered(true);
return bean;
}
public static boolean isBeanPostProcessorRegistered() {
return isBeanPostProcessorRegistered;
}
public static void setBeanPostProcessorRegistered(boolean isBeanPostProcessorRegistered) {
GameBeanPostProcessor.isBeanPostProcessorRegistered = isBeanPostProcessorRegistered;
}
}<bean id="gameBeanPostProcessor"
class="spring.ex.model.GameBeanPostProcessor" />
<bean id="gameBeanFactoryPostProcessor"
class="spring.ex.model.GameBeanFactoryPostProcessor" />xml에 해당 bean에 대한 정보를 기입합니다.
@Test
public void whenBFInitialized_thenBFPProcessorAndBPProcessorNotRegAutomatically() {
    Resource res = new ClassPathResource("bean-factory.xml");
    ConfigurableListableBeanFactory factory = new XmlBeanFactory(res);

    assertThat(GameBeanFactoryPostProcessor.isBeanFactoryPostProcessorRegistered(), is(false));
    assertThat(GameBeanPostProcessor.isBeanPostProcessorRegistered(), is(false));
}
test를 통해 bean을 xml에 정의했다고 하더라도, 즉시로딩이 되지 않음을 확인할 수 있었습니다. BeanFactory의 경우에는 BeanFactoryPostProcessor와 BeanPostProcessor를 요청시에 로드하기 때문에 test가 실패함을 알 수 있습니다.
반면에, ApplicationContex의 경우에는 run시 바로 즉시로딩이 되어 BeanFactoryPostProcessor와 BeanPostProcessor가 동작함을 확인할 수 있었습니다.
@Test
public void whenAppContInitialized_thenBFPostProcessorAndBPostProcessorRegisteredAutomatically() {
    ApplicationContext context
      = new ClassPathXmlApplicationContext("bean-factory.xml");

    assertThat(GameBeanFactoryPostProcessor.isBeanFactoryPostProcessorRegistered(), is(true));
    assertThat(GameBeanPostProcessor.isBeanPostProcessorRegistered(), is(true));
}
결과적으로 Spring IOC 컨테이너 기능을 제공하는 ApplicationContext와 BeanFactory에 대한 차이점은 Lazy와 Eager로 나눌 수 있다고 생각합니다. 해당 방식의 차이로 인해 메모리에 대한 영향도가 달라짐을 부수적으로 확인할 수 있었습니다.
궁금한 점
- @Bean이 Type에 따라서 진행된다고 나와 있지만, 아래의 코드 처럼 사용자가 직접 구현한 코드를 등록할 때 @Bean을 붙여 등록할 수 있습니다... 그렇다면, Type에 따라 진행되는게 아니라, 형태에 따라 진행되는게 아닌지 궁금합니다!
@Configuration
public class ApplicationConfig {

    @Bean
    public Game game() {
        return new Game();
    }

}