기획
1. 개요
NVIDIA ACADEMY에서 맞은 파이널 팀 프로젝트이다.
지난 번에 수행한 프로젝트는 LLM이었다면 이번 파이널 프로젝트는 CV이다.
(1) 주제
주제를 뭘 할 지 고민을 하던 도중...
팀원 ㅈㅅ님께서는 나와 ㄷㅇ님에게 같이 프로젝트를 하고 싶으시다면서 다가오셨다.
가져오신 주제는 Object Detection 기반 반려견 훈련 보조 장치이다.
진섭님이 우리에게 이 주제를 가져오신 이유는,
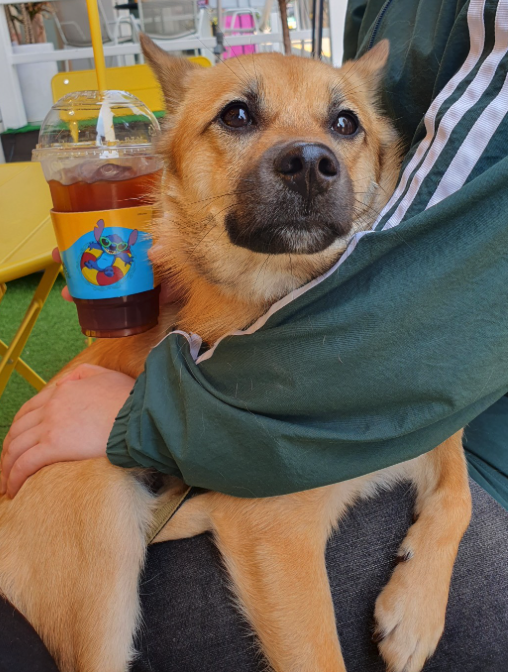
사랑스러운 동구가 있어야만 테스트가 가능했기 때문이었다. 😎
딱히 어떤 주제를 할 지 몰랐던 나와 ㄷㅇ님은 OK를 하며 같이 프로젝트를 시작했다.
(2) 기간
2025년 03월 17일 ~ 2025년 04월 04일 (약 3주)
(3) 팀원
팀장은 핀볼게임을 통해서 정해졌다.
팀장은 ㅈㅅ님이었다.
팀원 나, ㄷㅇ님 이렇게 이루어졌다.
팀 이름은 동구야가 되었다~
동구야 잘 부탁해~ 🐶
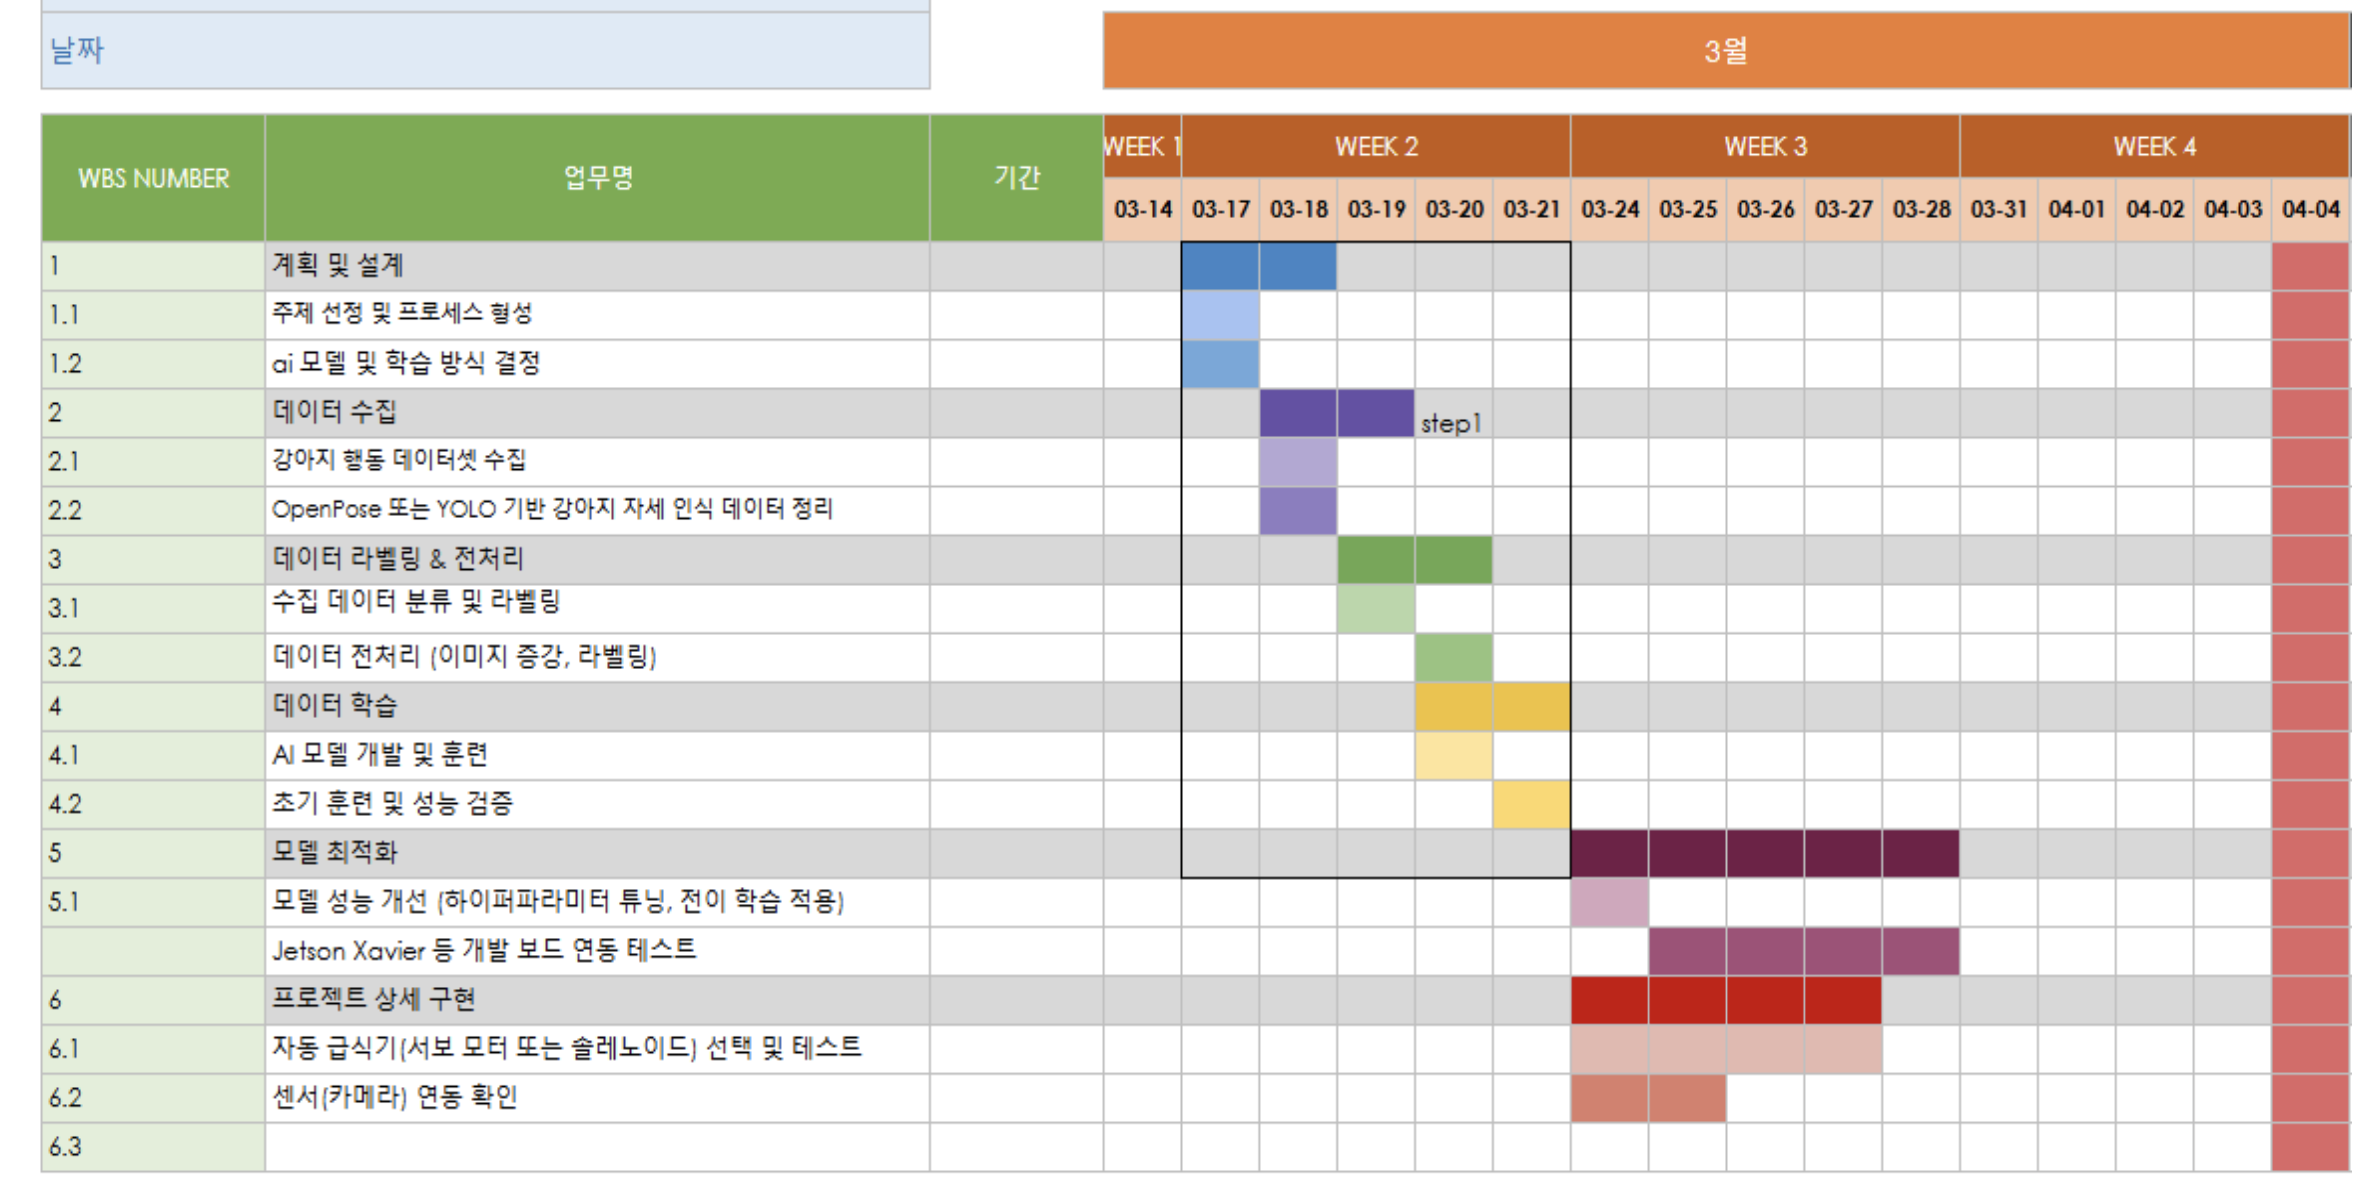
(4) 계획
먼저 간략하게 어떤 일들을 해야할 지 리스트화해보고 계획서를 작성했다.
이번 프로젝트에서 가장 설렜던 건 ...
SW만 다루는 것이 아니라 HW도 드디어 만지게 된다는 것이었다.
예전, 바이*론이라는 회사에 다니면서 설렜던 기분이랑 비슷했다.
난 아무래도 기계를 좋아하는 것 같다... ❤️
2. 준비물
아무래도 팀프로젝트이다 보니, 각오가 대단했다.
팀 지원금이 어느정도 나와서 도구를 준비할 수 있었다.
가장 먼저 가장 중요한 도구인
(1) 젯슨 자비에
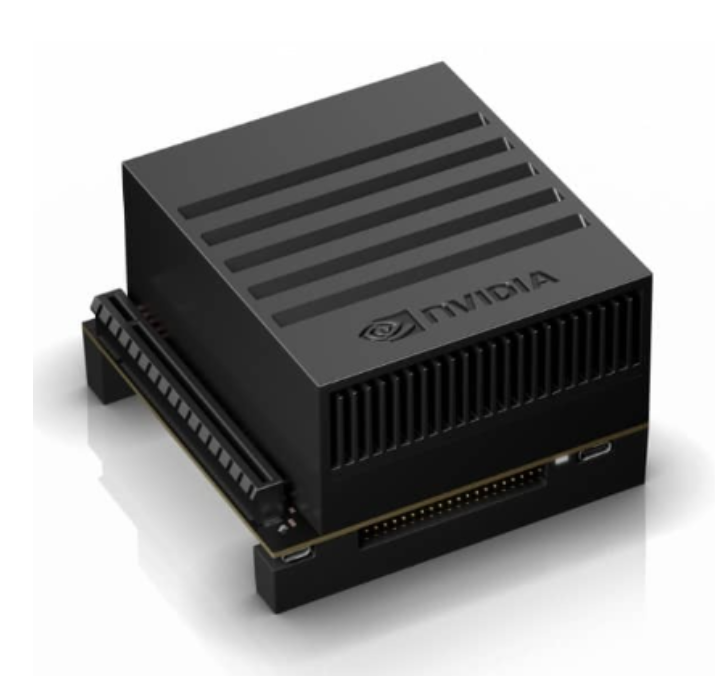
젯슨 자비에는 이미 학원에 구비가 되어있었기 때문에 대여가 가능했다.
약 3주간 우리의 팀을 책임질 중요한 서버이다.
(2) 소형 카메라
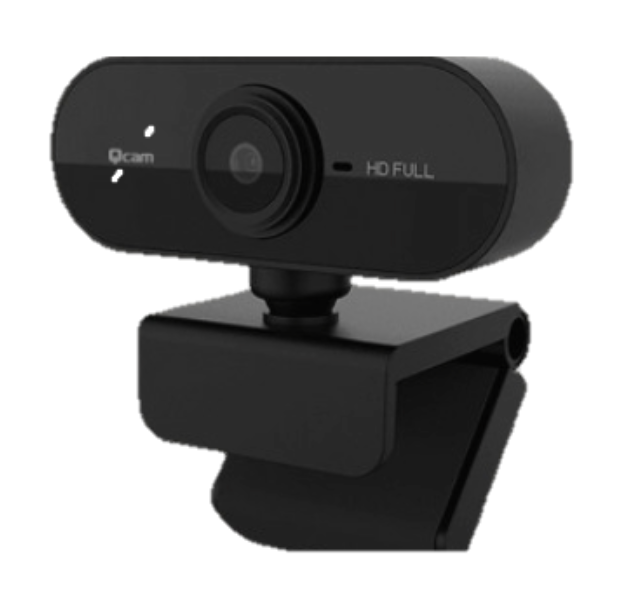
동구의 자세를 인식하기 위해서는 소형 카메라가 필요했다.
이 또한 학원에 구미가 되어 있었다.
(3) MCU

MCU칩은 간식 자동배급기를 만들 때 필요하다.
(4) 강아지 펜스
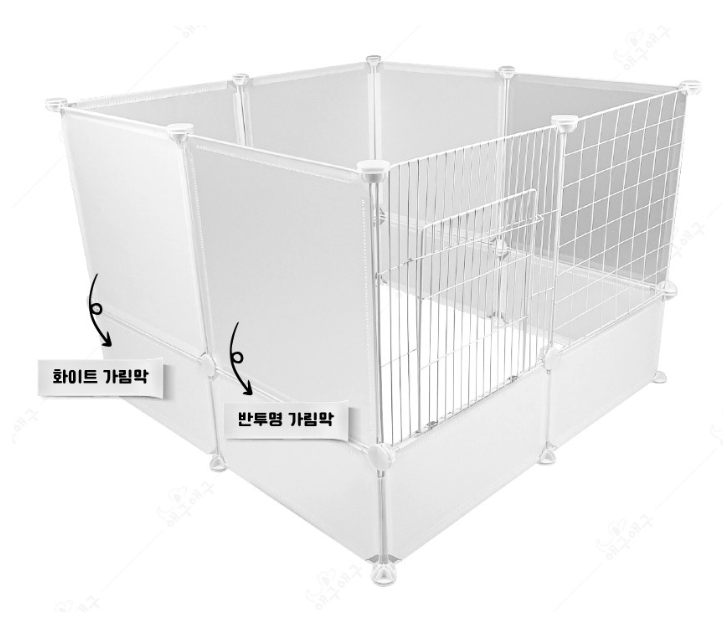
학습할 데이터를 직접 수집하고 테스트할 때 가장 걸렸던 점은 배경이었다..!
그래서 배경을 흰색으로 하는 게 맞겠다 싶어서 강아지 펜스를 준비물에 넣어놨다.
이 펜스는 지원금으로 구입할 계획이다.. 😁
3. FLOW
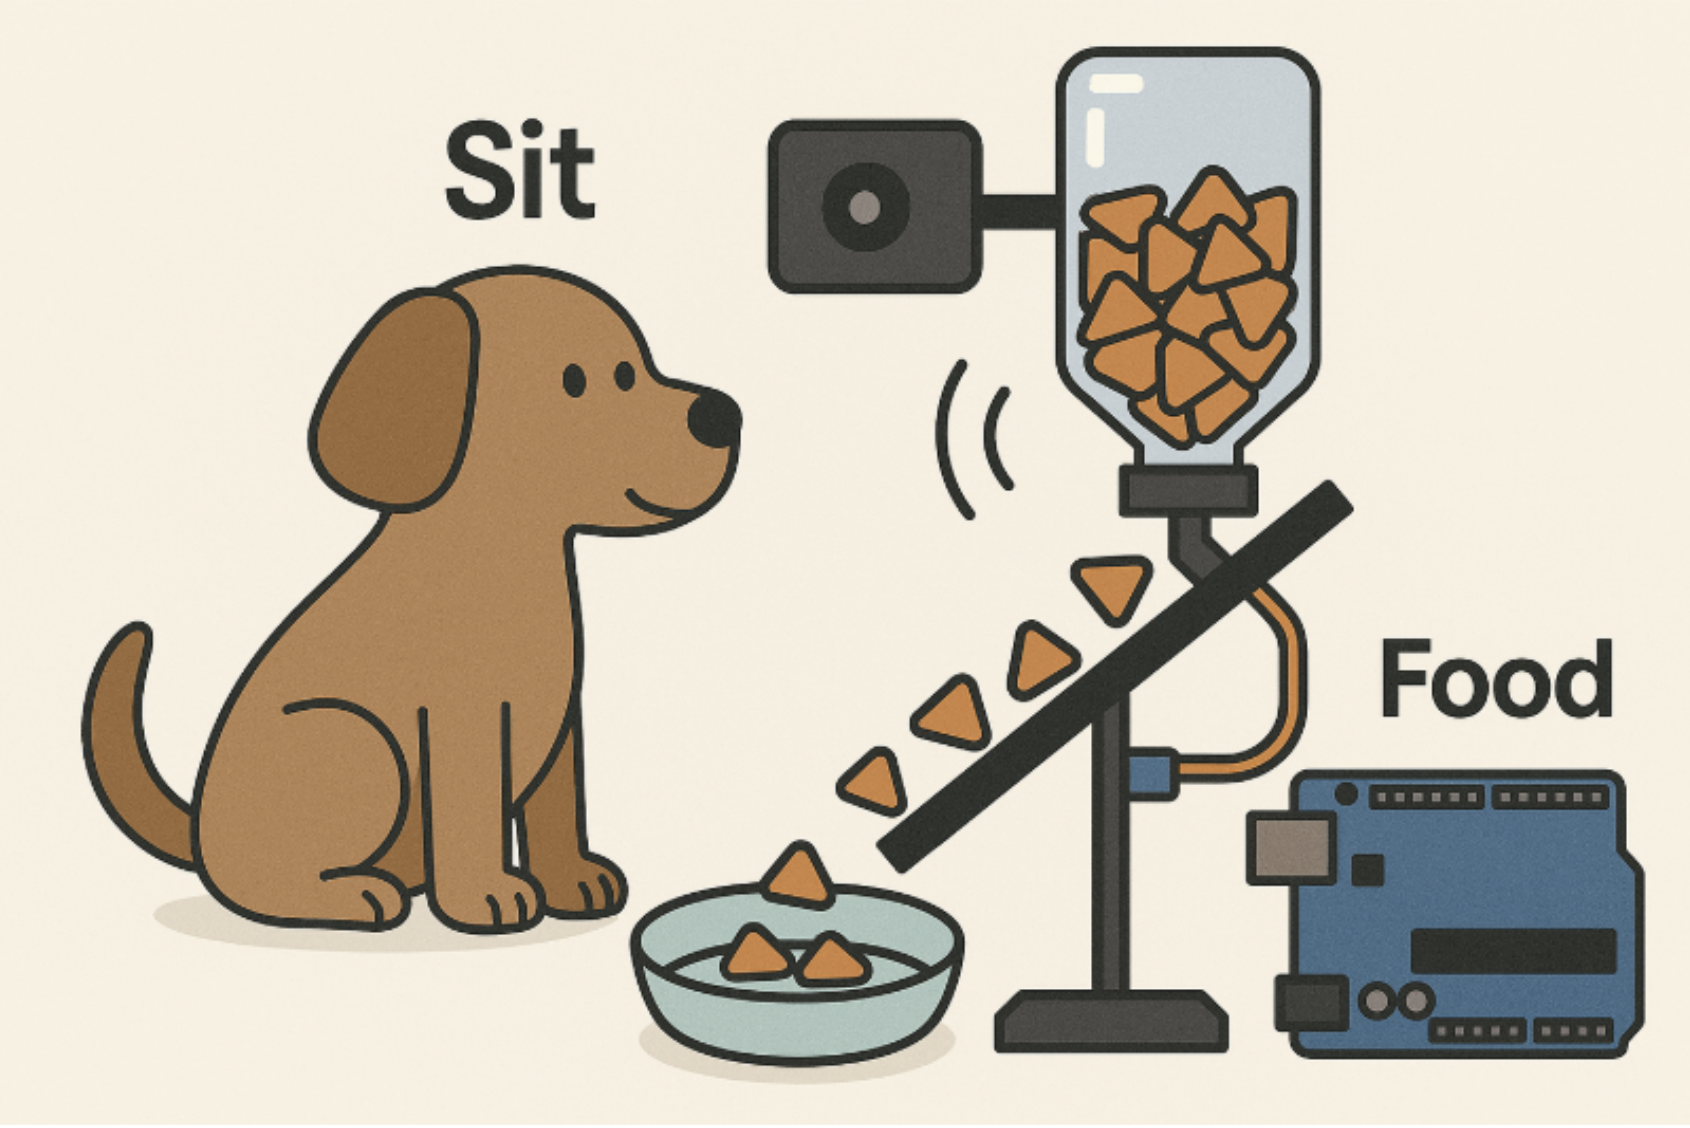
- 머신이 “동구야, 이리 와”라는 음성 명령을 출력
- 강아지 ‘동구’가 머신 앞으로 이동
- 이어서 “동구야, 앉아”라는 명령을 출력
- 동구가 실제로 앉는 행동을 수행
- 포즈 인식 모델이 ‘앉음 자세’를 정확히 감지
- 성공 판단 시, 자동으로 간식을 배급
우리는 이 플로우를 프로젝트의 핵심으로 정의하고,
모듈 설계와 데이터 수집, 행동 인식 알고리즘 구현 전 과정에서 이 구조를 기반으로 접근했다.
4. 데이터 수집처 탐색
CV 특성 상 데이터 수집처 탐색이 가장 난관이었다.
첫 번째로 생각해야 할 것은
기존에 누군가가 만들어 놓은 데이터를 찾는 것이다!
그렇게만 되면 가장 🍯 인 작업이 될텐데...
여러 사이트를 둘러 보다가
CV로 가장 유명한 Ultralytics 문서에서 단서를 발견했다!
Ultralytics - dog pose dataset
우거진 인터넷 숲에서 심봐버렸다! 🥹
이렇게 된 이상 준비물 '강아지 펜스'는 굳이 구입할 필요가 없어졌다~ 룰루~
5. 데이터 수집
Train Set
이미지: 6,774개
라벨: 6,774개
Valisation Set
이미지: 1,704개
라벨: 1,704개
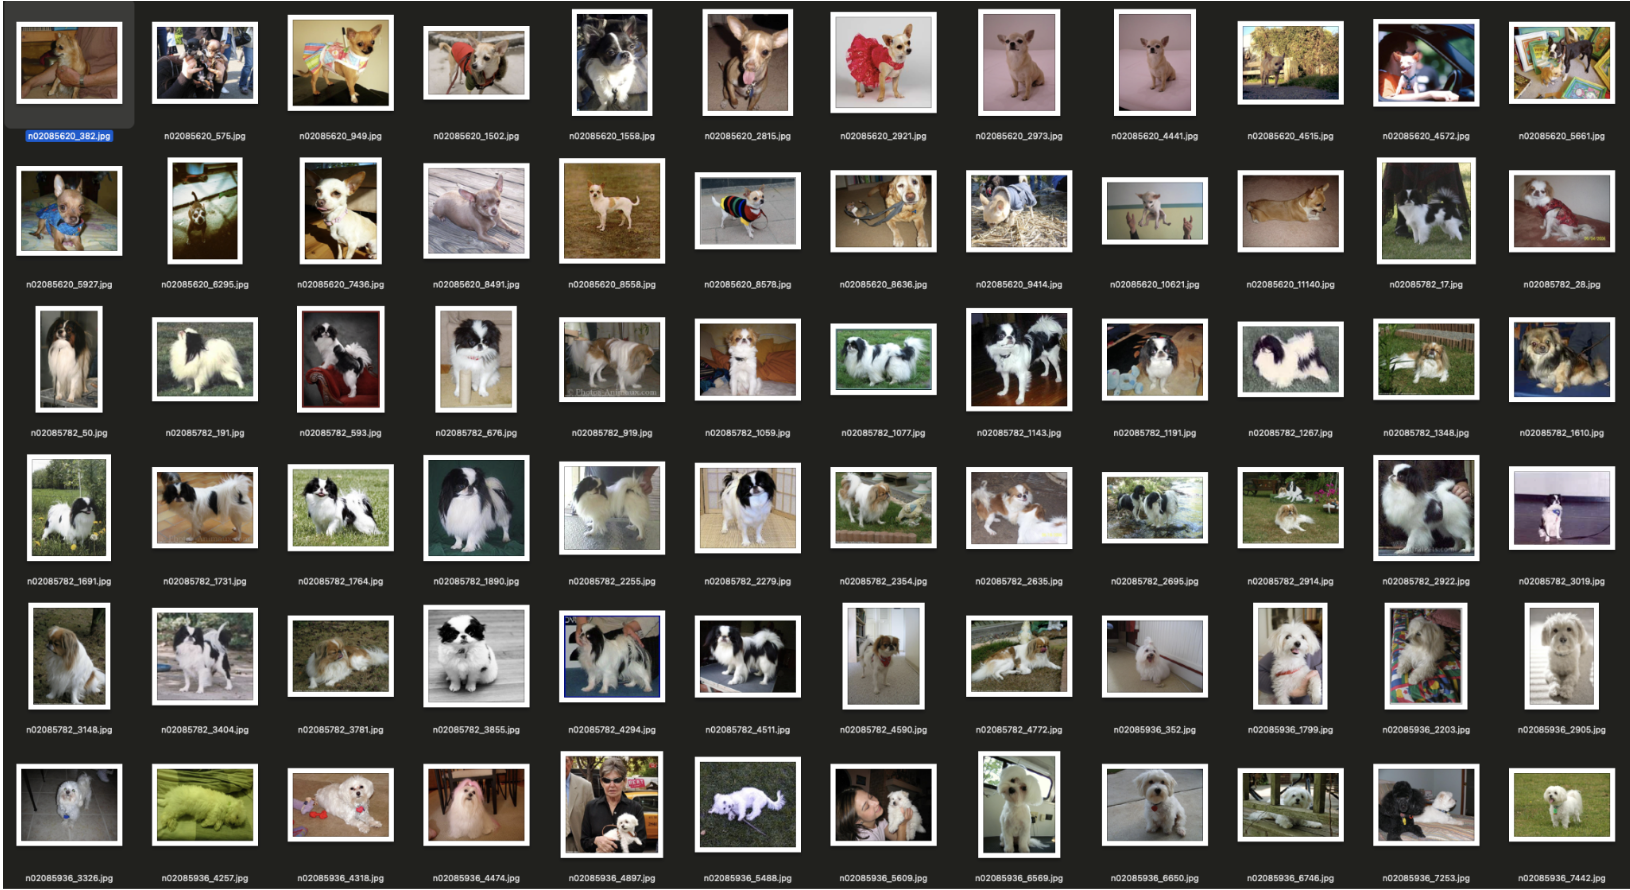
Ultralytics의 Dog Pose 데이터셋 덕분에 괜찮은 양의 데이터를 손쉽게 확보할 수 있었다.
이 데이터셋을 사용해서 성능이 떨어진다면 추가로 동구를 주인공으로 데이터를 더 확보할 생각이다.
(그럴 일 없었으면..)
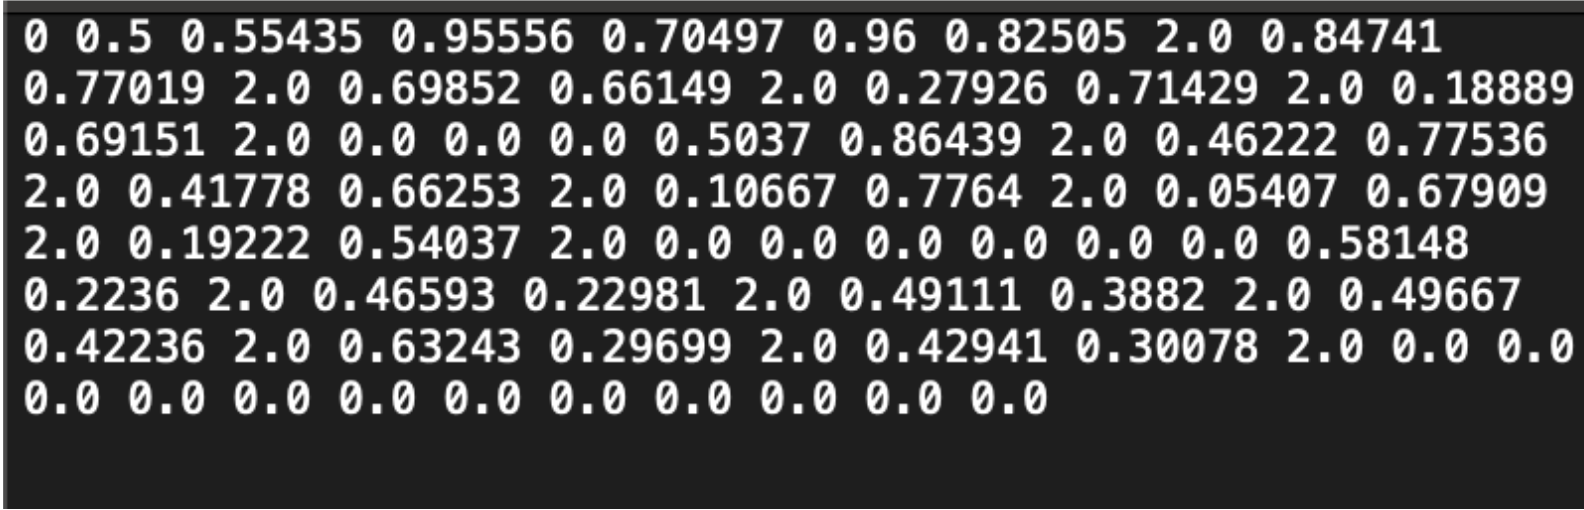
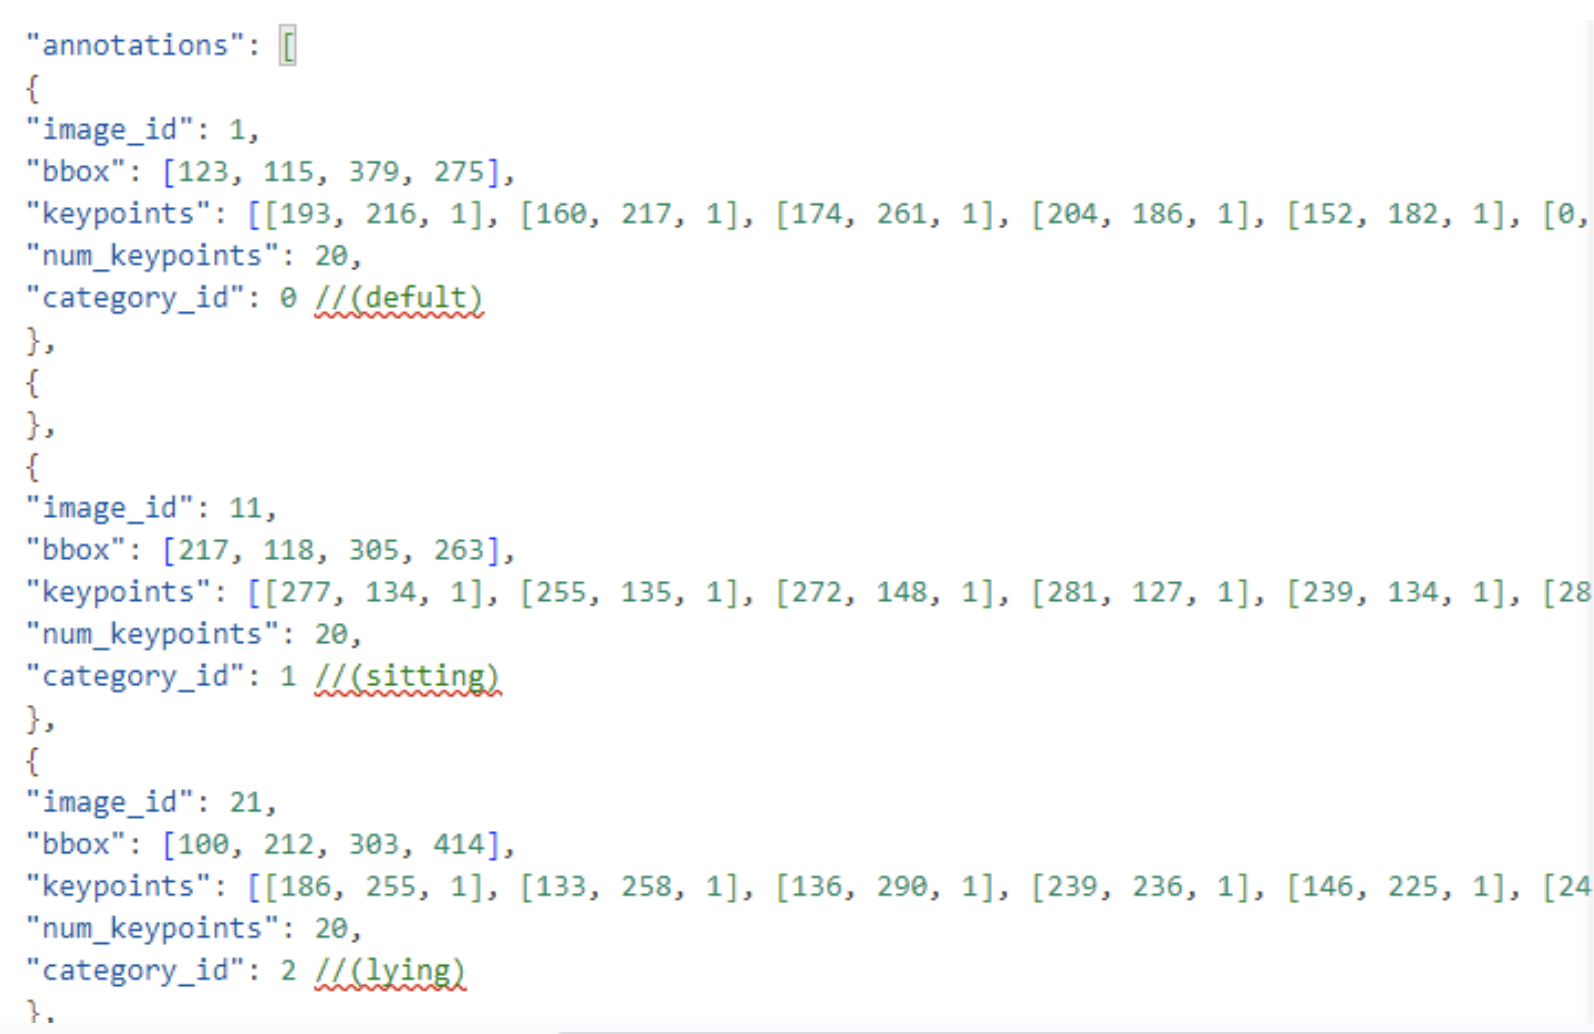
6. 전처리
데이터셋들을 확인해보았는데 강아지의 관절 위치 라벨링은 잘 되어 있었다.
우리팀은 인식할 포즈를 정의하고 그 포즈만을 모아서 재라벨링을 하는 작업이 필요했다.
인식할 포즈
[0] default: 서있는 모습
[1] sitting: 앉아있는 모습
[2] lying: 누워있는 모습
(1) 데이터셋 3등분 분할 및 팀원 간 분배 작업
사용 라이브러리
[1] OS (python)
[2] shutil (python)
[3] random (python)
import os
import shutil

# 기본 경로 설정
####### new-dog-pose-dh 로 작업해주세요. ########
# 사용자 이니셜 입력 (예: "dh")
# donghee = "dh"
# dongwoo = "dw"
# jinseop = "js"
initials = "dh"  # 여기에 본인 이니셜 입력
new_dir = f"./new-dog-pose-{initials}"

# 생성할 폴더 목록 정의
folders = [
    new_dir,
    os.path.join(new_dir, "train"),
    os.path.join(new_dir, "val"),
]

categories = ["default", "sitting", "lying"]
for split in ["train", "val"]:
    for category in categories:
        folders.append(os.path.join(new_dir, split, category, "images"))
        folders.append(os.path.join(new_dir, split, category, "labels"))

# 폴더 생성
for folder in folders:
    os.makedirs(folder, exist_ok=True)


print(f"🚀 폴더 구조 생성 완료: {new_dir}")
(2) default, sitting, lying 파일 이동 작업 수행 후 label 변환
사용 라이브러리
[1] OS (python)
[2] shutil (python)
import os
import shutil

# 사용자 이니셜 입력 (예: "dh")
initials = "dh"  # 본인 이니셜 입력

# 기존 원본 데이터셋 경로 (train/labels, val/labels 각각 다름)
original_labels_dirs = {
    "train": f"./dog-pose-{initials}/train/labels",
    "val": f"./dog-pose-{initials}/val/labels"
}

# 새로운 데이터셋 경로 (이미지만 분류된 곳)
new_base_dir = f"./new-dog-pose-{initials}"

# 클래스 매핑 (폴더 이름 → 클래스 번호)
class_mapping = {
    "default": 0,
    "sitting": 1,
    "lying": 2
}

# train과 val 각각 처리
splits = ["train", "val"]
categories = ["default", "sitting", "lying"]

for split in splits:
    for category in categories:
        img_dir = os.path.join(new_base_dir, split, category, "images")
        lbl_dir = os.path.join(new_base_dir, split, category, "labels")

        # labels 폴더 생성
        os.makedirs(lbl_dir, exist_ok=True)

        # 해당 폴더에 있는 이미지 파일 목록 가져오기
        for img_file in os.listdir(img_dir):
            if img_file.endswith(".jpg") or img_file.endswith(".png"):
                label_file = os.path.splitext(img_file)[0] + ".txt"

                # 해당 split(train 또는 val)에 맞는 원본 labels 폴더 지정
                original_label_path = os.path.join(original_labels_dirs[split], label_file)
                new_label_path = os.path.join(lbl_dir, label_file)

                # 라벨 파일이 존재하면 이동 및 클래스 번호 수정
                if os.path.exists(original_label_path):
                    with open(original_label_path, "r") as f:
                        lines = f.readlines()

                    # 클래스 번호 변경
                    new_lines = []
                    for line in lines:
                        parts = line.strip().split()
                        if len(parts) > 0:
                            parts[0] = str(class_mapping[category])  # 클래스 번호 변경
                            new_lines.append(" ".join(parts))

                    # 변경된 내용 저장
                    with open(new_label_path, "w") as f:
                        f.write("\n".join(new_lines) + "\n")

                    print(f"✅ {label_file} 이동 완료 및 클래스 수정 → {new_label_path}")

                else:
                    print(f"⚠️ {label_file} 없음 (라벨 누락 가능)")

print("🚀 TXT 라벨 이동 및 클래스 번호 수정 완료!")
데이터셋 구성
- Train Set
default: 3,755개
sitting: 1,283개
lying: 1,367개
- Validation Set
default: 940개
sitting: 304개
lying: 286개
데이터셋 비율
Train:val = 4:1
클래스 비율
default:sitting:lying = 3:1:1
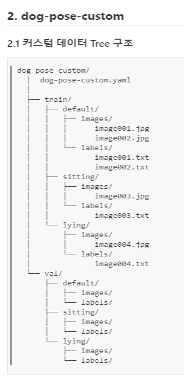
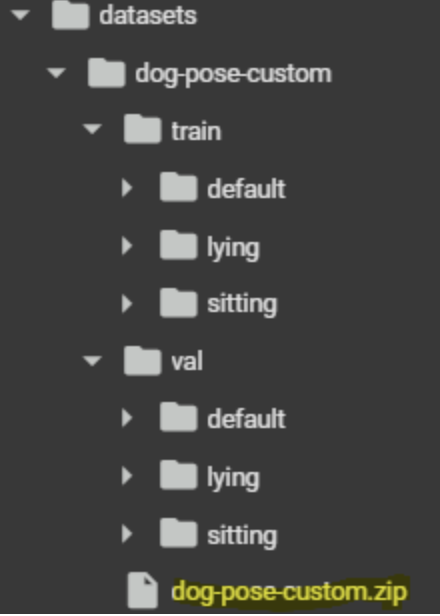
커스텀 데이터 구조
7. 모델 선택
yolo11n-pose.pt
선택 이유 1. Ultralytics
Ultralytics에서 제공하는 모델은 TensorRT에 대한 최적화 지원이 가장 뛰어난 프레임워크 중 하나로,
Jetson Xavier와 같은 엣지 디바이스에서 추론 성능을 극대화할 수 있다.
실제 TensorRT 변환 과정이 공식 문서와 예제 수준으로 잘 정리되어 있어, 실행 속도 최적화가 용이했다.
→ 다른 선택지보다 운영 효율성이 높았기 때문에, 이점이 크게 작용했다.
선택 이유 2. mAP, Latency 속도 우수
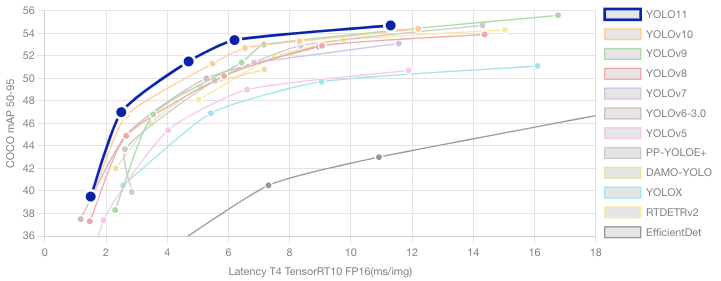
그래프에서 볼 수 있다시피 속도노 빠르며 정확도가 매우 높다. 특히 FPS 5~10 사이 구간이 다른 모델에 비해 앞도적으로 높은 것을 알 수 있다. Jetson Xavier처럼 GPU 성능이 제한된 장비에서도 실용적 실시간 처리가 가능하다는 점이 모델 선정에 결정적으로 작용했다.
선택 이유 3. Pose 인식 제공
yolo11n-pose.pt는 모델명에서도 확인할 수 있듯이, 포즈 인식 기능이 내장된 YOLOv11 변형 모델이다.
기존 YOLO 모델에 단순 객체 탐지뿐 아니라 사람의 관절 위치를 Keypoint로 인식하는 기능까지 포함되어 있어어서 행동 인식, 자세 분석 등 복합 AI 작업에 적합한 구조를 갖추고 있다.
학습
1. dog-pose-best.pt
(1) 학습

from ultralytics import YOLO

# Load a model
model = YOLO("yolo11n-pose.pt")

# Train the model
results = model.train(data="dog-pose.yaml", epochs=100, imgsz=640, patience=10)
[참고] yaml 활용 (Ultralytics 공식 문서)
위 코드로 dog-pose-best.pt를 생성했고 간단한 테스트를 진행했다.
(2) 테스트
%%bash
export LC_ALL=en_US.UTF-8
export LANG=en_US.UTF-8
zip -r /content/runs/pose.zip /content/runs
이미지를 잘 인식하는지 확인해야 하기 때문에 간단한 환경설정을 먼저 해주었다.
from ultralytics import YOLO
import cv2
import os
import random
import matplotlib.pyplot as plt

# 학습 완료된 모델 불러오기
model = YOLO("runs/pose/train/weights/best.pt")

# 이미지 폴더 경로 (실제 경로에 맞게 수정)
image_folder = "images"
all_image_files = [f for f in os.listdir(image_folder) if f.endswith(('.jpg', '.png'))]

# 랜덤으로 4개의 이미지 파일 선택
sample_files = random.sample(all_image_files, 4) if len(all_image_files) >= 4 else all_image_files

# 1행 4열 subplot 생성
fig, axes = plt.subplots(1, 4, figsize=(20, 5))

# 선택된 각 이미지에 대해 예측 수행 및 결과 표시
for idx, image_file in enumerate(sample_files):
    image_path = os.path.join(image_folder, image_file)
    image = cv2.imread(image_path)

    if image is None:
        print(f"이미지를 불러올 수 없음: {image_path}")
        continue

    # 모델 예측 수행 (이미지 경로를 인자로 전달)
    results = model(image_path)

    for result in results:
        # result.boxes.xyxy : bounding box 좌표 리스트
        # result.boxes.cls  : 각 bounding box의 클래스 인덱스 리스트
        # result.keypoints.xy : 각 객체의 keypoints 좌표 리스트
        for i, (box, keypoints) in enumerate(zip(result.boxes.xyxy, result.keypoints.xy)):
            x1, y1, x2, y2 = map(int, box)

            # 클래스 인덱스를 얻고, model.names 딕셔너리에서 해당 클래스 이름을 가져옴
            class_id = int(result.boxes.cls[i])
            label = model.names.get(class_id, str(class_id))

            # Bounding Box 그리기
            cv2.rectangle(image, (x1, y1), (x2, y2), (255, 0, 0), 2)
            cv2.putText(image, label, (x1, y1 - 10), cv2.FONT_HERSHEY_SIMPLEX,
                        0.5, (255, 0, 0), 2)

            # Keypoint 그리기
            for x, y in keypoints:
                if x > 0 and y > 0:  # 유효한 좌표인 경우에만 그림
                    cv2.circle(image, (int(x), int(y)), 5, (0, 255, 0), -1)

    # BGR -> RGB 변환 후 subplot에 결과 이미지 표시
    image_rgb = cv2.cvtColor(image, cv2.COLOR_BGR2RGB)
    axes[idx].imshow(image_rgb)
    axes[idx].set_title(f"YOLO-Pose - {image_file}")
    axes[idx].axis("off")

plt.tight_layout()
plt.show()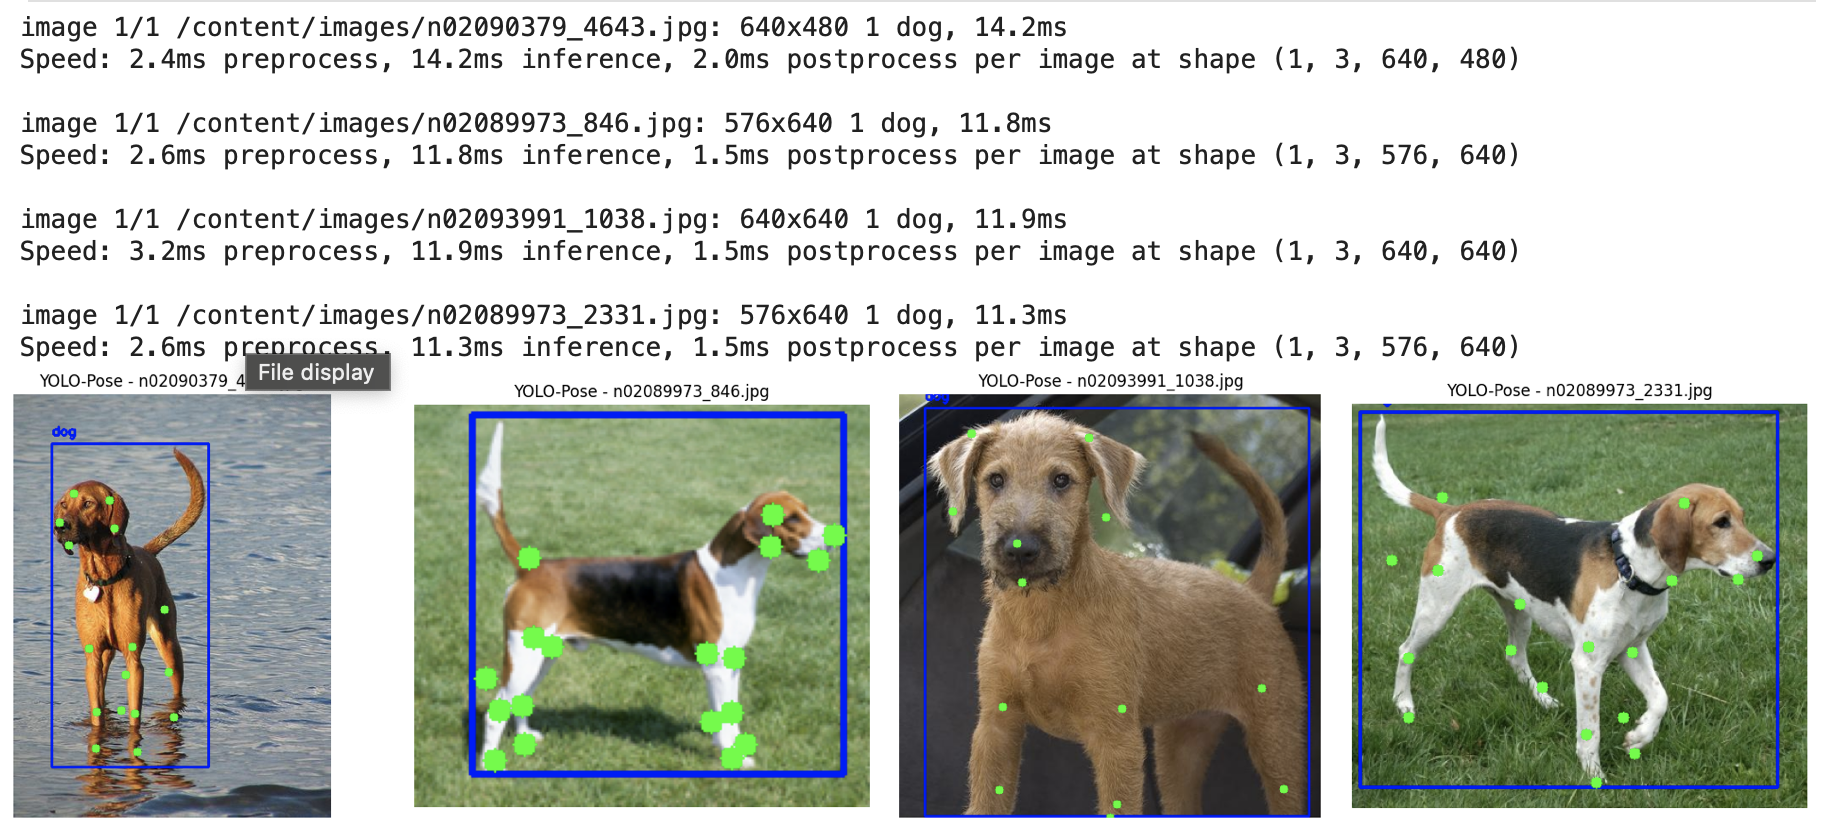
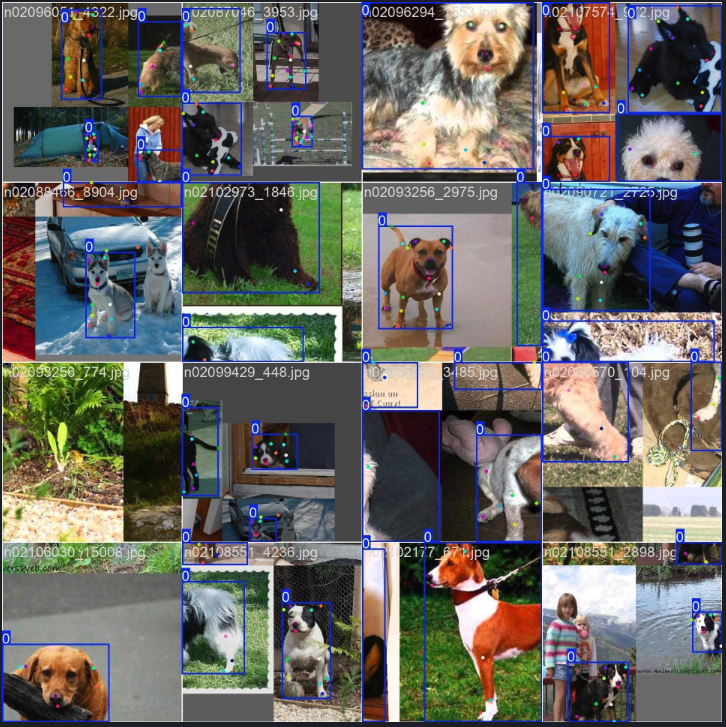
강아지인지 잘 인식하고, Key Point도 라벨링에 맞게 잘 찍히는 것을 확인했다.
2. dog-pose-costom.pt
이미 잘 학습된 dog-pose-best.pt 모델을 기반으로, 이 전에 전처리를 완료했던 default, sitting, lying 라벨링이 된 이미지로 재학습을 하였다.
(1) 커스텀 데이터셋 준비
(2) 학습
yaml 파일만 custom dataset을 바라보게 변경한 후, 기존에 작업했던 dog-pose-best.pt에다가 학습을 진행했다.
from ultralytics import YOLO

# Load a model
model = YOLO("/content/datasets/dog-pose-best.pt")

# Train the model
results = model.train(data="/content/datasets/dog-pose-custom.yaml", epochs=100, imgsz=640, patience=10, name="dog-pose-custom")
(3) 테스트
from ultralytics import YOLO
import cv2
import os
import random
import matplotlib.pyplot as plt

model = YOLO("runs/pose/dog-pose-custom2/weights/best.pt")

image_folder = "images"
all_image_files = [f for f in os.listdir(image_folder) if f.lower().endswith(('.jpg', '.png'))]

num_samples = 8
sample_files = random.sample(all_image_files, num_samples) if len(all_image_files) >= num_samples else all_image_files

fig, axes = plt.subplots(2, 4, figsize=(10, 5))
axes = axes.flatten()

for idx, image_file in enumerate(sample_files):
    image_path = os.path.join(image_folder, image_file)
    image = cv2.imread(image_path)
    if image is None:
        continue

    # verbose=False로 설정해 로그 최소화
    results = model.predict(source=image_path, verbose=False)

    for result in results:
        for i, (box, keypoints) in enumerate(zip(result.boxes.xyxy, result.keypoints.xy)):
            x1, y1, x2, y2 = map(int, box)
            class_id = int(result.boxes.cls[i])
            label = model.names.get(class_id, str(class_id))

            cv2.rectangle(image, (x1, y1), (x2, y2), (255, 0, 0), 2)
            label_x = x1 + 5
            label_y = y1 + 20
            cv2.putText(image, label, (label_x, label_y), cv2.FONT_HERSHEY_SIMPLEX, 0.7, (255, 0, 0), 2)

            for x, y in keypoints:
                if x > 0 and y > 0:
                    cv2.circle(image, (int(x), int(y)), 5, (0, 255, 0), -1)

    image_rgb = cv2.cvtColor(image, cv2.COLOR_BGR2RGB)
    axes[idx].imshow(image_rgb)
    axes[idx].set_title(f"YOLO11n-dog-pose-custom - {image_file}", fontsize=6)
    axes[idx].axis("off")

plt.tight_layout()
plt.show()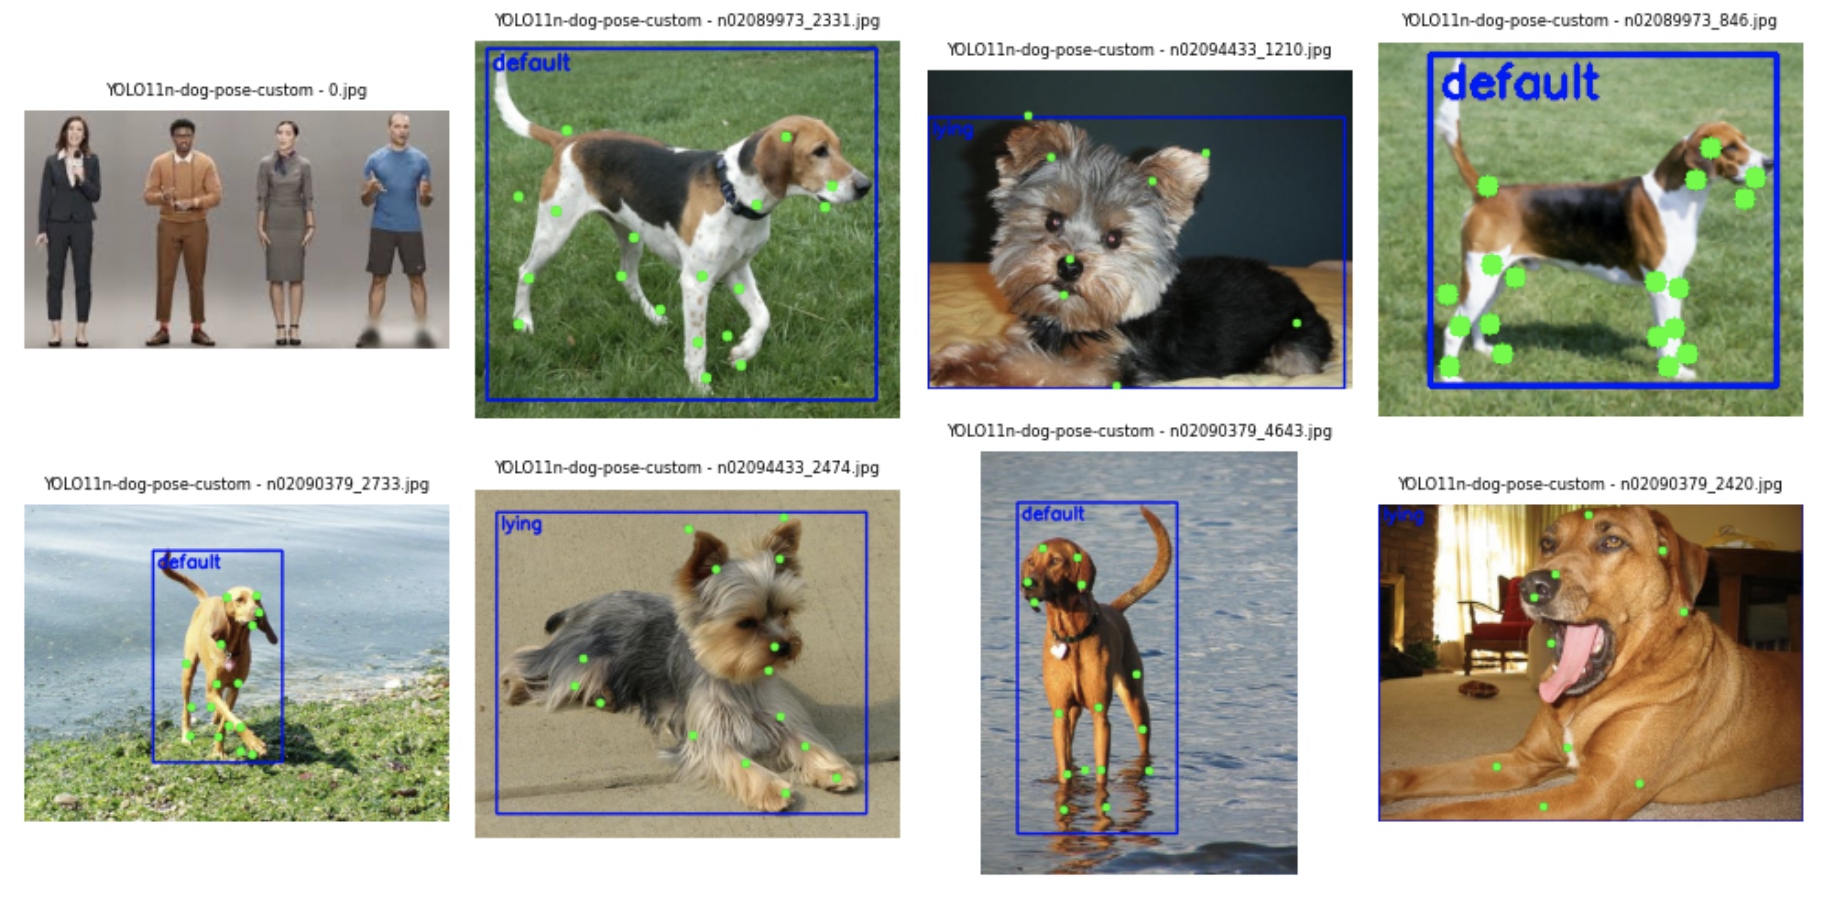
아, 생각했던 것보다 훨~~씬 잘나와서 놀랐다...!
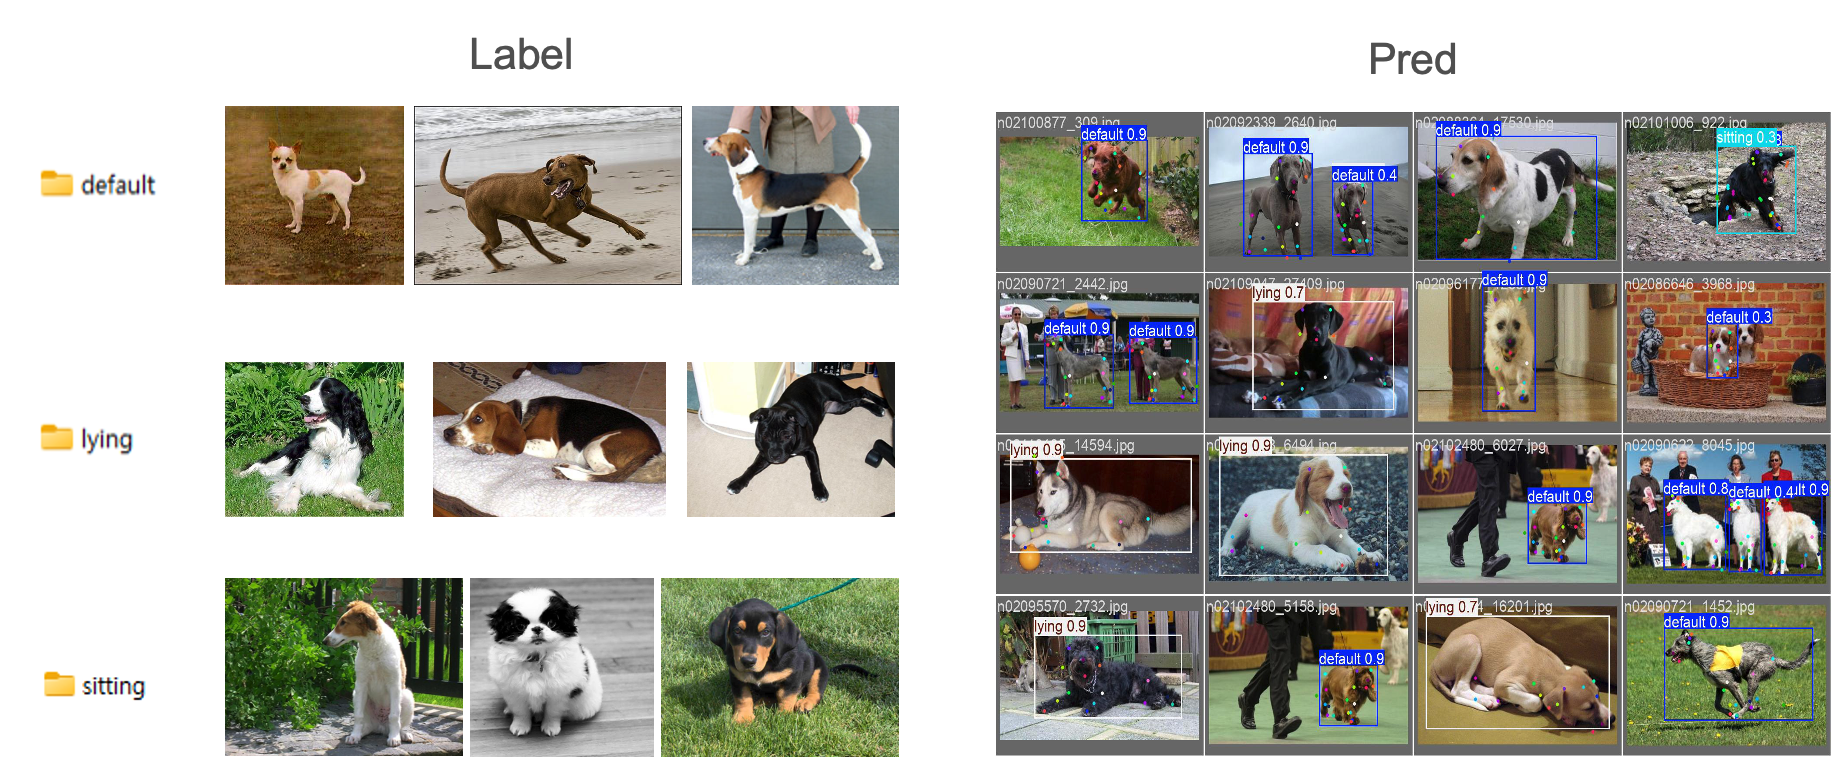
전체 예측 중 약 95% 이상이 정확하게 판별되었으며, 나머지 5%는 ‘엎드려’ 자세에 대한 라벨링 기준이 사전에 충분히 협의되지 않아 오차가 발생했다.
생각보다 Ultralytics에서 제공하는 dog-pose 데이터셋의 품질이 좋아서 시간을 많이 세이브할 수 있었다. 하지만, 아직 간식배급기와 젯슨자비에 최적화는 시작도 하지 않았기 때문에 모델은 이정도로 마무리 하고, 장비 만드는데에 전념하기로 했다..!
머신
1. 간식배급기
(1) HW
정말 고민이 많았던 부분이다. 간식 배급기를 찾아보려고 알리익스프레스에 들어가서 알아보고 했지만, 알리는 기본적으로 한 달이라는 긴 배송시간을 요구한다. 우리에겐 시간이 없었다.
결국, 직접 제작하기로 결정하였다.
학원 1층 주차장에 있는 분리배출구역에 찾아가서 괜찮은 목재를 가져오고, 근처 문구점에 가서 찍찍이와 목공용 풀 등을 구매했다.
그리하여 완성된 우리의 간식배급기...
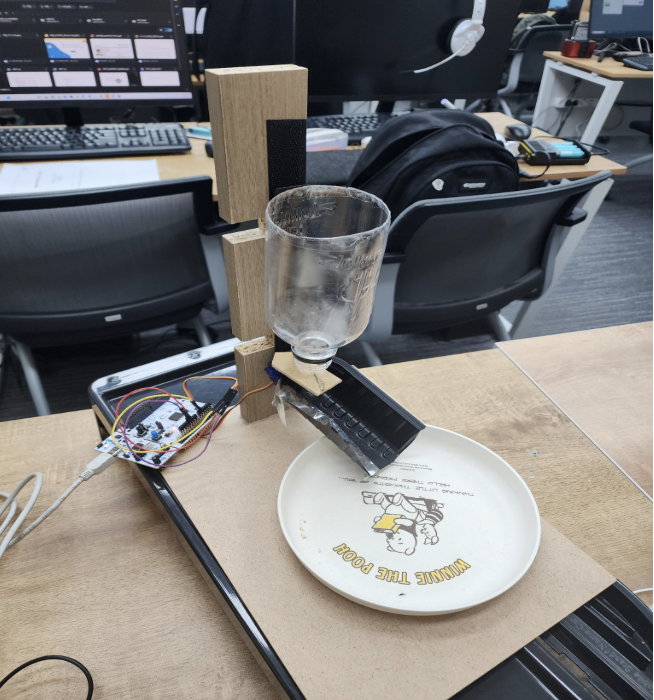
엉성해 보이지만 ... 🙈
나름 열심히 만든 동구의 자동 간식 배급기이다..!
(2) SW
그럴싸(?)한 간식배급기도 완성했으니 ...
이제 진짜 간식이 나오려면
Jetson Xavie에서 특정 신호를 보낸 후에 SG90 서보 모터를 움직여야했다.
#include "main.h"

TIM_HandleTypeDef htim2;
UART_HandleTypeDef huart2;

volatile uint8_t is_open = 0;
uint8_t rx_data;

void Servo_Write(uint8_t angle) {
    uint16_t pulse = 500 + (angle * 2000) / 180;
    __HAL_TIM_SET_COMPARE(&htim2, TIM_CHANNEL_2, pulse);
}

void HAL_GPIO_EXTI_Callback(uint16_t GPIO_Pin) {
    if (GPIO_Pin == B1_Pin) {
        is_open = !is_open;
        Servo_Write(is_open ? 45 : 0);
    }
}

int main(void) {
    HAL_Init();
    SystemClock_Config();

    MX_GPIO_Init();
    MX_USART2_UART_Init();
    MX_TIM2_Init();

    HAL_TIM_PWM_Start(&htim2, TIM_CHANNEL_2);
    Servo_Write(45);

    while (1) {
        if (HAL_UART_Receive(&huart2, &rx_data, 1, 10) == HAL_OK) {
            if (rx_data == '1') {
                Servo_Write(20);
                HAL_Delay(500);
                Servo_Write(45);
            }
        }
        HAL_Delay(10);
    }
}
2. TTS
간식배급기도 만들었으니, 이제는 음성이 필요했다.
그래서 TTS를 지원하는 서비스를 이용했다.
사람의 감정이 좀 풍부하게 들어갔으면 좋겠어서
TTS 서비스는 ElevenLabs를 사용해보았다.
import os
import tempfile
import pygame
from elevenlabs import ElevenLabs
from dotenv import load_dotenv, find_dotenv
import tempfile

# API Key 직접 설정
load_dotenv()
ELEVENLABS_API_KEY = os.getenv("ELEVENLABS_API_KEY")
VOICE_ID = "uyVNoMrnUku1dZyVEXwD"

# ElevenLabs 클라이언트 초기화
client = ElevenLabs(api_key=ELEVENLABS_API_KEY)

# 테스트할 문장 리스트
test_sentences = [
    "동구야 이리와~!",

    "동구야~ 이리와아~!!",
    "동구야~ 이리와아~!!"

    "착하지~ 앉아~",
    "앉아~"

    "엎드려~!",
    "엎드려!!"

    "우와~ 동구야 잘했어~!!"
]

# 보이스 세팅 값 여러 조합 시도 가능
voice_settings = {
    "stability": 0.2,
    "similarity_boost": 0.8,
    "style": 0.9
}

# 재생 함수
def play_voice(text):
    audio_stream = client.text_to_speech.convert(
        text=text,
        voice_id=VOICE_ID,
        model_id="eleven_multilingual_v2",
        voice_settings=voice_settings
    )
    audio_bytes = b"".join(chunk for chunk in audio_stream)

    with tempfile.NamedTemporaryFile(delete=False, suffix=".mp3") as temp_audio:
        temp_audio.write(audio_bytes)
        audio_path = temp_audio.name

    pygame.mixer.init()
    pygame.mixer.music.load(audio_path)
    pygame.mixer.music.play()
    while pygame.mixer.music.get_busy():
        pygame.time.Clock().tick(10)
    pygame.mixer.quit()

    os.remove(audio_path)

# 실행
if __name__ == "__main__":
    print("📣 테스트용 TTS 음성 재생 중...")
    for idx, sentence in enumerate(test_sentences):
        print(f"\n▶️ 문장 {idx+1}: {sentence}")
        play_voice(sentence)
    print("✅ 모든 문장 재생 완료!")
코드를 다 짜고 난 후에 ... 팀원들끼리 얘기를 하면서 의문이 제기됐다.
"강아지 훈련 보조 장치를 실제로 판매한다면?" 이라는 관점에서 다시 접근했다.
인터넷 연결이 필요하다는 점 → Wi-Fi 모듈이 있어야 하고
명령 입력 장치도 필요하지만, 강아지가 쓰는 기계에 키보드를 붙일 순 없었다
사용자 입력을 받기 위해 Whisper 기반 STT 음성 인식도 고민했지만,
비용, 네트워크 안정성, 마이크 수음 범위 문제 등 복잡성이 급격히 증가했다
그래서 다시 원점으로 돌아가,
이 프로젝트는 제품이 아니라 동구를 위한, 동구만을 위한
아주 사적인 훈련 파트너라는 컨셉에 집중했다.
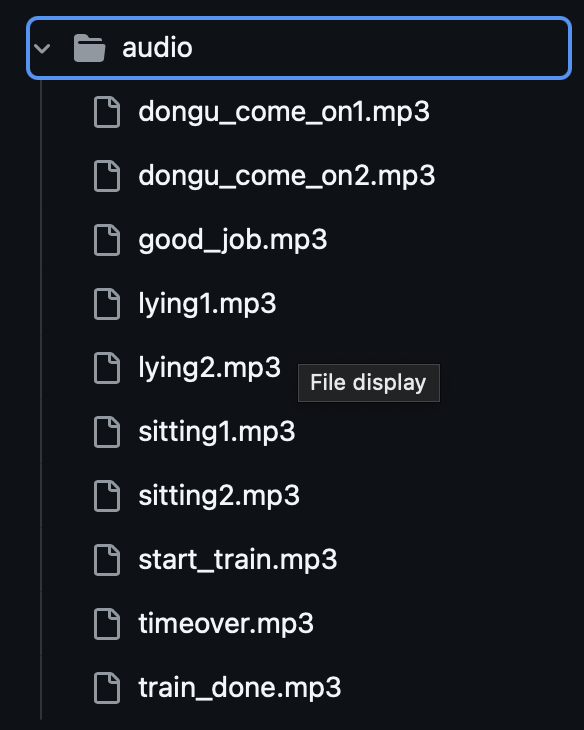
TTS에서 지원해주는 음성으로 파일을 만들어서 로컬에 저장했다.
3. Jetson Xavie 최적화
드디어 모델을 Jetson Xavie로 최적화를 할 때가 왔다.
학습은 그냥저냥 Colab으로 돌려서 진행했지만, 이제는 실제 장비에서 GPU로 추론을 해야할 때가 왔다.
하지만, 최적화 과정은 쉽지 않았다.
우리가 사용하고 있던 Jetson Xavie에 설치되어있던 ubuntu OS 환경이 좀 불안정하다는 느낌을 받았다. 😩
이 전에 사용했던 누군가에 의해 OS 손상이 온 것 같아서 강사님께 여쭤보니, 강사님께서 쓰시던 Xavie도 비슷한 증상이 있어서 OS 재설치를 하셨단다...!
OS를 변경했는데도 라이브러리 버전을 맞추는 게 쉽지가 않아,
결국 강사님의 도움을 받아서 가장 최적화된 버전들을 갈아끼우는 작업을 했다.
sudo apt install python3- version: Python 3.8.10
🚀 version: Python 3.8.10
✅ pip
sudo apt install python3-pip- version: pip 20.0.2
🚀 version: pip 20.0.2
☑️ pytorch
- https://forums.developer.nvidia.com/t/pytorch-for-jetson/72048
- 위에 링크에서 JetPack 5 Pytorch v2.0.0 wheel 다운로드
https://forums.developer.nvidia.com/t/pytorch-for-jetson/72048
☝️ 위 링크에서 JetPack 5 Pytorch v2.0.0 wheel 다운로드
( jetpack v5.1.5에 맞는 최신 안정화 버전 )
# sudo apt show nvidia-jetpack 명령어로 jetpack 버전 확인 -> 5.1.5-b11
@@ -24,4 +25,8 @@ pip install ~/Download/torch-2.0.0+nv23.05-cp38-cp38-linux_aarch64.whl
### ☑️ **pyserial**
```bash
pip install pyserial
# ⚠️ Arduino Uno /dev/ttyACM0 Permission denied 해결
sudo setfacl -m u:nvidia:rw /dev/ttyACM0문서에 차곡차곡 정리하면서 하다 보니, 어느새 최적화가 잘 되어 원활하게 서비스가 돌아갔다!
아래는 관련 코드이다.
[tensorrt_yolo.py]
import os
import cv2
import numpy as np
import pycuda.driver as cuda
import tensorrt as trt
import atexit  # context 정리용

# 설정값
BASE_DIR = os.path.dirname(os.path.dirname(os.path.abspath(__file__)))
MODEL_PATH = os.path.join(BASE_DIR, "model", "dongguya.engine")
IMG_SIZE = 640
NUM_KEYPOINTS = 24
NUM_CLASSES = 3

# TensorRT 로깅
TRT_LOGGER = trt.Logger(trt.Logger.WARNING)

# 0. CUDA 초기화 및 context 생성
cuda.init()
device = cuda.Device(0)
cuda_context = device.make_context()
atexit.register(cuda_context.pop)  # 안전한 종료 시 context 반납

# 1. 엔진 로딩
def load_engine(engine_path):
    with open(engine_path, "rb") as f, trt.Runtime(TRT_LOGGER) as runtime:
        return runtime.deserialize_cuda_engine(f.read())

engine = load_engine(MODEL_PATH)
if engine is None:
    raise RuntimeError("TensorRT 엔진 로딩 실패")

context = engine.create_execution_context()

# 2. CUDA I/O 메모리 설정
input_shape = (1, 3, IMG_SIZE, IMG_SIZE)
output_shape = (1, (4 + NUM_CLASSES + NUM_KEYPOINTS * 3), 8400)  # (1, 79, 8400)

input_dtype = trt.nptype(engine.get_binding_dtype(0))
output_dtype = trt.nptype(engine.get_binding_dtype(1))

input_nbytes = int(np.prod(input_shape) * np.dtype(input_dtype).itemsize)
output_nbytes = int(np.prod(output_shape) * np.dtype(output_dtype).itemsize)

d_input = cuda.mem_alloc(input_nbytes)
d_output = cuda.mem_alloc(output_nbytes)
bindings = [int(d_input), int(d_output)]

# 3. 전처리 함수
def preprocess_frame(frame):
    img = cv2.cvtColor(frame, cv2.COLOR_BGR2RGB)
    img = cv2.resize(img, (IMG_SIZE, IMG_SIZE))
    img = img.astype(np.float32) / 255.0
    img = img.transpose(2, 0, 1)
    img = np.expand_dims(img, axis=0)
    return img  # 여기서는 float32로 유지

# 4. 후처리 함수
def postprocess(output, orig_shape, conf_thres=0.5, iou_thres=0.5):
    preds = output.reshape((4 + NUM_CLASSES + NUM_KEYPOINTS * 3, 8400)).T
    cls_conf = preds[:, 4:4 + NUM_CLASSES]
    cls_scores = cls_conf.max(axis=1)
    cls_ids = cls_conf.argmax(axis=1)
    mask = cls_scores > conf_thres
    if not np.any(mask):
        return []

    boxes = preds[mask, :4]
    scores = cls_scores[mask]
    classes = cls_ids[mask]
    keypoints = preds[mask, 4 + NUM_CLASSES:].reshape(-1, NUM_KEYPOINTS, 3)

    xy = boxes[:, :2] - boxes[:, 2:] / 2
    wh = boxes[:, :2] + boxes[:, 2:]
    boxes_xyxy = np.concatenate((xy, wh), axis=1)

    # 간단한 NMS
    keep = []
    idxs = scores.argsort()[::-1]
    while len(idxs) > 0:
        current = idxs[0]
        keep.append(current)
        if len(idxs) == 1:
            break
        ious = compute_iou_np(boxes_xyxy[current], boxes_xyxy[idxs[1:]])
        idxs = idxs[1:][ious < iou_thres]

    results = []
    h, w = orig_shape
    scale = np.array([w / IMG_SIZE, h / IMG_SIZE, w / IMG_SIZE, h / IMG_SIZE])
    for i in keep:
        box = boxes_xyxy[i] * scale
        kps = keypoints[i]
        kps[:, 0] *= w / IMG_SIZE
        kps[:, 1] *= h / IMG_SIZE
        results.append({
            "box": box.astype(int).tolist(),
            "score": float(scores[i]),
            "class": int(classes[i]),
            "keypoints": kps
        })
    return results

# IoU 계산 함수
def compute_iou_np(box1, boxes2):
    x1 = np.maximum(box1[0], boxes2[:, 0])
    y1 = np.maximum(box1[1], boxes2[:, 1])
    x2 = np.minimum(box1[2], boxes2[:, 2])
    y2 = np.minimum(box1[3], boxes2[:, 3])
    inter = np.maximum(x2 - x1, 0) * np.maximum(y2 - y1, 0)
    area1 = (box1[2] - box1[0]) * (box1[3] - box1[1])
    area2 = (boxes2[:, 2] - boxes2[:, 0]) * (boxes2[:, 3] - boxes2[:, 1])
    union = area1 + area2 - inter
    return inter / (union + 1e-6)

# 5. 추론 함수
def infer(frame):
    orig_shape = frame.shape[:2]
    img_input = preprocess_frame(frame)
    img_input = img_input.astype(input_dtype, copy=False)
    img_input = np.ascontiguousarray(img_input)

    context.set_binding_shape(0, input_shape)

    print("[DEBUG] Input Shape to set:", input_shape)
    print("[DEBUG] Actual binding shape:", context.get_binding_shape(0))
    print("[DEBUG] Input dtype:", input_dtype)
    print("[DEBUG] Output dtype:", output_dtype)
    print("[DEBUG] Input max:", img_input.max(), "min:", img_input.min(), "NaN:", np.isnan(img_input).any())

    cuda.memcpy_htod(d_input, img_input)
    output = np.zeros(output_shape, dtype=output_dtype)
    context.execute_v2(bindings)
    cuda.memcpy_dtoh(output, d_output)

    print("[DEBUG] Output max:", output.max(), "min:", output.min(), "mean:", output.mean())
    print("[DEBUG] Output contains NaN:", np.isnan(output).any())

    return postprocess(output, orig_shape)
[tensorrt_detector.py]
import os
import random
import time
import cv2
from utils.audio import speak
from logic.tensorrt_yolo import infer # TensorRT 기반 추론 함수만 사용
# 클래스 라벨 정의
class_labels = ["default", "sitting", "lying"]
# 명령 설정
command_config = {
"앉아": {
"label": 1,
"audios": ["sitting1.mp3", "sitting2.mp3", "sitting2.mp3", "sitting1.mp3"]
},
"엎드려": {
"label": 2,
"audios": ["lying1.mp3", "lying2.mp3", "lying2.mp3", "lying1.mp3"]
}
}
# 명령 선택 및 오디오 출력
def choose_command():
command = random.choice(list(command_config.keys()))
for audio in command_config[command]["audios"]:
speak(audio)
return command, command_config[command]["label"]
# 실시간 추론 및 자세 유지 검증
def detect_and_verify(cap, target_label_id, hold_sec=1, timeout_sec=60):
start_time = None
training_start_time = time.time()
while time.time() - training_start_time < timeout_sec:
ret, frame = cap.read()
if not ret:
break
detections = infer(frame)
for det in detections:
x1, y1, x2, y2 = det["box"]
label = class_labels[det["class"]]
conf = det["score"]
kp = det["keypoints"]
cv2.rectangle(frame, (x1, y1), (x2, y2), (0, 255, 0), 2)
cv2.putText(frame, f"{label}: {conf:.2f}", (x1, y1 - 10),
cv2.FONT_HERSHEY_SIMPLEX, 0.7, (0, 255, 0), 2)
for x, y, p in kp:
if p > 0.5:
cv2.circle(frame, (int(x), int(y)), 3, (0, 0, 255), -1)
detected = any(det["class"] == target_label_id for det in detections)
if detected:
if start_time is None:
start_time = time.time()
elif time.time() - start_time >= hold_sec:
return True
else:
start_time = None
if os.environ.get("DISPLAY"):
cv2.imshow("Dog Pose Detection", frame)
if cv2.waitKey(1) & 0xFF == ord('q'):
return False
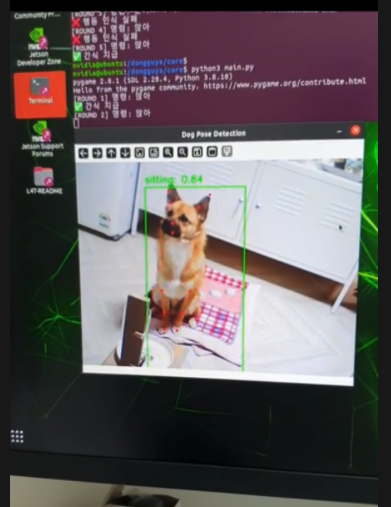
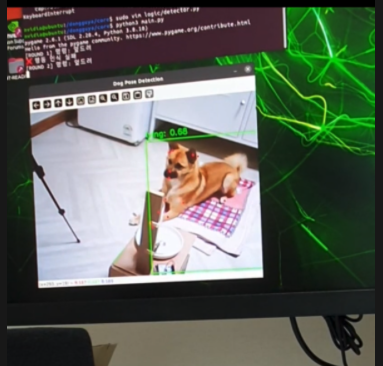
return False평가
우리의 주인공 동구가 직접 시연영상을 찍어줬다.
처음에는 기계를 많이 어색해하고 그랬었는데, 거의 매일 매일 기계로 테스트를 하다 보니 친숙해졌는지 "동구야~ 이리와~" 하면 와준다 ㅎㅎ
'앉아' 테스트
'엎드려' 테스트
회고
이번 프로젝트는 실제로 내가 설계하고 제작한 장비가 동작하는 것을 직접 확인했다는 점에서 매우 의미 있는 경험이었다.
단순한 프로토타입 구현을 넘어, 실제 하드웨어 제어, 포즈 인식, 음성 출력, 보상 메커니즘까지 전체 흐름이 유기적으로 작동했다는 점에서 높은 완성도를 갖춘 프로젝트였다.
무엇보다 ‘동구’를 위한 커스터마이징된 인터랙션 설계를 통해, AI와 실제 반려동물이 상호작용하는 자연스러운 구조를 구현하려는 시도 자체가 재밌었다.
초기에는 해당 시스템을 기반으로 훈련 보조용 스마트 반려기기 사업화도 고민했었다.
하지만 실제 구현 시 현실적인 장비 제약을 마주했다.
고성능 임베디드 디바이스(Jetson Xavier 등)의 부품 원가 부담
음성 합성/출력/추론 등 복합 기능 구현에 따른 전력/발열/사이즈 이슈
사용자의 입력 편의성을 위한 인터페이스(예: 음성 명령 STT 등) 부재
물론 스마트폰 기반 대체 솔루션도 고려해봤지만,‘집에 사람이 없을 때, 강아지가 외롭지 않도록’이라는 원래의 컨셉을 유지하려면 완전 자율형 독립 디바이스 형태가 더 적합하다고 판단했다.
장비 단가가 낮아지고, 소형화된 AI 모듈이 보급된다면, 해당 시스템은 다음과 같이 확장 가능할 것이다.
STT 기능 추가 → 사용자의 명령을 실시간으로 인식하여 반영
자동 피드백 학습 기능 → 강아지의 행동 패턴에 따라 적응형 보상 조절
모바일 연동 → 보호자의 외출 시 원격으로 반려동물과 상호작용 가능
향후 기술 발전 및 하드웨어 가격 안정화가 이루어진다면, 단순한 훈련 보조기를 넘어, 진정한 의미의 "스마트 반려 인터랙션 기기"로 진화시킬 수 있을 것이라 기대된다.
딱 한 살 짜리가 프로젝트에도 동참해주고 너무 고마웠다~ 동구 사랑해 😍