Swift 공식 문서의 네 번째 단원인 Collection Types (컬렉션 타입)를 읽고 정리를 해보려고 합니다.
Swift Apple 공식 문서 4챕터 Collection Types
Collection Types
-
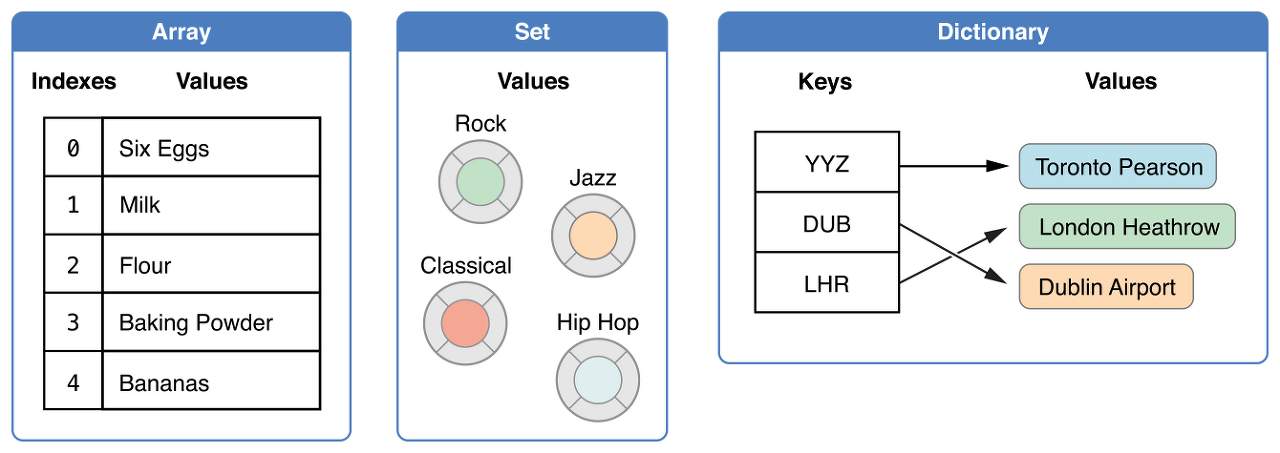
Swift는 여러 값들을 저장하기 위해 Array, Set, Dictionary라는 collection type(컬렉션 타입)을 제공한다.
-
Array(배열)은 순서대로 값을 모은 것이고 Set(집합)은 순서가 없는 값들을 모은 것이다.
-
Dictonary는 key-value 쌍을 순서 없이 모은 것이다.

위의 그림은 Swift 공식 문서에서 컬렉션 타입의 이해를 돕기 위해 제공하는 그림이다.
Swift의 Array, Set, Dictionary에 저장되는 값은 항상 명확한 타입을 가지고 있어야 한다.
만약 Int 자료형을 저장하는 Array에 String 타입의 값을 넣으려고 하면 오류가 발생한다.
Mutability of Collections
개발자가 Array, Set, Dictionary를 만들어 변수에 할당하면 해당 컬렉션들은 모두 변경 가능하다.
즉 값을 추가, 제거, 변경할 수 있다는 말이다.
하지만 만약 개발자가 let으로 컬렉션을 선언하면, 즉 상수에 할당하면 값을 추가, 제거, 변경이 불가능하게 된다.
Arrays
- Array는 같은 타입의 값들을 순서대로 저장하는 것을 말한다.
- Array에서는 중복된 값이 여러 장소에 존재할 수 있다.
Array Type Shorthand Syntax
- Swift에서 배열은 Array로 표현할 수 있으며 Element에는 저장할 값들의 타입을 쓰면 된다.
[Element]로 배열을 생성할 수도 있다.
Creating an Empty Array
var someInts = [Int]()
print("someInts is of type [Int] with \(someInts.count) items.")
// Prints "someInts is of type [Int] with 0 items."
빈 Array를 생성자를 통해 생성할 수 있다.
즉 someInts 변수에는 Int형을 저장할 수 있는 빈 Array이 할당되는 것이다.
어떠한 값을 Array에 넣을 땐 append() 메서드를 사용할 수 있는데, 만약 someInts Array에 값을 넣은 뒤 []로 초기화해도 someInts는 여전히 Int형 만 넣을 수 있는 Array이다.
someInts.append(3)
// someInts now contains 1 value of type Int
someInts = []
// someInts is now an empty array, but is still of type [Int]
Creating an Array with a Default Value
- Swift의 Array는 모든 값이 동일한 값으로 존재하게 만드는 생성자를 제공한다.
생성자의 repeating에는 어떠한 값을 동일하게 넣을 것인지를 count에는 몇 개의 값을 생성할 것인지를 명시해 주면 Array가 생성된다.
var threeDoubles = Array(repeating: 0.0, count: 3)
// threeDoubles is of type [Double], and equals [0.0, 0.0, 0.0]
Creating an Array by Adding Two Arrays Together
- Array에서 + 연산자를 사용해서 두 개의 Array를 하나의 새로운 Array로 만들 수 있다.
물론 합쳐지는 두 개의 Array는 같은 타입을 저장하는 Array 여야 한다.
var threeDoubles = Array(repeating: 0.0, count: 3)
// threeDoubles is of type [Double], and equals [0.0, 0.0, 0.0]
var anotherThreeDoubles = Array(repeating: 2.5, count: 3)
// anotherThreeDoubles is of type [Double], and equals [2.5, 2.5, 2.5]

var sixDoubles = threeDoubles + anotherThreeDoubles
// sixDoubles is inferred as [Double], and equals [0.0, 0.0, 0.0, 2.5, 2.5, 2.5]
Creating a Array with an Array Literal
- Array는 Array Literal로도 생성할 수 있다.
var shoppingList: [String] = ["Eggs", "Milk"]
// shoppingList has been initialized with two initial items
위의 코드와 같이 Array를 생성할 수 있다.
물론 초기화 시킬 값들의 타입을 잘 준수해야 한다.
Swift에서는 타입 유추를 통해 Array를 생성할 때도 타입을 안 써줘도 알아서 Swift가 추론해서 타입을 정해준다.
var shoppingList = ["Eggs", "Milk"]Accessing and Modifying an Array
- Array의 메서드와 프로퍼티를 통해 Array를 살펴볼 수 있다.
print("The shopping list contains \(shoppingList.count) items.")
// Prints "The shopping list contains 2 items."
Array의 count 프로퍼티는 몇 개의 값이 저장되어 있는지 볼 수 있는 프로퍼티이다
if shoppingList.isEmpty {
    print("The shopping list is empty.")
} else {
    print("The shopping list is not empty.")
}
// Prints "The shopping list is not empty."
Array의 isEmpty 프로퍼티는 Array가 비어있는지를 확인해 주는데, 즉 count 프로퍼티가 0과 같은지 확인해 준다.
Array의 append(_:) 메서드를 통해 새로운 값을 추가할 수 있다.
shoppingList.append("Flour")
// shoppingList now contains 3 items, and someone is making pancakes
아까 Array에 + 연산자를 사용할 수 있다고 했는데 += 연산자도 가능하다.

shoppingList += ["Baking Powder"]
// shoppingList now contains 4 items
shoppingList += ["Chocolate Spread", "Cheese", "Butter"]
// shoppingList now contains 7 items
Array는 순서가 있는 데이터들의 모임이기 때문에 index로 접근이 가능하다.
Array의 index는 0부터 시작하며 접근할 때는 [index]를 사용하면 된다.
var firstItem = shoppingList[0]
// firstItem is equal to "Eggs"
물론 index로 접근해서 값을 변경할 수도 있다.
변경할 때 아래와 같이 다른 길이의 값들도 변경할 수 있다.
shoppingList[4...6] = ["Bananas", "Apples"]
// shoppingList now contains 6 items
4,5,6 index의 값들 즉 3개의 값들을 ["Bananas", "Apples"]라는 값으로 변경하란 것인데, 이렇게 되면 Array의 값의 개수도 1개 줄어들게 된다.
만약 값을 특정한 index에 삽입하고 싶다면 insert(_:at:) 메서드를 사용하면 된다.
shoppingList.insert("Maple Syrup", at: 0)
// shoppingList now contains 7 items
// "Maple Syrup" is now the first item in the list
특정 index의 값을 제거하고 싶다면 remove(at:) 메서드를 사용하면 된다. 이때 제거된 항목은 반환된다.
let mapleSyrup = shoppingList.remove(at: 0)
// the item that was at index 0 has just been removed
// shoppingList now contains 6 items, and no Maple Syrup
// the mapleSyrup constant is now equal to the removed "Maple Syrup" string
만약 insert, remove와 같은 메서드를 사용할 때 범위에서 벗어난 곳에 접근하면 런타임 에러를 발생시킨다.
만약 Array에서 특정 값이 아니고 맨 마지막 값을 삭제하고 싶다면 removeLast() 메서드를 사용하면 된다.
물론 removeLast() 메서드도 제거된 항목을 반환한다.
Iterating Over an Array
- Array는 for-in 구문을 사용해서 Array 안의 모든 값에 접근할 수 있다.
for item in shoppingList {
    print(item)
}
// Six eggs
// Milk
// Flour
// Baking Powder
// Bananas
만약 Array의 index가 필요하다면 enumerated() 메서드를 사용하면 index와 값을 함께 사용할 수 있다.
for (index, value) in shoppingList.enumerated() {
    print("Item \(index + 1): \(value)")
}
// Item 1: Six eggs
// Item 2: Milk
// Item 3: Flour
// Item 4: Baking Powder
// Item 5: Bananas
Sets
Set은 동일한 타입의 값이 순서 없이 저장된 것을 말한다. Set은 중복 값을 허용하지 않기 때문에 이러한 특징을 사용하는 곳에서는 Array 대신 Set을 사용하면 된다.
Hash Values for Set Types
Set에 저장되기 위해선 hash 할 수 있어야 한다. 여기서 사용되는 해시 값은 Int형이다. 즉 A와 B가 있을 때 A의 해시 값과 B의 해시 값이 같다면 A와 B는 같다고 볼 수 있다.
모든 Swift의 기본적인 타입 (String, Int, Double, Bool)은 해시 할 수 있고 set의 값이나 dictionary의 키값이 될 수 있다.
Set Type Syntax
- Set은 Set로 표현할 수 있고 Element는 Set에 저장될 값들의 타입이다.
Creating and Initalizing an Empty Set
- 비어있는 Set도 역시 생성자로 생성할 수 있다.
var letters = Set<Character>()
print("letters is of type Set<Character> with \(letters.count) items.")
// Prints "letters is of type Set<Character> with 0 items."
물론 Array와 마찬가지로 Set도 한 번 선언되면 빈 Set을 다시 주더라도 저장되는 타입은 바뀌지 않는다.
letters.insert("a")
// letters now contains 1 value of type Character
letters = []
// letters is now an empty set, but is still of type Set<Character>
Creating a Set with an Array Literal
- Set을 처음 만들 때 값이 존재하도록 만들 수 있다.
var favoriteGenres: Set<String> = ["Rock", "Classical", "Hip hop"]
// favoriteGenres has been initialized with three initial items
물론 이때도 var, let으로 구분되어 변수로 생성되면 추가, 삭제 등이 가능하고 상수로 생성되면 추가, 삭제 등이 불가능하다.
Set 도 저장되는 자료형을 꼭 써주지 않아도 Swift에서 잘 유추해 준다.
var favoriteGenres: Set = ["Rock", "Classical", "Hip hop"]Accessing and Modifying a Set
- Set에도 다양한 프로퍼티와 메서드가 존재한다.
Set의 count메서드는 Set 안에 몇 개의 값이 있는지를 볼 수 있는 프로퍼티이다.
print("I have \(favoriteGenres.count) favorite music genres.")
// Prints "I have 3 favorite music genres."
Set의 isEmpty는 Set의 count 값이 0인지를 확인하여 Bool 값으로 나타내는 프로퍼티이다.
if favoriteGenres.isEmpty {
    print("As far as music goes, I'm not picky.")
} else {
    print("I have particular music preferences.")
}
// Prints "I have particular music preferences."
Set에 새로운 값을 넣고 싶다면 insert(_:) 메서드를 사용하면 된다.
favoriteGenres.insert("Jazz")
// favoriteGenres now contains 4 items
Set에 있는 값을 제거하고 싶다면 remove(_:) 메서드를 사용하면 된다.
if let removedGenre = favoriteGenres.remove("Rock") {
    print("\(removedGenre)? I'm over it.")
} else {
    print("I never much cared for that.")
}
// Prints "Rock? I'm over it."
만약 모든 값을 제거하고 싶다면 removeAll() 메서드를 사용하면 된다.
Set에는 중복된 값을 허용하지 않기 때문에 contains(_:)로 어떠한 값이 있는지 확인할 수 있다. 결과는 Bool 값으로 반환된다.
if favoriteGenres.contains("Funk") {
    print("I get up on the good foot.")
} else {
    print("It's too funky in here.")
}
// Prints "It's too funky in here."
Iterating Over a Set
- Set도 for-in 구문으로 Set 속 모든 값에 접근할 수 있다.
for genre in favoriteGenres {
    print("\(genre)")
}
// Classical
// Jazz
// Hip hop
Set은 순서를 순서가 정의되어 있지 않지만 sorted() 메서드를 사용하면 < 연산자에 의한 대소 비교로 값들을 정렬할 수 있다.
for genre in favoriteGenres.sorted() {
    print("\(genre)")
}
// Classical
// Hip hop
// Jazz
Performing Set Operations
Set은 해석하면 집합으로 차집합, 합집합, 교집합 등의 개념을 사용할 수 있다.
Fundamental Set Operations
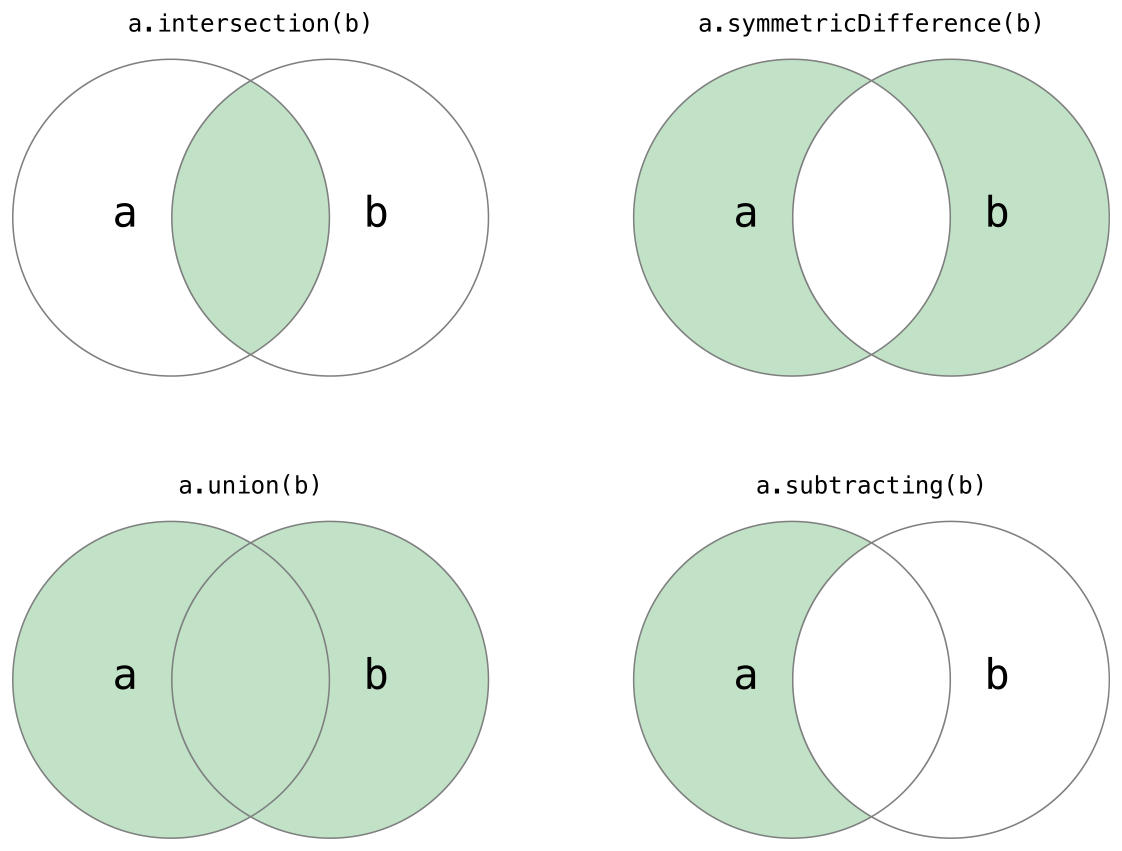
- Set에서 사용 가능 한 집합 연산 메서드들을 그림으로 표현한 것이다.

교집합(A∩B)
- intersection(_:) 메서드는 두 집합의 교집합을 구하여, 즉 두 집합에 모두 있는 값들을 모아 새로운 집합을 만든다.
대칭차집합(A△B)
- symmetricDifference(_:) 메서드는 두 개의 집합에서 교집합을 뺀 값들을 모아 새로운 집합을 만든다.
합집합 (A∪B)
- union(_:) 메서드는 두 개의 집합의 모든 값들로 새로운 집합을 만든다 (물론 중복된 값은 알아서 처리된다)
차집합(A-B)
- substracting(_:) 메서드는 차집합으로 지정된 집합에는 없는 값들을 제거한 새로운 집합을 만든다.
let oddDigits: Set = [1, 3, 5, 7, 9]
let evenDigits: Set = [0, 2, 4, 6, 8]
let singleDigitPrimeNumbers: Set = [2, 3, 5, 7]

oddDigits.union(evenDigits).sorted()
// [0, 1, 2, 3, 4, 5, 6, 7, 8, 9] -- 합집합
oddDigits.intersection(evenDigits).sorted()
// [] -- 교집합
oddDigits.subtracting(singleDigitPrimeNumbers).sorted()
// [1, 9] -- 차집합
oddDigits.symmetricDifference(singleDigitPrimeNumbers).sorted()
// [1, 2, 9] -- 대칭차집합
Set Membership and Equality

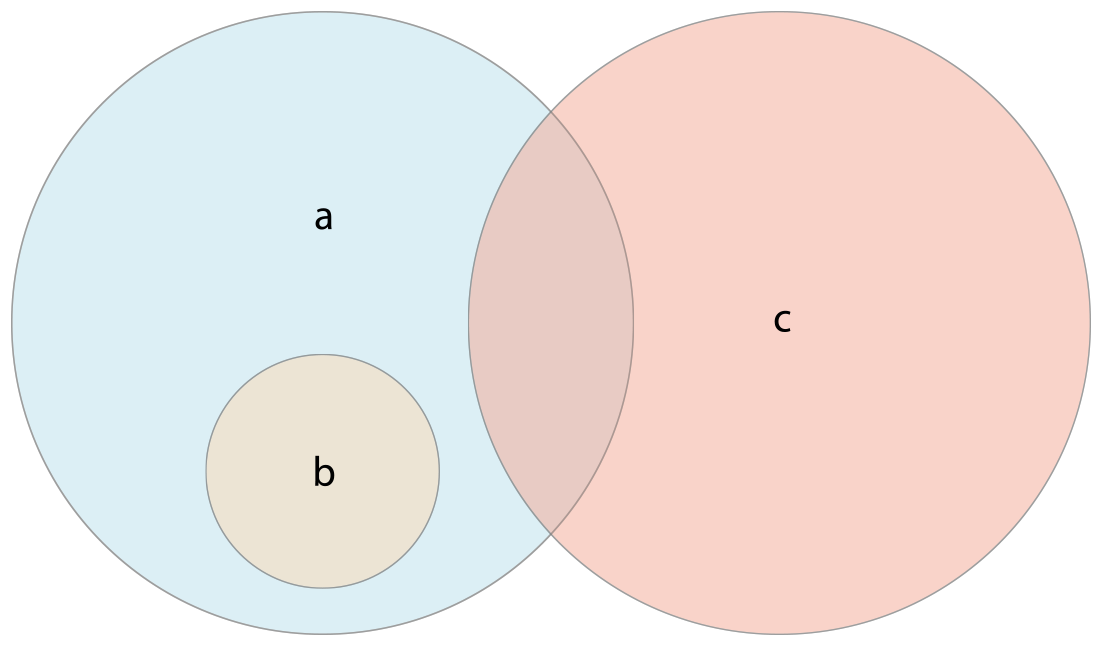
위 그림에서 a, b, c의 관계를 살펴보자
a는 b의 superset이라고 볼 수 있다. b의 모든 원소들이 a에 속하기 때문이다.
반대로 b는 a의 subset이라고 볼 수 있다. 역시 b의 모든 원소들이 a에 속하기 때문이다.
b, c는 하나도 겹치는 원소가 없는 것을 볼 수 있는데 이를 disjoint라고 한다.
Set에서 연산자 ==를 true로 반환시키기 위해선 비교되는 두 Set의 모든 원소가 같아야 한다.
isSubset(of:) 메서드를 사용하면 어떠한 set의 모든 원소를 특정 set이 가지고 있는지 확인해 준다.
즉 subset 인지 확인해 주는 것이다
isSuperset(of:) 메서드는 반대로 어떠한 set이 특정 set의 원소를 모두 가지고 있는지 확인해 준다.
즉 Supersetr인지 확인해 주는 것이다.
isStrictSubset(of:) 혹은 isStrictSuperset(of:)는 만약 어떤 Set이 특정 set의 subset 인지, superset이면서 같은 Set은 아닌지를 확인해 준다.
isDisjoint(with:) 메서드는 두 Set이 공통으로 가진 원소가 하나도 없는 것을 확인해 준다.
let houseAnimals: Set = ["🐶", "🐱"]
let farmAnimals: Set = ["🐮", "🐔", "🐑", "🐶", "🐱"]
let cityAnimals: Set = ["🐦", "🐭"]

houseAnimals.isSubset(of: farmAnimals)
// true
farmAnimals.isSuperset(of: houseAnimals)
// true
farmAnimals.isDisjoint(with: cityAnimals)
// true
Dictionaries
Dictionary는 key 값과 value 값의 쌍을 순서 없이 저장하는 타입이다.
모든 값들은 유일한 키값을 가지고 있다.
Dictionary Type Shorthand Syntax
Dictionary는 Dictionary<Key, Value>로 표현된다. 여기서 Key에는 Key 값의 타입, Value에는 Value 값의 타입을 써주면 된다. Dictionary를 [Key : Value]로 표현할 수도 있다. 물론 두 개의 표현방식은 같은 의미를 가진다.
Creating an Empty Dictionary
빈 Dictionary를 선언하기 위해 생성자를 사용하면 된다.
var namesOfIntegers = [Int: String]()
// namesOfIntegers is an empty [Int: String] dictionary
위에서 본 Set과 Array와 같이 Dictionary도 한 번 선언되었으면 빈 Dictionary가 된다고 해도 Key와 Value의 타입이 변하지 않는다. 빈 Dictionary는 [:]로 표현할 수 있다.
namesOfIntegers[16] = "sixteen"
// namesOfIntegers now contains 1 key-value pair
namesOfIntegers = [:]
// namesOfIntegers is once again an empty dictionary of type [Int: String]
Creating a Dictionary with a Dictionary Literal
Dictionary literal로도 Dictionary를 생성할 수 있다.
var airports: [String: String] = ["YYZ": "Toronto Pearson", "DUB": "Dublin"]Key : Value 형식으로 하나의 key-value 쌍을 만들 수 있고,로 구분하면 된다.
위와 같이 선언하면 2개의 key-value 쌍을 가진 Dictionary가 생성된다.
Dictionary에서도 타입을 써주지 않아도 알아서 Swift가 추론할 수 있게 만들면 오류가 발생되지 않는다.
var airports = ["YYZ": "Toronto Pearson", "DUB": "Dublin"]Accessing and Modifying a Dictionary
Dictionary에도 다양한 프로퍼티와 메서드들이 존재하고 이것들로 Dictionary의 여러 기능을 사용할 수 있다.
Dictionary의 count메서드는 Dictionary가 가지고 있는 key-value 쌍의 개수를 보여준다.
print("The airports dictionary contains \(airports.count) items.")
// Prints "The airports dictionary contains 2 items."
Dictionary의 isEmpty메서드는 Dictionary의 count 프로퍼티가 0인지에 대한 결과를 Bool 값으로 보여준다.
if airports.isEmpty {
    print("The airports dictionary is empty.")
} else {
    print("The airports dictionary is not empty.")
}
// Prints "The airports dictionary is not empty."
Dictionary에 새로운 값을 추가하고 싶다면 Key, Value 값을 모두 적어 추가할 수 있는데 추가 방법은 아래 코드와 같다. 물론 같은 방법으로 이미 존재하는 Key의 Value 값을 수정할 수도 있다.
airports["LHR"] = "London"
// the airports dictionary now contains 3 items
수정할 때 위의 방법 말고도 Dictionary의 updateValue(_:forKey:)로 수정할 수도 있다.
만약 이 메서드를 사용할 때 없는 Key에 대한 Value를 수정하려고 하면 수정이 아닌 생성을 하게 된다.
updateValue(_:forKey:) 메서드는 기존의 Value 값을 반환해 준다. 이때 반환되는 값은 옵셔널 값으로 반환된다.
즉 만약 String 값을 저장해뒀다면 String? 혹은 optional(String) 값을 반환한다. 만약 없는 Key 값에 Value 값을 변경하려고 했다면 nil을 반환한다.
if let oldValue = airports.updateValue("Dublin Airport", forKey: "DUB") {
    print("The old value for DUB was \(oldValue).")
}
// Prints "The old value for DUB was Dublin."
Dictionary에서 특정한 Key 값에 접근할 때 Key 값이 존재하지 않을 수 있기 때문에 늘 옵셔널 값으로 결과를 준다.
즉 존재하지 않는 Key 값에 접근하면 nil을 반환시켜주는 것이다.
이렇기 때문에 옵셔널 바인딩을 활용해서 Value 값을 추출해 줘야 한다.
if let airportName = airports["DUB"] {
    print("The name of the airport is \(airportName).")
} else {
    print("That airport is not in the airports dictionary.")
}
// Prints "The name of the airport is Dublin Airport."
만약 이미 존재하고 있는 Key 값의 Value를 nil로 수정하게 되면 이는 Key-Value 쌍의 삭제와 같은 효과를 보인다.
airports["APL"] = "Apple International"
// "Apple International" is not the real airport for APL, so delete it
airports["APL"] = nil
// APL has now been removed from the dictionary
nil로 수정하여 삭제하는 방법 말고도 Dictionary의 메서드 중 하나인 removeValue(forKey:)로 제거할 수 있다.
removeValue(forKey:) 함수도 삭제된 값을 반환해 주는데, 물론 존재하지 않는 Key-Value 쌍을 삭제하려고 하면 nil이 반환된다.
if let removedValue = airports.removeValue(forKey: "DUB") {
    print("The removed airport's name is \(removedValue).")
} else {
    print("The airports dictionary does not contain a value for DUB.")
}
// Prints "The removed airport's name is Dublin Airport."
Iterating Over a Dictionary
Dictionary도 for-in 구문으로 모든 값에 접근할 수 있다.
이때 Dictionary의 특징대로 key, value 두 개의 값을 모두 접근해야 하기 때문에 (key, value) 형태의 tuple로 반환된다.
for (airportCode, airportName) in airports {
    print("\(airportCode): \(airportName)")
}
// LHR: London Heathrow
// YYZ: Toronto Pearson
물론 tuple의 형태로 key, value 값 둘 다 받고 싶지 않다면 Dictionary의 keys, values 프로퍼티로 각각 접근할 수도 있다.
for airportCode in airports.keys {
    print("Airport code: \(airportCode)")
}
// Airport code: LHR
// Airport code: YYZ

for airportName in airports.values {
    print("Airport name: \(airportName)")
}
// Airport name: London Heathrow
// Airport name: Toronto Pearson
만약 Dictionary의 Key, Value 값을 각각 저장하고 싶다면 새로운 Array를 만들면 된다.
let airportCodes = [String](airports.keys)
// airportCodes is ["LHR", "YYZ"]

let airportNames = [String](airports.values)
// airportNames is ["London Heathrow", "Toronto Pearson"]
Swift의 Dictionary는 순서가 없기 때문에 만약 Key, Value 값들을 적절히 정렬하고 싶다면 sorted() 메서드를 사용하면 정렬 가능하다.
-Logo.wine.png)
