Building REST services with Spring #2
이어서
이전 포스트에는 Spring MVC를 이용하여 직원을 GET, POST, PUT, DELETE 해보았다.
없는 직원을 조회할 때에는 적절히 예외 처리를 통해 에러 페이지까지 띄어보았다.
하지만 /employees/3이나, 그저 GET, POST 등을 사용했다고 RESTful 하지 않다.
이제부터는 Spring HATEOAS를 이용하여 RESTful하게 코드를 수정해보겠다.
RESTful에 대한 개념은 https://wonit.tistory.com/454 참조
여기서 간단히 설명하자면, RESTful 서비스의 핵심은 관련 작업에 대한 링크를 추가하는 것이다.
Start
우선 HATEOAS를 사용하기 위해 아래 코드를 dependencies에 추가하자.
implementation 'org.springframework.boot:spring-boot-starter-hateoas'이제 본격적으로 수정을 해보자.
@GetMapping("/employees/{id}")
public EntityModel<Employee> getOne(@PathVariable Long id) {
	Employee employee = repository.findById(id).orElseThrow(() -> new EmployeeNotFoundException(id));

	return EntityModel.of(employee,
	linkTo( methodOn(EmployeeController.class).getOne(id) ).withSelfRel(),
	linkTo( methodOn(EmployeeController.class).getAll() ).withRel("employees"));
}
해당 튜토리얼은 Spring MVC를 기반하며
WebMvcLinkBuilder의 정적 메소드를 사용한다.
만약 Spring WebFlux를 기반으로 사용한다면WebFluxLinkBuilder클래스를 import 하자.
기존 코드와 달라진 점은, 기존에는 객체 자체를 body에 반환해주었다면 지금은 EntityModel<T>에 담아 반환한다.
EntityModel<T>는 데이터 뿐만 아니라 링크 collection도 포함하는 제너릭 컨테이너이다.
linkTo(methodOn(EmployeeController.class).getOne(id)).withSelfRel(): Spring HATEOAS에게EmployeeController에 있는getOne()메소드 자체의 link를 build 할 것을 요청한다.linkTo(methodOn(EmployeeController.class).getAll()).withRel("employees"): 위와 비슷하게 HATEOAS에게EmployeeController에 있는getAll()메소드의 link를 build 할 것을 요청한다.
이제 서버를 재실행 후, http://localhost:8080/employees/1로 접근해보자.
{"id":1,
 "name":"Kim",
 "role":"Student",
 "_links":{"self":{"href":"http://localhost:8080/employees/1"},
           "employees":{"href":"http://localhost:8080/employees"}}}
다음과 같이 결과가 바뀌는 것을 확인할 수 있다.
기존에 출력했던 객체 정보를 포함하여, 해당 객체와 관련된 href를 같이 반환하는 것이다.
이렇게 link를 JSON 방식으로 표현하는 것은 HAL를 사용하여 가능한 것이다.
HAL에 대한 정보는 이 글 참조
다음은 getAll()를 수정해자.
@GetMapping("/employees")
CollectionModel<EntityModel<Employee>> getAll() {
    List<EntityModel<Employee>> employees = repository.findAll().stream()
            .map(employee -> EntityModel.of(employee,
                    linkTo(methodOn(EmployeeController.class).getOne(employee.getId())).withSelfRel(),
                    linkTo(methodOn(EmployeeController.class).getAll()).withRel("employees")))
            .collect(Collectors.toList());

    return CollectionModel.of(employees, linkTo(methodOn(EmployeeController.class).getAll()).withSelfRel());
}CollectionModel<>: 단일이 아닌 여러 개의 EntityModel<>를 담기 위한 Spring HATEOAS의 하나의 container이다.
즉, resources collections의 캡슐화를 위한 container이다.
여기서는 employee resources들을 모아놓은 container라고 생각하면 된다.
이제 결과를 직접 눈으로 확인해보자.
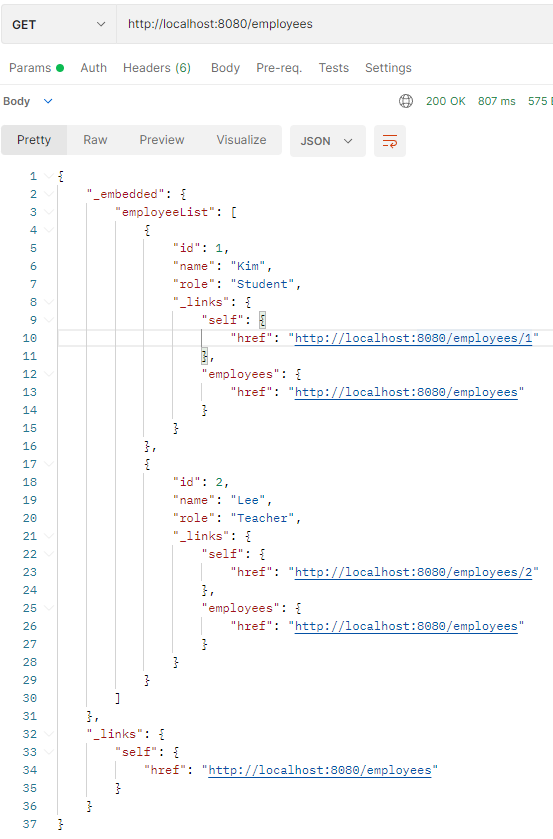
각 객체에 대한 정보, link들이 List 형식으로 들어가있다. 또한 list 자체의 link도 포함되어 있는 것을 볼 수 있다.
그런데 이 link들을 추가하는 이유는 무엇일까?
시간이 지남에 따라 서비스의 발전이 가능하기 때문이다. 기존 링크는 유지되고 새로운 링크는 나중에 추가할 수 있다.
새로운 고객은 새로운 링크를 활용할 수 있으며, 기존 고객은 이전 링크에서 유지 보수할 수 있다.
이것은 특히 서비스를 재배치하고 이동할 때 유용하다. 링크 구조가 유지되는 한, 클라이언트는 여전히 상호작용할 수 있다.
하지만, 위의 코드를 보면 코드가 중복되는 것을 볼 수 있다. 개발자라면 이것을 해결할 생각이 떠올라야 한다.
여기서 HATEOAS의 RepresentationModelAssembler 인터페이스를 사용하자.
package com.example.Payroll;

import org.springframework.hateoas.EntityModel;
import org.springframework.hateoas.server.RepresentationModelAssembler;
import org.springframework.stereotype.Component;

import static org.springframework.hateoas.server.mvc.WebMvcLinkBuilder.linkTo;
import static org.springframework.hateoas.server.mvc.WebMvcLinkBuilder.methodOn;

@Component
public class EmployeeModelAssembler implements RepresentationModelAssembler<Employee, EntityModel<Employee>> {

    @Override
    public EntityModel<Employee> toModel(Employee employee) {
        return EntityModel.of(employee,
                linkTo(methodOn(EmployeeController.class).getOne(employee.getId())).withSelfRel(),
                linkTo(methodOn(EmployeeController.class).getAll()).withRel("employees"));
    }
}RepresentationModelAssembler에 있는 toModel()를 사용하자.
이 메소드는 non-model object(Employee)를 model-based object(EntityModel<Employee>)로 바꿔준다.
Spring HATEOAS의 모든 model에 대한 추상적 기본 클래스는
RepresentationModel이다. 하지만 단순성을 위해,EntityModel<T>를 사용하는 것을 권장한다.
이제 이 클래스를 사용하려면, EmployeeController에 필드를 만들어 생성자 주입을 해주자.
우리는 Lombok을 사용
그 다음, 기존 코드를 간소화하자.
@GetMapping("/employees/{id}")
public EntityModel<Employee> getOne(@PathVariable Long id) {
	Employee employee = repository.findById(id).orElseThrow(() -> new EmployeeNotFoundException(id));
    return assembler.toModel(employee);
}@GetMapping("/employees")
CollectionModel<EntityModel<Employee>> getAll() {
List<EntityModel<Employee>> employees = repository.findAll().stream().map(assembler::toModel).collect(Collectors.toList());
return CollectionModel.of(employees, linkTo(methodOn(EmployeeController.class).getAll()).withSelfRel());
}여기까지해서 실제 하이퍼미디어 기반 content를 생성하는 Spring MVC REST Controller를 만들어 보았다.
다음에는 좀 더 발전시켜보자.