개요
- tomcat 을 통한 서비스를 제공하고 있고 서버는 이중화되어 있는 상태이다. 하지만 사용자가 페이지에 접근하여 사용을 하면서 로그인이 끊어지는 이슈를 겪고 있으며 tomcat 의 catalina.out 과 access.log 로그를 확인해보니 1번서버 -> 2번서버로 넘어가면서 문제가 발생하였다. 이를 해결하기 위해 세션을 고정 시킬 필요가 있는 것으로 판단하였고, 본 포스팅에서는 Sticky session 을 통한 방법과 AWS ElastiCache 를 통한 세션 유지 방법을 알아 보고자 한다.
사전 준비 사항
- Tomcat 이 설치된 EC2
- EC2 와 통신을 위한 ALB
% uname -a
Linux tomcat_172.31.0.135 5.10.210-201.855.amzn2.x86_64 #1 SMP Tue Mar 12 19:03:26 UTC 2024 x86_64 x86_64 x86_64 GNU/Linux

% java -version
openjdk version "17.0.10" 2024-01-16 LTS
OpenJDK Runtime Environment Corretto-17.0.10.8.1 (build 17.0.10+8-LTS)
OpenJDK 64-Bit Server VM Corretto-17.0.10.8.1 (build 17.0.10+8-LTS, mixed mode, sharing)

% tomcat version
Server version: Apache Tomcat/8.5.95
Server built:   Oct 20 2023 21:57:35 UTC
Server number:  8.5.95.0
OS Name:        Linux
OS Version:     5.10.210-201.855.amzn2.x86_64
Architecture:   amd64
JVM Version:    17.0.10+8-LTS
JVM Vendor:     Amazon.com Inc.
참고로 위는 실습을 진행한 서버의 정보이다.
Sticky session
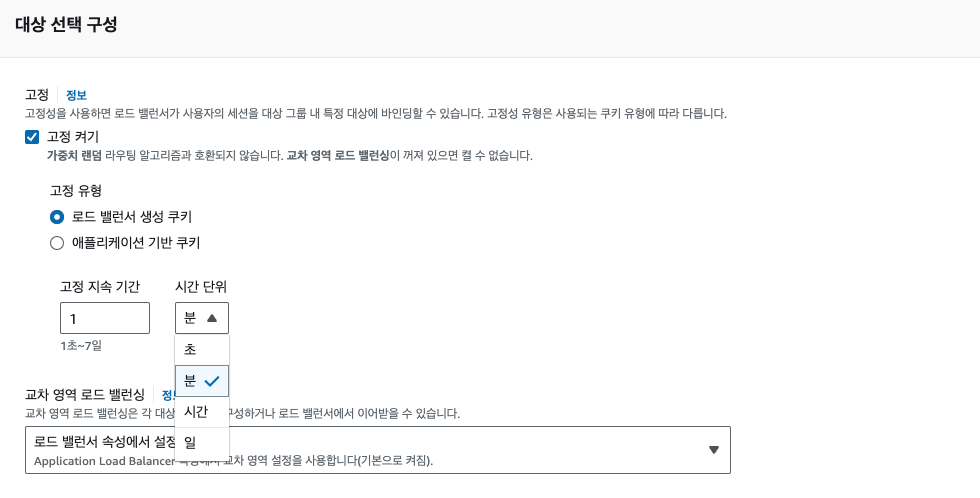
EC2 > 대상 그룹 > 선택 > 대상 그룹 속성 편집
위 순서로 Sticky session 을 설정할 수 있으며, 한글 콘솔에서는 고정 세션이라 불린다. 고정세션은 라운드 로빈으로 작동하는 로드벨런서에 세션을 고정해서 사용자의 경험을 지속할수 있도록 도와주는 역할을 한다.
EC2
# 테스트 페이지를 위한 설정
% cd <tomcat webapps 경로>
% mkdir sample
% cd sample
% vi test.jsp
# 해당 디렉토리를 사용하는 사용자와 그룹으로 권한 수정
% chown -R <사용자>:<그룹> sample/
test.jsp
<%@ page language="java" contentType="text/html; charset=EUC-KR"
        pageEncoding="EUC-KR"%>
<%@ page import="java.text.*"%>
<%@ page import="java.util.*"%>
<%
        String RsessionId = request.getRequestedSessionId();
        String sessionId = session.getId();
        boolean isNew = session.isNew();
        long creationTime = session.getCreationTime();
        long lastAccessedTime = session.getLastAccessedTime();
        int maxInactiveInterval = session.getMaxInactiveInterval();
        Enumeration e = session.getAttributeNames();
%>
<html>
<head>
<meta http-equiv="Content-Type" content="text/html; charset=EUC-KR">
<title>Session Test</title>
</head>
<body>
<table border=1 bordercolor="gray" cellspacing=1 cellpadding=0
        width="100%">
        <tr bgcolor="gray">
                <td colspan=2 align="center"><font color="white"><b>Session
                Info</b></font></td>
        </tr>
        <tr>
                <td>Server HostName</td>
                <td><%=java.net.InetAddress.getLocalHost().getHostName()%></td>
        </tr>
        <tr>
                <td>Server IP</td>
                <td><%=java.net.InetAddress.getLocalHost().getHostAddress()%></td>
        </tr>
        <tr>
                <td>Request SessionID</td>
                <td><%=RsessionId%></td>
        </tr>
        <tr>
                <td>SessionID</td>
                <td><%=sessionId%></td>
        </tr>
        <tr>
                <td>isNew</td>
                <td><%=isNew%></td>
        </tr>
        <tr>
                <td>Creation Time</td>
                <td><%=new Date(creationTime)%></td>
        </tr>
        <tr>
                <td>Last Accessed Time</td>
                <td><%=new Date(lastAccessedTime)%></td>
        </tr>
        <tr>
                <td>Max Inactive Interval (second)</td>
                <td><%=maxInactiveInterval%></td>
        </tr>
     <tr bgcolor="cyan">
                <td colspan=2 align="center"><b>Session Value List</b></td>
        </tr>
        <tr>
                <td align="center">NAME</td>
                <td align="center">VAULE</td>
        </tr>
        <%
                String name = null;
                while (e.hasMoreElements()) {
                        name = (String) e.nextElement();
        %>
        <tr>
                <td align="left"><%=name%></td>
                <td align="left"><%=session.getAttribute(name)%></td>
        </tr>
        <%
                }
        %>

</table>

        <%
                int count = 0;
                if(session.getAttribute("count") != null)
                        count = (Integer) session.getAttribute("count");
                count += 1;
                session.setAttribute("count", count);
                out.println(session.getId() + "     :     " + count);
        %>
</body>
</html>
결과

위는 최초 접근 시 나온 화면이며, 세션ID 를 잘 확인해본다면 7B1699723AD59DDE29E1846E2C028A26 으로 되어 있다.

새로고침을 5번 시도 하였지만 Sticky session 설정으로 세션ID 는 고정이 되어 있는 것을 확인할 수 있다.

시간이 지난 뒤 다시 새로 고침을 하였을 때는 다른 서버로 접근을 하였고, 세션ID 는 EF5457A5B3CD8C22AAD79ED51EB018C3 으로 바뀐 것을 확인할 수 있었다.
Sticky session 단점
- 특정 서버에 트래픽이 집중되는 문제 : 고정된 세션을 사용 시 사용자가 접속해야 하는 서버가 고정되어 있기에 하나의 서버에 트래픽이 집중되는 위험성이 있으며, 로드밸런싱이 제대로 되지 않는다.
- 세션 정보의 유실 : 서비스 중 하나의 서버에 장애가 발생한다면 해당 서버를 사용하는 사용자들의 세션은 모두 잃게 된다. 이렇게 된다면 다시 세션 인증을 해야하는 문제가 발생한다.
이처럼 Sticky session에서는 사용자와 세션 정보를 갖고 있는 서버를 1:1로 매핑해주어 세션 불일치를 해결해지만, 문제가 발생하면 Scale out의 장점인 트래픽 분산과 가용성을 제대로 활용하지 못하게 되는 경우가 발생할 수 있게 된다.
Redis(ElastiCache)
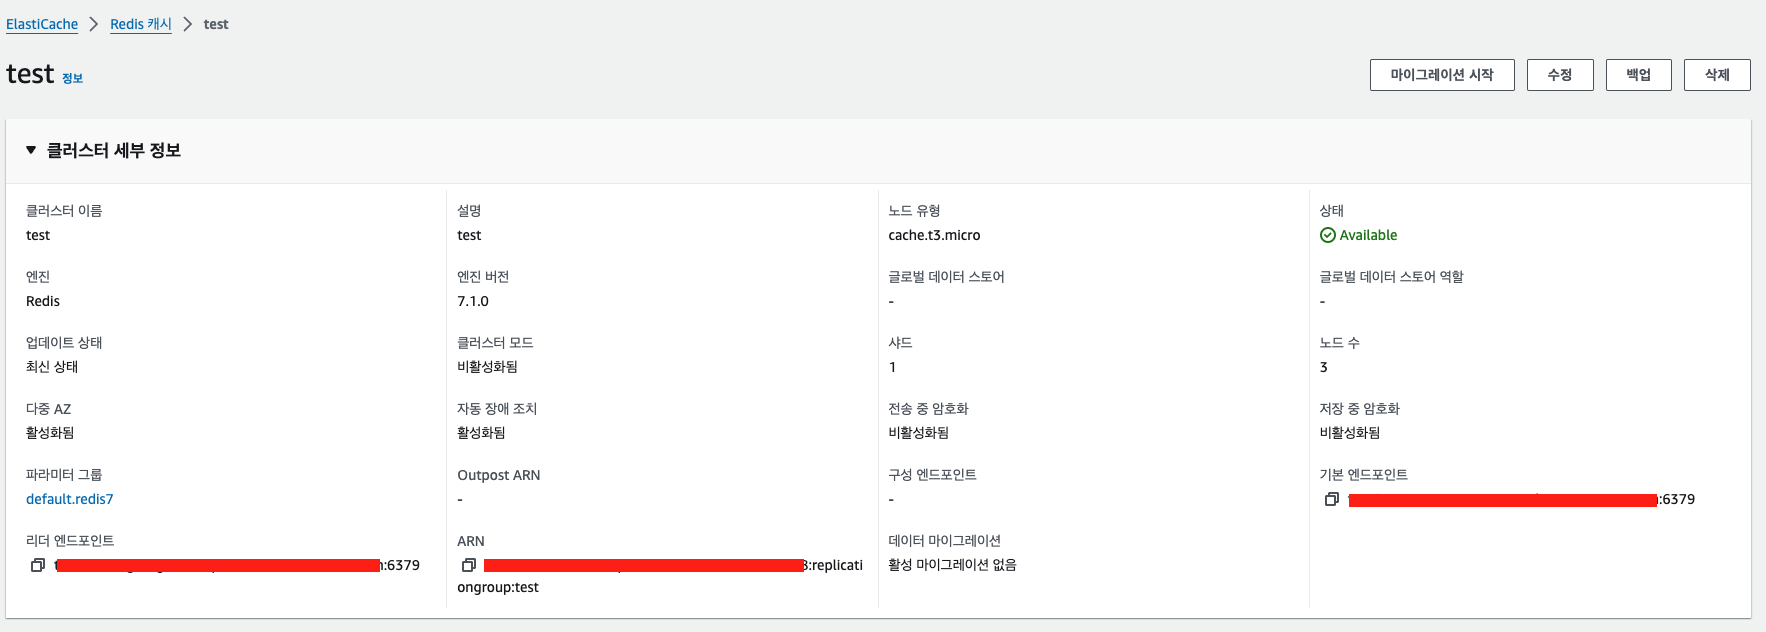
ElastiCache > Redis 캐시 > Redis 캐시 생성
테스트를 위해 위와 같이 설정 하였으며, 방화벽 오픈 등 작업은 진행이 되어야 한다. 또한 서브넷 그룹이나 파라미터 그룹 등은 기본 값으로 진행을 하였다.
EC2
# tomcat Redis 설치 및 설정
% cd <tomcat 설치 경로> # Amazonlinux2 기준으로 기본은 /usr/share/tomcat
% mkdir download
% cd download
% wget https://github.com/ran-jit/tomcat-cluster-redis-session-manager/releases/download/2.0.4/tomcat-cluster-redis-session-manager.zip
% unzip tomcat-cluster-redis-session-manager.zip
% cp tomcat-cluster-redis-session-manager/lib/* <tomcat lib 경로>/
% cp tomcat-cluster-redis-session-manager/conf/* <tomcat conf 경로>/
tomcat-cluster-redis-session-manager releases
자세한 릴리즈는 위 github 주소에서 확인하면 된다.
redis-data-cache.properties
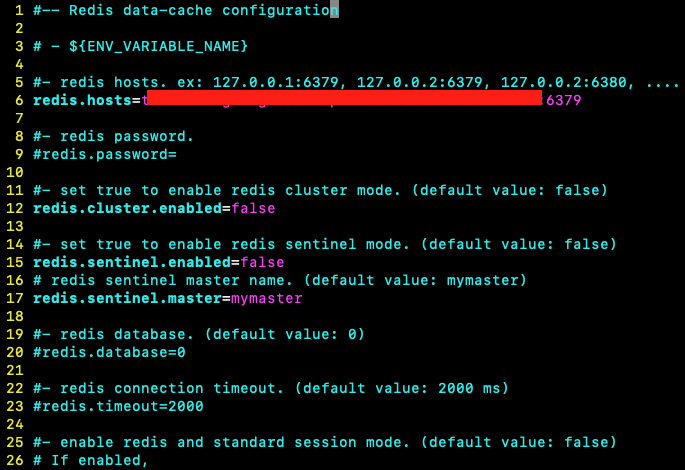
redis-data-cache.properties 파일 6번 라인에서 위와 같이 Elasticache 의 기본 엔드포인트 정보를 추가한다.
web.xml

web.xml 파일의 637번 라인에서 30 -> 60 으로 수정을 한다.
context.xml

제일 아래에서 화면과 같은 구문을 추가 한다.
<Valve className="tomcat.request.session.redis.SessionHandlerValve" />
<Manager className="tomcat.request.session.redis.SessionManager" />
Valve란?
* Catalina 컨테이너(Engine, Host, Context)의 요청 처리 파이프라인 상에서 특정 기능을 수행하기 위해 추가될 수 있는 컴포넌트
결과

처음 접속했을 때 세션ID 값이 A03F8E0DE557CB98281E34745CBB3382 인 것을 확인할 수 있었다.

새로고침을 하였고, 접속하는 서버의 IP는 172.31.0.135 -> 172.31.2.61 로 바뀌었지만 세션 ID 는 바뀌지 않은 것을 확인할 수 있었다. (처음 새로고침을 했을 때 동일한 서버로 접근을 하여 다시 시도를 하였기에 3이 찍혔다.)
Redis 장점
- 로드밸런싱 : 특정 서버의 과부하를 막을 수 있어 부하 분산을 줄 수 있다.
Redis 단점
- 문제가 생기면 모든 서버가 장애 : 세션을 저장하고 있는 Session storage 자체에 장애가 발생할 경우 모든 세션을 잃어버려 세션을 사용하는 모든 서버에 영향이 끼치는 위험이 있다.
- 성능적인 마이너스 : 별도의 Session storage로부터 세션을 불러와야 하기 때문에 추가적인 네트워트 I/O가 발생하며, 세션을 외부에서 가져와 사용하기 때문에 로컬 메모리에 저장해 사용하는 것보다 성능적인 면에서 떨어질 수 밖에 없다.