개요
SSAFY의 첫 프로젝트인 ‘SHabit’ 에서는 Spring Security 를 통한 자체 로그인, 카카오, 네이버, 구글 총 네 개의 로그인 시스템을 구축했습니다.
- build.gradle
implementation 'org.springframework.boot:spring-boot-starter-oauth2-client'
implementation 'org.springframework.boot:spring-boot-starter-security'
implementation 'org.springframework.boot:spring-boot-starter-data-redis'

// JWT
implementation group: 'io.jsonwebtoken', name: 'jjwt-api', version: '0.11.2'
runtimeOnly group: 'io.jsonwebtoken', name: 'jjwt-jackson', version: '0.11.2'
runtimeOnly group: 'io.jsonwebtoken', name: 'jjwt-impl', version: '0.11.2'
OAuth2
- OAuth는 웹을 이용할 때 자신의 비밀번호 등 특정 정보를 제공하지 않고 자기 정보에 대한 접근 권한을 부여하기 위해 카카오나 네이버에 관리에 대한 책임을 위임하는 것입니다.
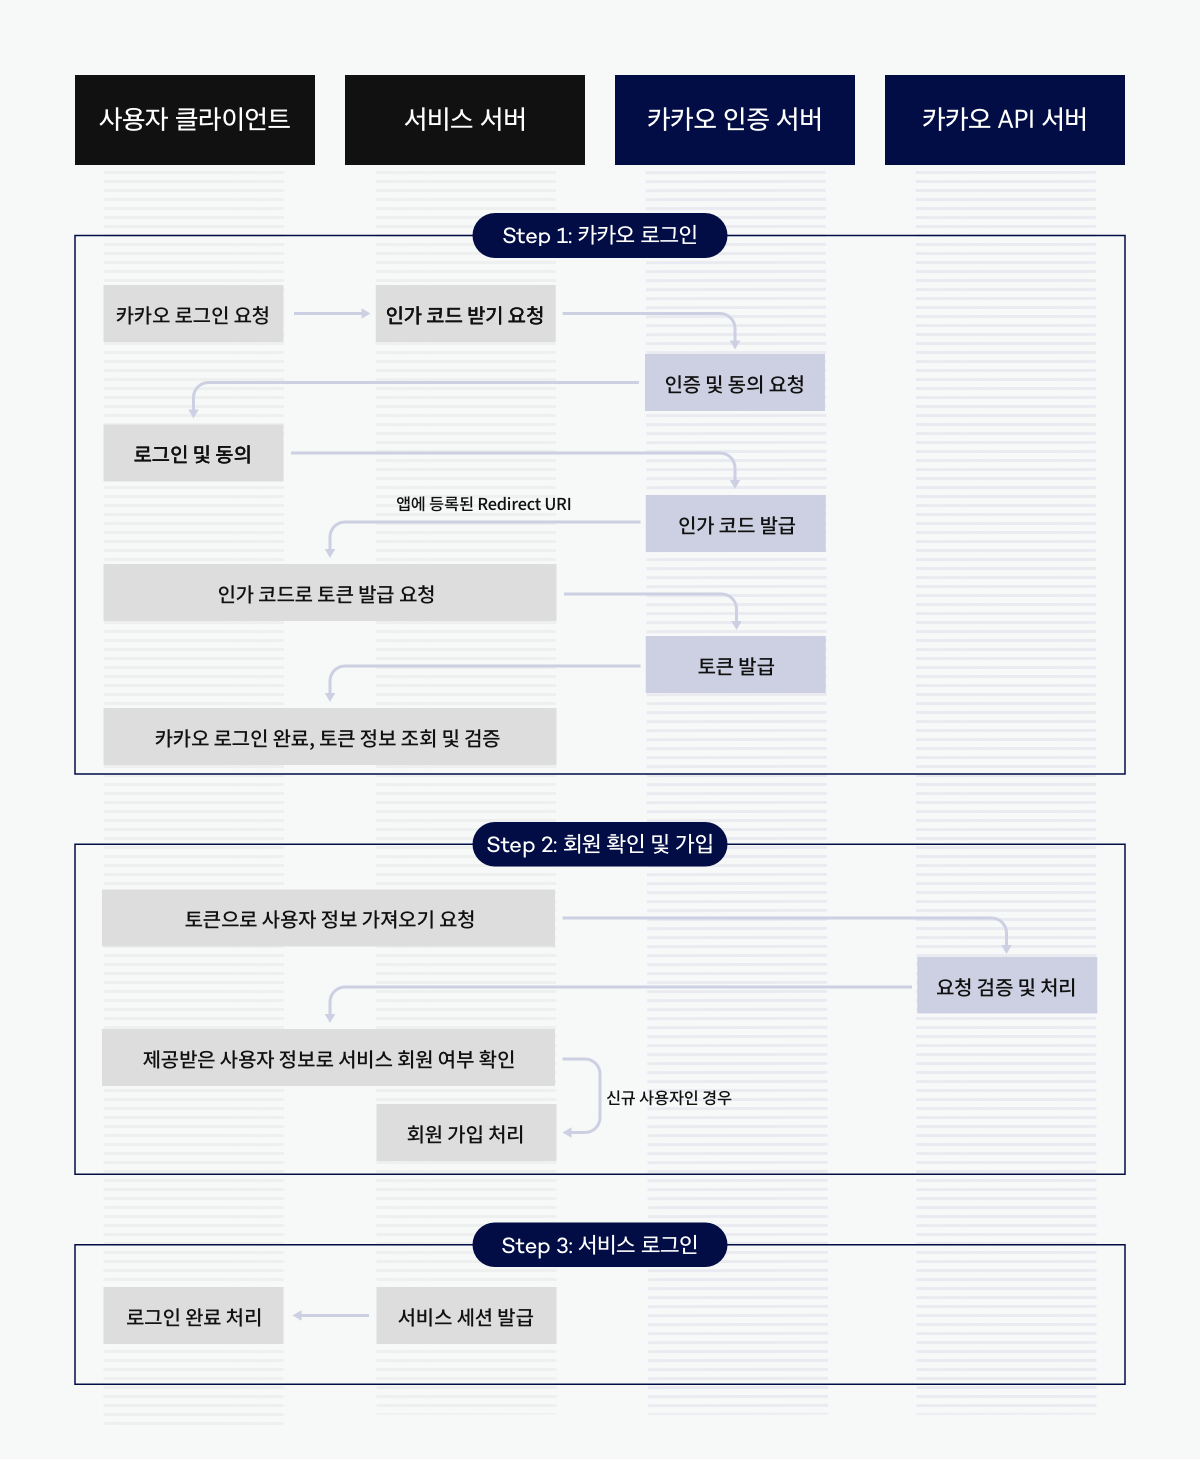
- 아래처럼 카카오 인증 서버에서
/oauth/authorize에서 사용자 인증 후/oauth/token을 통해 토큰을 발급받아 사용자의 정보를 받아볼 수 있습니다. - 저는 사용자의 정보를 최초로 받으면 회원가입을 시키고 이후에는 자체 JWT 와 Redis를 사용하여 사용자의 Refresh Token을 관리하였습니다.
1. OAuth를 통한 유저 정보 조회
- Spring Security OAuth에서 지원하는 방식을 사용하면 application.yaml에 필요한 기본 정보를 작성해두고 Security Config에서 OAuth2를 간단하게 설정할 수 있습니다.
spring:
  security:
    oauth2:
      client:
        registration:
          kakao:
            client-id: client-id-key
            client-secret: secret-value
            scope:
              - profile_nickname
              - account_email
              - profile_image
            client-name: Kakao
            authorization-grant-type: authorization_code
            redirect-uri: '{baseUrl}/{action}/oauth2/code/{registrationId}'
            client-authentication-method: POST

        provider:
          kakao:
            authorization-uri: https://kauth.kakao.com/oauth/authorize
            token-uri: https://kauth.kakao.com/oauth/token
            user-info-uri: https://kapi.kakao.com/v2/user/me
            user-name-attribute: id
httpSecurity
.oauth2Login()
.authorizationEndpoint()
.baseUri("/oauth2/authorization")
.authorizationRequestRepository(oAuth2AuthorizationRequestBasedOnCookieRepository())
.and()
.redirectionEndpoint()
.baseUri("/*/oauth2/code/*")
.and()
.userInfoEndpoint()
.userService(oAuth2UserService)
.and()
.successHandler(oAuth2AuthenticationSuccessHandler())
.failureHandler(oAuth2AuthenticationFailureHandler());- 이후
userService()메서드에서 사용자의 정보를 받게 됩니다. - DefaultOAuth2UserService 클래스의 loadUser()를 상속 받으면 사용자의 정보가 OAuth2UserRequest 에 담겨오기 때문에 회원가입을 진행하거나 로그인한 유저를 매핑하도록 구현하였습니다. 성공적으로 진행되었으면
.successHandler(oAuth2AuthenticationSuccessHandler())핸들러를 호출하여 JWT 생성 단계로 넘어갑니다.
public class CustomOAuth2UserService extends DefaultOAuth2UserService {
	...
	@Override
  public OAuth2User loadUser(OAuth2UserRequest userRequest) throws OAuth2AuthenticationException {
		....
	}
}
여러 Provider Type 이 있을 때
- 유저 데이터를 받아올 때는
OAuth2UserInfo클래스를 정의하여 필수 정보를 담도록 하였습니다. 하지만 카카오, 네이버, 구글 등 세 가지 Provider에서 제공하는 유저 정보 데이터 형태가 조금씩 달라서 따로 데이터를 받기 위한 하위 클래스를 작성해야 합니다. - 이를 그냥 분기 처리하면 지저분해 보일 수 있기 때문에 어떤 Provider인지 확인하고 팩토리 패턴을 적용하여 그에 맞는 타입 객체를 가져오도록 하였습니다.
// 사용자 정보를 호출할 때
...
OAuth2UserInfo userInfo = OAuth2UserInfoFactory.getOAuth2UserInfo(providerType, user.getAttributes());
...
// switch 문으로 type에 맞게 처리
public class OAuth2UserInfoFactory {
public static OAuth2UserInfo getOAuth2UserInfo(ProviderType providerType, Map<String, Object> attributes) {
return switch (providerType) {
case GOOGLE -> new GoogleOAuth2UserInfo(attributes);
case NAVER -> new NaverOAuth2UserInfo(attributes);
case KAKAO -> new KakaoOAuth2UserInfo(attributes);
default -> throw new IllegalArgumentException("Invalid Provider Type.");
};
}
}# Kakao에서 유저 nickname을 가져오는 방식
public class KakaoOAuth2UserInfo extends OAuth2UserInfo {
...
@Override
public String getName() {
Map<String, Object> properties = (Map<String, Object>) attributes.get("properties");
if (properties == null) {
return null;
}
return (String) properties.get("nickname");
}
...
}2. JWT 생성
- 유저 정보를 가져왔으면 이를 기반으로 JWT를 생성합니다.
- JWT 를 생성할 때는 통신 과정에서 탈취를 당할 수 있기 때문에 중요한 정보는 넣지 않고 필수 정보만을 포함하여 생성합니다.
    // Access Token 생성
    String accessToken = Jwts.builder()
        .setSubject(uuId)
        .claim(USER_ID, userId)
        .claim(AUTHORITIES_KEY, role)
        .claim(CREATED_TIME, createdTime)
        .signWith(key, SignatureAlgorithm.HS256)
        .setExpiration(new Date(now + ACCESS_TOKEN_EXPIRE_TIME))
        .compact();

// Refresh Token 생성
    String refreshToken = Jwts.builder(
        .setExpiration(new Date(now + REFRESH_TOKEN_EXPIRE_TIME))
        .signWith(key, SignatureAlgorithm.HS256)
        .compact();
- 여기서는 uuid를 Subject로, USER_ID, AUTHORITIES_KEY, CREATED_TIME를 Claim으로 지정합니다.
setExpiration를 통해 토큰의 유효 기간을 설정합니다.- 이와 유사하게 Refresh Token 도 생성합니다.
3. Redis 연동하기
- JWT는 Access Token과 Reresh Token으로 나누어서 관리합니다.
- Redis는 key-value 형식의 저장소이며 인메모리 형식 DB라 속도가 빠르고 유효기간 설정으로 유연한 데이터 관리가 가능한 특징이 있습니다.
- 평소에는 보안이 다소 약한 Access Token을 사용하다 탈취당할 경우를 대비해 유효기간을 짧게하고 Redis에 저장된 Refresh를 통해 재발급하는 형식으로 구현하였습니다.
private final RedisProperties redisProperties;

  @Bean
  public RedisConnectionFactory redisConnectionFactory() {
    return new LettuceConnectionFactory(redisProperties.getHost(), redisProperties.getPort());
  }

  @Bean
  public RedisTemplate<String, Object> redisTemplate() {
    RedisTemplate<String, Object> redisTemplate = new RedisTemplate<>();
    redisTemplate.setConnectionFactory(redisConnectionFactory());
    redisTemplate.setKeySerializer(new StringRedisSerializer());
    redisTemplate.setValueSerializer(new StringRedisSerializer());
    return redisTemplate;
}- 설정에 필요한 기본 값을 셋팅해주고 key에 유저 ID, 값에 Refresh Token을 저장합니다.
redisTemplate.opsForValue()
.set("token:" + authentication.getName(), tokenInfo.getRefreshToken(), tokenInfo.getRefreshTokenExpirationTime(), TimeUnit.MILLISECONDS);- 매번 Access token으로 통신하다 Access가 만료됐을 경우 Refresh token으로 재할당받습니다.
- Refresh Token이 만료될 경우 DB에서 찾을 수 없으니 재로그인을 요청합니다.
Ref.

Dare mighty things!