JavaScript - 31
코어 자바스크립트

Promise
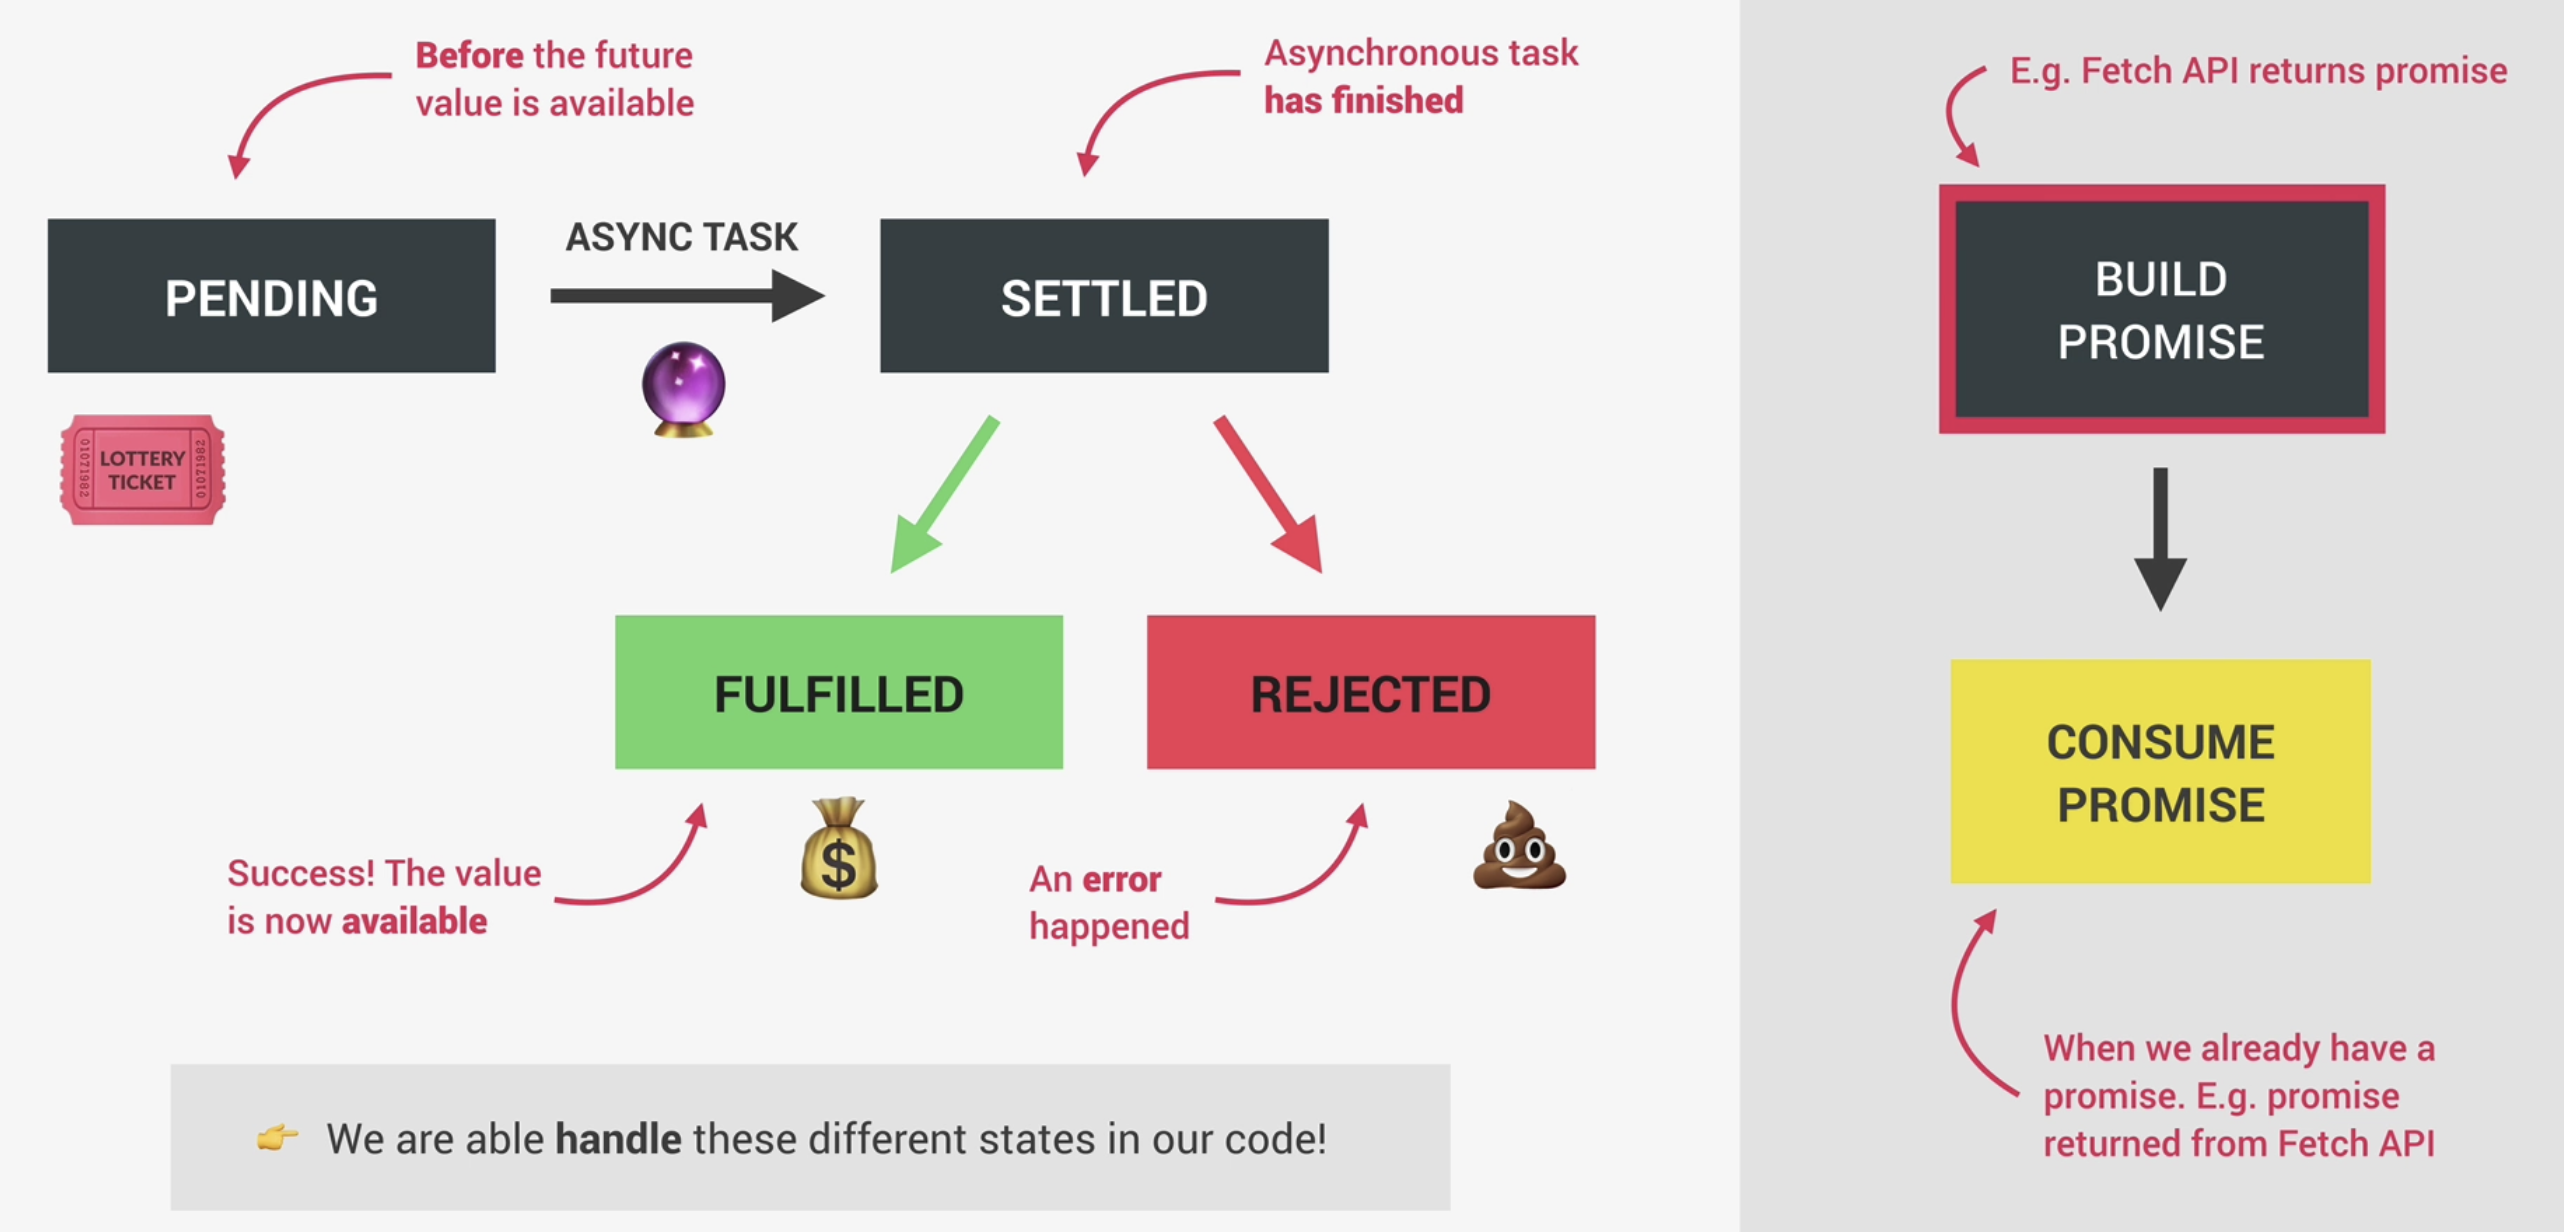
프로미스라는 것은 일종의 객체입니다. 객체인데 어떤 객체냐면 내용을 비동기적으로 실행하는 객체입니다. 위 그림과 함께 아래 그림과 예시 코드도 함께봅시다.
let promise = new Promise(function(resolve, reject) {
setTimeout(() => resolve("done!"), 1000);
});
console.log(promise)
// Promise(<pending>)
// resolve 함수는 .then의 첫 번째 함수(인수)를 실행합니다.
promise.then(
result => alert(result), // 1초 후 "done!"을 출력
error => alert(error) // 실행되지 않음
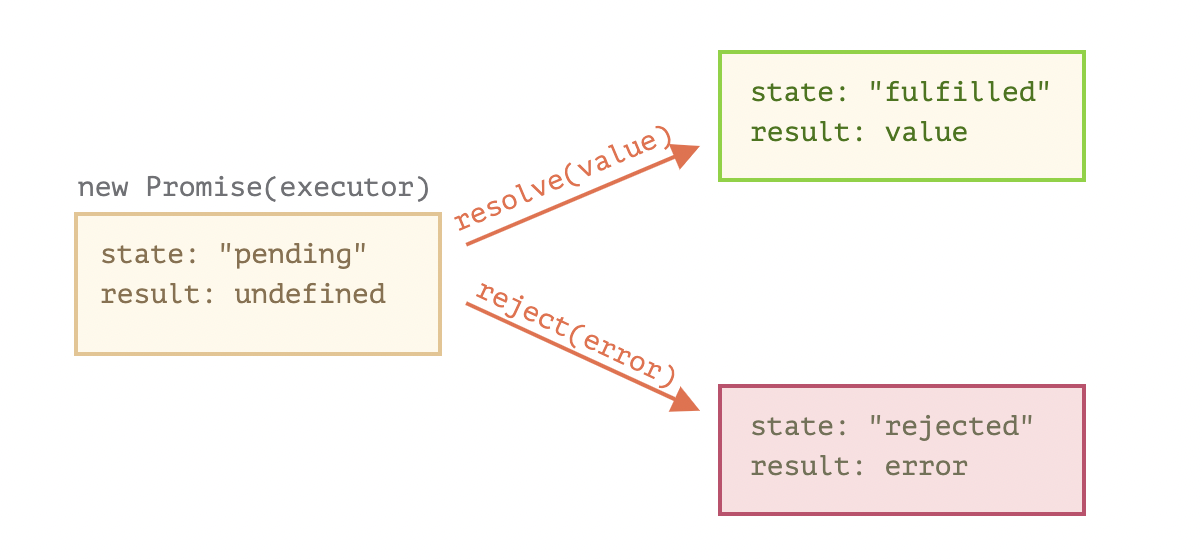
);위 코드에서 promise라는 변수는 Promise 객체에 의해 생겨난 객체입니다. Promise의 인수로 executor 라는 실행 함수가 들어갑니다. 실행함수의 인수는 두가지 입니다. resolve, reject
일단 프로미스는 실행함수를 실행하는데 실행함수의 결과는 무조건 두가지로 나뉩니다. 성공과 실패
실행함수는 단한번만 성공과 실패 둘중하나를 선택합니다. 이렇게 상태가 바뀐 promise는 다시는 상태를 번복할수 없습니다. 처음에 나온 resolve 혹은 reject함수 이후에 또 resolve나 reject함수가 나온다면 해당함수는 무시됩니다.
성공일 경우 실행함수는 resolve를 실행시켜야합니다. 실패할 경우 reject함수를 실행시켜야합니다.
Promise는 비동기 함수이므로 아직 처리되지 않았습니다. 따라서 일반적인 콜스택에 쌓이는 코드를 막지 않습니다. 이때에 Promise 객체는 pending 상태가됩니다. 아직 Promise 내부의 코드가 실행되어 결과가 나오지 않았기 때문입니다. 콜스택이 비워진후 microTasks Queue에 담겨진 Promise 콜백 함수가 실행되어진후 결과가 나오면 Promise 객체는 resolve 혹은 reject 상태가 되어 결과 값을 내놓을 수 있게 됩니다.
then
이렇게 실행함수의 실패과 성공에 따라서 프로미스의 상태는 나뉘게 되며 이러한 Promise 객체로부터 생성된 promise 객체를 사용하려면 promise.then(function success(){}, function fail(){})을 사용합니다. then은 두가지 인수를 갖고 있습니다.
-
첫번째 인수로서 함수는 Promise의 실행함수의 결과값이 성공했을 때
resolve()함수가 실행되면 실행되는 함수입니다. -
두번째 인수로서 함수는 Promise의 실행함수의 결과값이 실패했을 때
reject()함수가 실행되면 실행되는 함수입니다.
const success = function (str) {
  console.log(str + '성공입니다!');
  return str;
};// 무시됨.
const fail = function (str) {
  console.log(str + '실패입니다 ㅜ');
  return str;
};// 무시됨

const promise = new Promise(function (success, fail) {
  console.log('실험의 결과는 어때요?');
  const result = prompt('결과를 어떻게 정하시겠습니까?');
  if (result === 'y') success(result);
  fail(result);
});

promise
  .then(
    function (result) {
      console.log('축하해요!! 성공이군요');
    },
    function (result) {
      if (result !== 'n') {
        throw new Error('잘못된 입력입니다.');
      }
      console.log('다음번엔 더잘 할수 있어요. 앞으로가 시작이에요');
    }
  )
  .finally(function () {
    console.log('실험 종료');
  })
  .catch(function (err) {
    console.log(err.name, err.message);
  });
Promise 객체에서는 결과가 resolve 아니면 reject 함수 실행이기때문에 예외를 둘수 없다. 첫인수에서 resolve나 reject함수의 이름을 커스텀할수 있으나 따로 함수를 만들경우 해당함수의 내용은 실행되지 않습니다.
즉, 실행함수에서의 인수 resolve와 reject는 자바스크립트에서 제공하는 자체 콜백함수로서 의 기능을 수행하므로 개발자가 정의한 함수의 정의는 무시됩니다. 달리 말하면 개발자는 resolve와 reject의 함수의 내용을 신경쓰지 않고 개발하면 됩니다. resolve의 인수는 자동으로 다음 then절의 첫번째 인수함수의 인수로 전달되고, reject의 인수는 자동으로 다음 then절에서의 두번째 인수함수의 인수로 전달됩니다.
Promise에서 만들어진 promise 객체가 실행될 때 then으로 성공시 인수 함수, 실패시 인수 함수만 신경써서 만들면됩니다. 만약 성공시나 실패시 함수에서 에러가 날 경우 then의 실패시 함수 혹은 이후의 catch 절에서 에러를 잡게됩니다.
catch 절
catch(function (){}) 절은 then(null, func () {})과 완벽하게 같습니다. 즉, promise 절이 실패하는 경우에 실행되거나 then 절에서 실패하는 경우만을 위해 실행합니다. catch 절을 사용하는 이유는 하나의 콜백함수를 사용하여 코드의 가독성을 높이는 작업입니다. 매우 직관적 이고 좋습니다.
Error 객체 & throw
에러 객체는 error.name, error.message 라는 기본적인 구조를 갖고 있습니다. 따라서 에러 검출시 해당 내용을 신경써서 처리해야합니다. throw <객체>라는 것으로 catch 절로 보낼수 있습니다. throw 로 보내는 객체를 new Error('error.name') 으로 생성해서 catch 절로 보내면 catch 절의 인수는 에러객체로 받아집니다. 즉, throw <객체>는 실패시 다음체이닝에 then의 실패함수나 catch절로 <객체>를 보냅니다.
Promise 체이닝
const promise = new Promise(function (success, fail) {
  console.log('실험의 결과는 어때요?');
  const result = prompt('결과를 어떻게 정하시겠습니까?');
  if (result === 'y') success(result);
  fail(result);
});

promise
  .then(
    function (result) {
      console.log('축하해요!! 성공이군요');
    },
    function (result) {
      if (result !== 'n') {
        throw new Error('잘못된 입력입니다.');
      }
      console.log('다음번엔 더잘 할수 있어요. 앞으로가 시작이에요');
    }
  )
  .then(function () {
    console.log('성공을 축하드립니다.');
  })
  .finally(function () {
    console.log('실험 종료');
  })
  .catch(function (err) {
    console.log(err.name, err.message);
  });
/*
// y 입력시
실험의 결과는 어때요?
축하해요!! 성공이군요
성공을 축하드립니다.
실험 종료

// n 입력시
실험의 결과는 어때요?
다음번엔 더잘 할수 있어요. 앞으로가 시작이에요
성공을 축하드립니다.
실험 종료

// 다른 키 입력시
실험의 결과는 어때요?
실험 종료
Error 잘못된 입력입니다.
*/
promise 객체에 처음으로 then절이 실행된 후 바로 then이 이어서 연결이 되었습니다. 이것이 가능한 이유는 then절이 프로미스를 반환하게 때문입니다. 즉,.then(...) 자체가 프로미스입니다. 프로미스이므로 다시 .then(...)을 붙이는게 가능합니다.
위 코드를 보면 then 절의 성공함수로 진행이되는 실패함수로 진행이되든 다음 then절이 실행됨을 알수 있습니다. throw <객체> 는 then(,function(){}) 안으로 넘깁니다. 다음으로 이어지는 체인에 then 절의 두번째 인수로 객체를 넘깁니다. 그래서 두번째 인수인 catch에서 잡혀집니다. 아래와 같이 이렇게 작성하면 2에서 처리가 안되고 1에서 처리됩니다.
.then(function () {
    console.log('성공을 축하드립니다.');
  }),function (err) {
  console.log(err.name, err.message, '1');
}.catch(function(err){
  console.log(err.name, err.message, '2');
}
Promise 반환
Promise는 객체 입니다. 그러므로 생성자 함수를 실행시킬 수 있습니다. 여기서 new Promise(executer)를 생성하면 executer가 실행되고 이에 따라 executer안의 resolve나 reject가 실행되며 이후의 then절을 실행시킬수 있습니다.
let sec = 1;
new Promise(function (resolve, reject) {
  setTimeout(function () {
    console.log(`${sec}초 뒤에 실행되었습니다.`);
    resolve(sec);
  }, sec * 1000);
}).then(function () {
  return new Promise(function (resolve) {
    sec *= 2;
    setTimeout(function () {
      console.log(`${sec}초 뒤에 실행되었습니다.`);
      resolve(sec);
    }, sec * 1000);
  });
});
Thenable 객체
then의 특성을 잘살리면 커스텀 객체로 부터도 then 체이닝을 사용할수 있게 됩니다. 이러한 객체를 Thenable 객체라고 부르기도 합니다. 즉, then이라는 메소드를 가진 객체는 모두 thenable이라고 부릅니다. 이 객체는 Promise 객체처럼 처리됩니다.
class Thenable {
  constructor(num) {
    this.num = num;
  }
  then(resolve, reject) {
    setTimeout(() => {
      console.log(`${this.num}초 뒤에 실행되었습니다.`);
      resolve(this.num);
    }, this.num * 1000);
  }
}
let sec = 1;
new Promise(function (resolve, reject) {
  setTimeout(function () {
    console.log(`${sec}초 뒤에 실행되었습니다.`);
    resolve(sec);
  }, sec * 1000);
})
  .then(function (sec) {
    sec *= 2;
    return new Thenable(sec);
  })
  .then(function (data) {
    console.log(data);
  });
위코드를 보면 Thenable이라는 커스텀 클래스가 정의되어 있습니다. 클래스는 생성자 함수로 인수를 받으며 then이라는 메소드를 갖고 있습니다.따라서 두번째 절의 return new Thenable(sec) 이후에 .then을 실행시키는 것이 가능하며 이역시 커스텀 클래스에서 정의한 then 메소드 정의처럼 (기존의 then동작처럼) 작동합니다. 이렇게 Thenable 객체가 만들어질 수 있습니다.
const btn = document.querySelector('.btn-country');
const countriesContainer = document.querySelector('.countries');

const redenderCountry = function (data) {
  const html = `
    <article class="country ${data.name}">
    <img class="country__img" src="${data.flag}" />
    <div class="country__data">
      <h3 class="country__name">${data.name}</h3>
      <h4 class="country__region">${data.region}</h4>
      <p class="country__row"><span>👫</span>${(
        +data.population / 1000000
      ).toFixed(1)} people</p>
      <p class="country__row"><span>🗣️</span>${data.languages[0].name}</p>
      <p class="country__row"><span>💰</span>${data.currencies[0].name}</p>
    </div>
  </article>
    `;
  countriesContainer.insertAdjacentHTML('beforeend', html);
  countriesContainer.style.opacity = 1;
};
/////////////////////////////////////
const getCountryData = function (country) {
  fetch(`https://restcountries.eu/rest/v2/name/${country}`)
    .then(response => response.json())
    .then(data => {
      console.log(data);
      redenderCountry(data[0]);
      const neighbour = data[0].borders[0];
      return fetch(`https://restcountries.eu/rest/v2/alpha/${neighbour}`);
    })//1
    .then(response => response.json())
    .then(data => {
      console.log(data);
      redenderCountry(data);
    });
};

getCountryData('uk');
fetch 함수는 url를 통해서 통신을 하는 AJAX 함수로서 Promise 객체를 반환합니다. //1에서 then 으로 resolve를 받아서 return fetch를 하면 fetch 함수의 안에서 성공적인 결과를 받으면 resolve 함수가 그결과를 다음 then 절의 인수로서 들어가게 합니다.
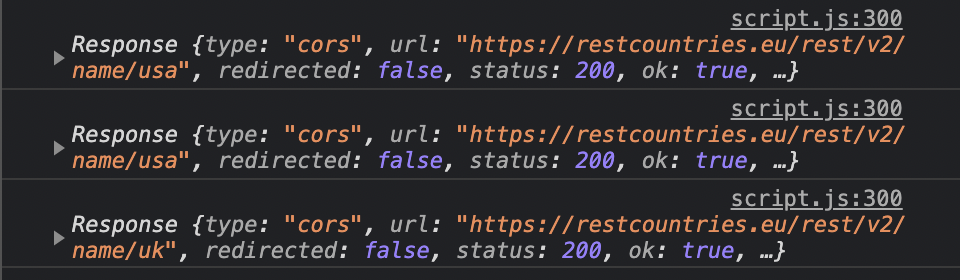
따라서 이러한 fetch 함수의 resolve(result) 에서 result는 위 코드의 response입니다. 이 response는 실제로 Response 객체를 반환합니다.
Response
const getCountryData = function (country) {
  fetch(`https://restcountries.eu/rest/v2/name/${country}`)
    .then(response => {
      console.log(response);
      return response.json();
    })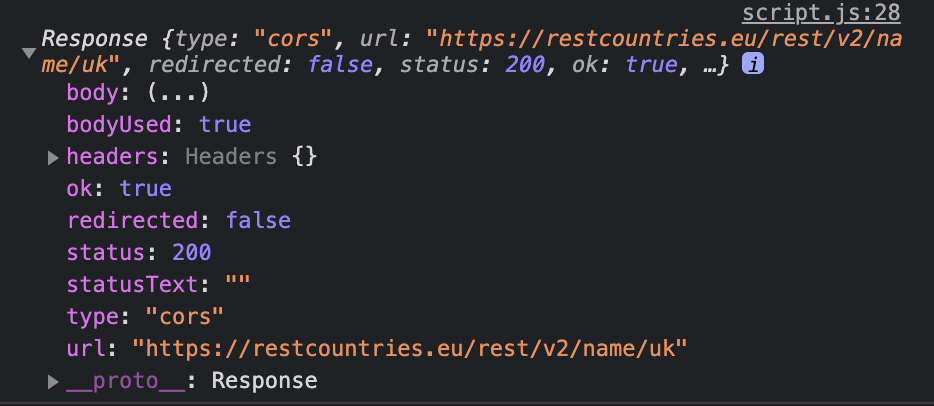
response 객체는 fetch 함수에서 resolve 함수의 인수로 다음 then 절의 인수로 들어가는 객체입니다.
모양을 살펴보면
- response.ok :
boolean값의 형태를 취하고 있습니다. http의 상태코드가 200 - 299 인경우true를 반환하며 나머지는false입니다. - response.status: 반환된 http 의 상태코드를 갖고 있습니다.
- response.url : 요청한 url입니다.
정도를 볼수 있는데, 이를 활용하여 response 응답 결과의 상태를 알수 있습니다.
Async / Await
Promise의 사용은 resolve, reject의 이해와 then을 사용하면서 비동기처리를 동기적으로 처리하는 체이닝에 대한 이점이 있습니다.
간단하게 Promise를 사용하는 방법에 대해서 async, await 문법이 있습니다.
async
//1
const testFunc = async function () {
  return 5;
};

//2
const testFunc = async function () {
  return new Promise((resolve, reject) => {
    resolve(5);
  });
};

//3
testFunc().then(res => console.log(res));
위 두개의 같은 이름의 함수는 정확하게 똑같이 동작합니다. async 키워드는 function 앞에 붙으며 function 결과를 Promise 객체로 만들어 반환합니다. 함수의 결과 자체가 Promise 객체 자체되어도 해당 객체를 그대로 반환합니다. 즉, 어떠한 결과라도 Promise객체를 반환합니다.
첫번째 testFunc에는 결과값 5만을 반환합니다. async은 이를 Promise 객체로 감싸서 resolve(5)를 한 것처럼 반환합니다. 따라서 //3 코드에서 then의 인수에 5가 전달됩니다.
두번째 testFunc에는 결과로서 Promise 객체를 반환합니다. async은 결과가 이미 Promise 객체이기 때문에 그대로 반환합니다. 따라서 //3코드에서 then의 인수에 5가 전달됩니다.
await
await는 async 없이 사용할수가 없습니다. await는 Promise 객체의 바로 앞에 사용할 수 있습니다. await는 Promise객체의 결과가 나올때까지 다음코드줄로 넘어가지 않도록 기다립니다.
const testFunc = async function (country) {
  const city = await fetch(`https://restcountries.eu/rest/v2/name/${country}`);
  const cityInfo = await city.json();
  console.log(cityInfo[0].name);
};
testFunc('usa');
//1 에서 await는 fetch 의 결과가 나올때까지 다음 코드로 넘어가는 것을 기다립니다.
await가 없다면 city는 Promise <pending> 상태로 다음 코드로 넘어가며 cityInfo는 city.json()에서 에러가 납니다. 결과가 없기 때문에 .json()을 할수가 없기 때문이죠.
await는 잠시 Promise 결과가 나올때까지 다음코드가 콜스택에 들어가는 것을 방지합니다.
위 코드를 Promise로 작성한다면 아래 코드와 같습니다.
const testFunc = function (country) {
  fetch(`https://restcountries.eu/rest/v2/name/${country}`)
    .then(city => city.json())
    .then(res => console.log(res[0].name));
};
testFunc('usa');
async / await는 코드의 순서대로 굉장히 직관적으로 볼수 있기 때문에 가독성과 이해도가 높습니다.
try - catch
이러한 async, await 문법의 에러 핸들링은 try catch로 합니다. 즉 비동기 처리중에 어떠한 에러가 나든 catch 문법으로 에러가 나오게 됩니다.
const testFunc = async function (country) {
  try {
    const city = await fetch(
      `https://restcountries.eu/rest/v2/name/${country}`
    );
    const cityInfo = await city.json();
    console.log(cityInfo[0].name);
  } catch (err) {
    console.log(`${err.name} 발생! ${err.message}`);
  }
};

btn.addEventListener('click', function () {
  testFunc('usa');
});
Promise.all([])
여러개의 promise 객체가 비동기적으로 실행된 뒤에 처리해야할 코드가 있다고 합니다. 예를 들면 다음과 같은 코드입니다.
const testFunc = async function (country1, country2, country3) {
  try {
    const city1 = await fetch(
      `https://restcountries.eu/rest/v2/name/${country1}`
    );
    const city2 = await fetch(
      `https://restcountries.eu/rest/v2/name/${country2}`
    );
    const city3 = await fetch(
      `https://restcountries.eu/rest/v2/name/${country3}`
    );
    const cities = [city1, city2, city3];
    if (!cities.every(city => city.ok)) {
      console.log('check');
      throw new Error('Fetch response error!');
    }
  } catch (err) {
    console.log(`${err.name} 발생! ${err.message}`);
  }
};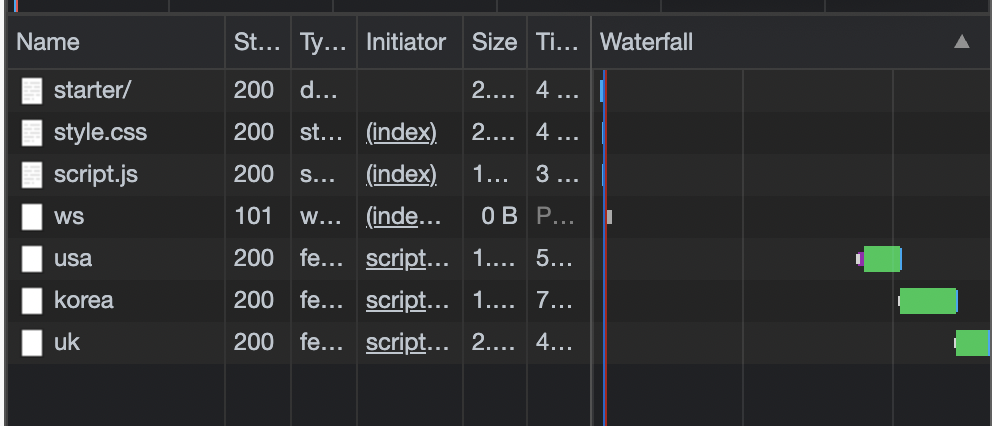
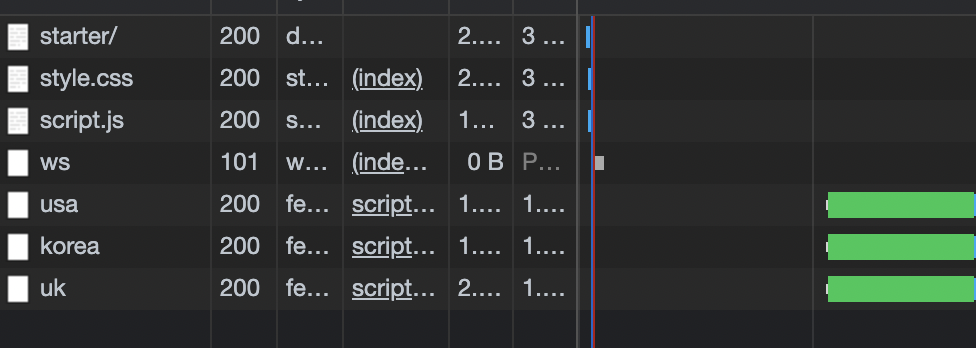
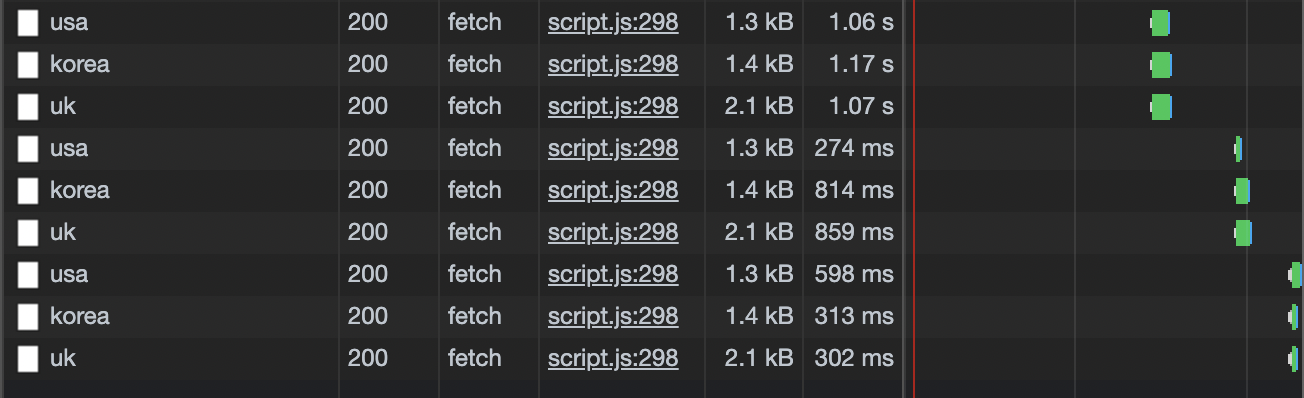
city 3개가 하나씩 로드될때까지 기다리는 것은 로딩속도를 느리게 합니다. 3개를 비동기적으로 실행시켜야합니다. 이때 Promise.all을 사용할 수 있습니다.
const testFunc = async function (country1, country2, country3) {
  try {
    const cities = await Promise.all([
      fetch(`https://restcountries.eu/rest/v2/name/${country1}`),
      fetch(`https://restcountries.eu/rest/v2/name/${country2}`),
      fetch(`https://restcountries.eu/rest/v2/name/${country3}`),
    ]);
    console.log(cities);
    if (!cities.every(city => city.ok)) {
      console.log('check');
      throw new Error('Fetch response error!');
    }
  } catch (err) {
    console.log(`${err.name} 발생! ${err.message}`);
  }
};
Promise.all에도 주의해야할 점들이 있습니다.
- Promise.all은 하나의 Promise라도 reject가 발생하면 Promise.all자체가 reject를 발생시킵니다.
위 코드를 map 함수로 새로운 배열로 반환하여 한번에 처리하는 것은 흔한 코드입니다.
const testFunc = async function (country1, country2, country3) {
  try {
    const urls = [...arguments].map(country => fetch(`https://restcountries.eu/rest/v2/name/${country}`));
    const cities = await Promise.all(urls);
    console.log(cities);
    if (!cities.every(city => city.ok)) {
      console.log('check');
      throw new Error('Fetch response error!');
    }
  } catch (err) {
    console.log(`${err.name} 발생! ${err.message}`);
  }
};
Promise.race([])
Promise.all과 사용방법은 동일하지만 result는 가장먼저 처리되어 나오는 Promise의 result 입니다.
const testFunc = async function (country1, country2, country3) {
  try {
    const urls = [...arguments].map(country => fetch(`https://restcountries.eu/rest/v2/name/${country}`));
    const city = await Promise.race(urls);
    console.log(city);
    if (!city.ok) {
      console.log('check');
      throw new Error('Fetch response error!');
    }
  } catch (err) {
    console.log(`${err.name} 발생! ${err.message}`);
  }
};
역시나 셋다 비동기 처리이기 때문에 정확히 어떤 Promise가 더 빨리 처리되는지 알수 없습니다. race 메서도도 all 메서드와 마찬가지로 reject되어질 경우 reject를 반환합니다.
Promise.allSettled([])
위에서 Promise.all은 하나의 Promise라도 reject를 발생시키면 Promise.all자체가 reject를 발생시킨다고 했습니다. 하지만 실제 그렇게 동작한다면 사용자 입장에서는 성공적으로 받아온 데이터도 못받게 됩니다. 그럴때 Promise.allSettled([])를 사용합니다.
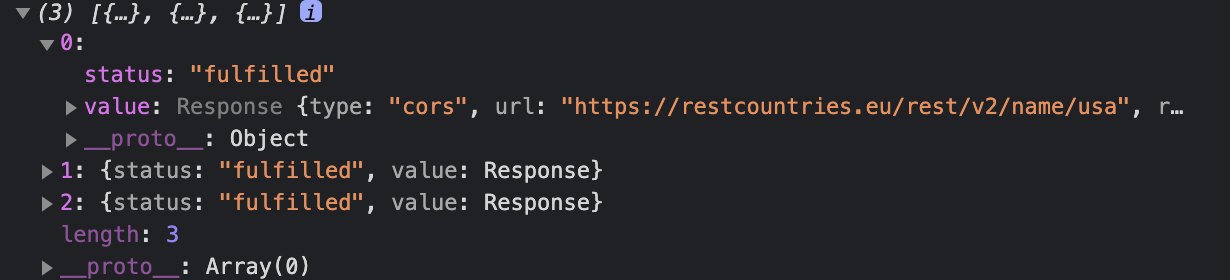
이 메서드는 각각 프로미스에 대한 결과가 있는 {status, value} 객체를 반환합니다.
- status에는 promise 결과가 성공시 'fulfilled' 실패시 'rejected'를 반환합니다.
- value에는 promise 성공시 resolve 결과를 표시하고 실패시에는 reject 결과를 표시합니다.
const testFunc = async function (country1, country2, country3) {
  try {
    const urls = [...arguments].map(country =>
      fetch(`https://restcountries.eu/rest/v2/name/${country}`)
    );
    const cities = await Promise.allSettled(urls);
    console.log(cities);
    if (!cities.every(city => city.status === 'fulfilled')) {
      console.log('check');
      throw new Error('Fetch response error!');
    }
  } catch (err) {
    console.log(`${err.name} 발생! ${err.message}`);
  }
};
Promise.any()
Promise.race() 메서드와 거의 같습니다 하지만 차이점이 있습니다.
Promise 객체가 reject일 경우 무시합니다. 그리고 resolve된 Promise 결과 값만 받습니다.
const testFunc = async function () {
  try {
    const test = await Promise.any([
      Promise.reject('error'),
      Promise.resolve('success').then(res => console.log(res)),
      Promise.reject('error'),
    ]);
  } catch (err) {
    console.log(err.name, err.message);
  }
};
//success
```**텍스트**
만약 모든 Promise가 reject를 반환한다면 error를 발생시킵니다.