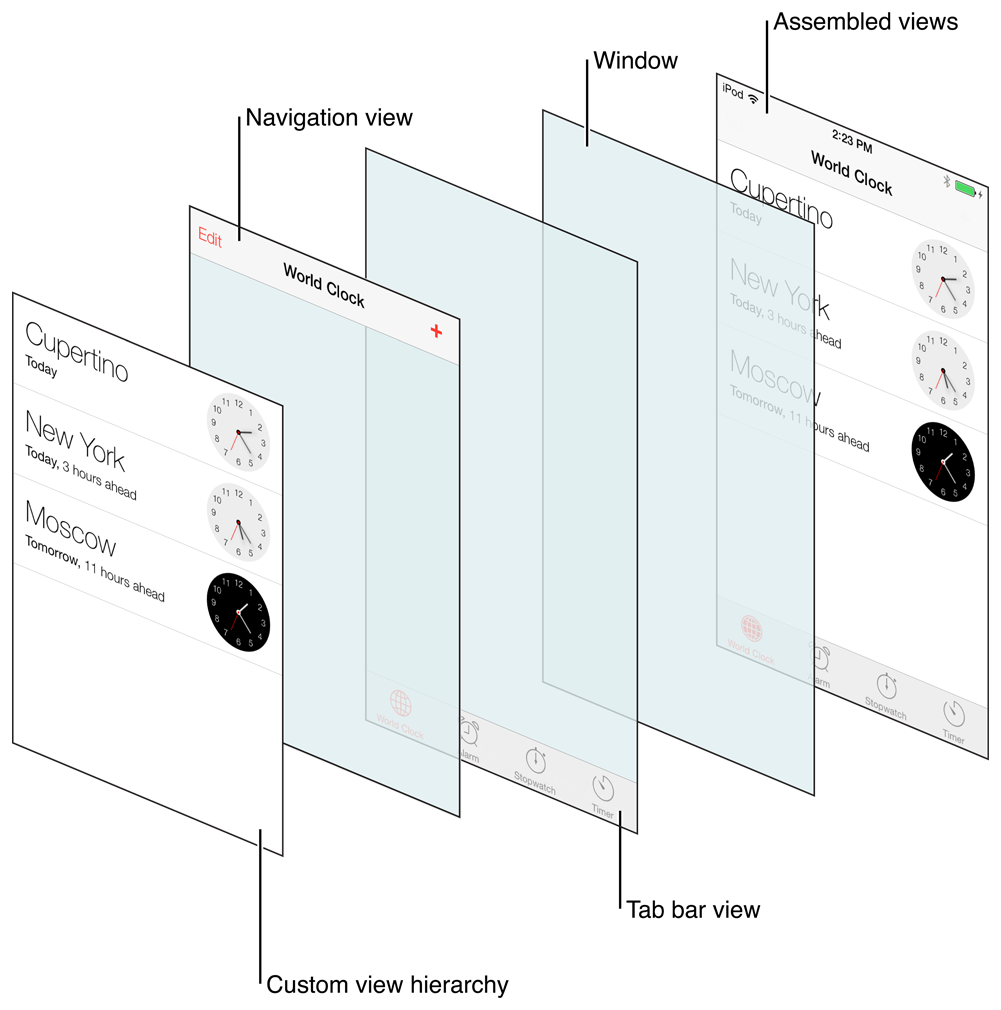
UITabBarController란?
다중 선택 인터페이스를 관리하는 컨테이너 뷰 컨트롤러로, 선택한 자식 뷰 컨트롤러를 보여주는 역할을 합니다.
ViewController를 자식으로 지정하고, TabBar에 있는 Tabbar Item을 각각 ViewController에 연결합니다.
각각의 자식 ViewController들은 독립적인 관계를 이루며, NavigatioinController로 감싸져있습니다.
[Apple 공식 문서]
https://developer.apple.com/documentation/uikit/uitabbarcontroller
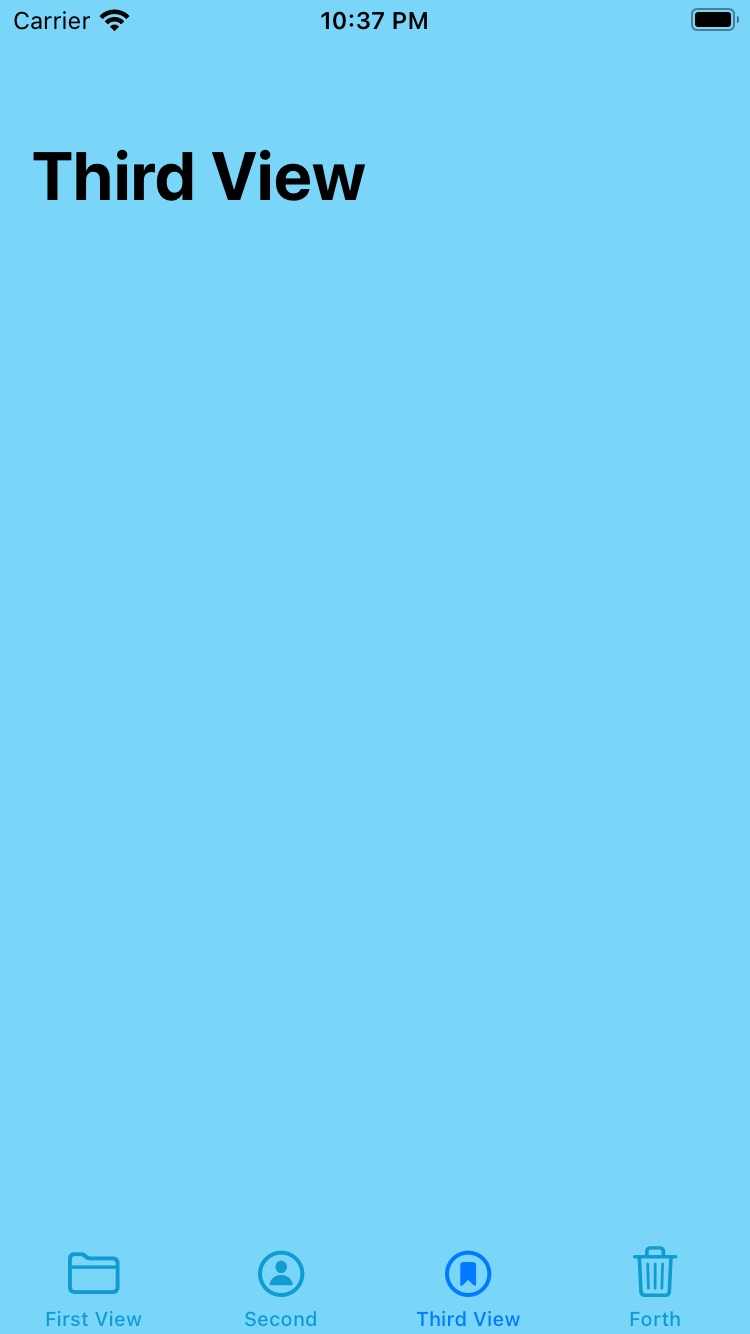
TabBar Item 4개를 사용해 TabbarController를 간단하게 응용해보겠습니다
1. Navigation Controller 만들기
import UIKit
class TabbarController : UITabBarController{
	 override func viewDidLoad() {
   		 let firstVc = UINavigationController(rootViewController: ViewController())
    	let secondVc = UINavigationController(rootViewController: ViewController())
    	let thirdVc = UINavigationController(rootViewController: ViewController())
    	let forthVc = UINavigationController(rootViewController: ViewController())

        self.viewControllers = [firstVc, secondVc, thirdVc, forthVc]
}- UITabBarController에 4개의 NavigationController 객체를 만들어줍니다.
- 그리고 4개의 Controller를 TabBarController의 viewControllers로 지정해줍니다.
2.TabBar Item 설정
        let firstTabbarItem = UITabBarItem(title: "First", image: UIImage(systemName: "folder"), tag: 0)
        let secondTabbarItem = UITabBarItem(title: "Second", image: UIImage(systemName: "person.circle"), tag: 1)
        let thirdTabbarItem = UITabBarItem(title: "Third", image: UIImage(systemName: "bookmark.circle"), tag: 2)
        let forthTabbarItem = UITabBarItem(title: "Forth", image: UIImage(systemName: "trash"), tag: 3)

        firstVc.tabBarItem = firstTabbarItem
        secondVc.tabBarItem = secondTabbarItem
        thirdVc.tabBarItem = thirdTabbarItem
forthVc.tabBarItem = forthTabbarItem- UITabBarItem을 이용해 TabBarItem을 각각 만들어줍니다.
title은 TabBar에서 사용되는 아이콘 아래에 쓰이는 이름이고, tag는 왼쪽부터 Item의 순서입니다. - image에서 UIImage를 사용해 apple의 SF Symbols를 넣어봤습니다. HIG에서 각 Symbol의 이름을 확인해 systemName에 추가해 설정 가능합니다.
- 위에서 만든 NavigationController의 tabBarItem을 설정해줍니다.
3. Customizing
  		firstVc.view.backgroundColor = #colorLiteral(red: 0.721568644, green: 0.8862745166, blue: 0.5921568871, alpha: 1)
        secondVc.view.backgroundColor = #colorLiteral(red: 0.9568627477, green: 0.6588235497, blue: 0.5450980663, alpha: 1)
        thirdVc.view.backgroundColor = #colorLiteral(red: 0.4745098054, green: 0.8392156959, blue: 0.9764705896, alpha: 1)
        forthVc.view.backgroundColor = #colorLiteral(red: 0.9764705896, green: 0.850980401, blue: 0.5490196347, alpha: 1)

        firstVc.navigationBar.prefersLargeTitles = true
        secondVc.navigationBar.prefersLargeTitles = true
        thirdVc.navigationBar.prefersLargeTitles = true
        forthVc.navigationBar.prefersLargeTitles = true
각 뷰의 배경 색을 바꿔주었습니다.
또한 각 뷰의 타이틀을 따로 설정한 후 글자가 항상 크게 보이도록 설정했습니다.
4. SceneDelegate에서 rootViewController 수정
   guard let windowScene = (scene as? UIWindowScene) else { return }
        window = UIWindow(windowScene: windowScene)

        let mainViewController = ViewController()
        let tabbarController = TabbarController()

        window?.rootViewController = tabbarController
        window?.makeKeyAndVisible()
위에서 만든 TabbarController를 SceneDelegate에서 rootViewController로 지정해줍니다.
[실행 화면]

TabBarController는 SceneDelegate에서 설정할 수도 있습니다
위의 코드를 그대로 SceneDelegate에서 작성한다면, UITabBarController 인스턴스를 따로 생성한다는 차이점이 존재합니다.
        window = UIWindow(windowScene: windowScene)
        let mainViewController = ViewController()


        let TabbarController = UITabBarController()

        let firstVc = UINavigationController()
        let secondVc = UINavigationController()
        let thirdVc = UINavigationController()
        let forthVc = UINavigationController()

        TabbarController.viewControllers = [firstVc, secondVc, thirdVc, forthVc]

        if let items = TabbarController.tabBar.items{
            items[0].image = UIImage(systemName: "folder")
            items[1].image = UIImage(systemName: "person.circle")
            items[2].image = UIImage(systemName: "bookmark.circle")
            items[3].image = UIImage(systemName: "trash")

            items[0].title = "First"
            items[1].title = "Second"
            items[2].title = "Third"
            items[3].title = "Forth"
        }

        TabbarController.tabBar.unselectedItemTintColor = .black
        //Tabbar Custom, 선택되지 않은 아이템 색깔 설정


        firstVc.view.backgroundColor = #colorLiteral(red: 0.721568644, green: 0.8862745166, blue: 0.5921568871, alpha: 1)
        secondVc.view.backgroundColor = #colorLiteral(red: 0.9568627477, green: 0.6588235497, blue: 0.5450980663, alpha: 1)
        thirdVc.view.backgroundColor = #colorLiteral(red: 0.4745098054, green: 0.8392156959, blue: 0.9764705896, alpha: 1)
        forthVc.view.backgroundColor = #colorLiteral(red: 0.9764705896, green: 0.850980401, blue: 0.5490196347, alpha: 1)


        window?.rootViewController = TabbarController
        window?.makeKeyAndVisible()
    }
또한 Item을 설정하는 또 다른 방법도 있어 추가로 사용해봤습니다.
Item의 순서는 setViewController 과정에서 추가된 VC의 순서입니다.
+ TabBarController와 NavigationController가 같이 있을 때,
ViewController에서
self.title = "First View"라고 작성하면 TabBar Item의 title이 바뀌게 됩니다.
따라서 이런 상황에 NavigationBar의 title을 바꾸려면,
self.navigationItem.title = "First View"을 사용하는 것이 좋습니다!!
