
목차
- 아래와 같은 실습을 차례대로 진행할 예정
- AWS Cloud9을 통한 실습 환경 구축
- 도커를 이용하여 컨테이너 이미지 생성
- 컨테이너 이미지를 ECR에 업로드
- Amazon EKS 클러스터 구축 및 서비스 배포
- Container Insights 사용해보기
- 파드 및 클러스터 오토 스케일링
- AWS Fargate로 서비스 올리기
- CI/CD 파이프라인 구축
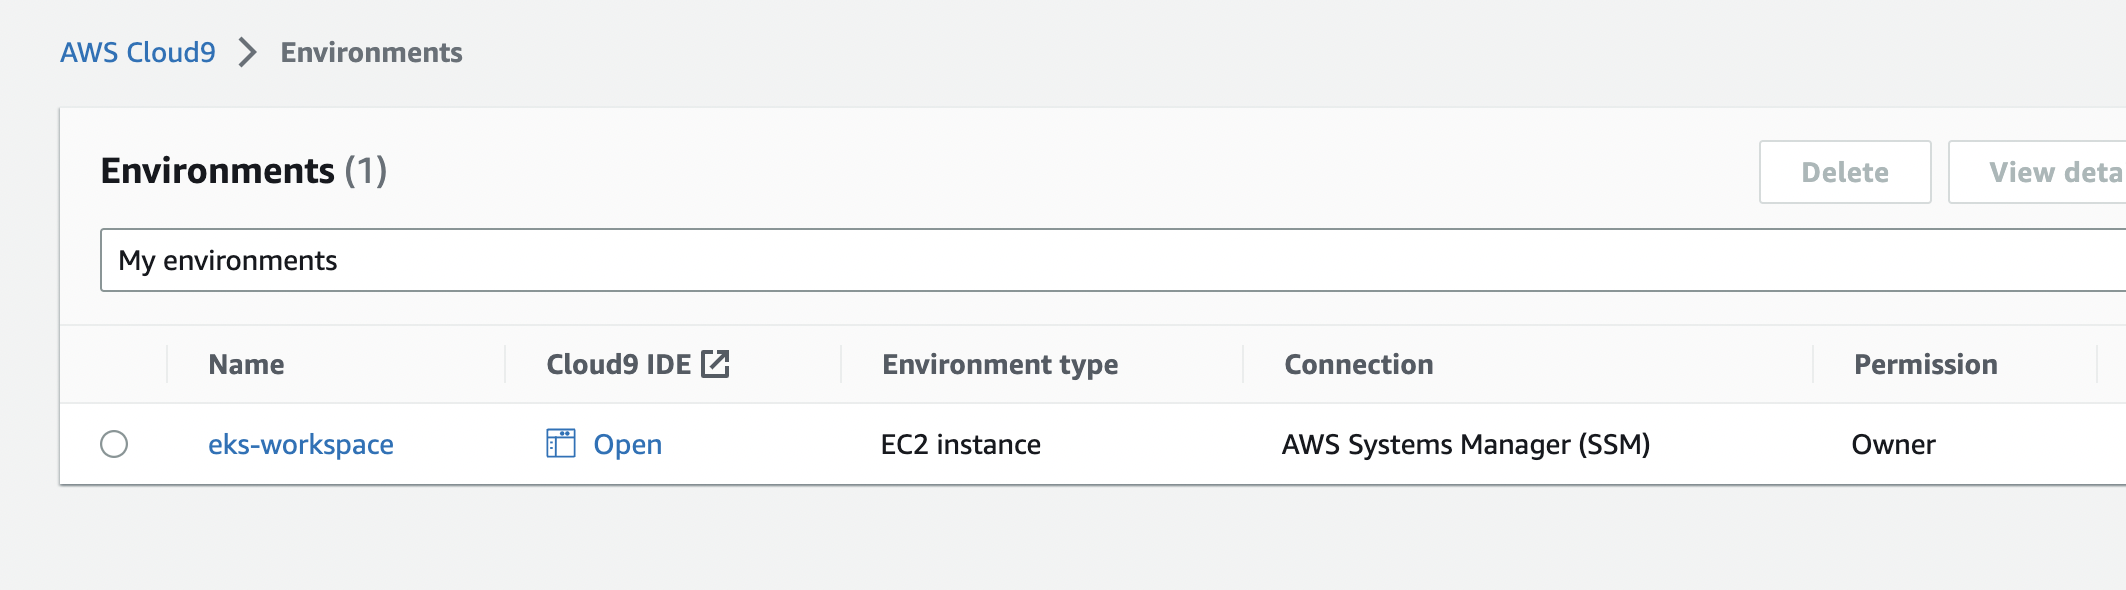
실습 환경 구축
cloud9
- t3.medium
- Amazon Linux 2
- test vpc select
환경설정
리전 기본값
export AWS_REGION=$(curl -s 169.254.169.254/latest/dynamic/instance-identity/document | jq -r '.region')

echo "export AWS_REGION=${AWS_REGION}" | tee -a ~/.bash_profile

aws configure set default.region ${AWS_REGION}

aws configure get default.region
계정 기본값
export ACCOUNT_ID=$(curl -s 169.254.169.254/latest/dynamic/instance-identity/document | jq -r '.accountId')

echo "export ACCOUNT_ID=${ACCOUNT_ID}" | tee -a ~/.bash_profile
disk resize
wget https://gist.githubusercontent.com/joozero/b48ee68e2174a4f1ead93aaf2b582090/raw/2dda79390a10328df66e5f6162846017c682bef5/resize.sh
sh resize.sh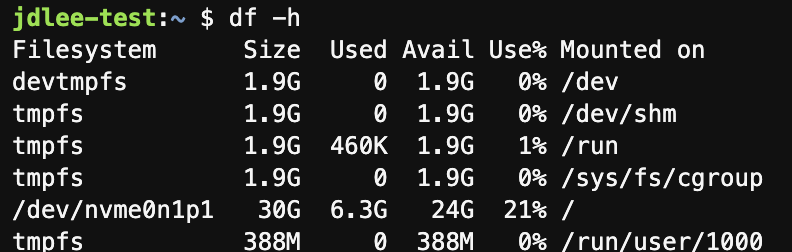
IAM
role create
- AdministratorAccess > ec2
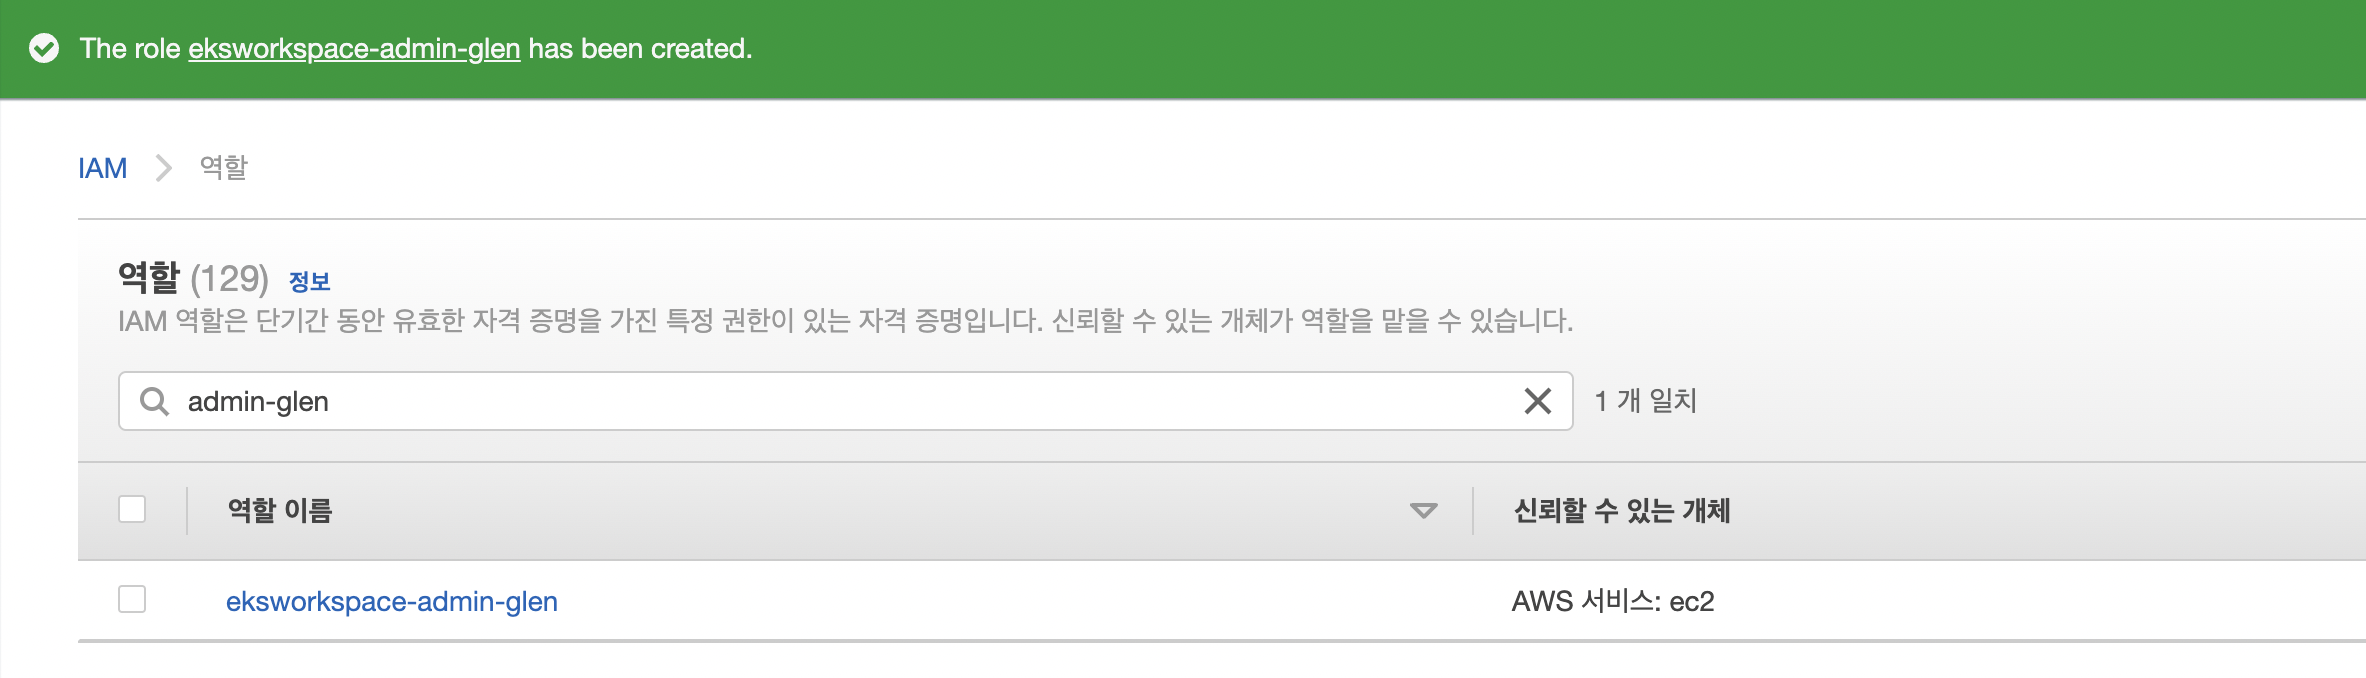
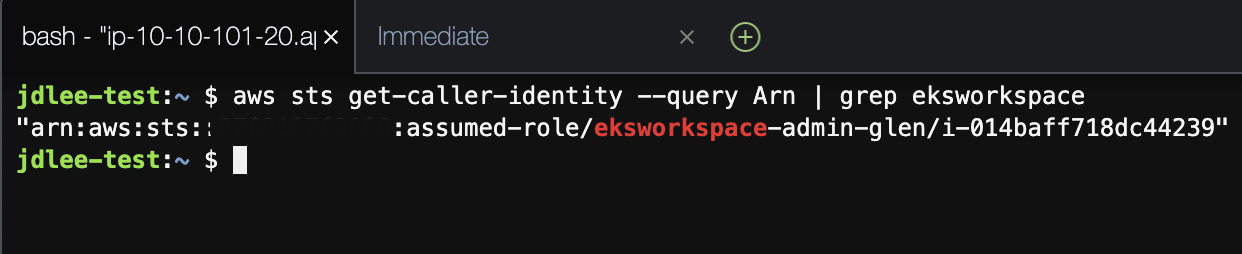
cloud9에 role 추가
-
앞서 만든 role을 추가해준다.

-
ec2 role 업데이트
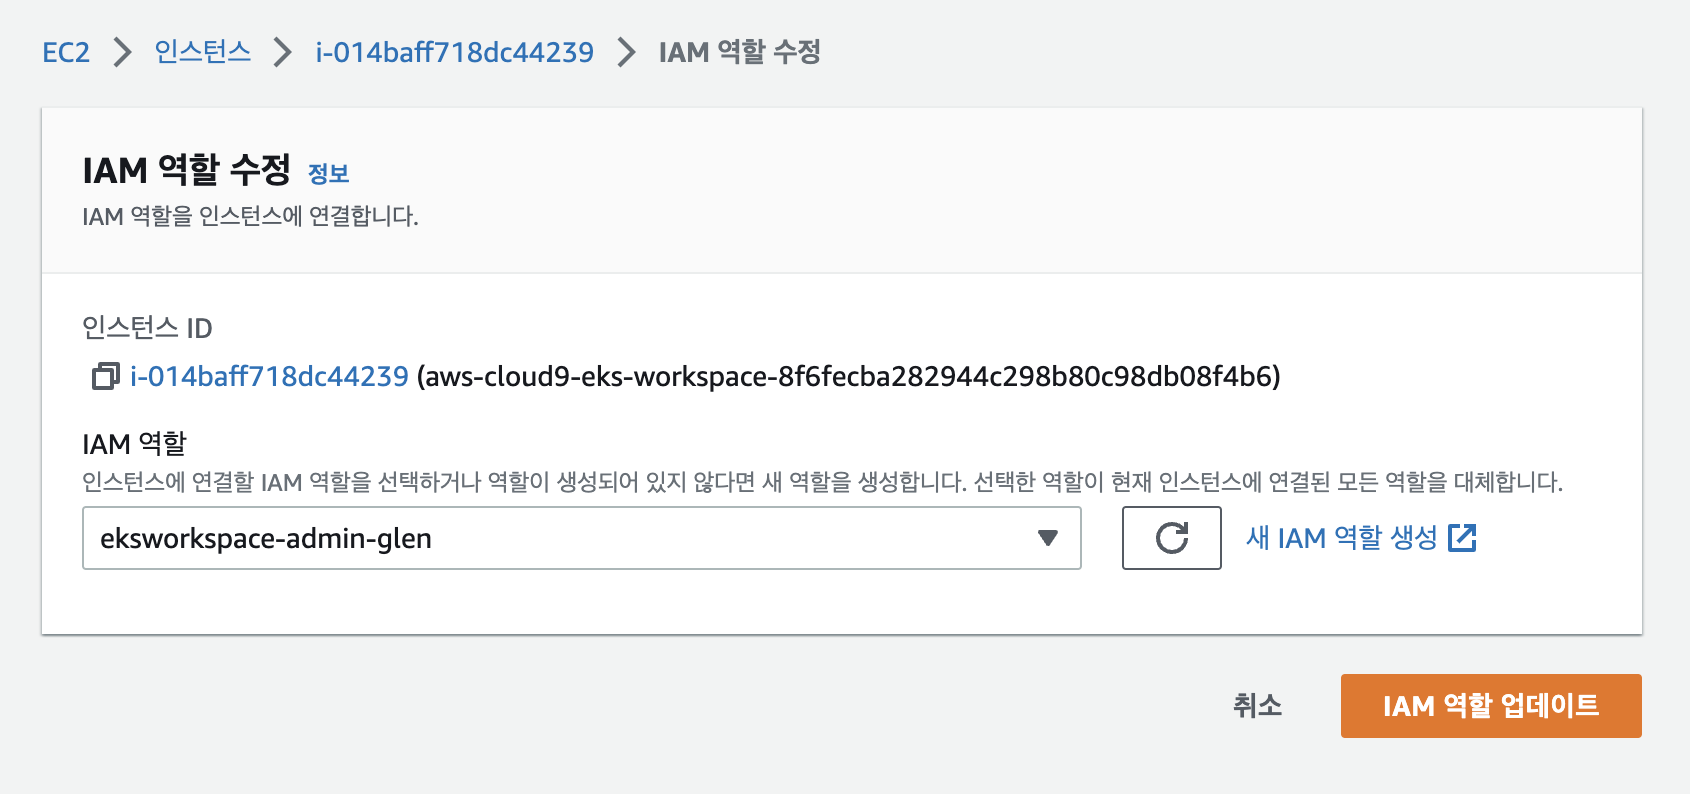
- cloud9에서 확인
도구 설치 및 업데이트
aws cli update
- 기본 1.x 버전에서 2.x 로 업그레이드
curl "https://awscli.amazonaws.com/awscli-exe-linux-x86_64.zip" -o "awscliv2.zip"
unzip awscliv2.zip
sudo ./aws/install
export PATH=/usr/local/bin:$PATH
source ~/.bash_profile-
설치 후 버전 확인


kubectl
sudo curl -o /usr/local/bin/kubectl  \
   https://s3.us-west-2.amazonaws.com/amazon-eks/1.23.13/2022-10-31/bin/linux/amd64/kubectl
sudo chmod +x /usr/local/bin/kubectl
kubectl version --client=true --short=true- 설치 후 버전 확인

#jq 설치
sudo yum install -y jq

#bash-completion
sudo yum install -y bash-completion
eksctl
- 본 실습에서는 eksctl을 사용해서 클러스터 배포를 진행한다.
curl --silent --location "https://github.com/weaveworks/eksctl/releases/latest/download/eksctl_$(uname -s)_amd64.tar.gz" | tar xz -C /tmp
sudo mv -v /tmp/eksctl /usr/local/bin
eksctl version-
설치 후 버전 확인


1. docker image
-
DockerFile을 아래와 같이 작성
FROM nginx:latest RUN echo '<h1> test nginx web page </h1>' >> index.html RUN cp /index.html /usr/share/nginx/html -
FROM : Base Image 지정(OS 및 버전 명시, Base Image에서 시작해서 커스텀 이미지를 추가)
-
RUN : shell command를 해당 docker image에 실행시킬 때 사용함
docker build -t test-image . -
docker inspect로 test-image의 레이어 확인
- 기본 nginx 이미지에 2개의 레이어 추가됨.

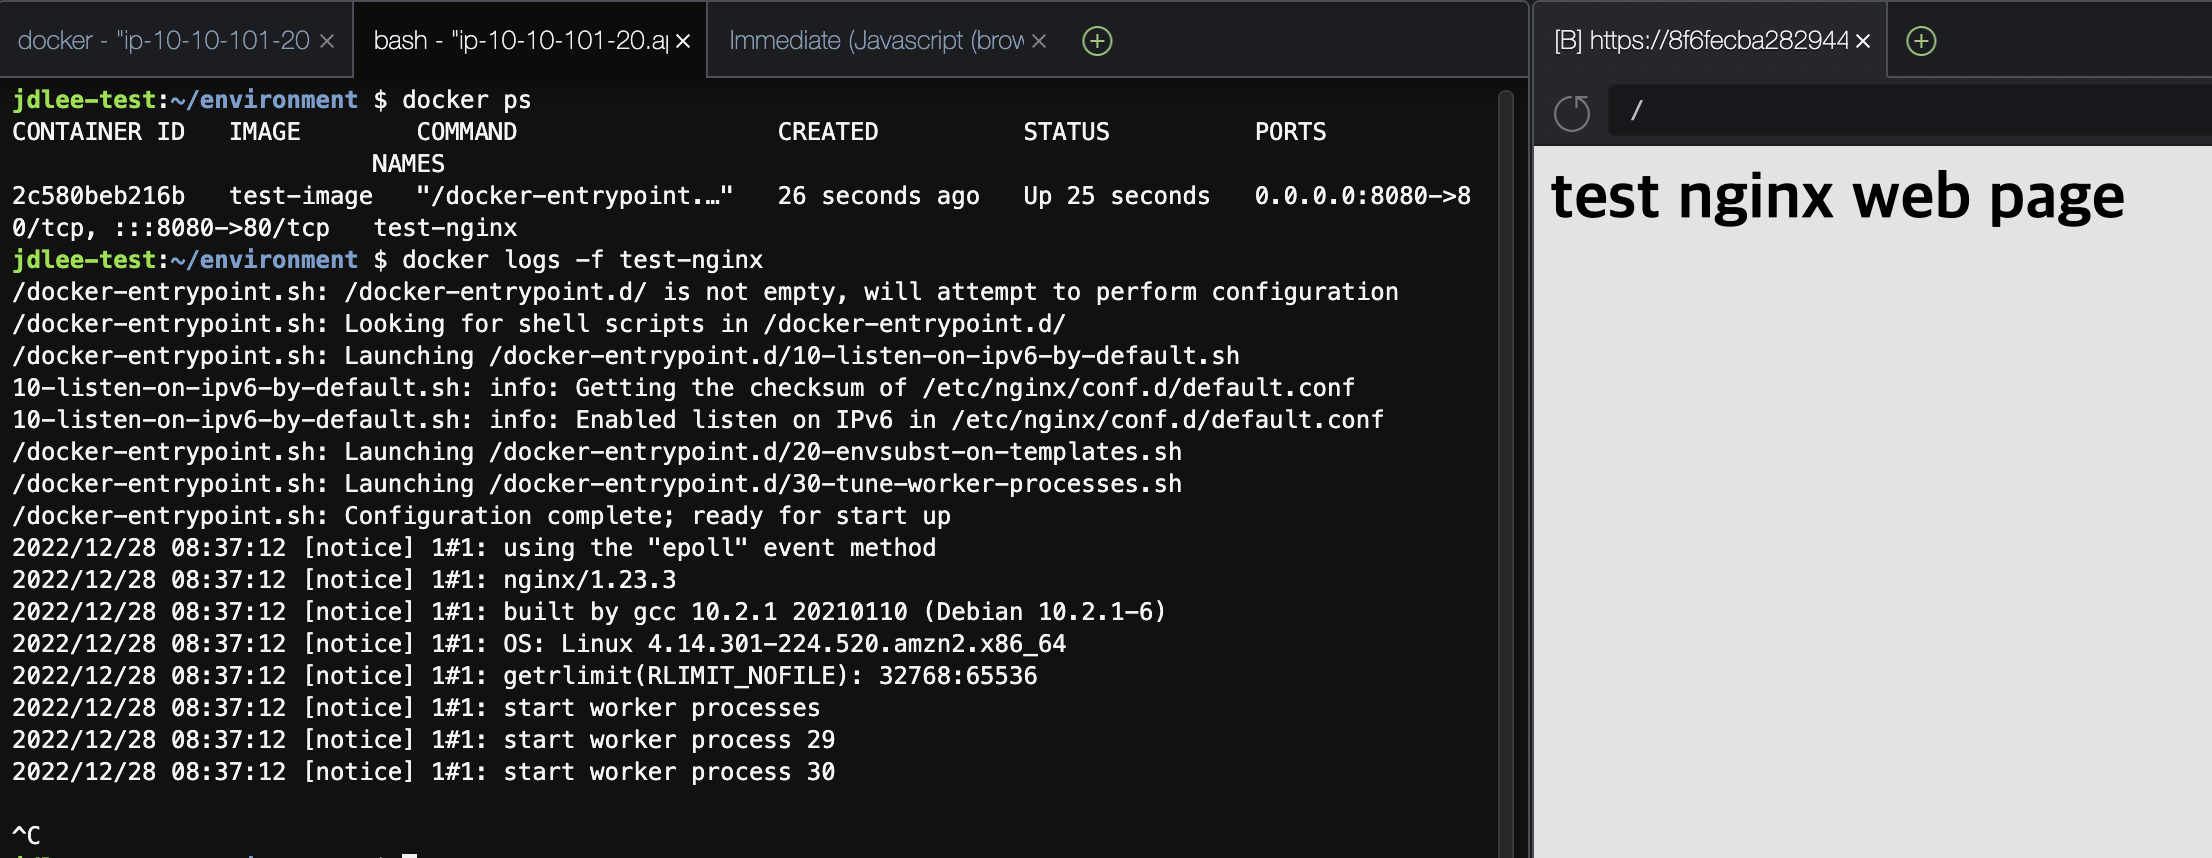
docker run -p 8080:80 --name test-nginx test-image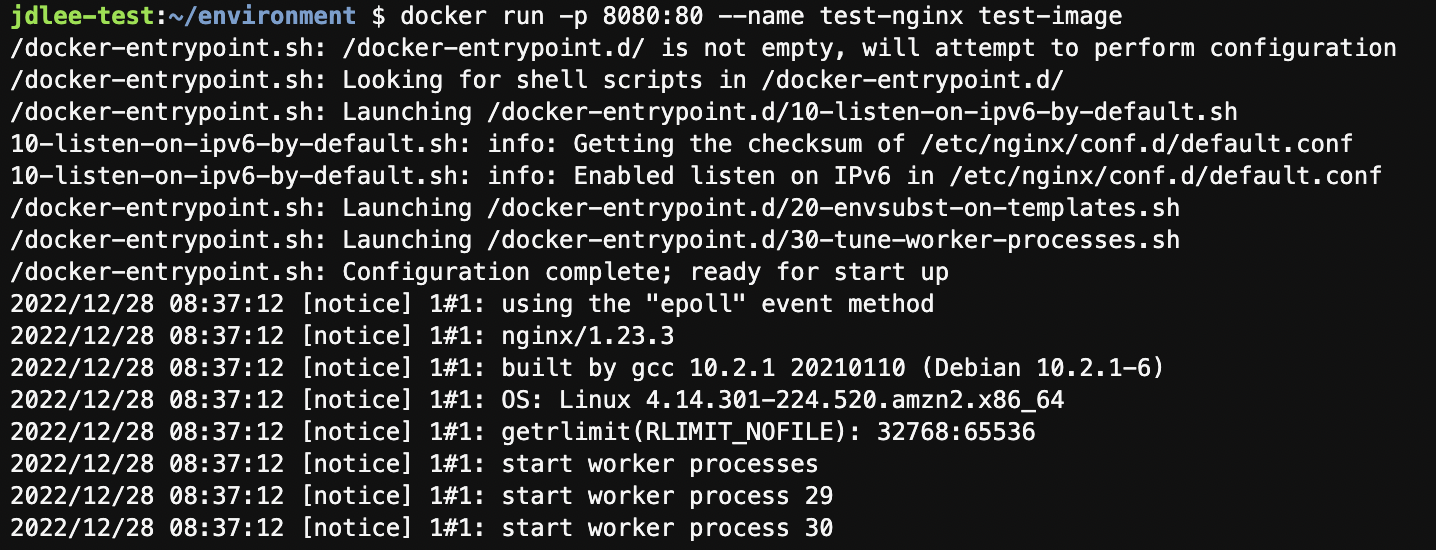
- 해당이미지 log 확인
- preview application으로 웹 확인
- 컨테이너 및 이미지 삭제
- 컨테이너 제거는 정지해야 가능
docker stop test-nginx
docker rm test-nginx
docker rmi test-image
2. ECR에 image 올리기
- 컨테이너 라이징 할 이미지 다운로드
git clone https://github.com/joozero/amazon-eks-flask.git- aws cli를 이용하여 레포생성
aws ecr create-repository \
--repository-name demo-flask-backend \
--image-scanning-configuration scanOnPush=true \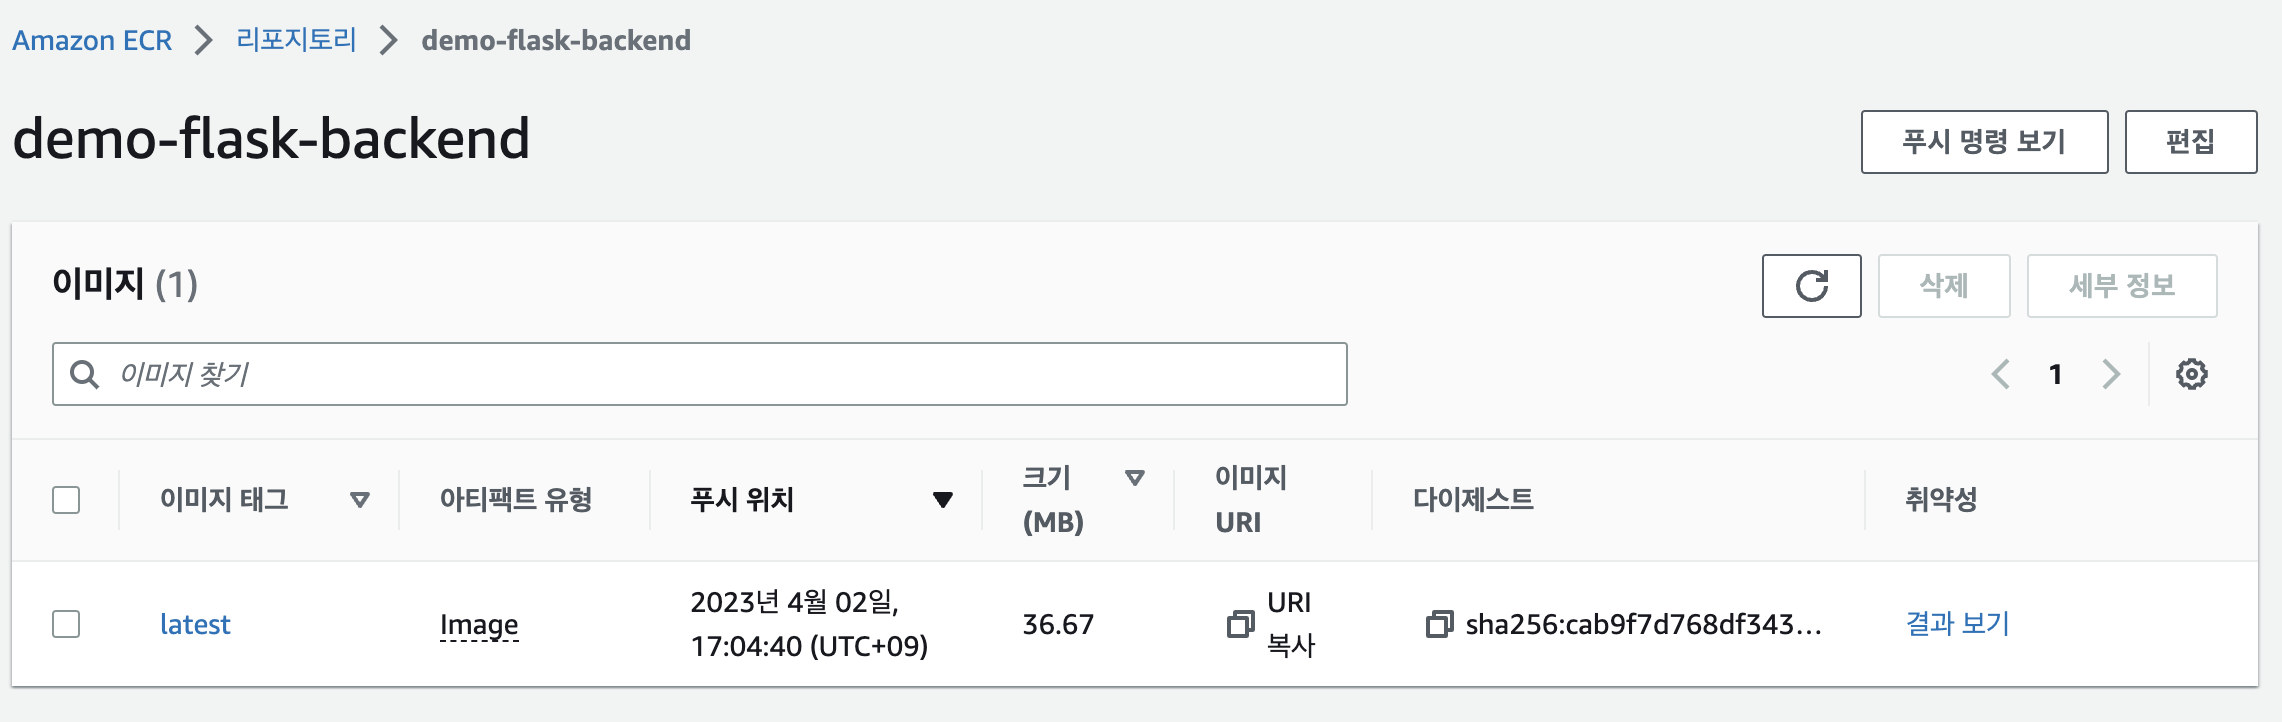
--region ${AWS_REGION}- console에서 확인

-
repo에 image push하는 방법
- 위에서 받은 git 폴더에서 실행.
- environment에서 하면 앞선 도커 실습이미지가 올라감.
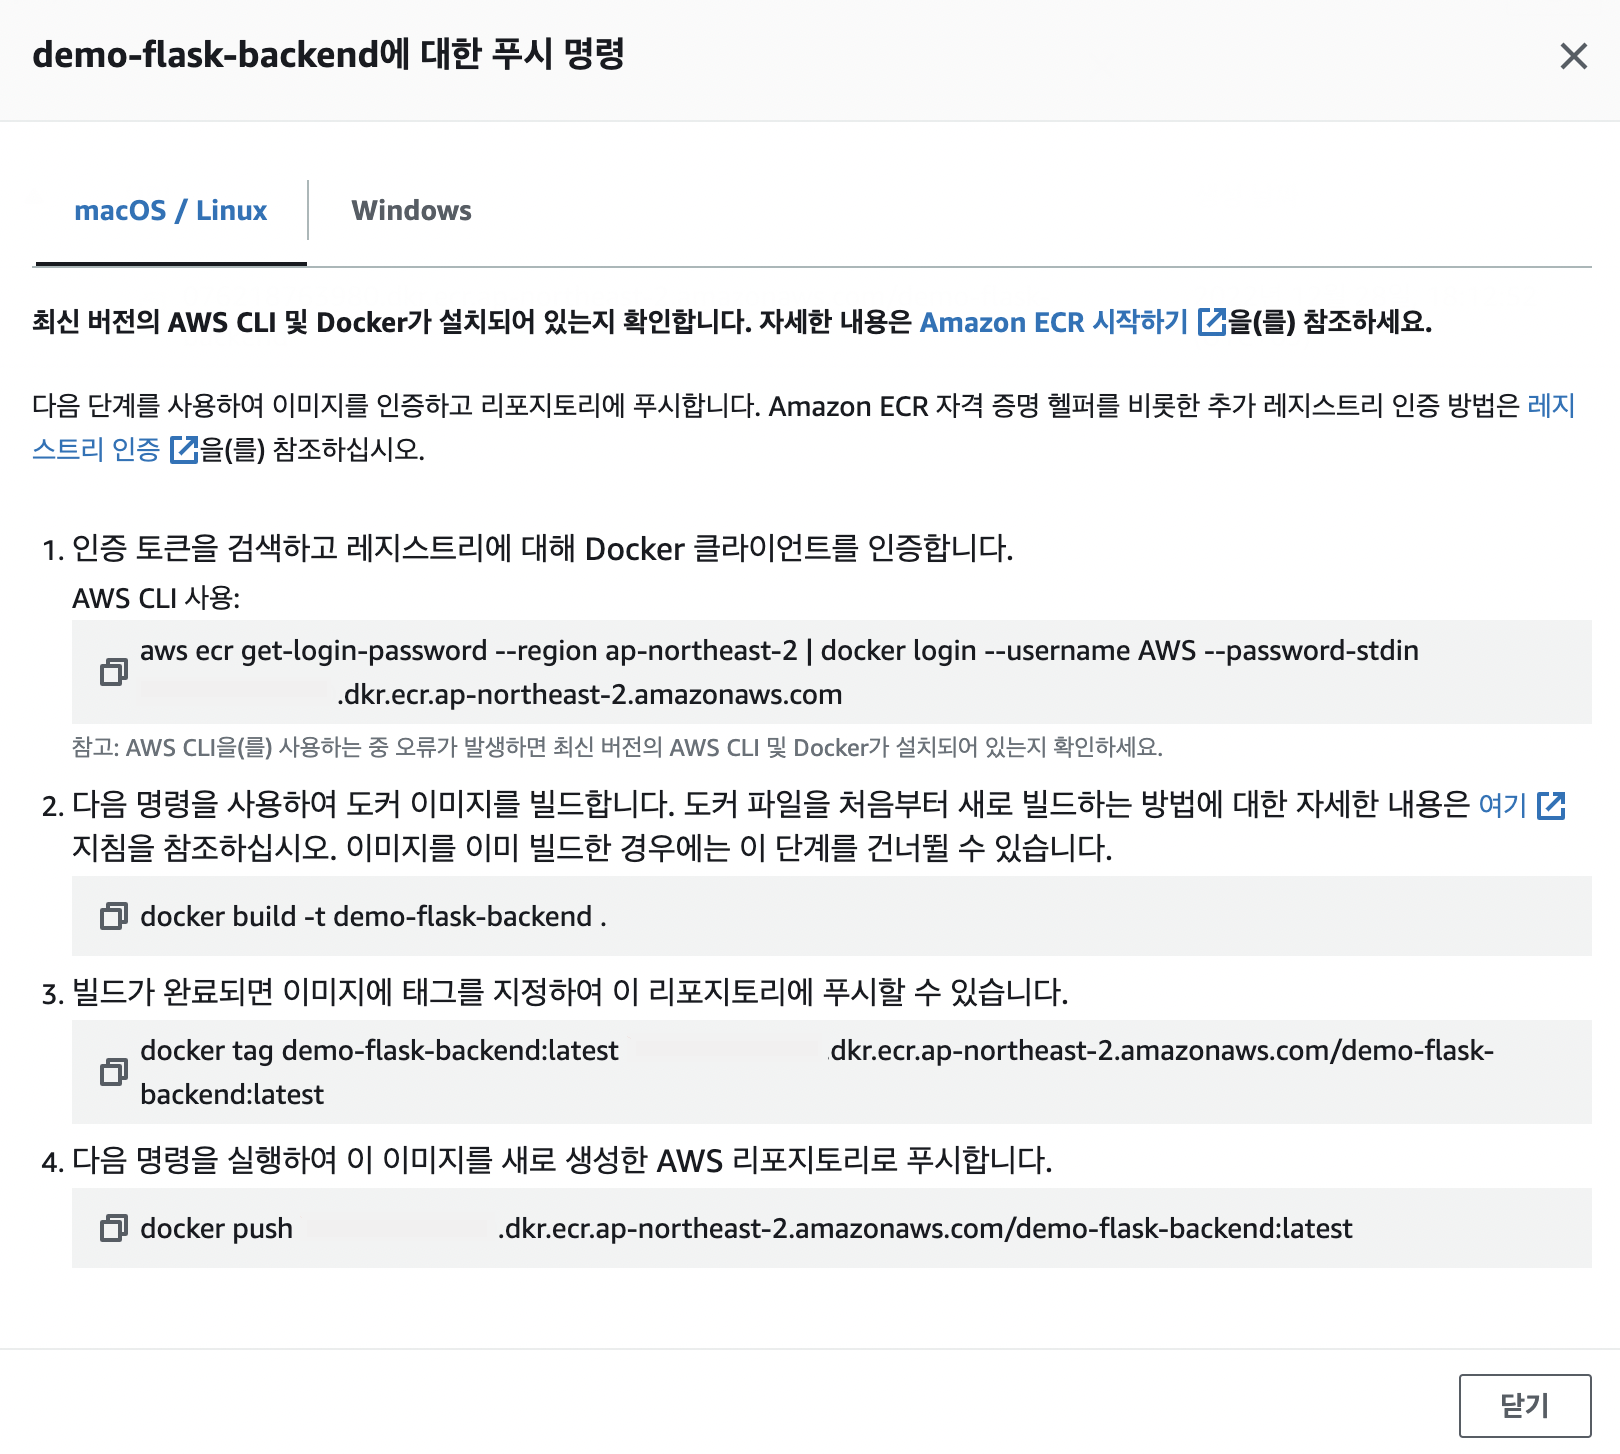
cd ~/environment/amazon-eks-flask docker build -t demo-flask-backend . docker tag demo-flask-backend:latest $ACCOUNT_ID.dkr.ecr.$AWS_REGION.amazonaws.com/demo-flask-backend:latest docker push $ACCOUNT_ID.dkr.ecr.$AWS_REGION.amazonaws.com/demo-flask-backend:latest -
image push 결과
3. eksctl로 클러스터 생성하기
yaml파일 작성
apiVersion: eksctl.io/v1alpha5
kind: ClusterConfig

metadata:
  name: eks-demo # 생성할 EKS 클러스터명
  region: ${AWS_REGION} # 클러스터를 생성할 리전
  version: "1.23"

vpc:
  cidr: "10.101.0.0/16" # 클러스터에서 사용할 VPC의 CIDR
  nat:
    gateway: HighlyAvailable

managedNodeGroups:
  - name: node-group # 클러스터의 노드 그룹명
    instanceType: m5.large # 클러스터 워커 노드의 인스턴스 타입
    desiredCapacity: 3 # 클러스터 워커 노드의 갯수
    volumeSize: 20  # 클러스터 워커 노드의 EBS 용량 (단위: GiB)
    privateNetworking: true
    ssh:
      enableSsm: true
    iam:
      withAddonPolicies:
        imageBuilder: true # Amazon ECR에 대한 권한 추가
        albIngress: true  # albIngress에 대한 권한 추가
        cloudWatch: true # cloudWatch에 대한 권한 추가
        autoScaler: true # auto scaling에 대한 권한 추가
        ebs: true # EBS CSI Driver에 대한 권한 추가

cloudWatch:
  clusterLogging:
    enableTypes: ["*"]

iam:
withOIDC: true- 클러스터 배포
eksctl create cluster -f eks-demo-cluster.yaml- eksctl 배포를 하면 cloudformation을 통해 배포가 진행됨.
- 배포 확인 - cloudformation
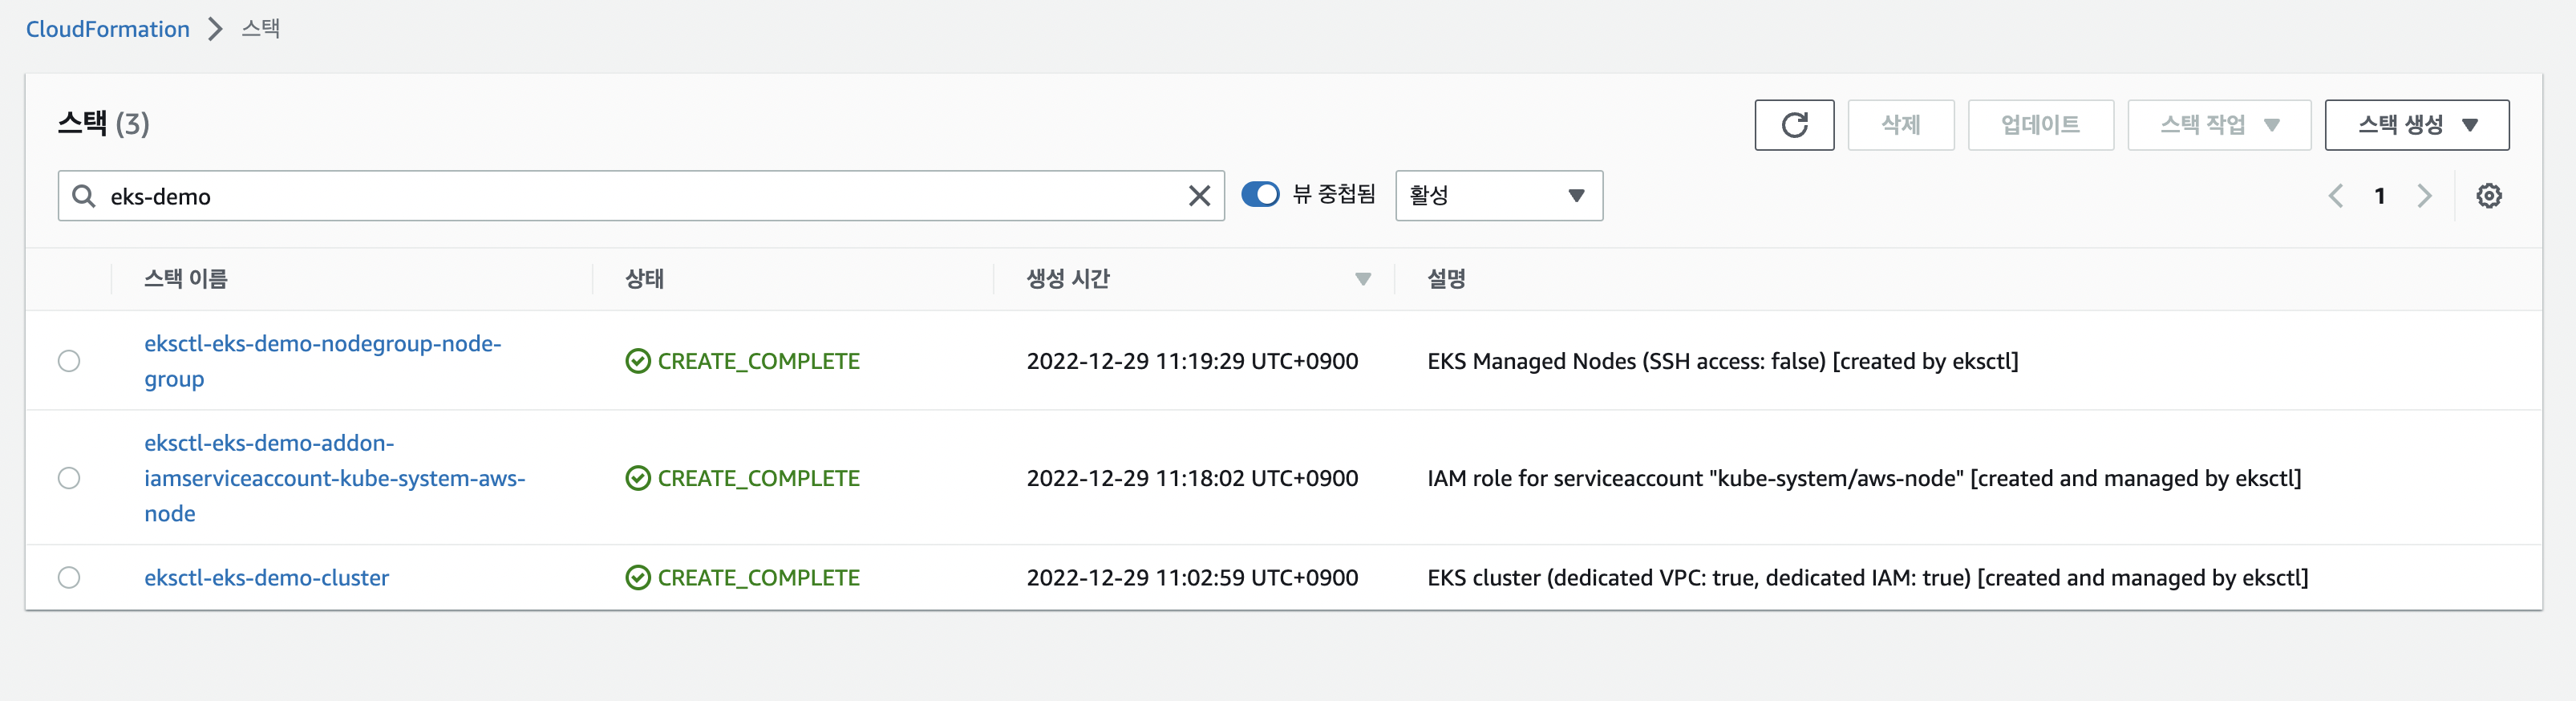
-
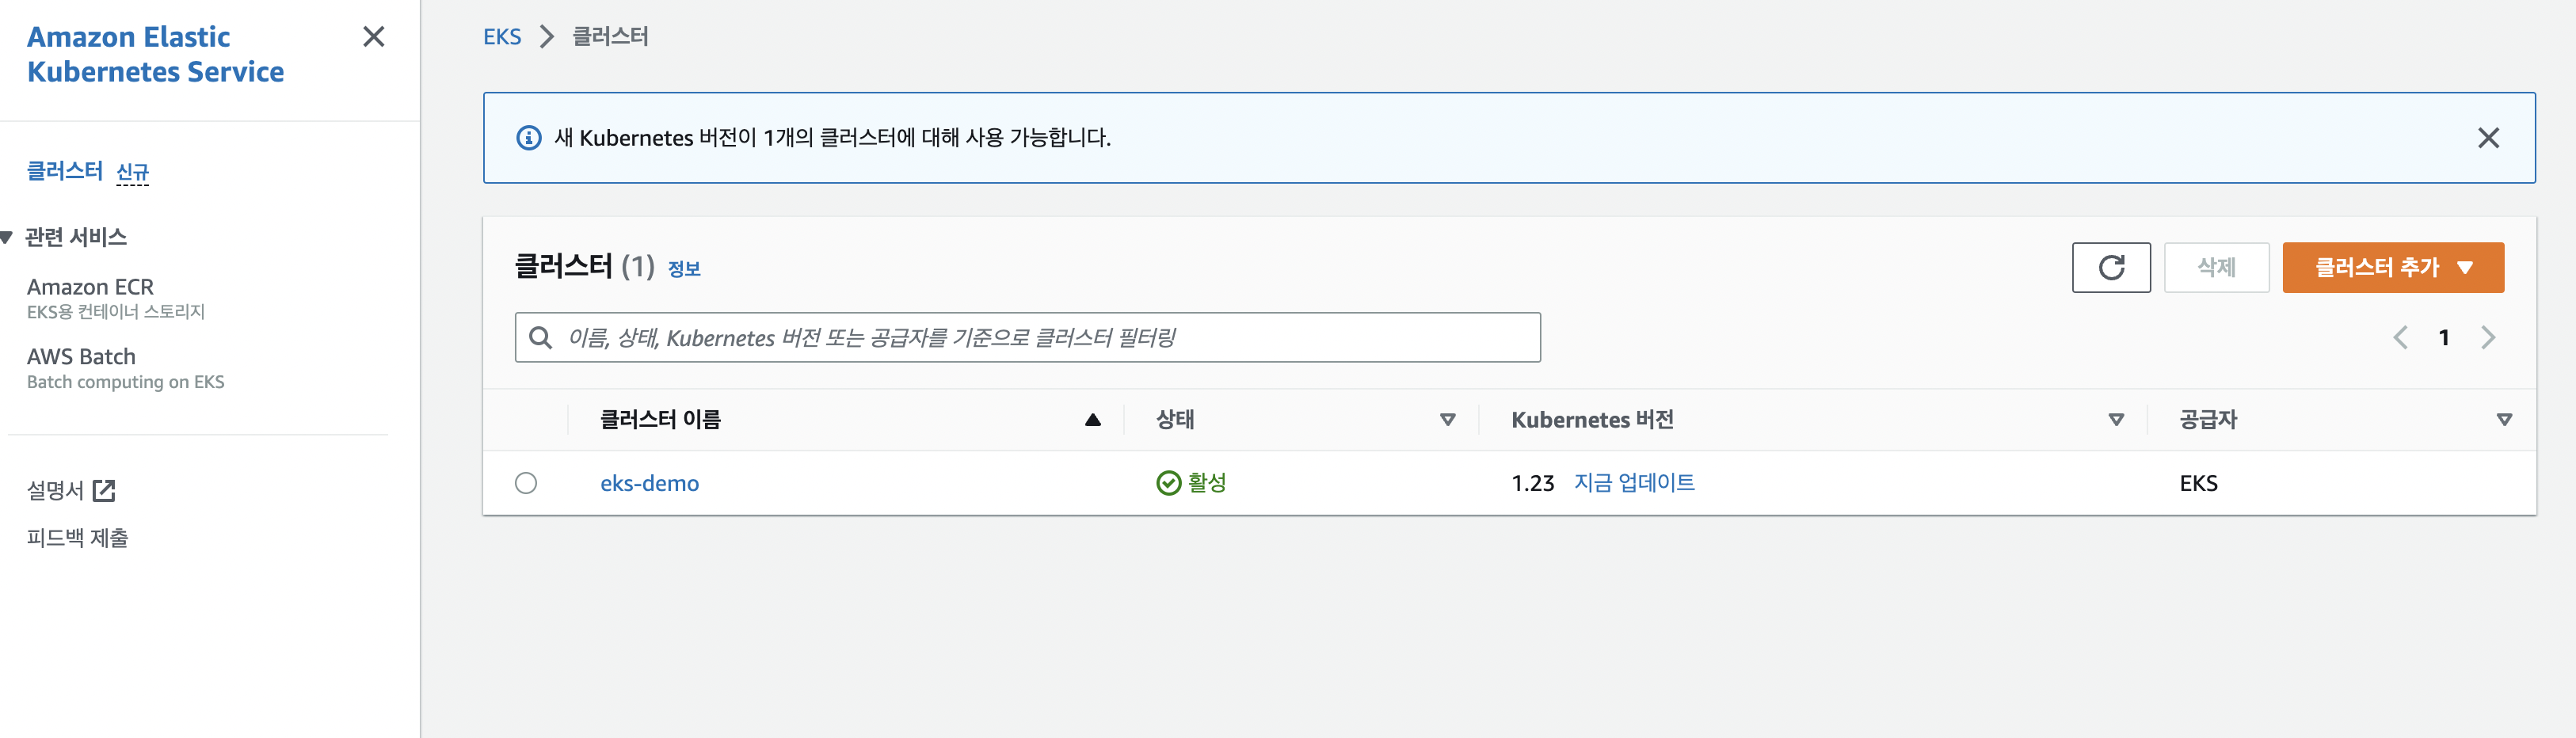
클러스터 배포 노드 확인


- 배포확인 - aws eks
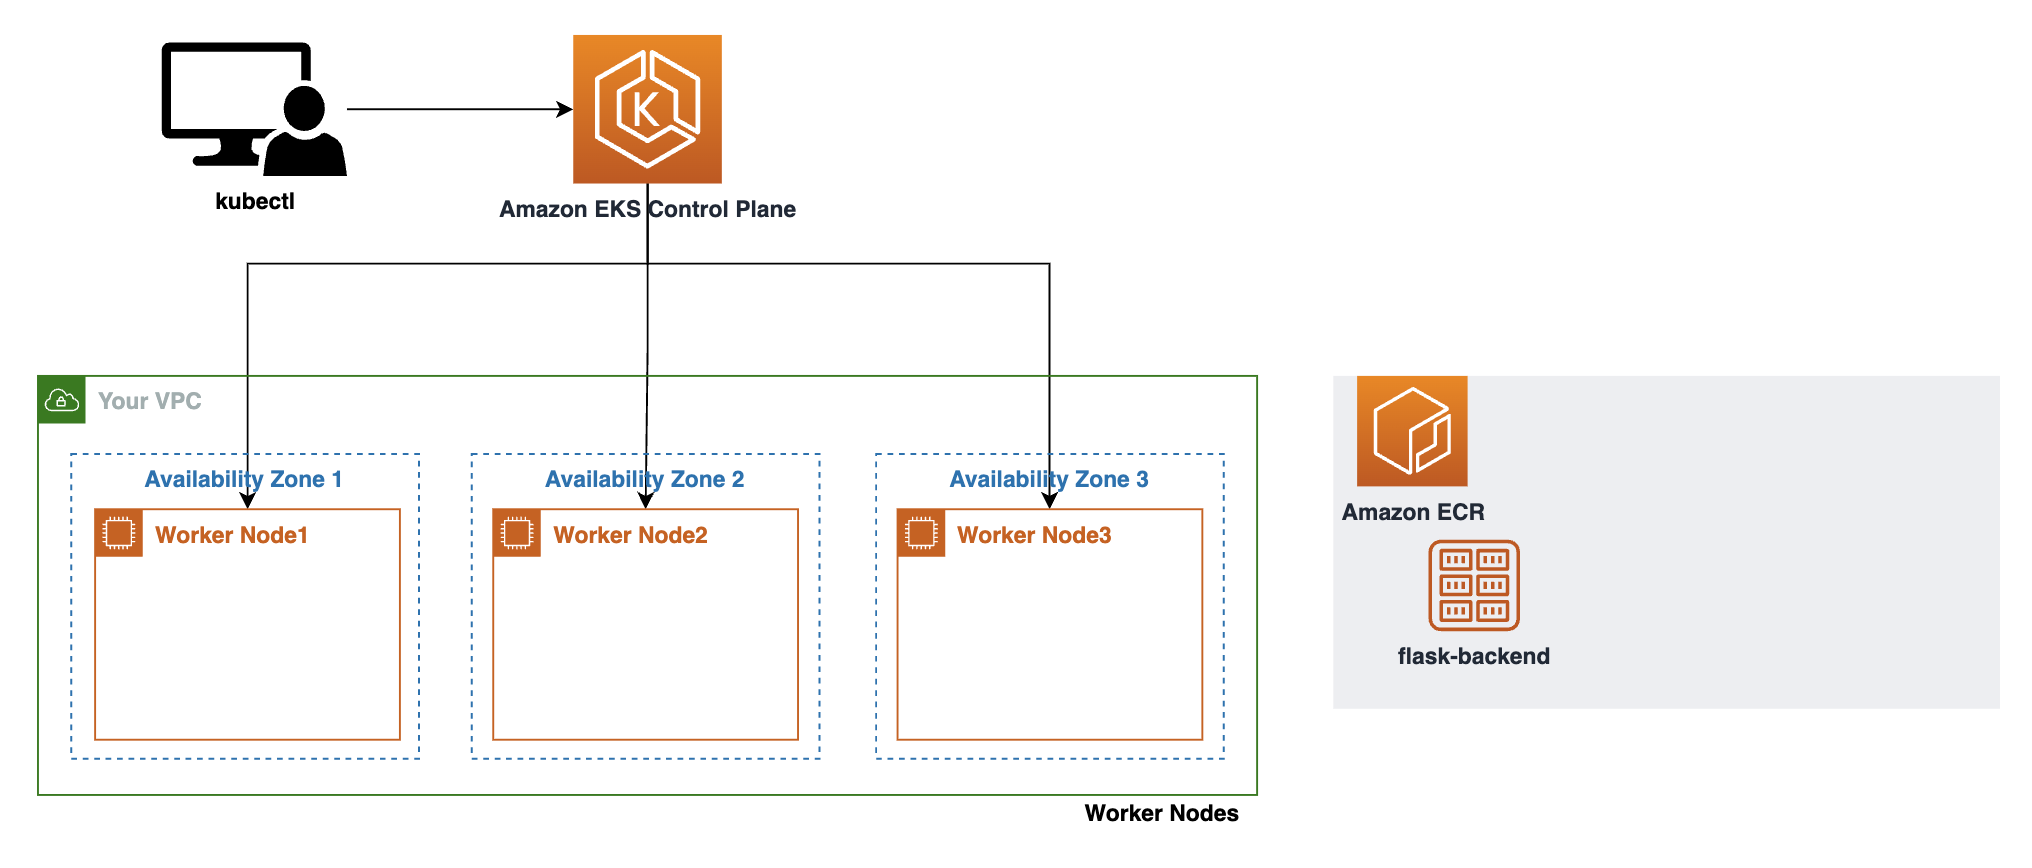
- 현재 아키텍처
오류
- iam 변경했는데 설정이 안되어있어서 그런듯…?

- cloud9에 credential설정 부분에 temporary체크 해제
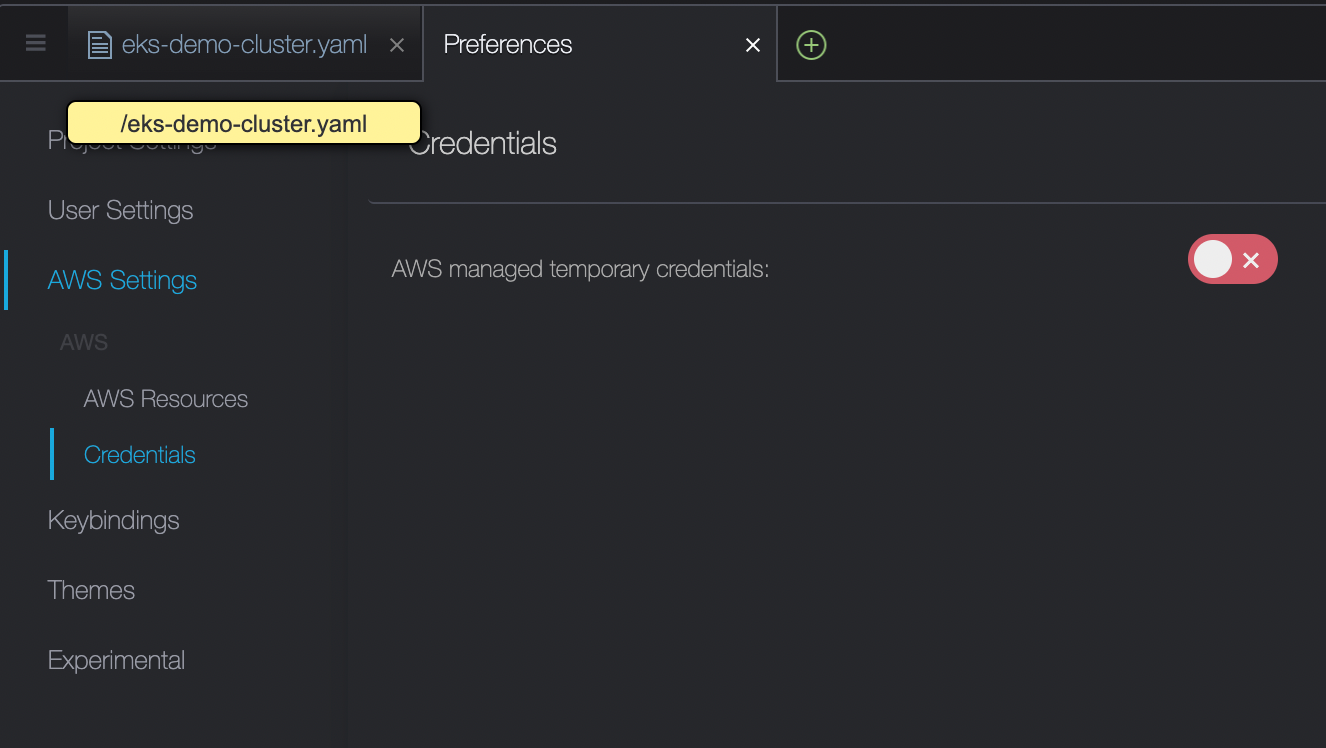
- 위에 설정이 체크되어있으면 앞서 설정한 iam이 적용되지 않음

- 체크 해제후 iam 확인

4. ingress 컨트롤러
AWS Load Balancer 컨트롤러 만들기
-
인그레스 자원들은 ALB를 구성하여 HTTP 또는 HTTPS 트래픽을 클러스터 내 파드로 라우팅합니다.
- 쿠버네티스의
Ingress의 경우,Application Load Balancers으로 프로비저닝됩니다. - 쿠버네티스의
Service의 경우,Network Load Balancers으로 프로비저닝됩니다.
cd ~/environment mkdir -p manifests/alb-ingress-controller && cd manifests/alb-ingress-controller # 최종 폴더 위치 /home/ec2-user/environment/manifests/alb-ingress-controller - 쿠버네티스의
IAM OIDC(OpenID Connect) identity Provider 설정
eksctl utils associate-iam-oidc-provider \
    --region ${AWS_REGION} \
    --cluster eks-demo \
--approve-
oidc
aws eks describe-cluster --name eks-demo --query "cluster.identity.oidc.issuer" --output text #>> https://oidc.eks.ap-northeast-2.amazonaws.com/id/849B218C5~~~~ #결과 값이 출력되면 IAM OIDC identity provider가 클러스터에 생성이 된 것이고, 아무 값도 나타나지 않으면 생성 작업을 수행해야 합니다. aws iam list-open-id-connect-providers | grep 849B218C5~~~~ -
참고
-
AWS Load Balancer Controller에 부여할 IAM Policy 생성
curl -o iam-policy.json https://raw.githubusercontent.com/kubernetes-sigs/aws-load-balancer-controller/v2.4.4/docs/install/iam_policy.json aws iam create-policy \ --policy-name AWSLoadBalancerControllerIAMPolicy \ --policy-document file://iam-policy.json -
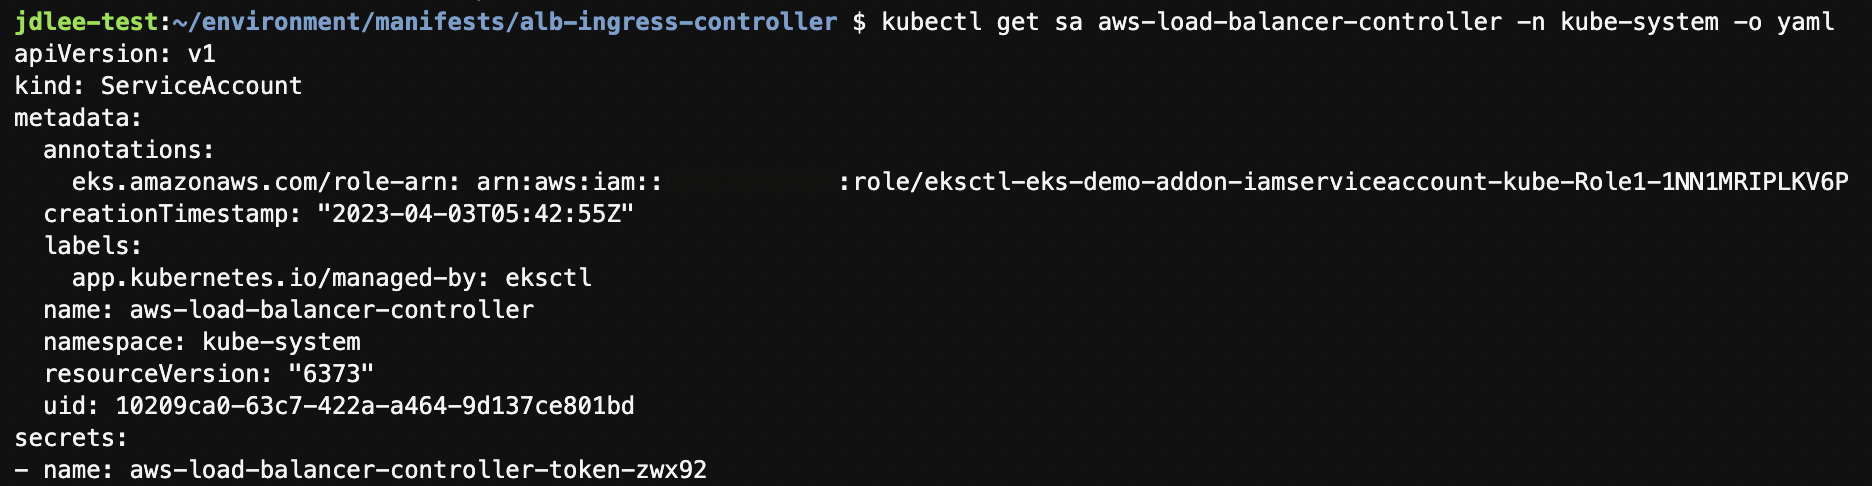
AWS Load Balancer Controller를 위한 ServiceAccount 생성
eksctl create iamserviceaccount \
    --cluster eks-demo \
    --namespace kube-system \
    --name aws-load-balancer-controller \
    --attach-policy-arn arn:aws:iam::$ACCOUNT_ID:policy/AWSLoadBalancerControllerIAMPolicy \
    --override-existing-serviceaccounts \
    --approve
클러스터에 컨트롤러 추가하기.
Cert-manager
- 쿠버네티스 클러스터 내에서 TLS인증서를 자동으로 프로비저닝 및 관리하는 오픈 소스
kubectl apply --validate=false -f https://github.com/jetstack/cert-manager/releases/download/v1.5.4/cert-manager.yaml- load balance controller yml 다운
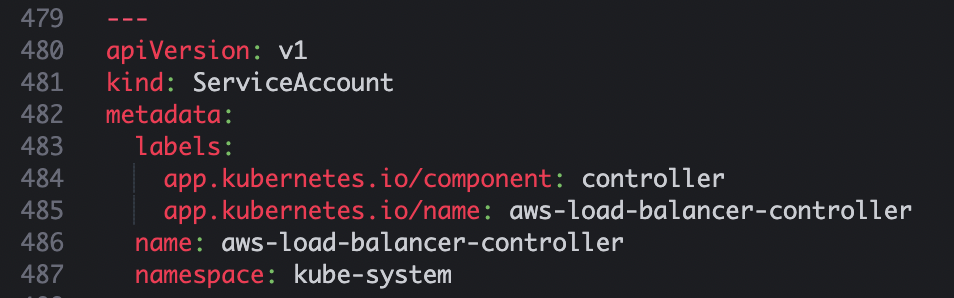
wget https://github.com/kubernetes-sigs/aws-load-balancer-controller/releases/download/v2.4.4/v2_4_4_full.yaml
- cluster-name을 위에서 만든 이름으로 변경
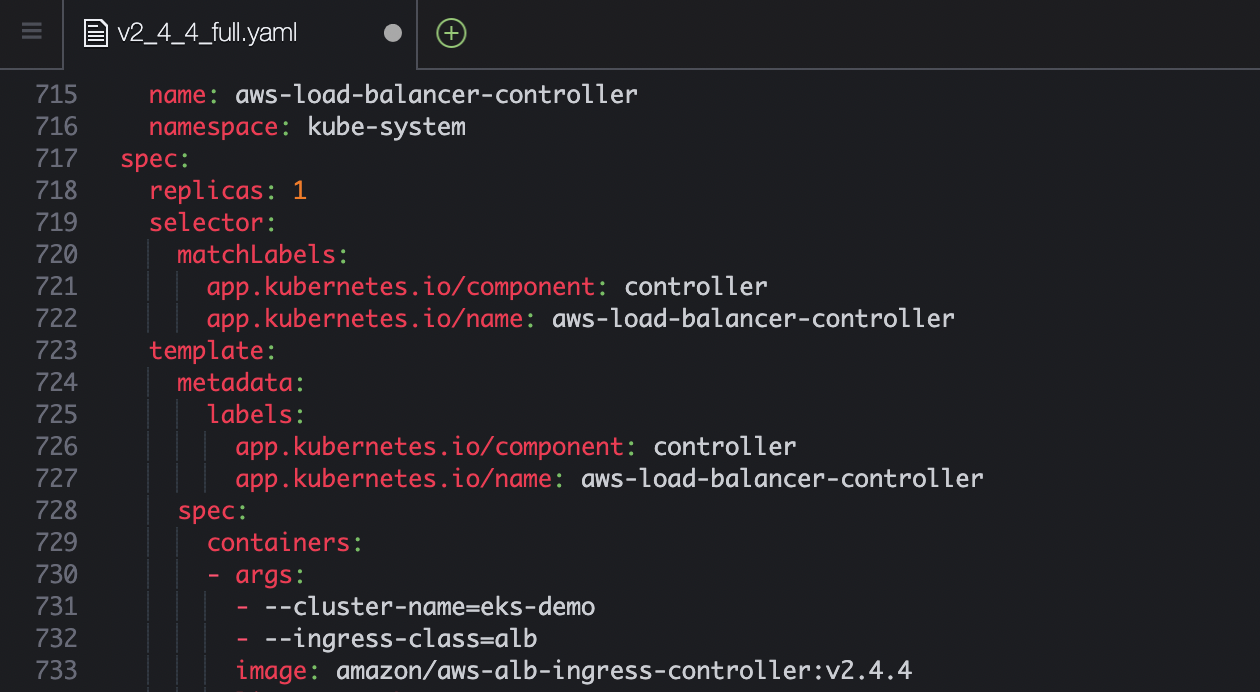
- 위에서 service account는 생성했기때문에 해당 부분 제거
- aws load balancer controller 파일 배포
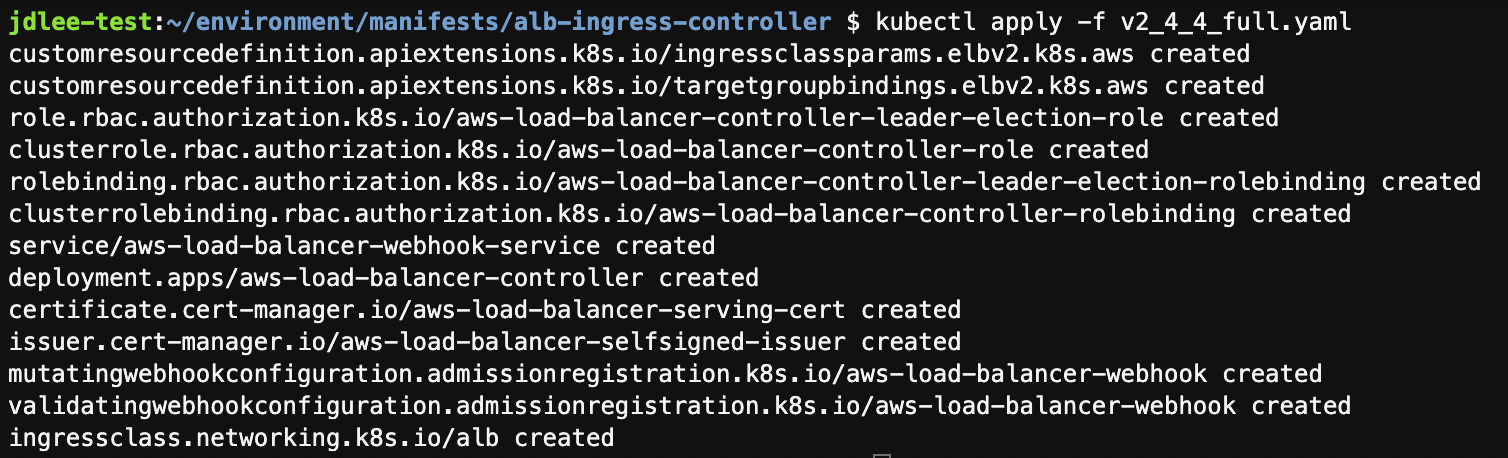
-
컨트롤러가 실행되는지 확인

5. 서비스 배포하기
배포순서
- 소스 코드 다운로드
- Amazon ECR에 각 서비스에 대한 repo 생성
- Dockerfile을 포함한 소스 코드 위치에서 컨테이너 이미지 빌드 후, repo push
- 각 서비스에 대한 Deployment, Service, Ingress 파일 생성 및 배포

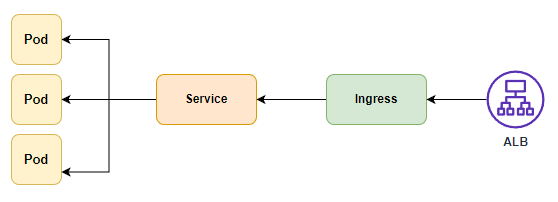
- 서비스 배포 완료되면 사용자가 접근하는 프로세스는 아래와 같다
Flask frontend 배포
- 위 그림과 같은 ingress, service, deployment를 작성한다.
cd ~/environment/manifests/- deployment.yaml
cat <<EOF> flask-deployment.yaml
---
apiVersion: apps/v1
kind: Deployment
metadata:
  name: demo-flask-backend
  namespace: default
spec:
  replicas: 3
  selector:
    matchLabels:
      app: demo-flask-backend
  template:
    metadata:
      labels:
        app: demo-flask-backend
    spec:
      containers:
        - name: demo-flask-backend
          image: $ACCOUNT_ID.dkr.ecr.$AWS_REGION.amazonaws.com/demo-flask-backend:latest
          imagePullPolicy: Always
          ports:
            - containerPort: 8080
EOF- service.yaml
cat <<EOF> flask-service.yaml
---
apiVersion: v1
kind: Service
metadata:
  name: demo-flask-backend
  annotations:
    alb.ingress.kubernetes.io/healthcheck-path: "/contents/aws"
spec:
  selector:
    app: demo-flask-backend
  type: NodePort
  ports:
    - port: 8080 # 서비스가 생성할 포트
      targetPort: 8080 # 서비스가 접근할 pod의 포트
      protocol: TCP
EOF- ingress.yaml
cat <<EOF> flask-ingress.yaml
---
apiVersion: networking.k8s.io/v1
kind: Ingress
metadata:
    name: "flask-backend-ingress"
    namespace: default
    annotations:
      kubernetes.io/ingress.class: alb
      alb.ingress.kubernetes.io/scheme: internet-facing
      alb.ingress.kubernetes.io/target-type: ip
      alb.ingress.kubernetes.io/group.name: eks-demo-group
      alb.ingress.kubernetes.io/group.order: '1'
spec:
    rules:
    - http:
        paths:
          - path: /contents
            pathType: Prefix
            backend:
              service:
                name: "demo-flask-backend"
                port:
                  number: 8080
EOF- 위 작성한 yaml을 배포한다.
kubectl apply -f flask-deployment.yaml
kubectl apply -f flask-service.yaml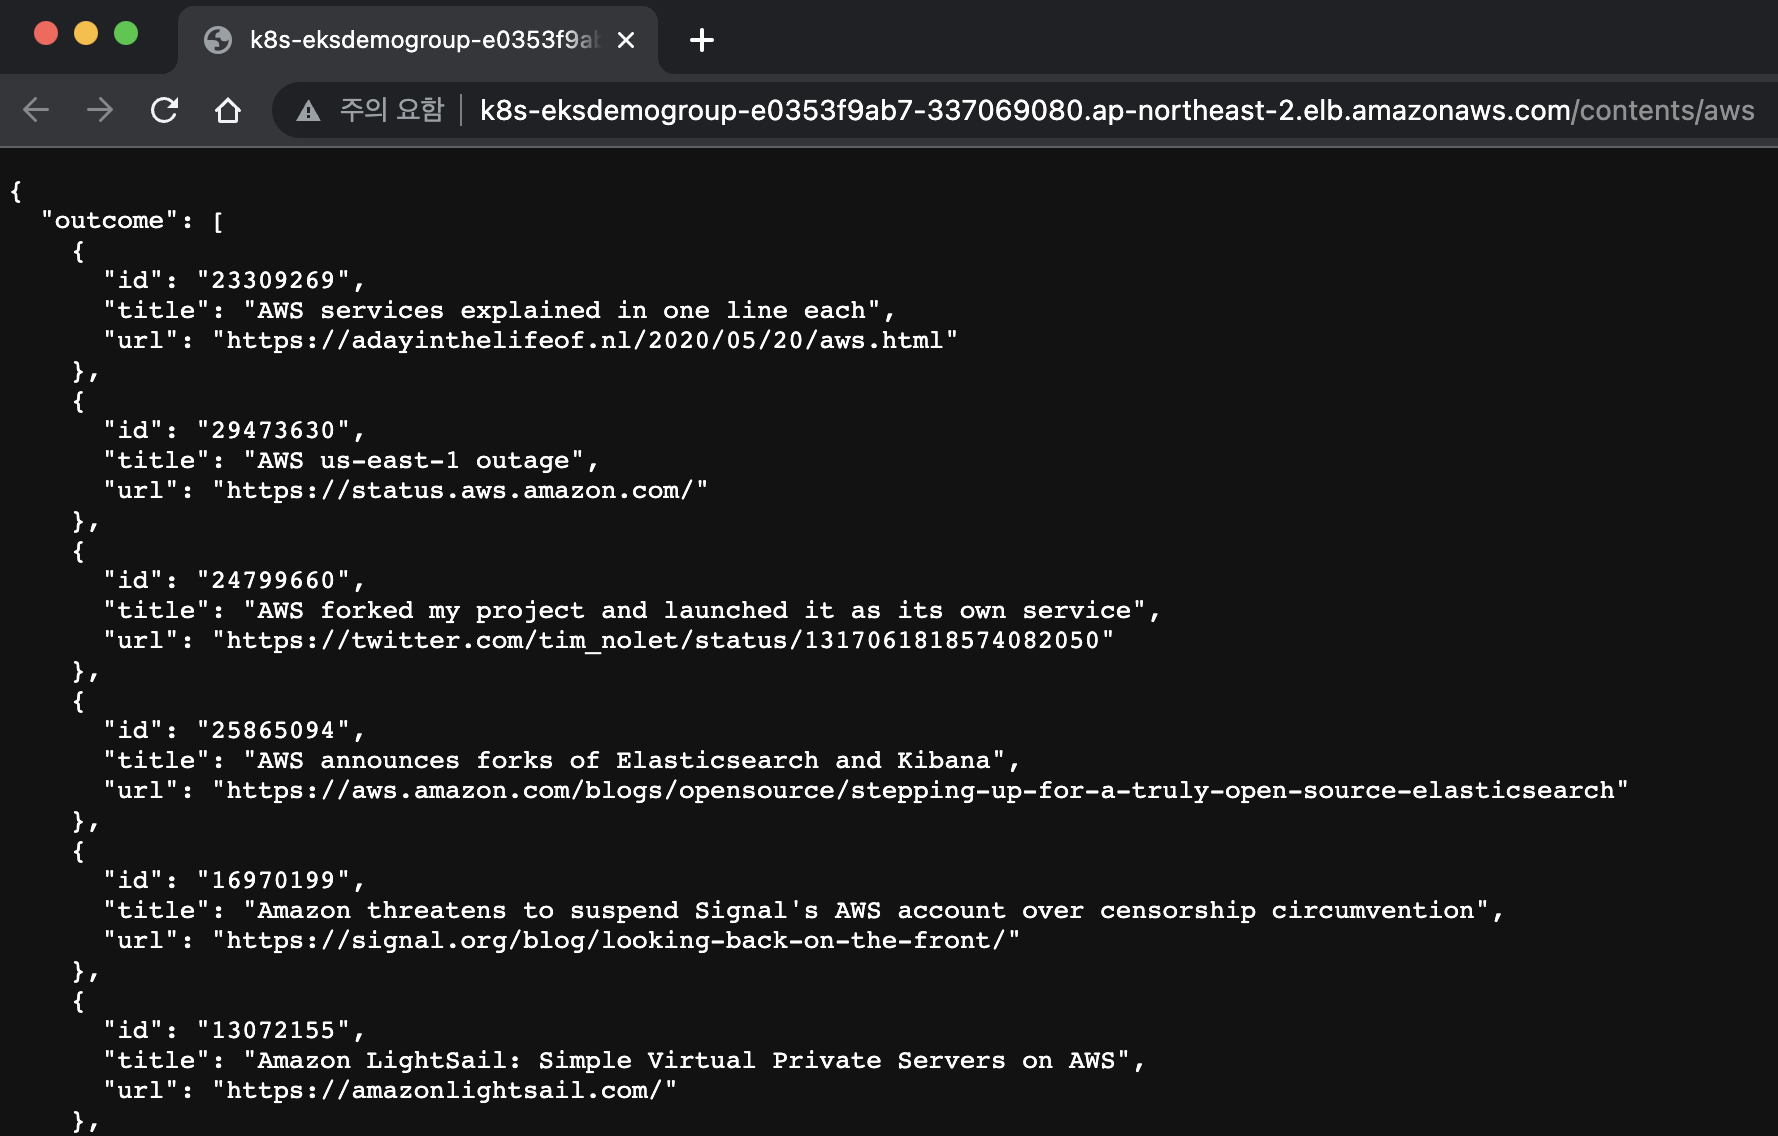
kubectl apply -f flask-ingress.yaml- 배포가 다됐으면 페이지 확인
#배포되는데 시간이 조금 걸린다.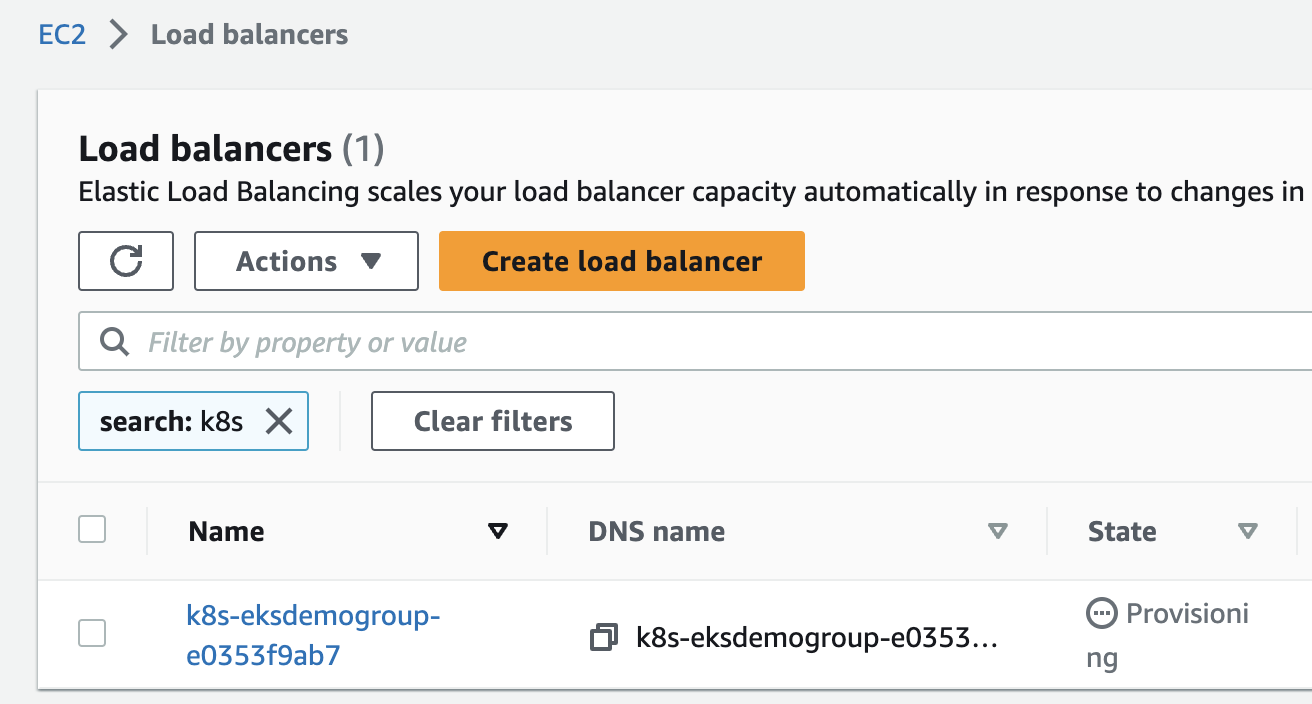
echo http://$(kubectl get ingress/flask-backend-ingress -o jsonpath='{.status.loadBalancer.ingress[*].hostname}')/contents/aws- ec2 콘솔에서 확인.
- 웹페이지로 접속하여 액티브 확인
Express backend 배포
- deploy
cat <<EOF> nodejs-deployment.yaml
---
apiVersion: apps/v1
kind: Deployment
metadata:
  name: demo-nodejs-backend
  namespace: default
spec:
  replicas: 3
  selector:
    matchLabels:
      app: demo-nodejs-backend
  template:
    metadata:
      labels:
        app: demo-nodejs-backend
    spec:
      containers:
        - name: demo-nodejs-backend
          image: public.ecr.aws/y7c9e1d2/joozero-repo:latest
          imagePullPolicy: Always
          ports:
            - containerPort: 3000
EOF- service
cat <<EOF> nodejs-service.yaml
---
apiVersion: v1
kind: Service
metadata:
  name: demo-nodejs-backend
  annotations:
    alb.ingress.kubernetes.io/healthcheck-path: "/services/all"
spec:
  selector:
    app: demo-nodejs-backend
  type: NodePort
  ports:
    - port: 8080
      targetPort: 3000
      protocol: TCP
EOF- ingress
cat <<EOF> nodejs-ingress.yaml
---
apiVersion: networking.k8s.io/v1
kind: Ingress
metadata:
  name: "nodejs-backend-ingress"
  namespace: default
  annotations:
    kubernetes.io/ingress.class: alb
    alb.ingress.kubernetes.io/scheme: internet-facing
    alb.ingress.kubernetes.io/target-type: ip
    alb.ingress.kubernetes.io/group.name: eks-demo-group
    alb.ingress.kubernetes.io/group.order: '2'
spec:
  rules:
  - http:
        paths:
          - path: /services
            pathType: Prefix
            backend:
              service:
                name: "demo-nodejs-backend"
                port:
                  number: 8080
EOF- node js 배포
kubectl apply -f nodejs-deployment.yaml
kubectl apply -f nodejs-service.yaml
kubectl apply -f nodejs-ingress.yaml- 배포 확인
echo http://$(kubectl get ingress/nodejs-backend-ingress -o jsonpath='{.status.loadBalancer.ingress[*].hostname}')/services/all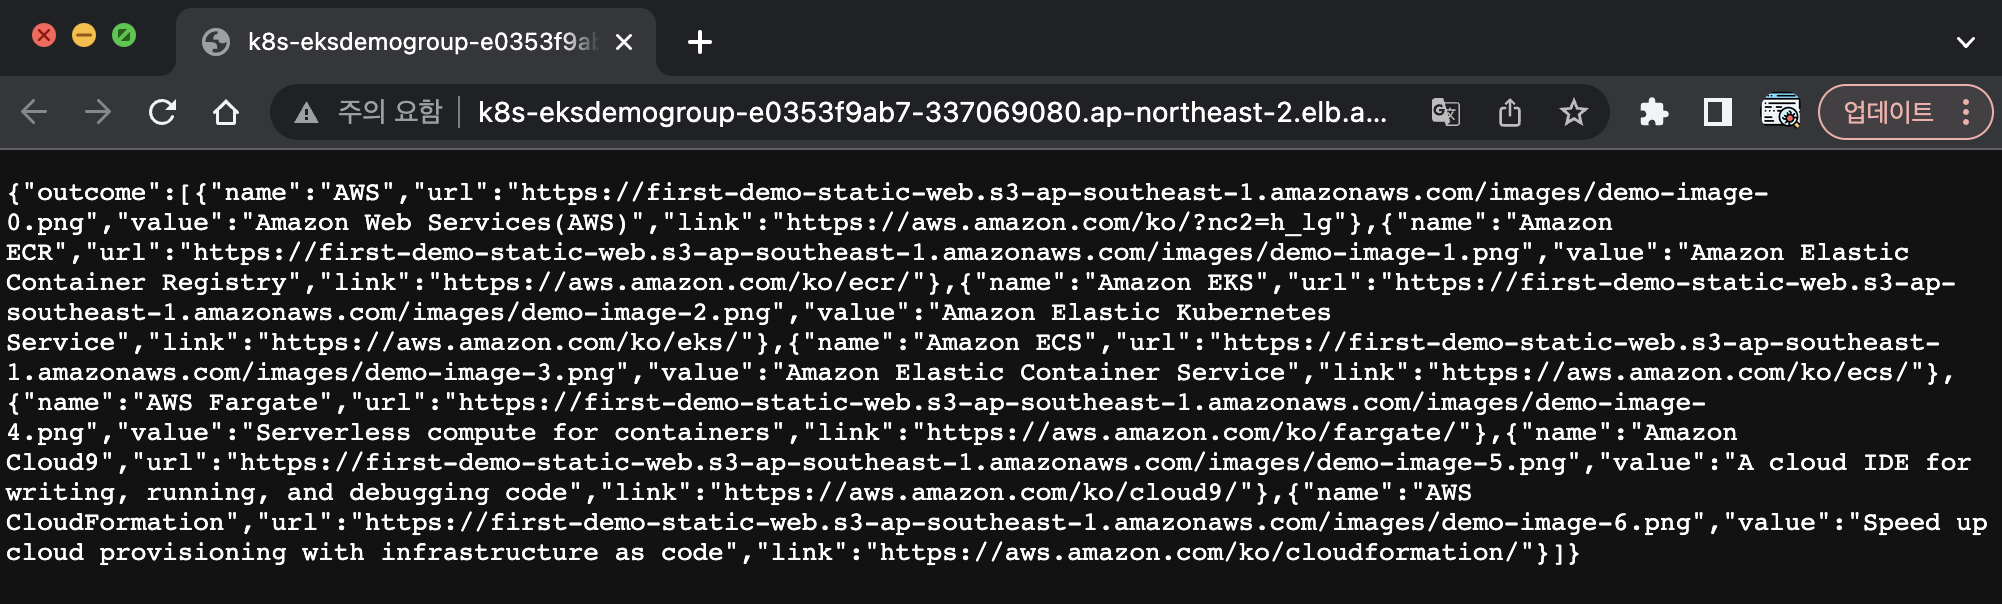
react frontend 배포
- frontend 코드를 다운로드 받는다.
cd /home/ec2-user/environment
git clone https://github.com/joozero/amazon-eks-frontend.git- aws ecr 서비스에 repository를 다음과 같이 생성한다.
aws ecr create-repository \
--repository-name demo-frontend \
--image-scanning-configuration scanOnPush=true \
--region ${AWS_REGION}- 앞서 배포한 백엔드를 프론드엔드에 반영하기 위해 주소 확인을 한다.
#src/App.js
echo http://$(kubectl get ingress/flask-backend-ingress -o jsonpath='{.status.loadBalancer.ingress[*].hostname}')/contents/'${search}'
#src/page/UpperPage.js
echo http://$(kubectl get ingress/nodejs-backend-ingress -o jsonpath='{.status.loadBalancer.ingress[*].hostname}')/services/all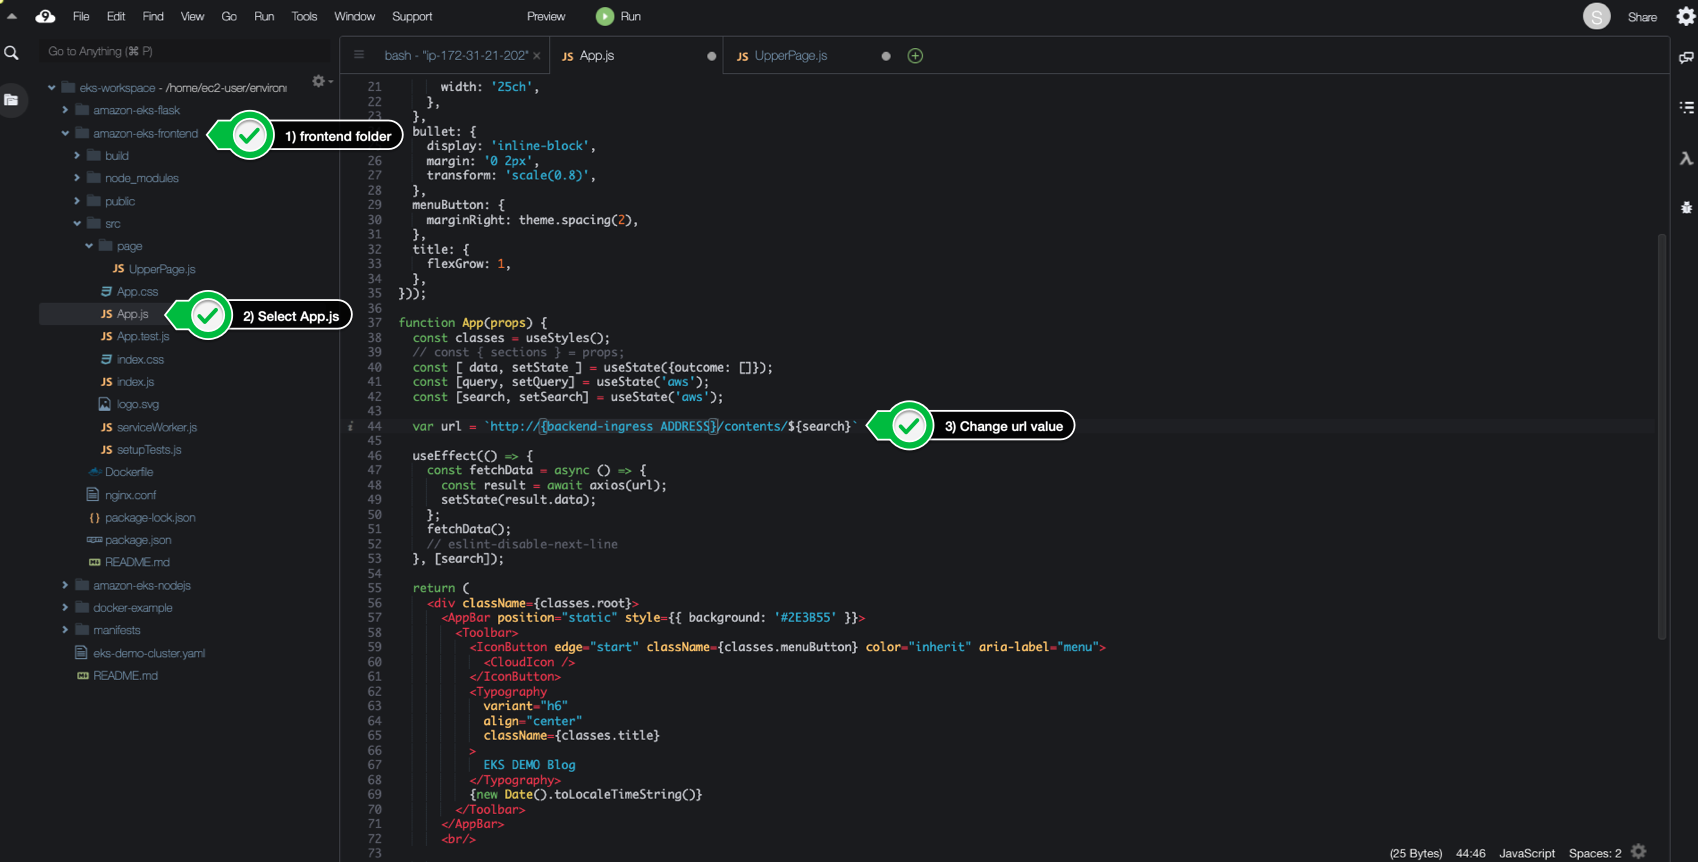
- 다운받은 frontend에서 npm명령어 실행
cd /home/ec2-user/environment/amazon-eks-frontend
npm install
npm run build- 빌드완료 후 docker build, tag, push
docker build -t demo-frontend .

docker tag demo-frontend:latest $ACCOUNT_ID.dkr.ecr.$AWS_REGION.amazonaws.com/demo-frontend:latest

docker push $ACCOUNT_ID.dkr.ecr.$AWS_REGION.amazonaws.com/demo-frontend:latest- push에서 오류 > denied: Your authorization token has expired. Reauthenticate and try again.
#로그인 풀려서 그런거니 로그인 하면 됨
aws ecr get-login-password --region $AWS_REGION | docker login --username AWS --password-stdin $ACCOUNT_ID.dkr.ecr.$AWS_REGION.amazonaws.com- frontend 배포하기 위한 yaml 작업 진행
cd /home/ec2-user/environment/manifests

cat <<EOF> frontend-deployment.yaml
---
apiVersion: apps/v1
kind: Deployment
metadata:
  name: demo-frontend
  namespace: default
spec:
  replicas: 3
  selector:
    matchLabels:
      app: demo-frontend
  template:
    metadata:
      labels:
        app: demo-frontend
    spec:
      containers:
        - name: demo-frontend
          image: $ACCOUNT_ID.dkr.ecr.$AWS_REGION.amazonaws.com/demo-frontend:latest
          imagePullPolicy: Always
          ports:
            - containerPort: 80
EOF
cat <<EOF> frontend-service.yaml
---
apiVersion: v1
kind: Service
metadata:
name: demo-frontend
annotations:
alb.ingress.kubernetes.io/healthcheck-path: "/"
spec:
selector:
app: demo-frontend
type: NodePort
ports:
- protocol: TCP
port: 80
targetPort: 80
EOFcat <<EOF> frontend-ingress.yaml
---
apiVersion: networking.k8s.io/v1
kind: Ingress
metadata:
name: "frontend-ingress"
namespace: default
annotations:
kubernetes.io/ingress.class: alb
alb.ingress.kubernetes.io/scheme: internet-facing
alb.ingress.kubernetes.io/target-type: ip
alb.ingress.kubernetes.io/group.name: eks-demo-group
alb.ingress.kubernetes.io/group.order: '3'
spec:
rules:
- http:
paths:
- path: /
pathType: Prefix
backend:
service:
name: "demo-frontend"
port:
number: 80
EOF- frontend 배포
kubectl apply -f frontend-deployment.yaml
kubectl apply -f frontend-service.yaml
kubectl apply -f frontend-ingress.yaml- 배포 결과 확인
echo http://$(kubectl get ingress/frontend-ingress -o jsonpath='{.status.loadBalancer.ingress[*].hostname}')

어제보다 더 나은 엔지니어가 되자