[TIL] 2023-04-11 DAY18
ExpressJS
GIT 주소
https://github.com/dowoo303/express-routing
https://github.com/dowoo303/todolist-noDB
- 오늘 배운것들
- express-3 (백엔드)
저번 시간 복습
라우터 생성해서 연결해보기
REST API 동작시켜보기
- todolist-noDB
위 express-3 심화학습
REST API 실습
포스트맨이나 인섬니아 이용해서 백엔드 테스트
- 각종 팁
- 원하는 동작에 따라 라우팅 설정 - 특정 게시물 조회 같은 경우 동적 라우팅(/:id)을 이용해야한다.
- params : request{id: 'string'} -> string이기 때문에 parseInt필요
ExpressJS (파일 : express-3)
시작
npm init후 입력 터미널에 main, author와 license만 입력
npm i express로 expressJS 설치
목표
- 서버열어서 get(read),post(create),put(update),delete 동작시켜보기
- routes 폴더 생성 후 라우터 파일들을 생성하여 연결시켜보기
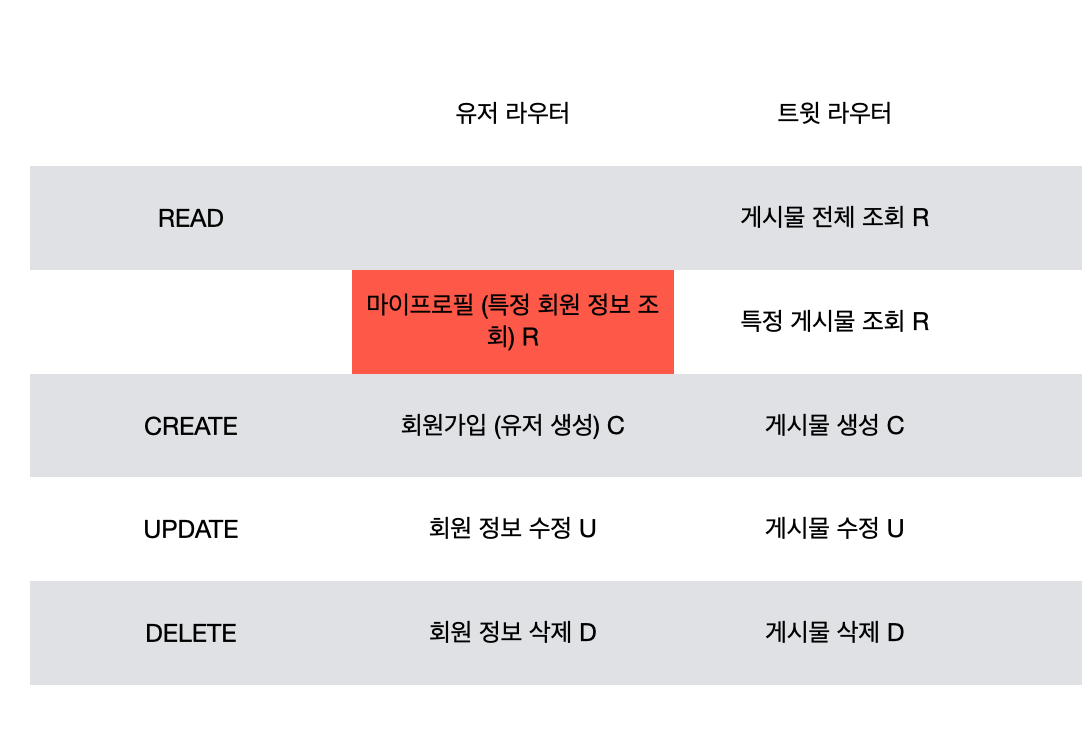
라우터
유저 수가 많아지면 코드가 복잡해지기때문에 라우터를 사용해야만 한다.
라우터를 이용하면 휠씬 쉽고 깔끔하게 보관이 가능하다.const express = require("express"); // import const router = express.Router(); // 라우터 불러오기 module.exports = router; // export
router.js
router.get("/", (req, res) => {
  res.send("전체 게시물 조회");
});

router.get("/:id", (req, res) => {
  console.log(req.params);
  // 동적 라우팅 경로 부여
  res.send("특정 게시물 조회");
});
app.js
const userRouter = require("./routes/user");
const tweetRouter = require("./routes/tweet");

const app = express();

const port = 3010;

app.use("/user", userRouter);
app.use("/tweet", tweetRouter);
nodemon
자동으로 express 업데이트를 지원해준다.
- 설치방법
설치 명령어 :npm i -D nodemon
사이트 : https://www.npmjs.com/package/nodemon
package.json에서 dev 추가해줘야함."scripts": { "dev": "nodemon app.js" },실행시에는 터미널에서
npm run dev입력.
todolist (파일 : todolist-noDB)
시작
expressJS 및 nodemon까지 설치 (위와 동일)
목표
REST API의 동작들 모두 구현해보기(POST, GET, PUT, DELETE)
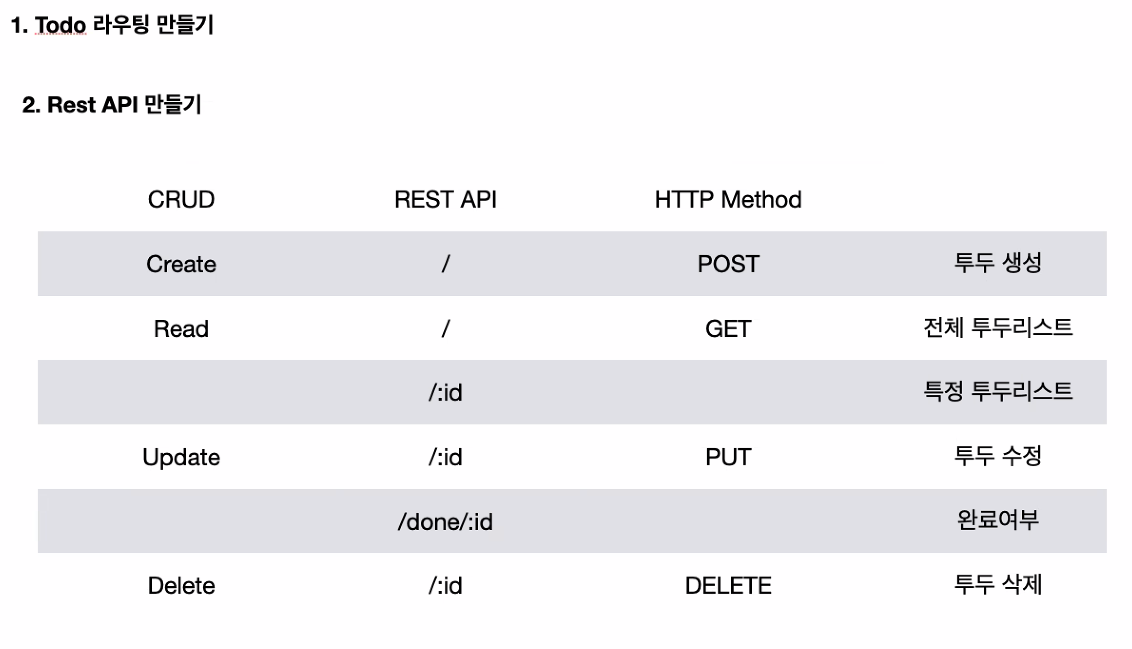
완료 여부 바꾸기(put-update)
router.put("/done/:id", (req, res) => {
  const { id } = req.params;

  if (parseInt(id) >= todoData.length) {
    // 배열의 길이보다 많은 id값이 들어왔을 경우 오류발생
    res.status(400).json({ error: "존재하지않는 ID입니다." });
  }

  todoData[parseInt(id)] = {
    title: todoData[parseInt(id)].title, // 값 그대로
    desc: todoData[parseInt(id)].desc, // 값 그대로
    isDone: !todoData[parseInt(id)].isDone, // 부울린값 변경(완료 or 미완료)
  };

  console.log(todoData);

  res.json(todoData);
});
생성되어 있는 배열 값 바꾸기(put-update)
router.put("/:id", (req, res) => {
  const { id } = req.params;
  const { title, desc } = req.body;

  if (parseInt(id) >= todoData.length) {
    res.status(400).json({ error: "존재하지않는 ID입니다." });
  }
  if (!title && !desc) {
    res
      .status(400)
      .json({ error: "타이틀이나 설명 중에 하나의 값은 입력해야 합니다." });
  }

  todoData[parseInt(id)] = {
    // 내가 body에 입력한 원하는 값으로 업데이트
    title: title ? title : todoData[parseInt(id)].title, // 입력값 : 없으면 그대로
    desc: desc ? desc : todoData[parseInt(id)].desc, // 입력값 : 없으면 그대로
    isDone: todoData[parseInt(id)].isDone, // 기존에 있던 isDone값 그대로 사용
  };

  console.log(todoData);

  res.json(todoData);
});
배열에 새로운 값 추가하기(post-create)
router.post("/", (req, res) => {
  const { title, desc } = req.body; // 구조분해

  todoData.push({ title, desc, isDone: false }); // 키값과 value값이 같기 때문에 title: title 축소 가능

  console.log(todoData);

  res.json(todoData);
});
배열에 있는 값 삭제하기(delete)
router.delete("/:id", (req, res) => {
  const { id } = req.params;

  if (parseInt(id) >= todoData.length) {
    // 배열의 길이보다 많은 id값이 들어왔을 경우 오류발생
    res.status(400).json({ error: "존재하지않는 ID입니다." });
  }

  todoData = todoData.filter((v, i) => {
    // id와 index 값이 같은 배열값은 삭제(값이 다른것들만 통과)
    return parseInt(id) !== i;
  });

  console.log(todoData);

  res.json(todoData);
});
필터(filter)
시작
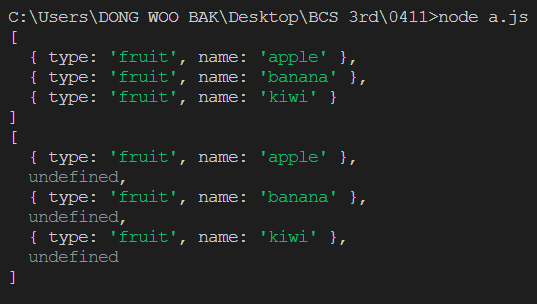
맵 함수와 filter 함수의 차이점 비교해보기
코드
const foods = [
  { type: "fruit", name: "apple" },
  { type: "vegetable", name: "carrot" },
  { type: "fruit", name: "banana" },
  { type: "vegetable", name: "potato" },
  { type: "fruit", name: "kiwi" },
  { type: "vegetable", name: "tomato" },
];

const onlyFruits = foods.filter((v, i) => {
  // 통과된 값만 저장
  return v.type === "fruit";
});

const mapFruits = foods.map((v, i) => {
  // 결과값까지 모두 저장
  if (v.type === "fruit") {
    return v;
  }
});

console.log(onlyFruits);
console.log(mapFruits);
결과

HELLO!