[TIL] 2023-04-14 DAY21
Frontend+Backend+DB 연결 및 통신
GIT 주소 : https://github.com/dowoo303/todolist_all
오늘 배운것들
- DAY20에 이어서 todolist 계속 작성
backend - user, todo router 생성 및 제작
frontend - Login 페이지 생성 및 DB와 통신
각종 팁
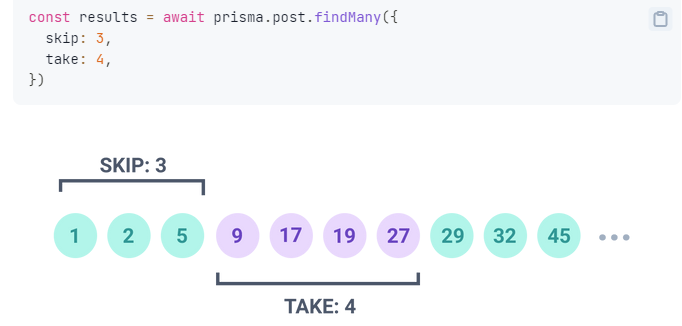
- fundMany 기능중에는 skip, take기능도 존재한다.
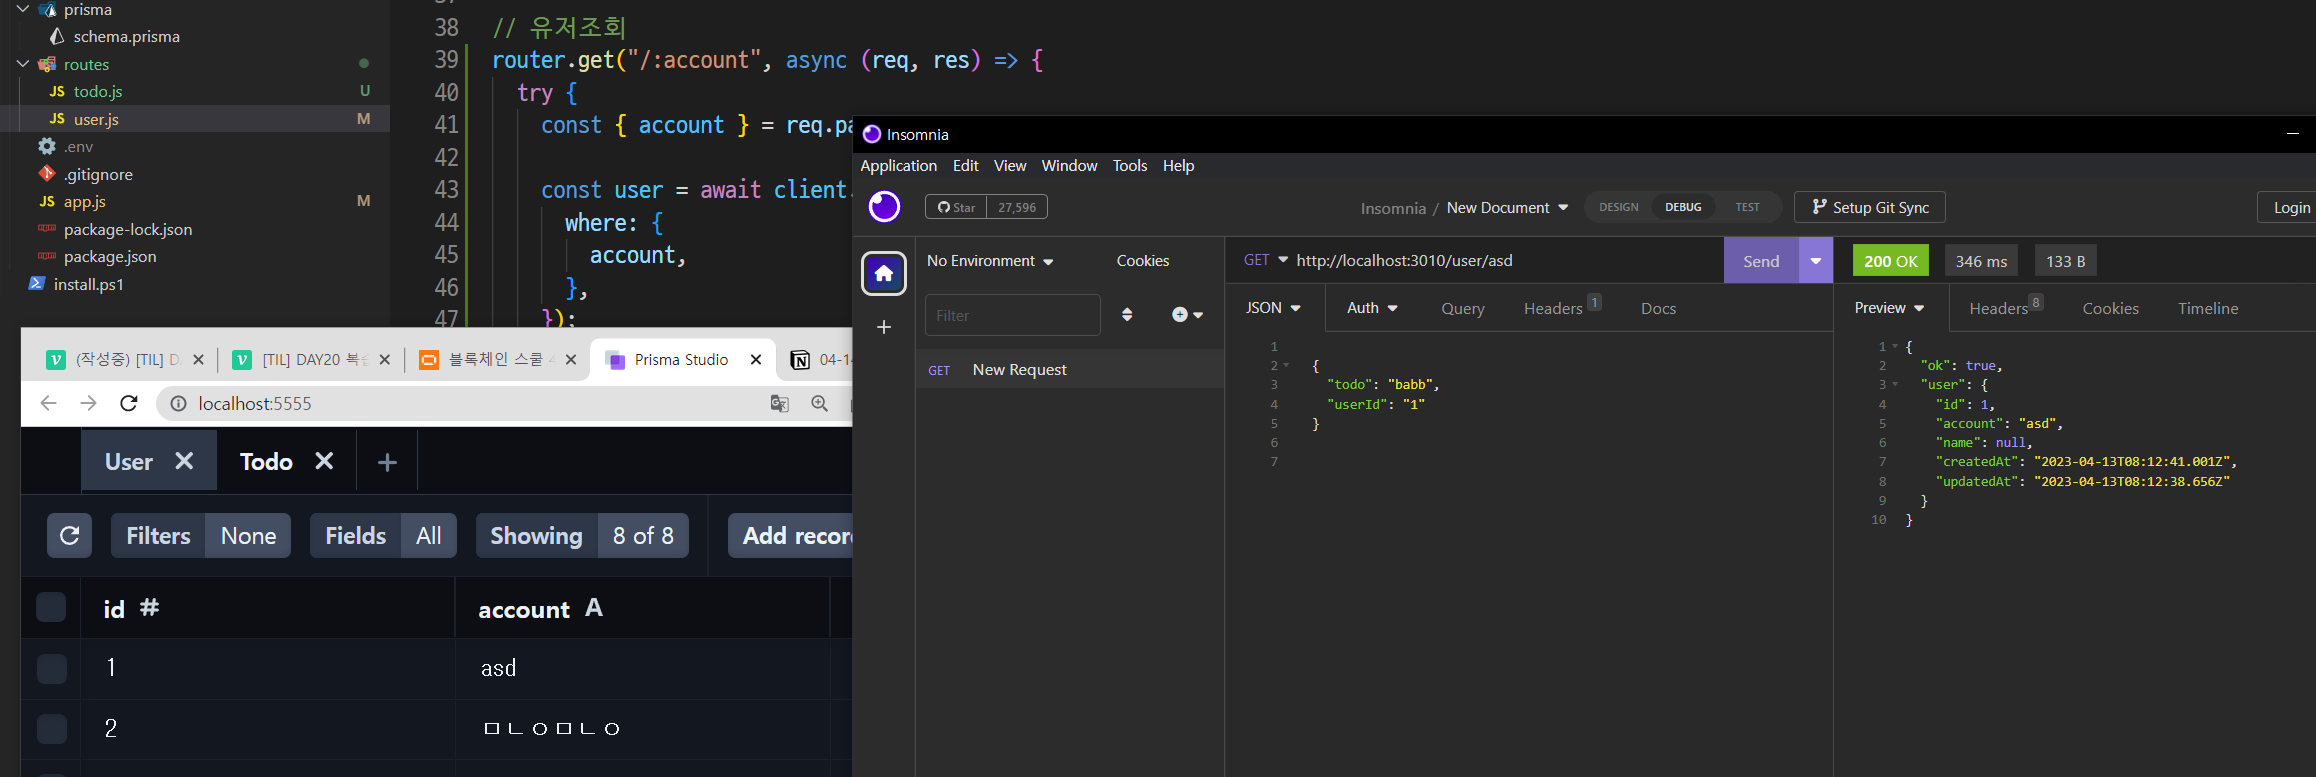
req.params은 문자열로 받아온다는 것 잊지말기.(parseInt 쓰기)
- 백엔드와 DB 사이에 통신을 할 때 밑 코드처럼 id를 날리는게 아니라 Session나 JWT으로 암호화를 통해 날림.(그렇지 않으면 보안이 바로 뚫릴테니까)
회고
- 함수를 쓸 때 뒤에 괄호() 빼먹지 말자
- 과제
스케마에 댓글 테이블 추가하고 동작시켜보기
패스워드(Bcrypt) 추가해보기
todolist
DAY20에서 연결했던 3가지
pscale connect to-do-list프리즈마 연결(위치 상관 x)
npx prisma studio프리즈마 스튜디오 켜기
npm run dev백엔드 연결
문제점
account는 @unique이라 중복이 되면 안된다.
해결방법 : 먼저 DB에서 아이디를 조회한 다음 없다면 생성한다.const existUser = await client.user.findUnique({ // 중복된 값 확인 where: { account, }, }); if (existUser) { return res .status(400) .json({ ok: false, error: "그 계정은 이미 존재합니다." }); }
user.js
account에 따른 유저조회 기능 추가
todo.js
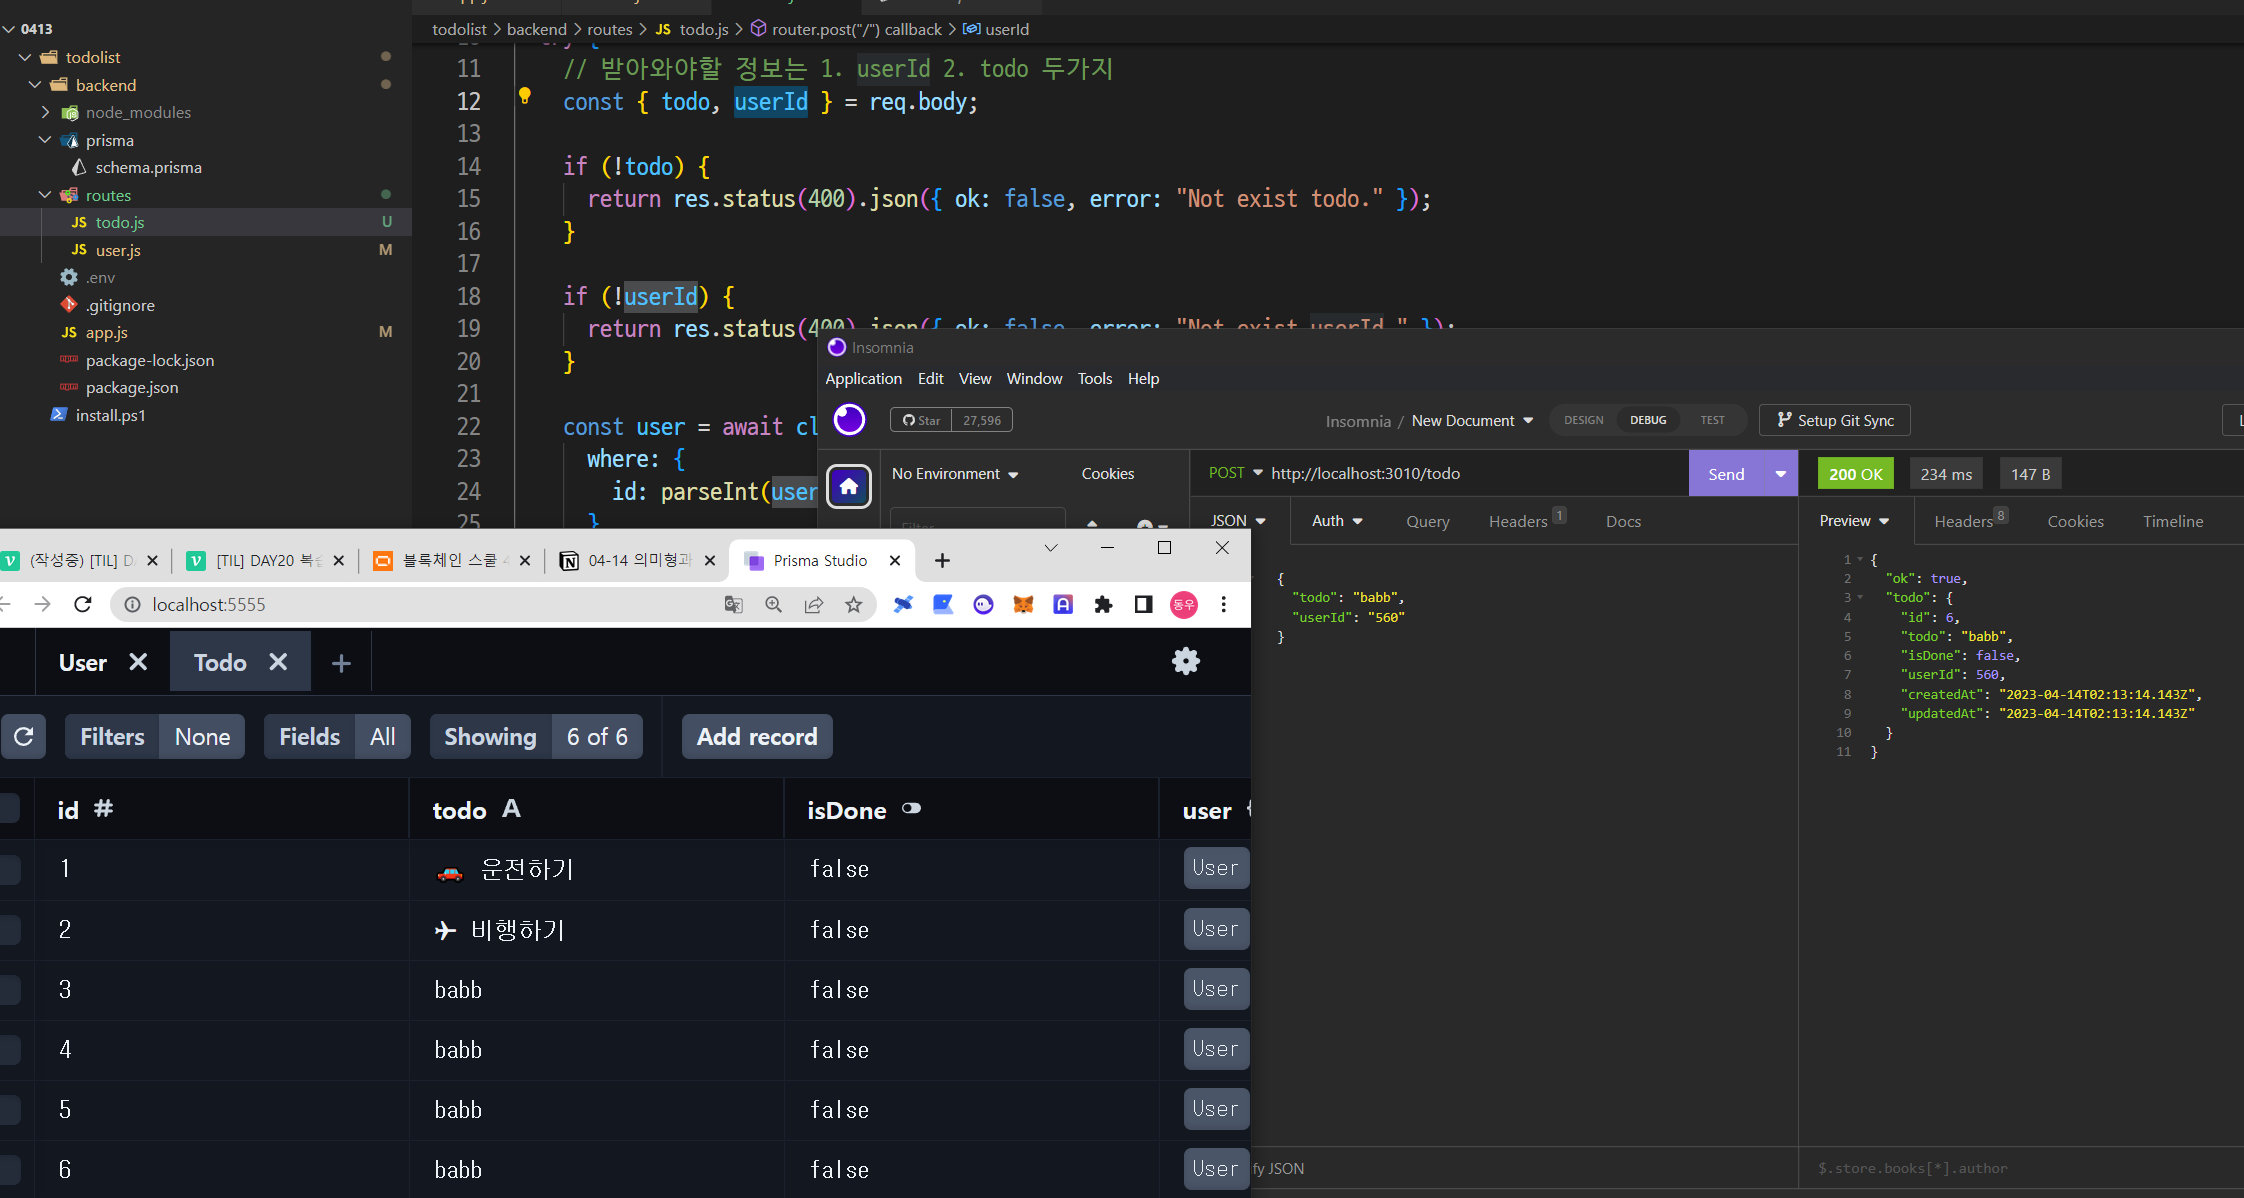
1. 투두 생성 API 코드
router.post("/", async (req, res) => {
  try {
    // 받아와야할 정보는 1. userId 2. todo 두가지
    const { todo, userId } = req.body;
    if (!todo) {
      return res.status(400).json({ ok: false, error: "Not exist todo." });
    }
    if (!userId) {
      return res.status(400).json({ ok: false, error: "Not exist userId." });
    }

    // user가 존재하는지 체크
    const user = await client.user.findUnique({
      where: {
        id: parseInt(userId),
      },
    });
    if (!user) {
      return res.status(400).json({ ok: false, error: "Not exist user." });
    }

    // 위 조건들이 모두 만족했다면 create data 후 res.json
    const newTodo = await client.todo.create({
      data: {
        todo,
        isDone: false,
        userId: user.id,
      },
    });

    res.json({ ok: true, todo: newTodo });
  } catch (error) {
    console.error(error);
  }
});
결과
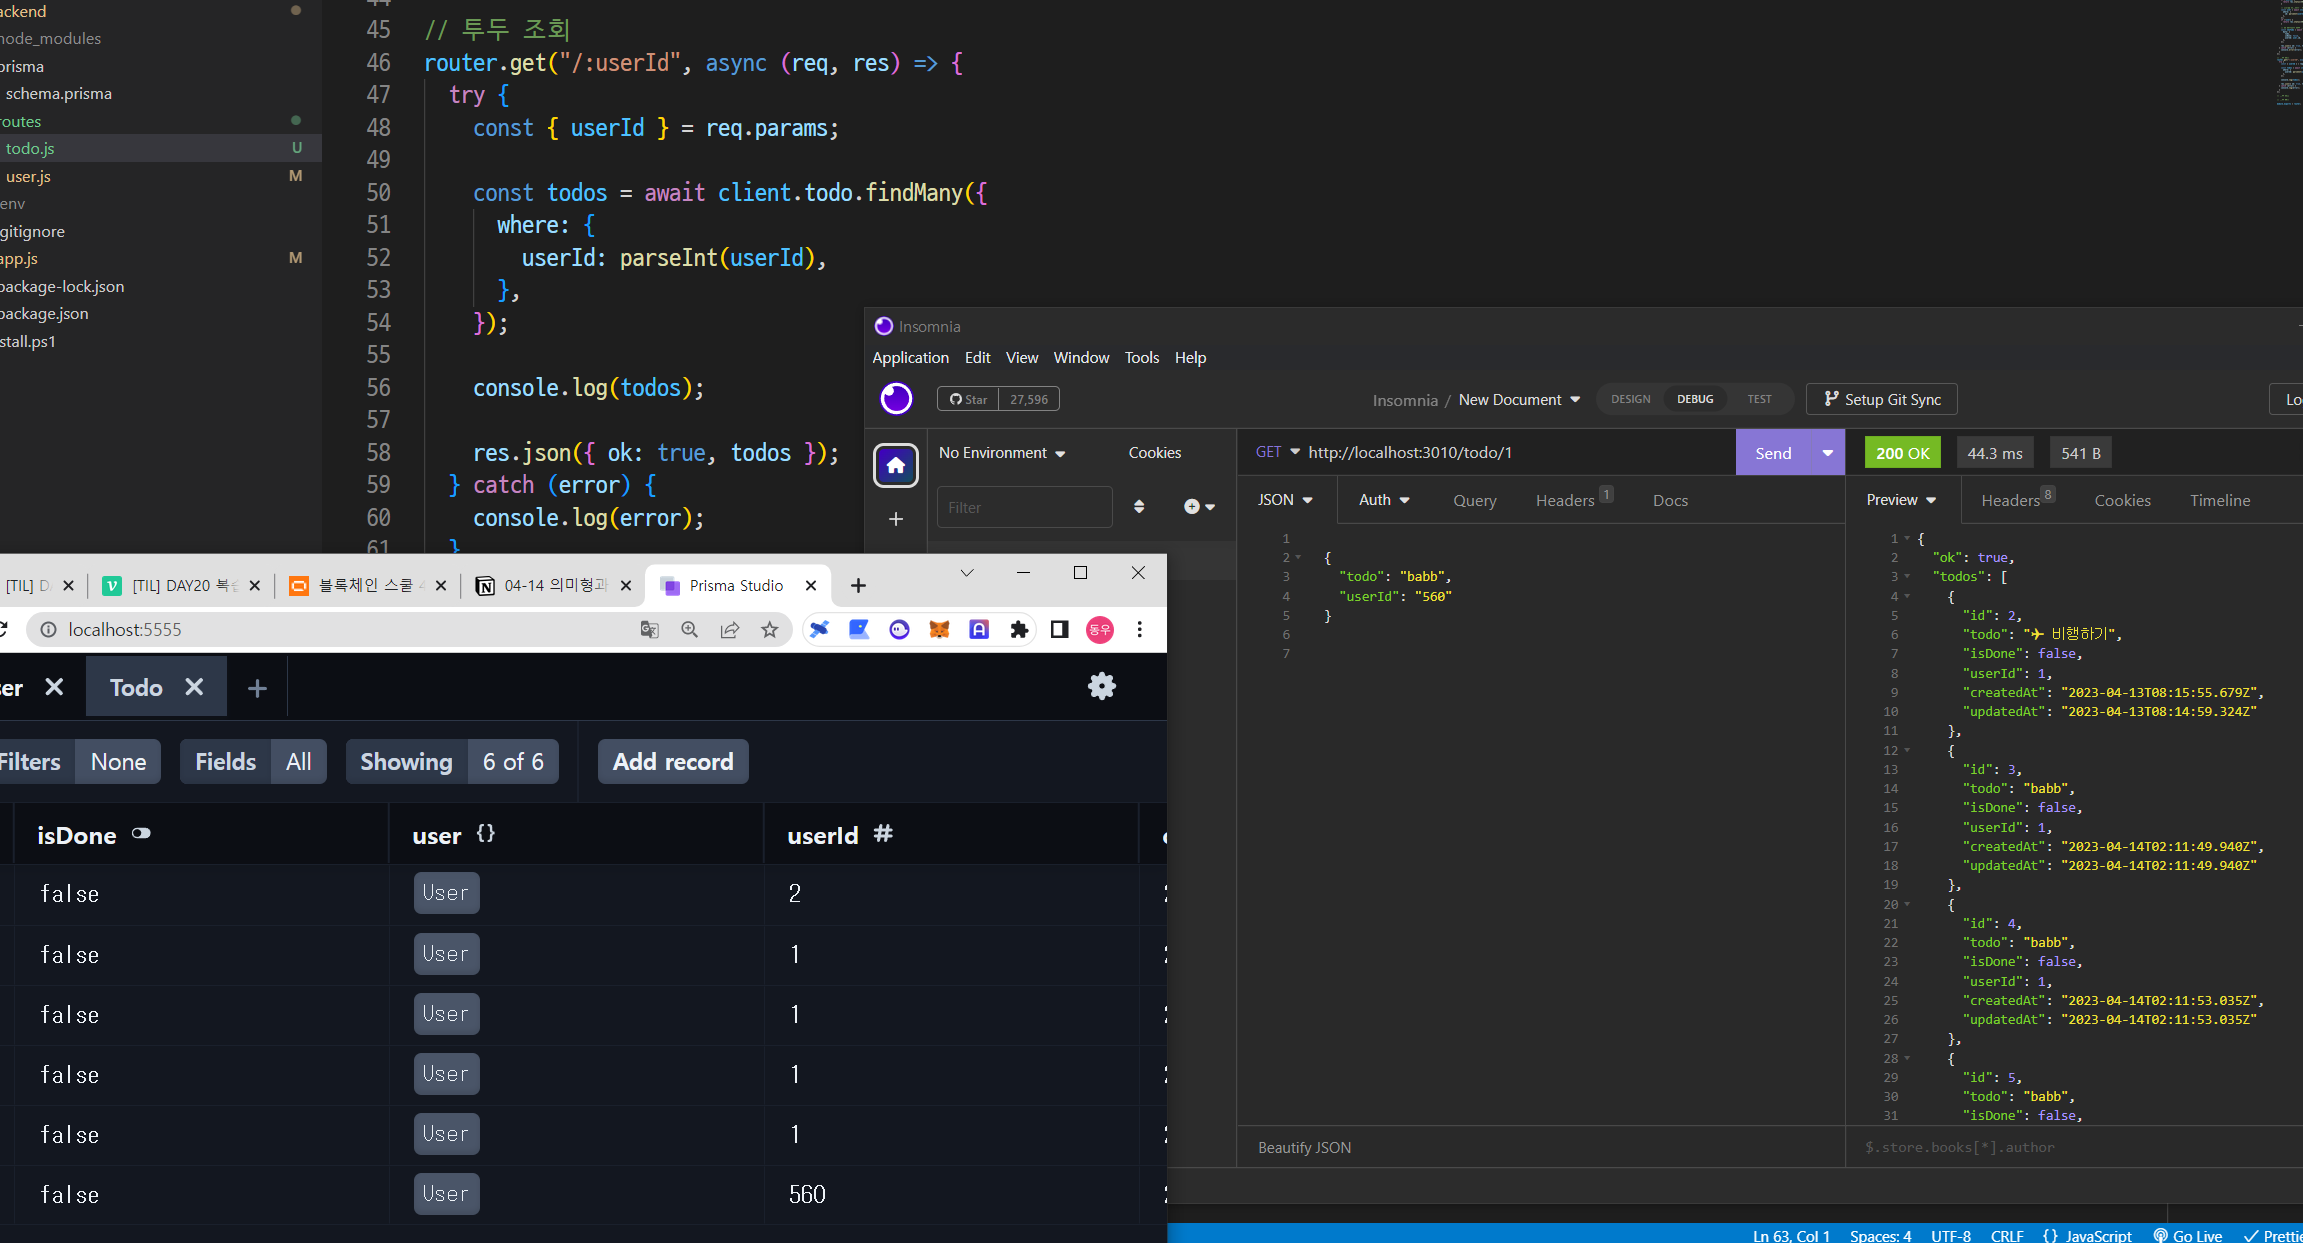
2. 투두 조회
router.get("/:userId", async (req, res) => {
  try {
    const { userId } = req.params;

    // user가 존재하는지 체크
    const user = await client.user.findUnique({
      where: {
        id: parseInt(userId),
      },
    });
    if (!user) {
      return res.status(400).json({ ok: false, error: "Not exist user." });
    }

    // findMany: 조건을 만족하는 여러가지 값 조회
    const todos = await client.todo.findMany({
      where: {
        userId: parseInt(userId),
      },
    });

    res.json({ ok: true, todos });
  } catch (error) {
    console.log(error);
  }
});
결과
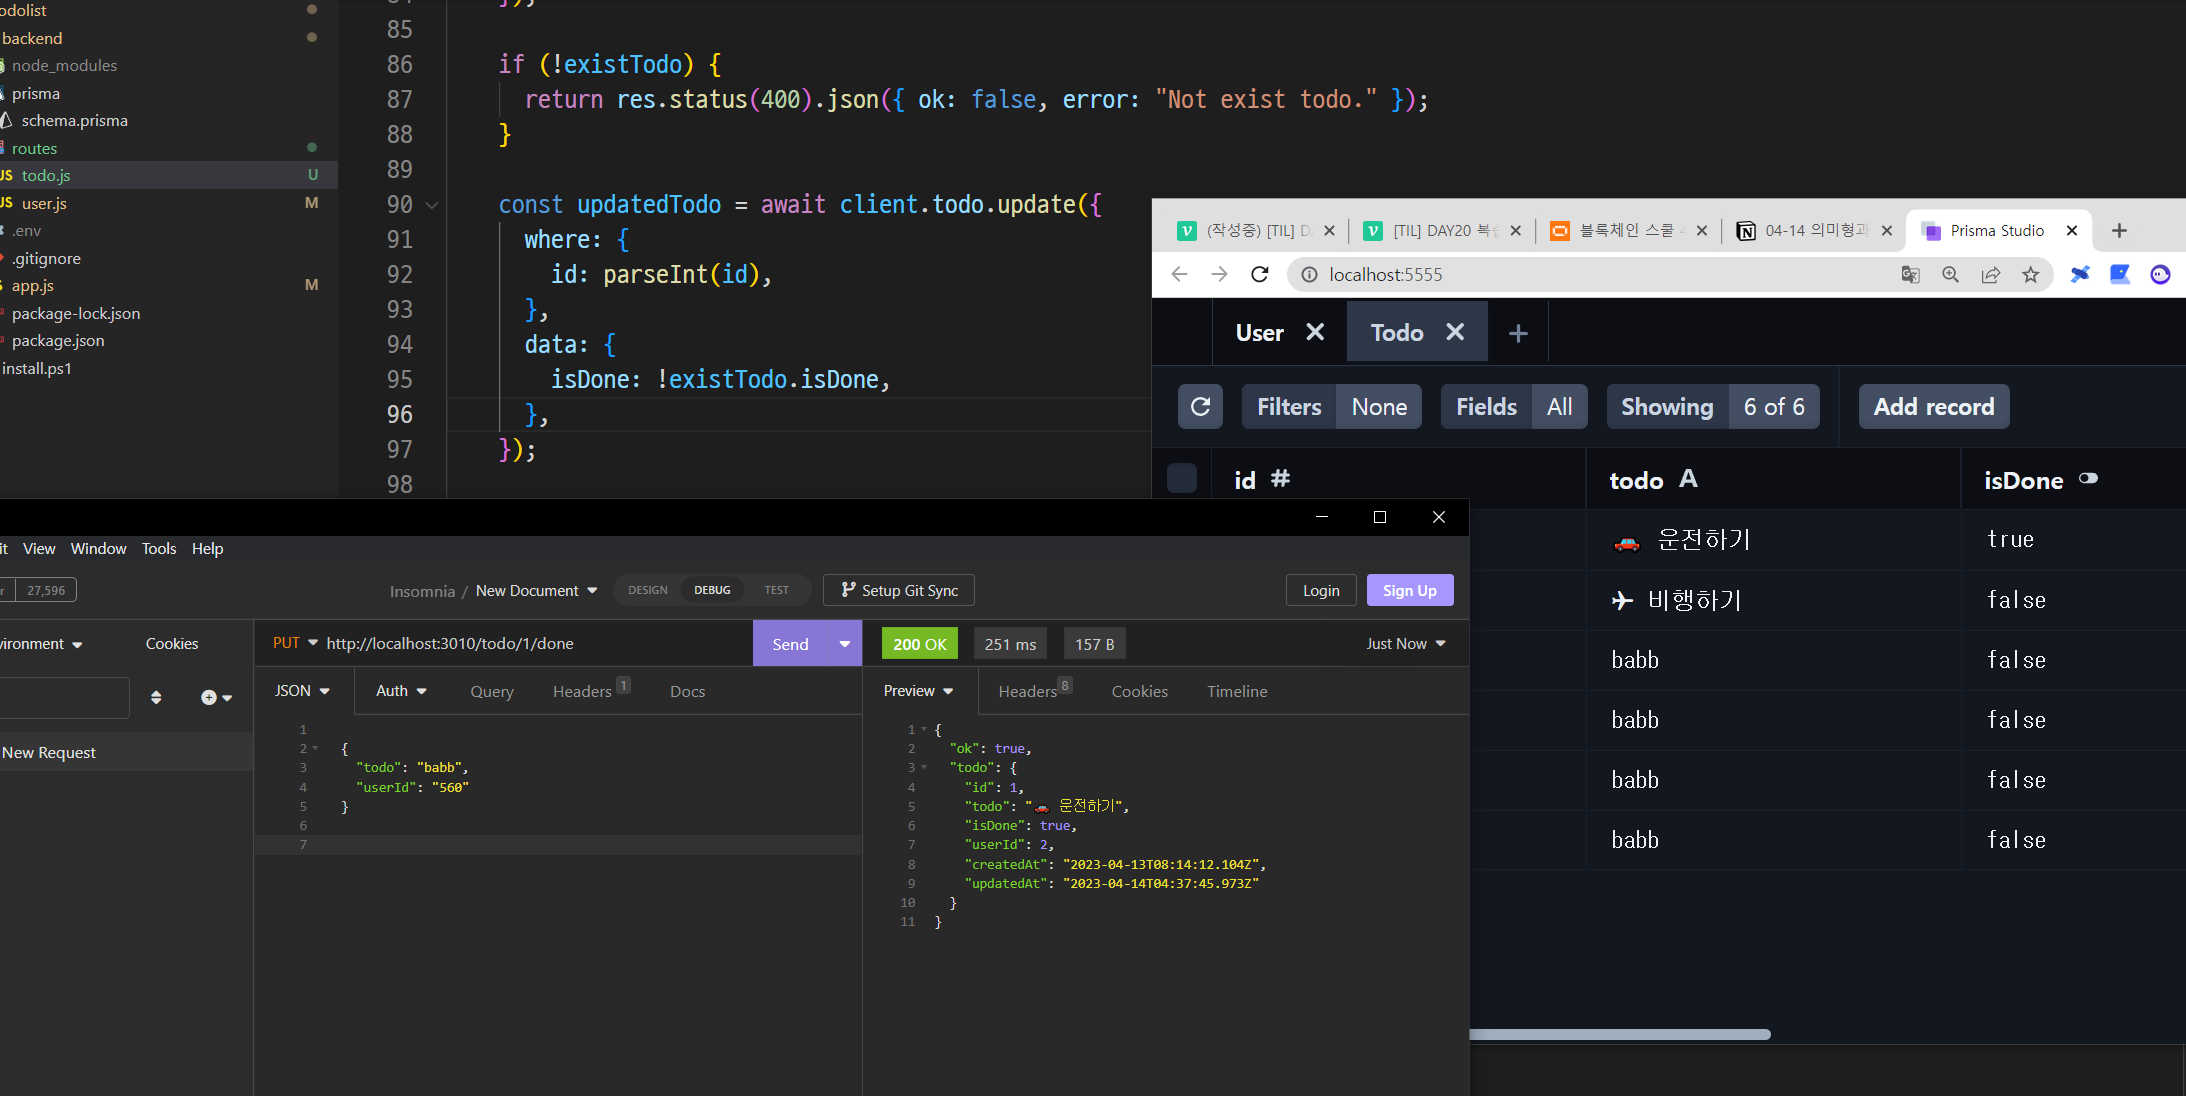
3. 투두 완료 업데이트
router.put("/:id/done", async (req, res) => {
  try {
    const { id } = req.params;
    const { userId } = req.body;

    // id를 통해서 투두의 상태 값을 확인
    // todo의 주인이 맞는지 확인
    const existTodo = await client.todo.findUnique({
      where: {
        id: parseInt(id),
      },
    });
    if (!existTodo) {
      return res.status(400).json({ ok: false, error: "Not exist todo." });
    }
    if (!existTodo.userId !== parseInt(userId)) {
      return res
        .status(400)
        .json({ ok: false, error: "you are not todo owner" });
    }

    // 투두 상태 값 업데이트
    const updatedTodo = await client.todo.update({
      where: {
        id: parseInt(id),
      },
      data: {
        isDone: !existTodo.isDone,
      },
    });

    res.json({ ok: true, todo: updatedTodo });
  } catch (error) {
    console.error(error);
  }
});
결과
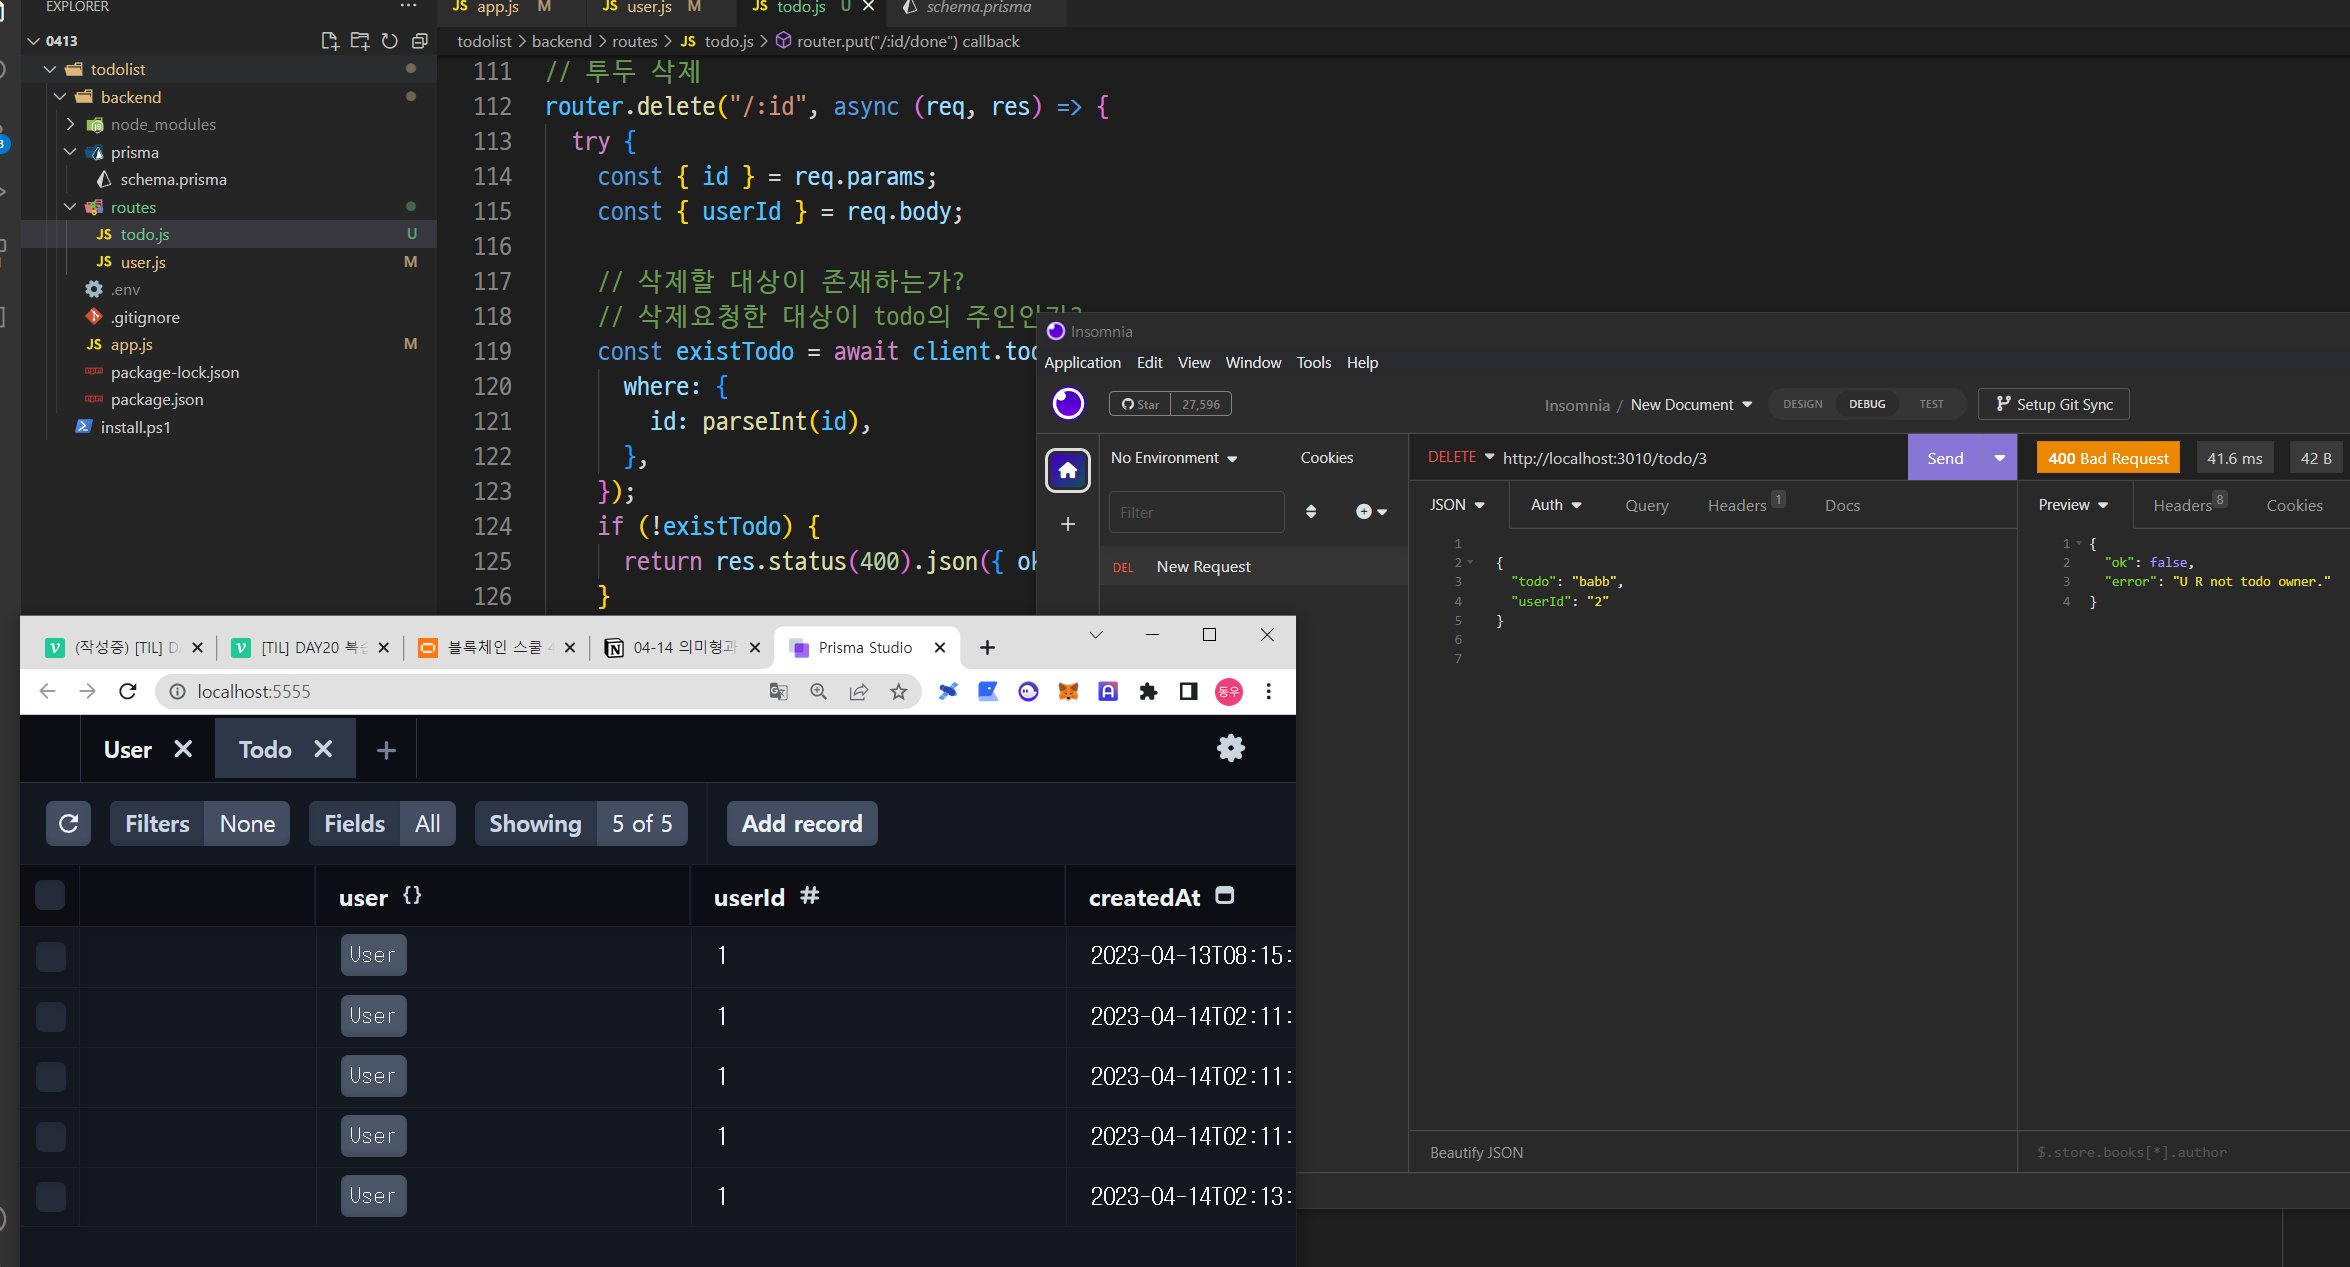
4. 투두 삭제
router.delete("/:id", async (req, res) => {
  try {
    const { id } = req.params;
    const { userId } = req.body;

    // 삭제할 대상이 존재하는가?
    // 삭제요청한 대상이 todo의 주인인가?
    const existTodo = await client.todo.findUnique({
      where: {
        id: parseInt(id),
      },
    });
    if (!existTodo) {
      return res.status(400).json({ ok: false, error: "Not exist todo." });
    }
    if (existTodo.userId !== parseInt(userId)) {
      return res.status(400).json({ ok: false, error: "U R not todo owner." });
    }

    // 삭제 실행
    const deletedTodo = await client.todo.delete({
      where: {
        id: parseInt(id),
      },
    });

    res.json({ ok: true, todo: deletedTodo });
  } catch (error) {
    console.error(error);
  }
});
결과
Frontend
로그인 화면 제작
axios 설치:
npm i axios
메인 앱에 로그인 추가if (!user) { return <LogIn />; }
Login.jsx 코드
import { useState } from "react";
import axios from "axios";

const LogIn = () => {
  const [createAccount, setCreateAccount] = useState("");

  const onSubmitCreateUser = async (e) => {
    try {
      e.preventDefault();

      const response = await axios.post(
        `${process.env.REACT_APP_BACKEND_URL}/user`,
        {
          account: createAccount,
        }
      );
      console.log(response);
    } catch (error) {
      console.error(error);
    }
  };

  return (
    <div className="min-h-screen flex flex-col justify-center items-center">
      <form className="flex mt-2 my-16" onSubmit={onSubmitCreateUser}>
        <input
          className="grow border-2 border-pink-200 rounded-lg focus:outline-pink-400 px-2 py-1 text-lg"
          type="text"
          value={createAccount}
          onChange={(e) => setCreateAccount(e.target.value)}
        />
        <input
          className="ml-4 px-2 py-1 bg-pink-400 rounded-lg text-gray-50 w-24"
          type="submit"
          value="계정 생성"
        />
      </form>
    </div>
  );
};

export default LogIn;
결과
-> 프론트엔드를 통해 DB에 데이터를 추가 할 수 있게 되었다 !
프론트엔드는 계속 진행예정 ...

HELLO!