디자인 요구사항
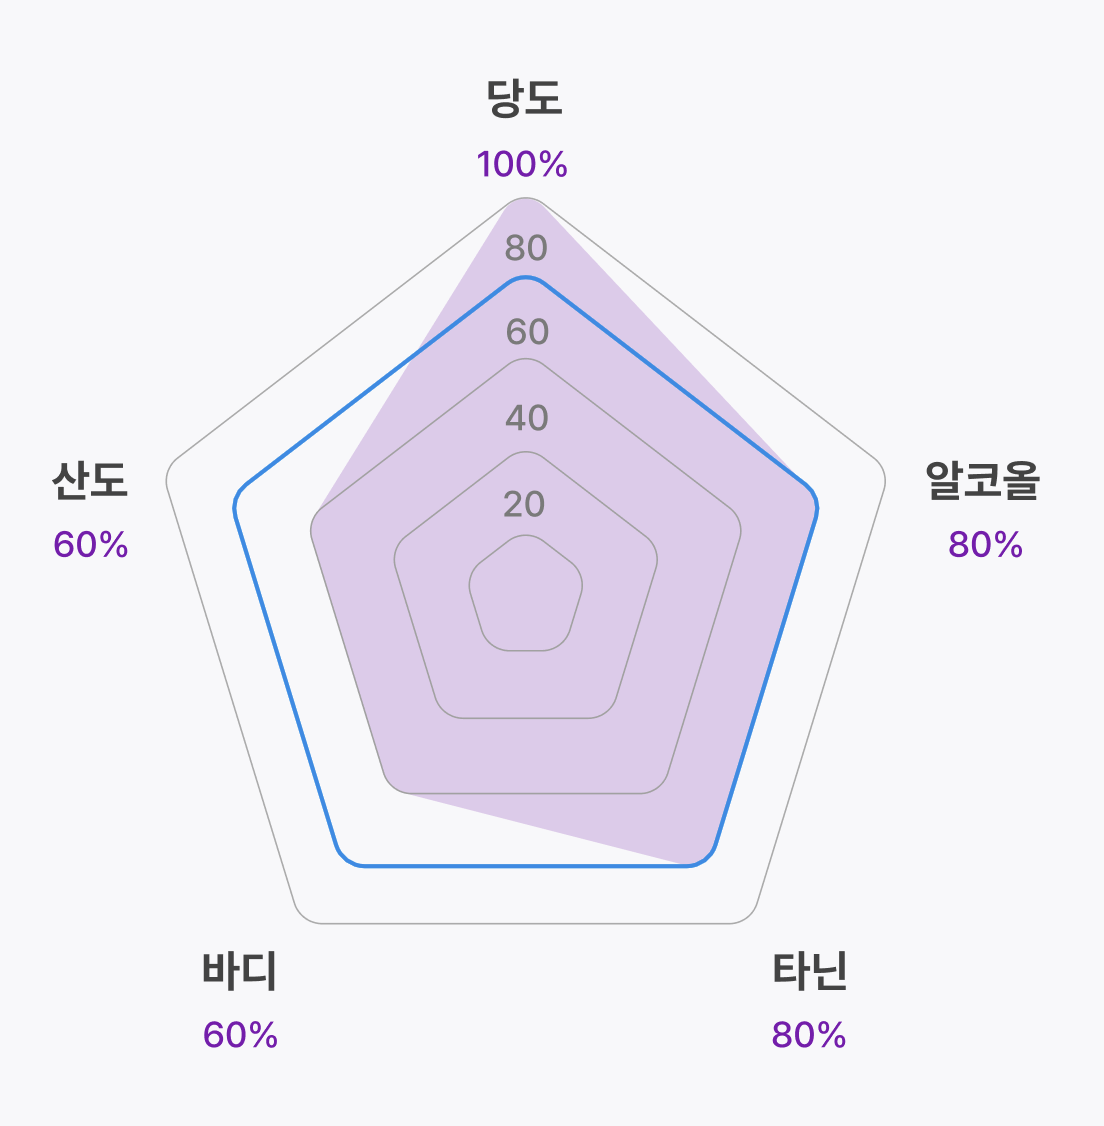
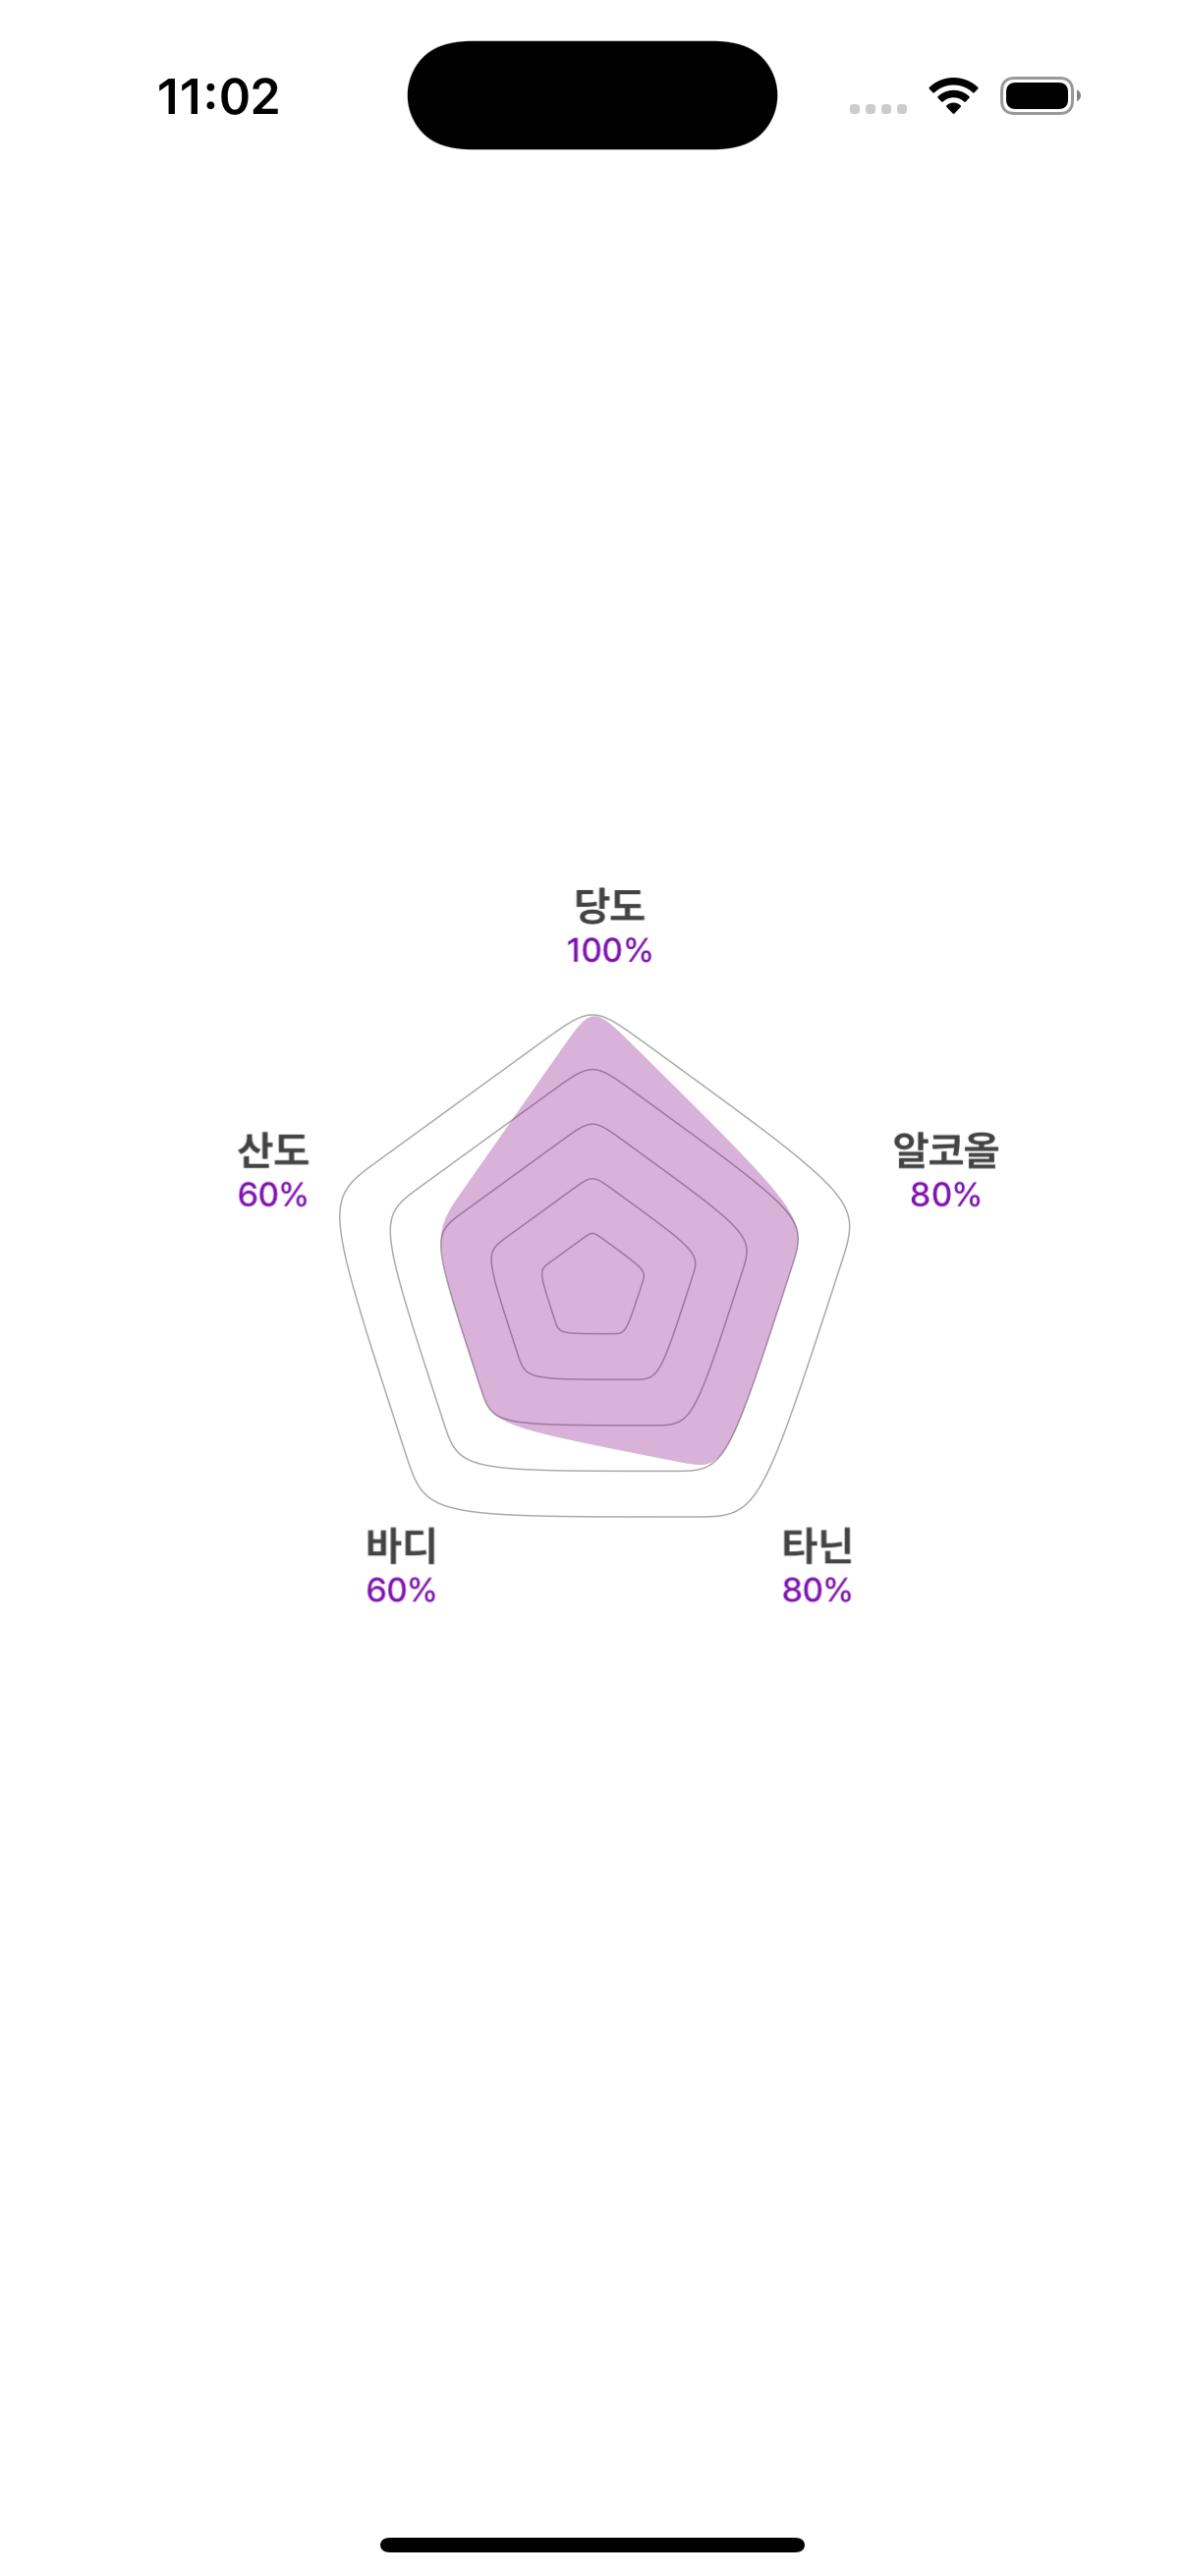
실제로 구현한 디자인
아이디어
수학 계산을 두려워하지말라는 조언을 듣고,,,
한 점(여기서는 당도 점으로 하겠다)을 기준으로 왼쪽 점과의 1:9 내적점, 오른쪽 점과의 1:9 내적점을 찾아 세 점을 커브로 연결해보자고 생각했다. 내적 비율은 러프하게 1:9 정도로 생각했으나, 디자인과 유사하게 맞춰보는 과정에서 3:7 ~ 1:9 사이의 점을 여러번 테스트해본 결과 2:8 정도가 딱 적당하다고 판단하였다.
결과
여러가지 수치를 넣어봤을 때, 100 ~ 20 차이가 예쁘지 않아서 디자이너와 의논 후 라운딩 오각형을 사용하지 않기로...ㅠ 하지만 이제 라운딩 삼각형, 라운딩 육각형 등을 만들 줄 알게 되었다.
코드파일
// Copyright © 2024 DRINKIG. All rights reserved

import UIKit
import CoreGraphics
import CoreModule

class NewPentagonChartView: UIView {
    private let numberOfSides = 5 // 오각형
    var values: [CGFloat] = [0.8, 0.6, 0.9, 0.7, 0.5] {
        didSet { setNeedsDisplay() }
    }

    // 꼭짓점 라벨 텍스트
    var labels: [String] = ["당도", "알코올", "타닌", "바디", "산도"] {
        didSet { addCornerLabels() }
    }

    // 오각형 색상
    var guideLineColor: UIColor = .lightGray
    var chartColor: UIColor = UIColor.purple.withAlphaComponent(0.3)
    var chartBorderColor: UIColor = UIColor.purple

    override init(frame: CGRect) {
        super.init(frame: frame)
        backgroundColor = .clear
    }

    required init?(coder: NSCoder) {
        fatalError("init(coder:) has not been implemented")
    }

    override func draw(_ rect: CGRect) {
        super.draw(rect)

        // 중심점과 반지름 계산
        let center = CGPoint(x: bounds.midX, y: bounds.midY)
        let radius = min(bounds.width, bounds.height) / 3

        drawGuidePolygons(center: center, radius: radius)
        drawDataPolygon(center: center, radius: radius, values: values)
    }

    private func drawGuidePolygons(center: CGPoint, radius: CGFloat) {
        let guideLevels: [CGFloat] = [0.2, 0.4, 0.6, 0.8, 1.0]
        for level in guideLevels {
            let scaledRadius = radius * level

            // 꼭짓점 좌표 계산
            let points = (0..<numberOfSides).map { i -> CGPoint in
                let angle = CGFloat(i) * (2 * .pi / CGFloat(numberOfSides)) - .pi / 2
                return CGPoint(
                    x: center.x + cos(angle) * scaledRadius,
                    y: center.y + sin(angle) * scaledRadius
                )
            }

            // 각 점 사이를 곡선으로 연결
            drawCustomRoundedPolygon(points: points, color: guideLineColor, fill: false, fillColor: .clear, lineWidth: 0.5)
        }
    }

    private func drawDataPolygon(center: CGPoint, radius: CGFloat, values: [CGFloat]) {
        guard values.count == numberOfSides else { return }

        let scaledPoints = (0..<numberOfSides).map { i -> CGPoint in
            let angle = CGFloat(i) * (2 * .pi / CGFloat(numberOfSides)) - .pi / 2
            return CGPoint(
                x: center.x + cos(angle) * radius * values[i],
                y: center.y + sin(angle) * radius * values[i]
            )
        }

        drawCustomRoundedPolygon(points: scaledPoints, color: .clear, fill: true, fillColor: chartColor, lineWidth: 0)
    }

// 꼭짓점에 라운딩을 주는 함수
    private func drawCustomRoundedPolygon(points: [CGPoint], color: UIColor, fill: Bool, fillColor: UIColor, lineWidth: CGFloat) {
            guard points.count == numberOfSides else { return }

        let path = UIBezierPath()
        for i in 0..<points.count {
            let currentPoint = points[i]
            let nextPoint = points[(i + 1) % points.count]
            let previousPoint = points[(i - 1 + points.count) % points.count]

            // 왼쪽 내적 점 계산
            // 더 둥글게 하고싶으면 내적 위치를 중앙에 가깝게 가도록 계산하면 된다
            let controlPointLeft = CGPoint(
                x: currentPoint.x * 0.8 + previousPoint.x * 0.2,
                y: currentPoint.y * 0.8 + previousPoint.y * 0.2
            )

            // 오른쪽 내적 점 계산
            let controlPointRight = CGPoint(
                x: currentPoint.x * 0.8 + nextPoint.x * 0.2,
                y: currentPoint.y * 0.8 + nextPoint.y * 0.2
            )

            if i == 0 {
                path.move(to: controlPointLeft)
            }

            path.addCurve(to: controlPointRight, controlPoint1: currentPoint, controlPoint2: currentPoint)
        }
        path.close()

        if fill {
            fillColor.setFill()
            path.fill()
        }

        if lineWidth > 0 {
            color.setStroke()
            path.lineWidth = lineWidth
            path.stroke()
        }
    }

	// 오각형 바깥 라벨 설정
    private func addCornerLabels() {
        subviews.forEach { $0.removeFromSuperview() }

        let center = CGPoint(x: bounds.midX, y: bounds.midY)
        let radius = min(bounds.width, bounds.height) / 3 * 1.2

        for i in 0..<numberOfSides {
            let angle = CGFloat(i) * (2 * .pi / CGFloat(numberOfSides)) - .pi / 2
            let point = CGPoint(
                x: center.x + cos(angle) * radius,
                y: center.y + sin(angle) * radius
            )

            let label = UILabel()

            let attributeText = createAttributedText(for: labels[i], value: Int(values[i] * 100))
            label.attributedText = attributeText
            label.textAlignment = .center
            label.numberOfLines = 2
            label.sizeToFit()
            label.center = point

            addSubview(label)
        }
    }
	// 오각형 바깥 라벨 텍스트 폰트, 컬러 다르게 적용
    private func createAttributedText(for label: String, value: Int) -> NSAttributedString {
        let labelAttributes: [NSAttributedString.Key: Any] = [
            .font: UIFont.ptdBoldFont(ofSize: 14),
            .foregroundColor: AppColor.gray100!
        ]

        let valueAttributes: [NSAttributedString.Key: Any] = [
            .font: UIFont.ptdMediumFont(ofSize: 11.5),
            .foregroundColor: AppColor.purple100!
        ]

        let attributedText = NSMutableAttributedString(string: "\(label)\n", attributes: labelAttributes)
        let valueText = NSAttributedString(string: "\(value)%", attributes: valueAttributes)
        attributedText.append(valueText)

        return attributedText
    }
}
Kirby-like iOS developer