섹션 11. 리팩토링 2 - 사용자 프로필 컴포넌트 공통화
vue.js 인프런 학습을 위한 강의와 책
이 스리즈에서는 인프런 강좌
"Vue.js 완벽 가이드 - 실습과 리팩토링으로 배우는 실전 개념" 을 수강하고 복습을 위한 기록을 하고 있습니다. 자세한 강의내용이 궁금하신 분은 https://www.inflearn.com/course/vue-js/dashboard 의 링크를 참고하세요.
사용자 프로필 컴포넌트 소개 및 등록
UserView.vue 에서 생성된 유저페이지를

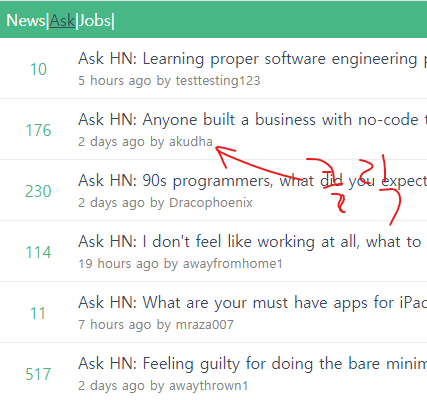
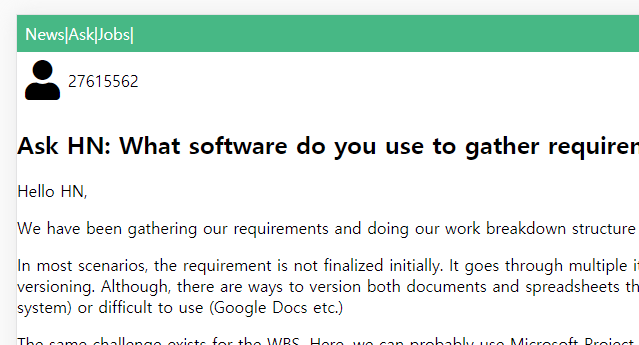
Jobs페이지 제목을 클릭하는 나오는 아바타를 곁들린 이 디자인으로 바꿀려고한다.
components / UserProfile.vue
<template>
  <div class="user-container">
    <div>
      <i class="fas fa-user"></i>
    </div>
    <div class="user-description">
      <router-link :to="`/user/${fetchedItem.user}`">
        {{ fetchedItem.user }}
      </router-link>
      <div class="time">
        {{ fetchedItem.time_ago }}
      </div>
    </div>
  </div>
</template>

<script>
export default {};
</script>

<style scoped>
.user-container {
  display: flex;
  align-items: center;
  padding: 0.5rem;
}
.fa-user {
  font-size: 2.5rem;
}
.user-description {
  padding-left: 8px;
}
.time {
  font-size: 0.7rem;
}
</style>UserProfile.vue생성하고 ItemView.vue에 있는 <div class="user-container">구역을 모두 복사에 붙인다.
<style>테그 내용도 ItemView.vue에서 가져온다.
<template>
  <div class="user-container">
    <div>
      <i class="fas fa-user"></i>
    </div>
    <div class="user-description">

      <!-- <router-link :to="`/user/${fetchedItem.user}`">
        {{ fetchedItem.user }}
      </router-link>
      <div class="time">
        {{ fetchedItem.time_ago }}
      </div> -->

    </div>
  </div>
</template>
컴포넌트 연결 테스트를 위해 일단 주석처리하고
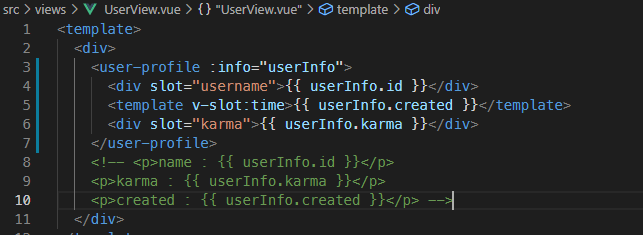
UserView.vue
<template>
<div>
<user-profile></user-profile> <!-- user-profile로 데이터 바인딩 -->
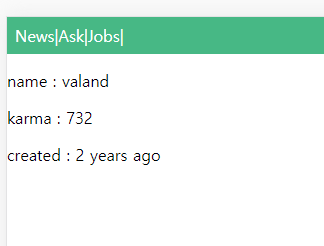
<!-- <p>name : {{ userInfo.id }}</p>
<p>karma : {{ userInfo.karma }}</p>
<p>created : {{ userInfo.created }}</p> -->
</div>
</template>
<script>
import UserProfile from "../components/UserProfile.vue"; // 1. import로 불러오고
export default {
components: {
UserProfile, // 2. components 추가
},
computed: {
// ...mapGetters(["userInfo"]),
userInfo() {
return this.$store.state.user;
},
},
created() {
const userName = this.$route.params.id;
this.$store.dispatch("FETCH_USER", userName);
},
};
</script>
-
import로 불러오고
-
components 추가
-
user-profile로 데이터 바인딩
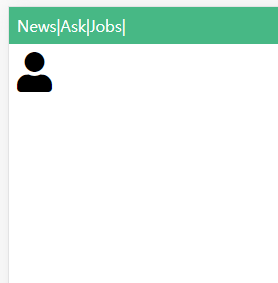
UserProfile.vue 잘 연결 된 걸 확인
사용자 컴포넌트 데이터 흐름 처리 1
연결을 위한 여러 방법이 있는데 이 강의에서는 Vuex를 활용한 store를 응용한다.
UserView.vue
<script>
import UserProfile from "../components/UserProfile.vue";

export default {
  components: {
    UserProfile,
  },
  // computed: {
  //   userInfo() {
  //     return this.$store.state.user;
  //   },
  // },
  created() {
    const userName = this.$route.params.id;
    this.$store.dispatch("FETCH_USER", userName);
  },
};
</script>
computed:{} 을 지우고
src \ components \ UserProfile.vue
<template>
  <div class="user-container">
    <div>
      <i class="fas fa-user"></i>
    </div>
    <div class="user-description">
      <div>
        {{ userInfo.id }}      <!-- 수정  -->
      </div>
      <!-- <router-link :to="`/user/${userInfo.user}`">
        {{ userInfo.id }}
      </router-link> -->
      <div class="time">
        {{ userInfo.created }}     <!-- 수정 -->
      </div>
    </div>
  </div>
</template><script>
export default {
computed: {
userInfo() {
return this.$store.state.user;
},
},
};
</script>이 파일의 computed: {}에 붙인다. userInfo.user와 userInfo.time_ago라는 정보가 없는 다른 이름으로 되어 있기 때문에 새로운 정보에 맞춰서 <div class="user-description">내부의 정보도 고친다.
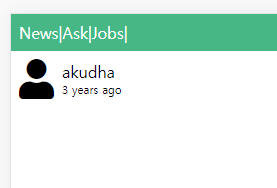
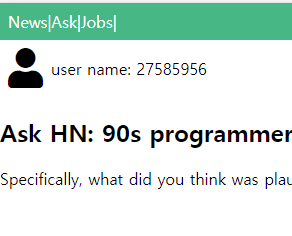
이렇게 나오면 정상적인 작업이 완료된 것이다.
사용자 컴포넌트 데이터 흐름 처리 2
또다른 연결 방법이다.
이 경우는 computed: {}를 다른 컴포넌트 파일에 옮기지 않고 쓰는 법이다.
src\views\UserView.vue
<template>
  <div>
    <user-profile :info="userInfo"></user-profile>  // :info="userInfo"추가
    <!-- <p>name : {{ userInfo.id }}</p>
    <p>karma : {{ userInfo.karma }}</p>
    <p>created : {{ userInfo.created }}</p> -->
  </div>
</template>

<script>
import UserProfile from "../components/UserProfile.vue";

export default {
  components: {
    UserProfile,
  },
  computed: {        // 여기를 살리고
    userInfo() {
      return this.$store.state.user;
    },
  },
  created() {
    const userName = this.$route.params.id;
    this.$store.dispatch("FETCH_USER", userName);
  },
};
</script>

<style></style>:info="userInfo"추가, props를 보내는 역활이다.
src\components\UserProfile.vue
<template>
  <div class="user-container">
    <div>
      <i class="fas fa-user"></i>
    </div>
    <div class="user-description">
      <div>
        {{ info.id }}  <!-- 변경
      </div>
      <!-- <router-link :to="`/user/${userInfo.user}`">
        {{ userInfo.id }}
      </router-link> -->
      <div class="time">
        {{ info.created }}  <!-- 변경
      </div>
    </div>
  </div>
</template>

<script>
export default {
  props: {
    info: Object,
  },
};
</script>
받은 props는 props: {info: Object}라는 코드를 쓴다. 따라서 이 코드에 맞춰서 <template>의 userInfo도 Info로 바꿔준다.
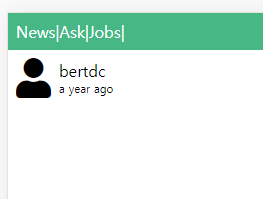
이렇게 나오면 성공
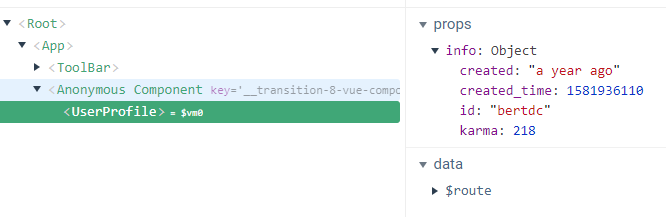
2가지 데이터 처리 흐름 비교

지금까지 사용자 컴포넌트 데이터 흐름 처리 2가지를 비교한 그림
computed 속성으로 바로 전달할건지 UserView에 거처서 props로 전달한건지의 차이점이 있다.
무엇이 더 좋은 방법이 있는게 아니라 각자 상황과 목적에 맞춰서 선택하면 좋을것이다.
slot을 이용한 사용자 프로필 컴포넌트 구현
유저 상세 페이지의 정보와 질문 상세 페이지 정보는 거의 유사해보인다. 이것을 공통 컴포넌트화 작업을 할려고 한다.
src \ views \ ItemView.vue
<template>
  <div>
    <section>
      <!-- 사용자 상세정보-->
      <user-profile :info="fetchedItem"></user-profile>  // UserProfile로 <template>전
      <!-- <div class="user-container">
        <div>
          <i class="fas fa-user"></i>
        </div>
        <div class="user-description">
          <router-link :to="`/user/${fetchedItem.user}`">
            {{ fetchedItem.user }}
          </router-link>
          <div class="time">
            {{ fetchedItem.time_ago }}
          </div>
        </div>
      </div> -->
    </section>
    <section>
      <h2>{{ fetchedItem.title }}</h2>
    </section>
    <section>
      <!-- 질문댓글 -->
      <div v-html="fetchedItem.content"></div>
    </section>
  </div>
</template><script>
import UserProfile from "../components/UserProfile.vue"; // UserProfile과 연결
import { mapGetters } from "vuex";
export default {
components: { // UserProfile과 연결
UserProfile,
},
computed: {
...mapGetters(["fetchedItem"]),
},
created() {
const itemId = this.$route.params.id;
this.$store.dispatch("FETCH_ITEMS_VIEW", itemId);
},
};
</script>
.
.
.공통 컴포넌트화를 위해 위와 같이 UserProfile과 연결한다.
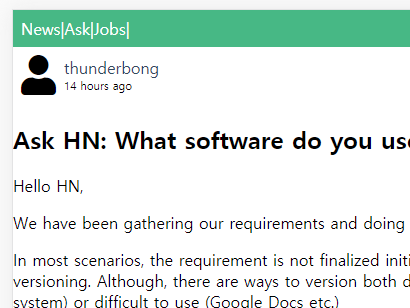
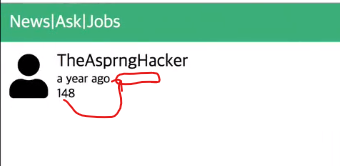
그러면 Ask페이지 제목 클릭했을시 유저이름이 사라지고 id로 보이는 숫자만 표시된다.
이전 공통 컴포넌트화처럼 서로의 키가 맞지 않기 때문이다, 이번에도 마찬가지로 분기처리를 해야한다.

또한 맞지 않는 이유 중의 하나가 prop이 objact가 아닌 Array로 들어오기 때문이다.
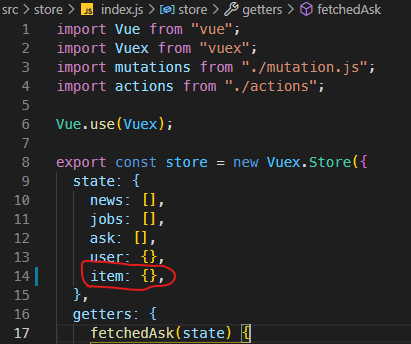
item: {}로 바꾼 후엔 그 에러가 사라진다.
이제 분기처리를 시작해본다.
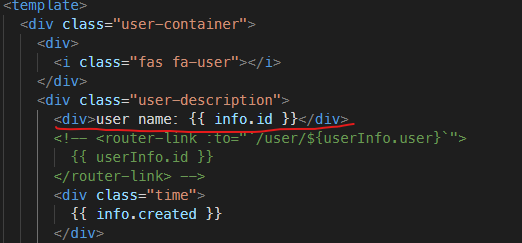
div에 user name: 입력하면 그대로 데이터바인딩 되는데 이것을 <slot>을 이용해서 표시할 수있다.
src\components\UserProfile.vue
<template>
<div class="user-container">
<div>
<i class="fas fa-user"></i>
</div>
<div class="user-description">
<!-- <div>user name: {{ info.id }}</div> -->
<slot name="username">
<!-- 상위 컴포넌트에서 정의할 영역 -->
</slot>
<!-- <router-link :to="`/user/${userInfo.user}`">
{{ userInfo.id }}
</router-link> -->
<div class="time">
<!-- time: {{ info.created }} -->
<slot name="time">
<!-- 상위 컴포넌트에서 정의할 영역 -->
</slot>
</div>
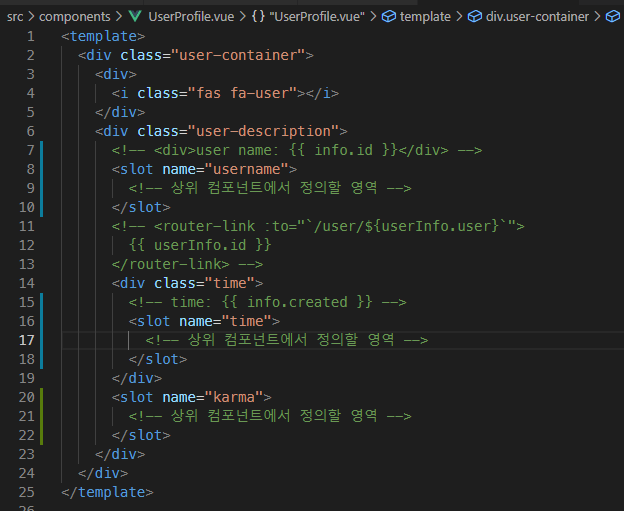
</div>
</div>
</template>하위 컴포넌트이자 공통 컴포넌트인 이 파일에서 <slot>의 내부는 상위 컴포넌트에서 정의할 영역이기 때문 비워둔다.
src\views\ItemView.vue
<template>
  <div>
    <section>
      <!-- 사용자 상세정보-->
      <user-profile :info="fetchedItem">
                <!--  -->
        <div slot="username">{{ fetchedItem.user }}</div>
        <template slot="time">{{ fetchedItem.time_ago }}</template>
                <!--  -->
      </user-profile>
      <!-- <div class="user-container">
        <div>
          <i class="fas fa-user"></i>
        </div>
        <div class="user-description">
          <router-link :to="`/user/${fetchedItem.user}`">
            {{ fetchedItem.user }}
          </router-link>
          <div class="time">
            {{ fetchedItem.time_ago }}
          </div>
        </div>
      </div> -->
    </section>
    <section>
      <h2>{{ fetchedItem.title }}</h2>
    </section>
    <section>
      <!-- 질문댓글 -->
      <div v-html="fetchedItem.content"></div>
    </section>
  </div>
</template>
{{ fetchedItem.user }}, {{ fetchedItem.time_ago }} 처럼
상위 컴포넌트인 ItemView.vue에서 바인딩할 텍스트정보 변수를 넣는다.
하지만 src\views\UserView.vue 에서 정의를 아직 안했기 때문에
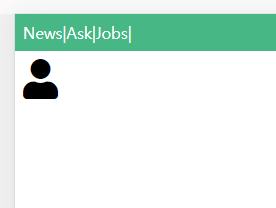
유저 페이지쪽에서 텍스트 정보가 사라져있다.
<template>
  <div class="user-container">
    <div>
      <i class="fas fa-user"></i>
    </div>
    <div class="user-description">
      <!-- <div>user name: {{ info.id }}</div> -->
      <slot name="username">
        <!-- 상위 컴포넌트에서 정의할 영역 -->
      </slot>
      <!-- <router-link :to="`/user/${userInfo.user}`">
        {{ userInfo.id }}
      </router-link> -->
      <div class="time">
        <!-- time: {{ info.created }} -->
        <slot name="time">
          <!-- 상위 컴포넌트에서 정의할 영역 -->
        </slot>
      </div>
        <!--  -->
      <slot name="karma"></slot>
         <!--  -->
    </div>
  </div>
</template>
복구는 물론이고 유저 정보에 karma도 넣겠다 싶으면 UserProfile.vue로 가서 <slot name="karma"></slot> 를 추가하고...
src\views\UserView.vue
<template>
  <div>
    <user-profile :info="userInfo">
         <!--  -->
      <div slot="username">{{ userInfo.id }}</div>
      <template v-slot:time>{{ userInfo.created }}</template>
      <div slot="karma">{{ userInfo.karma }}</div>
        <!--  -->
    </user-profile>
    <!-- <p>name : {{ userInfo.id }}</p>
    <p>karma : {{ userInfo.karma }}</p>
    <p>created : {{ userInfo.created }}</p> -->
  </div>
</template>
유저페이지를 담당하는 UserView.vue로 가서 위 코드대로 <slot>에 적용할 내용을 넣는다.
참고로 <div>와는 달리 <template>안의 텍스트변수인 경우는 HTML에서 테그가 없다고 한다.
Vue 2.6 기준으로 template에서 slot을 전달할 때 <template v-slot:time>로 써야한다.
사용자 프로필 컴포넌트 스타일링 및 코드 정리
하위 컴포넌트이자 공통컨포넌트 UserProfile.vue
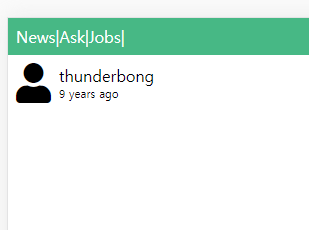
지금까지 사진대로 id, user, karma 등등 속성이 조금씩 달라도 페이지 내용은 동일한 유저정보의 컴포넌트를 공통컨포넌트화 시킨 결과들이다.
이제 Ask페이지에서 유저이름을 클릭할 때 유저정보페이지로 넘어가게 해보자
src\views\ItemView.vue
<template>
  <div>
    <section>
      <!-- 사용자 상세정보-->
      <user-profile :info="fetchedItem">

        <!-- <div slot="username">{{ fetchedItem.user }}</div> -->

        <template v-slot:time>{{ fetchedItem.time_ago }}</template>
                 <!--  -->
        <router-link slot="username" :to="`/user/${fetchedItem.user}`">
          {{ fetchedItem.user }}
        </router-link>
                 <!--  -->
      </user-profile>
    </section>
    <section>
      <h2>{{ fetchedItem.title }}</h2>
    </section>
    <section>
      <!-- 질문댓글 -->
      <div v-html="fetchedItem.content"></div>
    </section>
  </div>
</template>UserProfile.vue에서 썻었던 <router-link>를 활용한다.
여기 컴포넌트에 맞춰서 fetchedItem으로 바꾸는 것에 주의

클릭하면 유저정보 페이지로 넘어가기 때문에 karma정보도 표시된다.
이제 karma 정보위치를 올려서 가로로 이것저것 정리 해 볼려한다.
src\views\UserView.vue
<template>
  <div>
          <!--  -->
    <user-profile :info="userInfo">
      <div slot="username">{{ userInfo.id }}</div>
      <span slot="time">{{ "Joined " + userInfo.created }}, </span>
      <span slot="karma">{{ userInfo.karma }}</span>
    </user-profile>
          <!--  -->
  </div>
</template>
<span> 으로 가로정렬하고 "Joined "를 봤듯이 띄어쓰기를 활용해 간격조절
src\views\ItemView.vue
<template>
  <div>
    <section>
      <!-- 사용자 상세정보-->
      <user-profile :info="fetchedItem">
        <!-- <div slot="username">{{ fetchedItem.user }}</div> -->
        <router-link slot="username" :to="`/user/${fetchedItem.user}`">
          {{ fetchedItem.user }}
        </router-link>
 <!--  -->
        <template v-slot:time>{{ "Posted " + fetchedItem.time_ago }}</template>
 <!--  -->
      </user-profile>
    </section>
    <section>
      <h2>{{ fetchedItem.title }}</h2>
    </section>
    <section>
      <!-- 질문댓글 -->
      <div v-html="fetchedItem.content"></div>
    </section>
  </div>
</template>ItemView에도 마찬가지로 작업

"Posted" 가 추가된걸 확인했디.