개요
어플리케이션을 사용하다보면 Scroll을 아래로하면 나타났다가 위로하면 사라지는 영역을 볼 수 있습니다. 이는 구글에서 제공하는 디자인 메뉴얼인 Material Design을 따라 만든것입니다.
하지만 저는 AppBar를 고정된 영역과 움직이는 영역으로 나눠 사용하고자 했습니다.
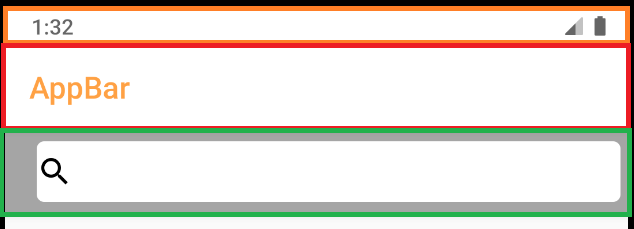
- 주황색 영역은 statusbar 일반적으로 상태(상단)바라고 부르는 영역
- 빨간색 영역이 고정된 Appbar 영역
- 초록색 영역이 움직이는 Appbar 영역
초록색 Searchbar영역이 Scroll을 위로 하면 빨간색 영역 뒤로 숨겨져 들어갈 것입니다.
프로젝트 생성
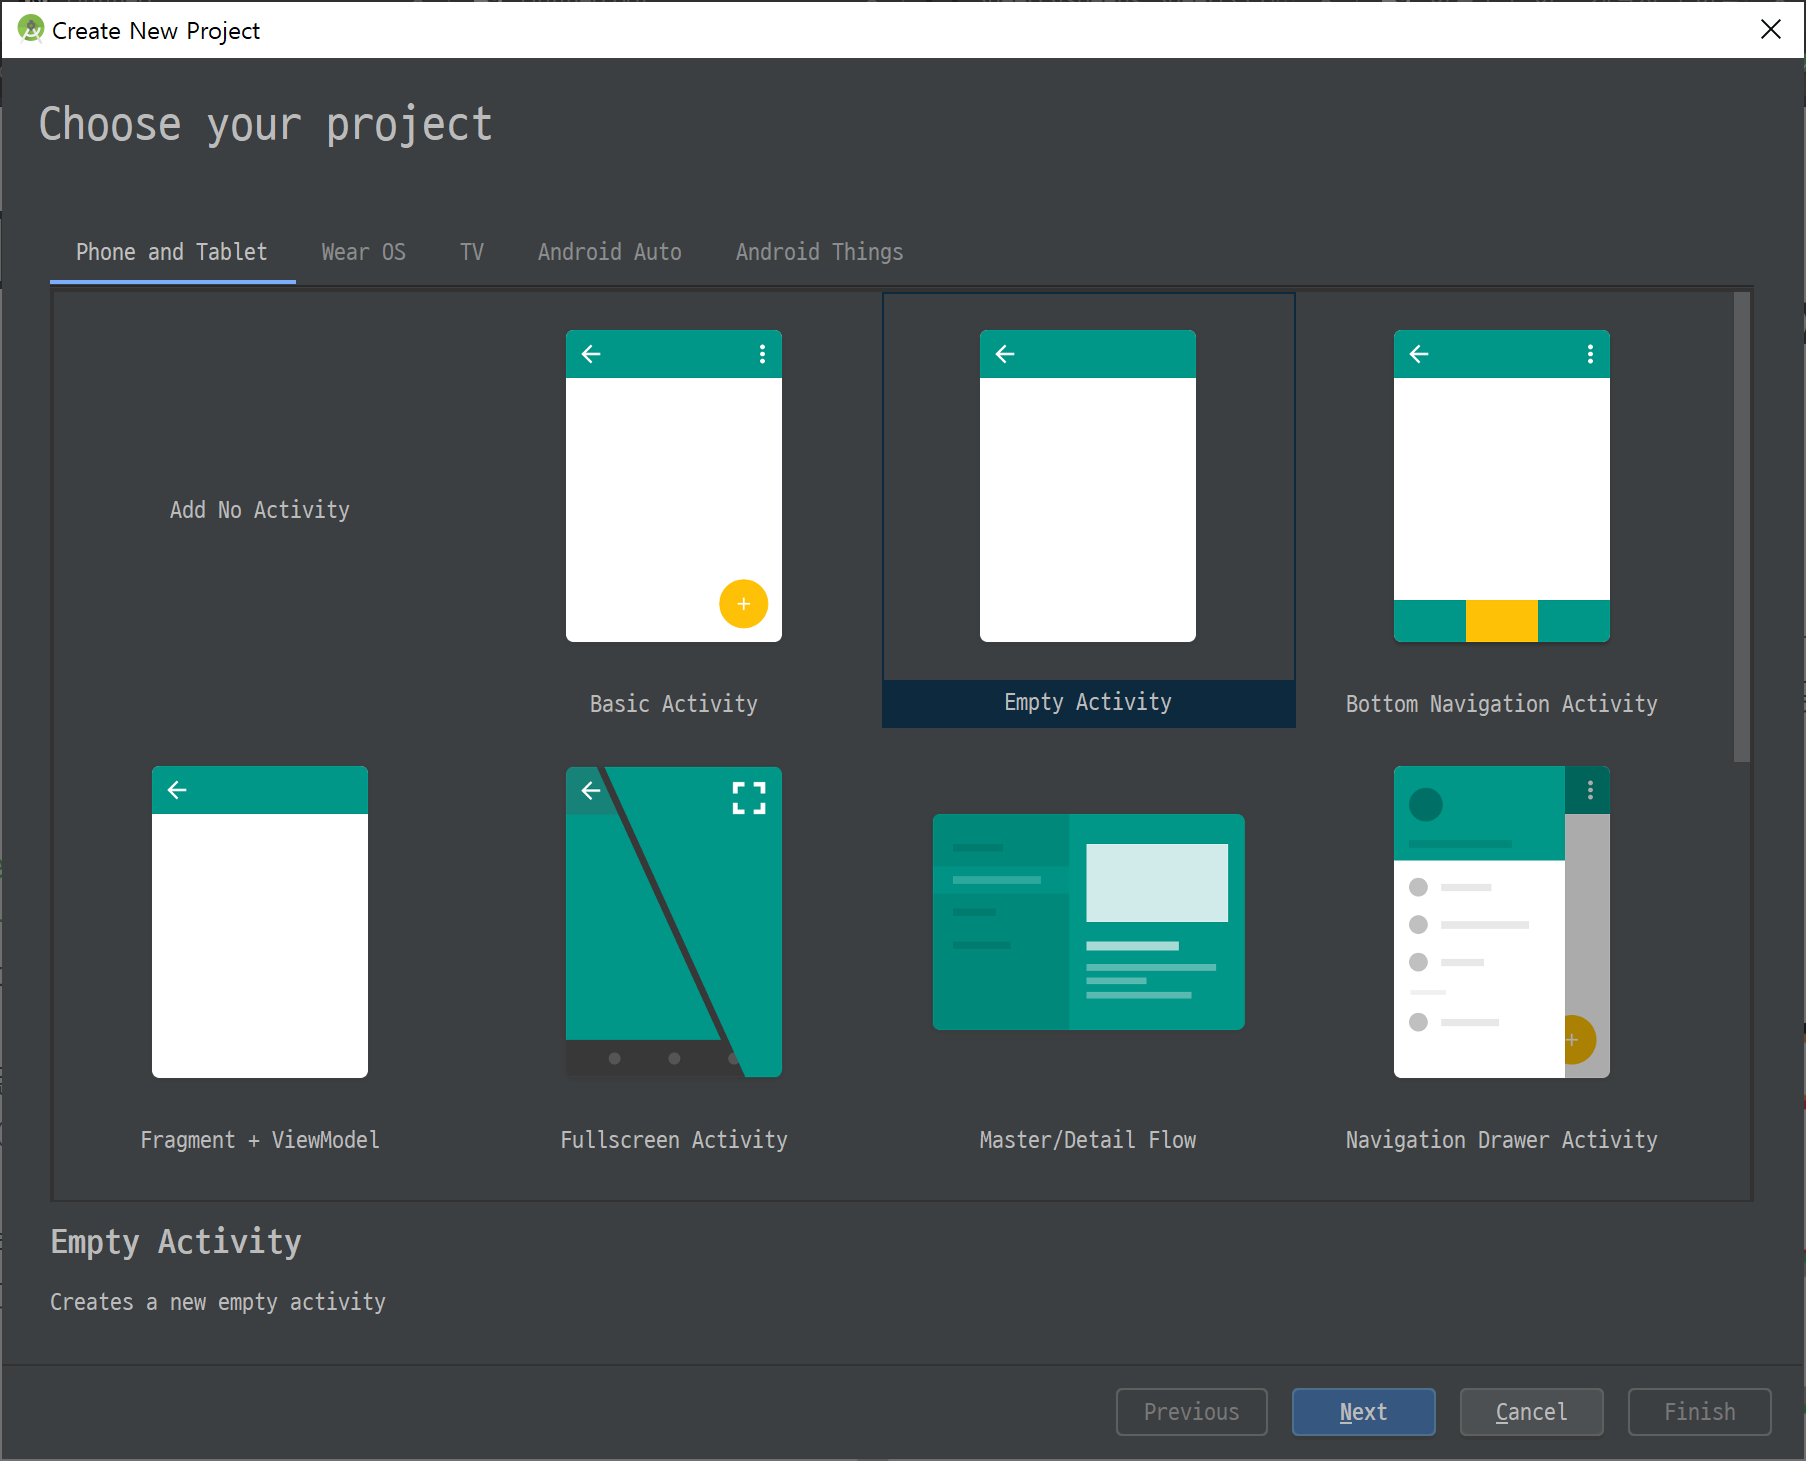
먼저 프로젝트를 생성합니다. Empty Activity를 선택합니다.
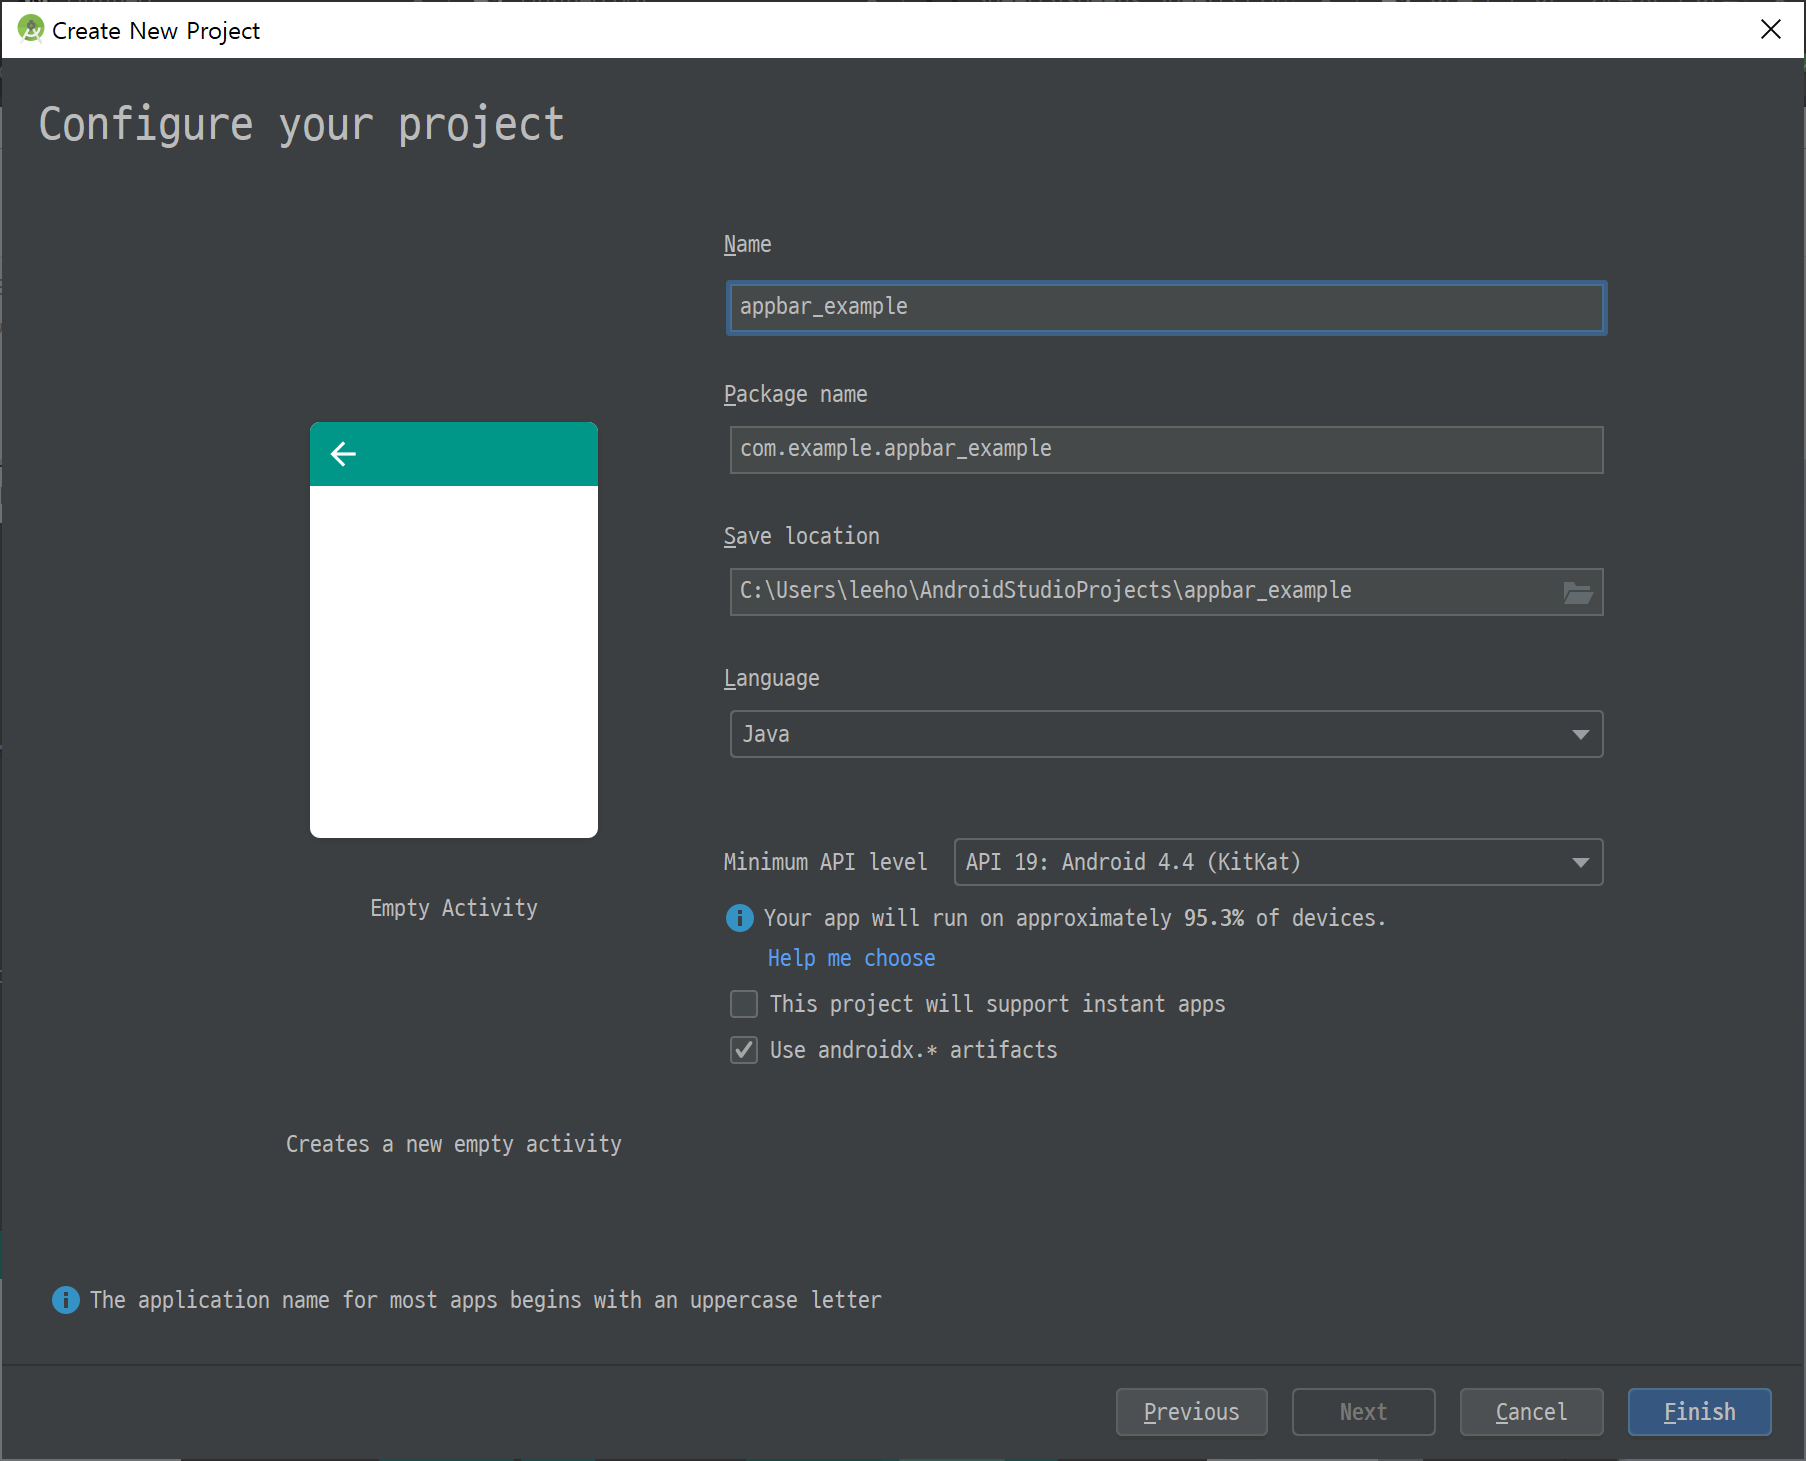
프로젝트 이름은 appbar_example로 정하고 Minimum API는 19로 킷캣 이상에서만 동작하도록 했습니다.
먼저 레이아웃을 설정하기 위해 activity_main.xml을 열어줍니다.
전체 레이아웃을 CoordinatorLayout으로 설정해야합니다. CoordinatorLayout은 FrameLayout에 Behavior를 이용해 자식 뷰 들간에 상호작용을 가능하게 해준다고 생각하시면 됩니다. 기본적으로 사용할 수 있는 레이아웃이 아니기 때문에 의존성을 추가해주어야 합니다.
implementation 'com.android.support:design:28.0.0'build.gradle에 추가해줍니다.
layout 수정
activity_main.xml 파일을 아래와 같이 수정해줍니다.
<?xml version="1.0" encoding="utf-8"?>
<androidx.coordinatorlayout.widget.CoordinatorLayout
    xmlns:android="http://schemas.android.com/apk/res/android"
    xmlns:app="http://schemas.android.com/apk/res-auto"
    xmlns:tools="http://schemas.android.com/tools"
    android:layout_width="match_parent"
    android:layout_height="match_parent"
    tools:context=".MainActivity">

</androidx.coordinatorlayout.widget.CoordinatorLayout>
그 다음 AppbarLayout을 추가합니다. 주의하실점은 CoordinatorLayout의 direct child로 선언하셔야 됩니다. 다른 ViewGroup으로 감싼다면 작동이 되지 않습니다.
<...CoordinatorLayout>
...
   <com.google.android.material.appbar.AppBarLayout
        android:layout_width="match_parent"
        android:layout_height="wrap_content">

        <androidx.appcompat.widget.Toolbar
            android:id="@+id/searchBar"
            android:layout_width="match_parent"
            android:layout_height="?attr/actionBarSize"
            android:background="#A5A5A5"
            app:layout_scrollFlags="scroll|enterAlways"
            app:popupTheme="@style/ThemeOverlay.AppCompat.Light">
            <include layout="@layout/search_bar" />
        </androidx.appcompat.widget.Toolbar>
    </com.google.android.material.appbar.AppBarLayout>
</...CoordinatorLayout>
Toolbar의 layout_scrollFlags와 popupTheme 속성이 이전에 못보던 속성들입니다.
layout_scrollFlags는 스크롤할때 해당 View의 행동을 설정해 주는 거라고 생각하시면 됩니다. 더 자세히 알고 싶으시면 참고
우리는 scroll과 enterAlways를 적용합니다.
popupTheme속성은 Toolbar는 원하는 테마를 적용해 줄 수 있습니다. 자기가 원하는 테마를 적용해 줄 수 있습니다.
<LinearLayout xmlns:android="http://schemas.android.com/apk/res/android"
    android:layout_width="match_parent"
    android:layout_height="match_parent"
    android:gravity="center"
    android:orientation="vertical"
    android:padding="5sp">
    <EditText
        android:id="@+id/searchTab"
        android:layout_width="match_parent"
        android:layout_height="40sp"
        android:background="@drawable/border_round"
        android:textSize="15dp"
        android:inputType="textPersonName" />
</LinearLayout>
search_bar.xml xml파일을 생성한다.
<selector xmlns:android="http://schemas.android.com/apk/res/android">
    <item>
        <shape android:shape="rectangle">
            <solid android:color="@android:color/white"/>
            <corners android:radius="5sp"/>
            <padding android:bottom="0dip" android:left="0dip" android:right="0dip" android:top="0dip" />
        </shape>
    </item>
</selector>
border_round.xml 파일을 생성한다.
그 다음은 Appbar가 반응할 스크롤을 추가해줍니다.
<...CoordinatorLayout>
...
    <com.google.android.material.appbar.AppBarLayout>
        <androidx.appcompat.widget.Toolbar>
            ...
        </androidx.appcompat.widget.Toolbar>
    </com.google.android.material.appbar.AppBarLayout>

    <androidx.core.widget.NestedScrollView
        android:id="@+id/main.scrollview"
        android:layout_width="match_parent"
        android:layout_height="match_parent"
        android:descendantFocusability="blocksDescendants"
        android:fillViewport="true"
        android:scrollbars="none"
        app:layout_behavior="@string/appbar_scrolling_view_behavior">

        <androidx.recyclerview.widget.RecyclerView
            android:id="@+id/main.scrollview.recyclerview"
            android:layout_width="match_parent"
            android:layout_height="match_parent"
            android:divider="@android:color/transparent"
            android:dividerHeight="20sp"
            app:layout_behavior="@string/appbar_scrolling_view_behavior" />
    </androidx.core.widget.NestedScrollView>

</androidx.coordinatorlayout.widget.CoordinatorLayout>
layout_behavior 속성을 추가해야합니다. 관련한 자세한 지식은 여기를 참고해주세요. (저도 자세히는 이해 못했...)
구현된 내용
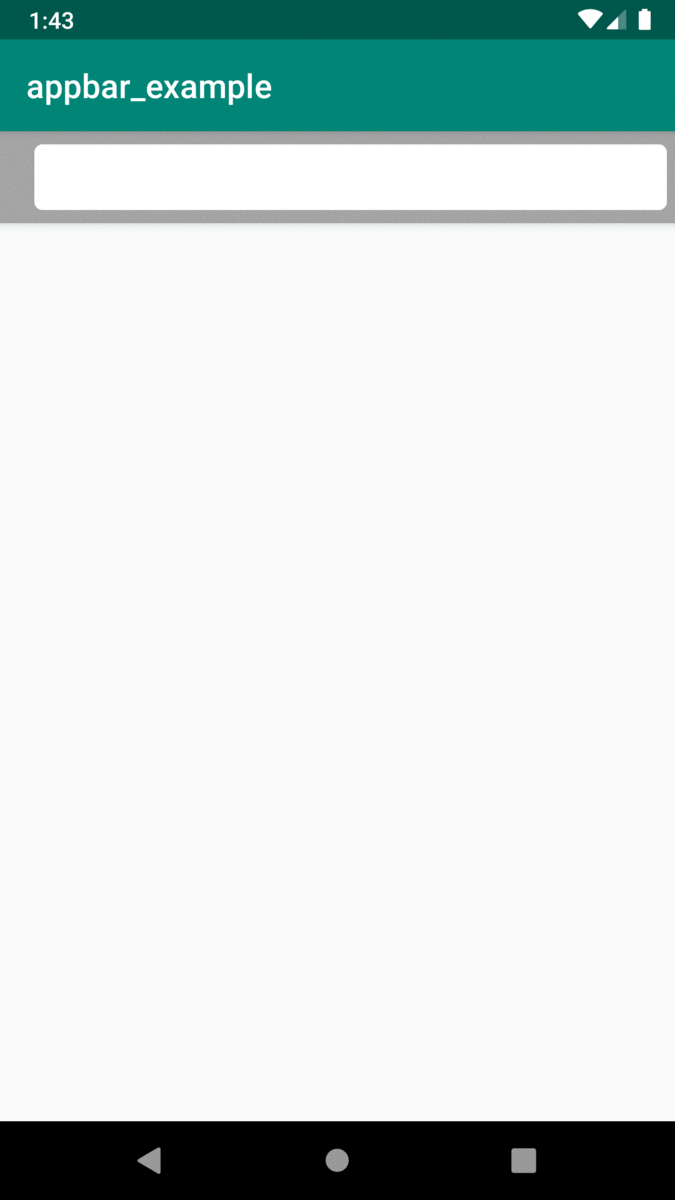
실행하면 위와 같이 스크롤하면 Appbar가 다른 Appbar 뒤로 숨는 것을 볼 수 있습니다.
추가적으로
Appbar의 title textColor를 변경하는 방법도 알려드리겠습니다.
<resources>
    <!-- Base application theme. -->
    <style name="AppTheme" parent="Theme.AppCompat.Light.DarkActionBar">
        <!-- Customize your theme here. -->
        <item name="colorPrimary">@color/colorPrimary</item>
        <item name="colorPrimaryDark">@color/colorPrimaryDark</item>
        <item name="colorAccent">@color/colorAccent</item>
        <item name="actionBarTheme">@style/ActionBarTheme</item>
    </style>

    <style name="ActionBarTheme" parent="@style/ThemeOverlay.AppCompat.Dark.ActionBar">
        <item name="android:textColorPrimary">#123123</item>
    </style>
</resources>
style.xml파일을 열고 actionBarTheme를 이용해 색을 변경하면 원하는 색으로 변경됩니다.
안드로이드 앱을 개발하면서 삽질했던 부분을 공유하고자 글을 작성했습니다. 보시다 싶이 프로젝트를 생성하고 바로 Appbar를 추가하면 2개의 Appbar를 하나는 고정 하나는 스크롤에 따라 움직이게 할 수 있엇지만 windowNoTitle로 타이틀바를 없애버리고.. xml파일에서 두개의 Appbar를 생성하고 삽질하고... 저와 같은 고생을 하지 않았으면 하는 바램으로 글을 적어봤습니다. 또한 Title 의 textColor를 변경하는 것도 제가 삽질했던 거라 도움되길 바라며 추가적으로 적었습니다.