1. Exception(예외 처리)에 대하여 설명하시오:
- 예외 처리는 프로그램 실행 중 발생할 수 있는 예기치 않은 오류나 예외를 처리하는 방법입니다. 이를 통해 실행 중인 프로그램의 갑작스러운 비정상 종료를 방지하고 정상적인 실행 상태를 유지할 수 있습니다. 주로
try ~ catch문을 사용합니다.
2. 예외처리의 기본적인 매커니즘은:
try블록 내에서 예외가 발생할 수 있는 코드를 작성하고, 예외가 발생하면catch블록에서 예외 처리를 수행합니다. 예외가 발생하지 않는 경우는catch블록을 건너뛰고 프로그램은 정상적으로 실행됩니다.
3. 아래의 객체를 예를 들어 설명하시오:
- ClassCastException: 코드가 하위 유형이 아닌 유형에 대한 참조를 캐스팅하려고 시도했음을 알리는 확인되지 않은 예외입니다.
- NullPointerException: 변수나 객체에 접근할 때, 값이 null로 설정되어있어서 접근할 수 없을 때 발생하는 예외입니다[^10^].
- ArrayIndexOutOfBoundsException: 배열의 인덱스 범위를 초과하여 접근하려고 할 때 발생합니다⁵. 즉, 유효하지 않은 인덱스를 사용할 때 발생하는 예외입니다.
4. 아래의 결과를 나타내는 사칙연산 계산기를 완성하시오:
interface ICalculator {
	int add(int x, int y);
	int sub(int x, int y);
	int mul(int x, int y);
	int div(int x, int y);
}
public class CalculatorMain {

	public static void main(String[] args) {
		Calculator cal = new Calculator();
		System.out.println(cal.add(6, 5));
		System.out.println(cal.sub(6, 5));
		System.out.println(cal.mul(6, 5));
		System.out.println(cal.div(6, 0));

	}

}
interface ICalculator {
int add(int x, int y);
int sub(int x, int y);
int mul(int x, int y);
int div(int x, int y);
}
public class Calculator implements ICalculator {
public int add(int x, int y) {
return x + y;
}
public int sub(int x, int y) {
return x - y;
}
public int mul(int x, int y) {
return x * y;
}
public int div(int x, int y) {
if (y == 0) {
throw new ArithmeticException("/ by zero");
}
return x / y;
}
}
public class CalculatorMain {
public static void main(String[] args) {
Calculator cal = new Calculator();
System.out.println(cal.add(6, 5));
System.out.println(cal.sub(6, 5));
System.out.println(cal.mul(6, 5));
try {
System.out.println(cal.div(6, 0));
} catch (ArithmeticException e) {
System.out.println(e);
}
System.out.println("계산기 종료");
}
}이 코드는 ICalculator 인터페이스를 구현하는 Calculator 클래스를 정의하고, 이 클래스의 객체 cal을 생성하여 사칙연산을 수행합니다. div 메소드에서 0으로 나누는 경우 ArithmeticException을 발생시키므로, 이를 try-catch 블록으로 처리하여 예외 메시지를 출력합니다.
5. throws에 대하여 설명하시오.
throws는 메소드 시그니처의 일부로, 메소드를 호출하는 클라이언트에게 메소드의 동작 중 어떤 예외가 발생할 수도 있으므로 예외 처리해줘야한다는 것을 알려줍니다. 예를 들어, public void queryDatabase() throws IOException이라는 메소드가 있다면, 이 메소드를 호출하는 코드는 IOException을 처리해야 합니다.
6. Checked Exception과 Unchecked Exception 설명하시오.
Checked Exception:RuntimeException클래스에 상속하지 않은 것들이고, 예외가 발생할 수 있는 메소드를 사용할 경우 반드시catch문이나throw를 정의해서 처리해야 합니다.Unchecked Exception: 프로그램이 실행된 후에 확인할 수 있고, 프로그램의 오류가 있을 때 발생하도록 의도된 것입니다.RuntimeException을 상속받는Exception클래스들을 포함합니다¹¹.
7. 아래가 컴파일 에러가 나는 이유에 대하여 설명하시오.
try {
		int num = 6 / 0;
} catch (Exception e) {
		e.printStackTrace();
} catch (InputMismatchException e) {
		e.printStackTrace();
}
catch 블록의 순서 때문입니다. Exception 클래스는 모든 예외 클래스의 슈퍼클래스이므로, Exception 타입의 catch 블록이 먼저 나오면 그 아래에 있는 catch 블록은 도달할 수 없게 됩니다⁸. 따라서, 더 구체적인 예외 타입의 catch 블록을 먼저 배치하고, 그 다음에 Exception 타입의 catch 블록을 배치해야 합니다.
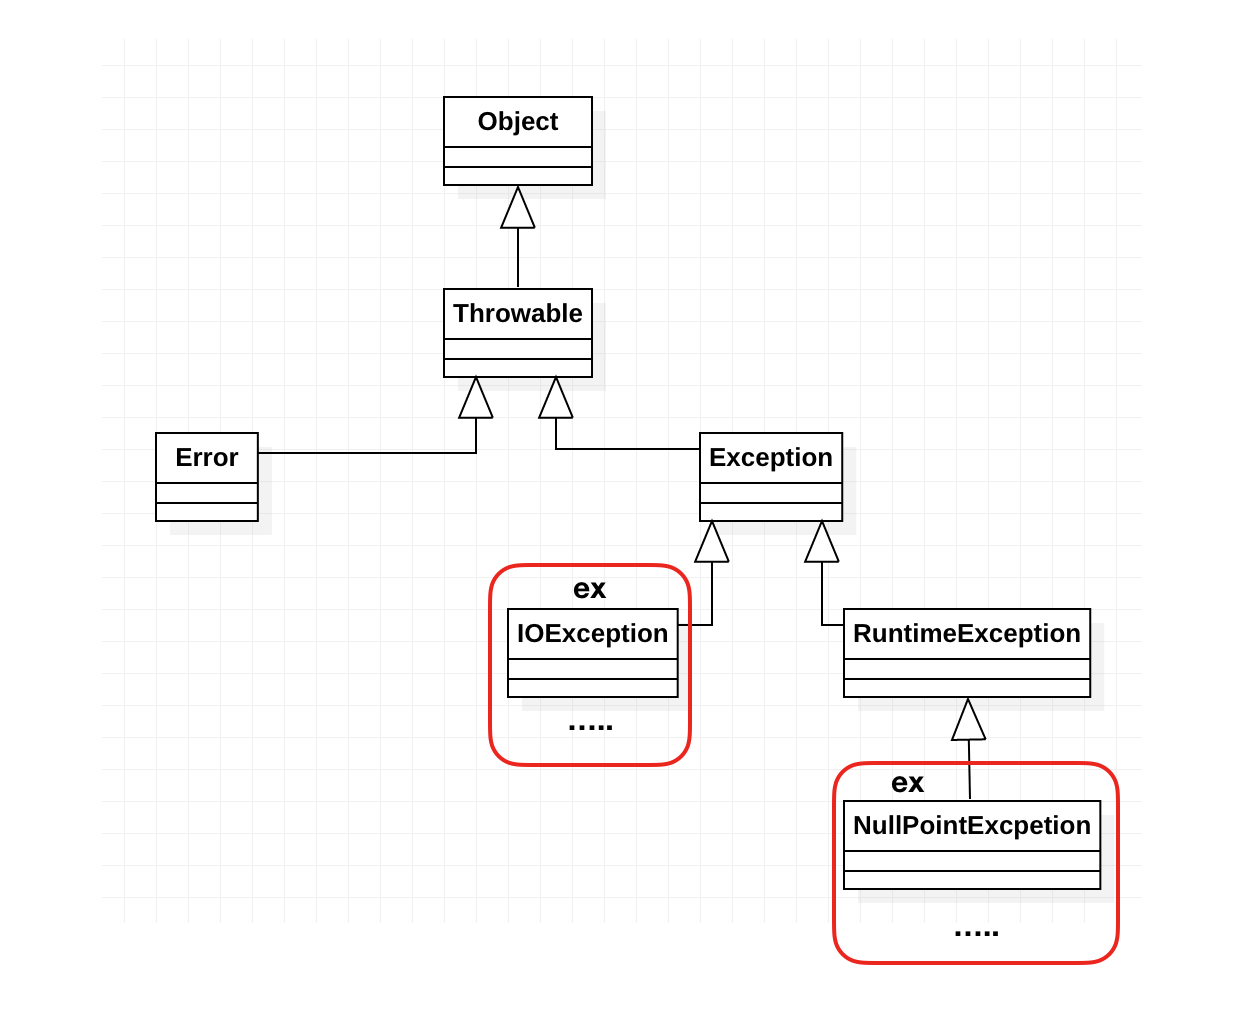
8. 예외처리(Exception Handling) UML(상속도)참고하여 그리시오.
9. 주어진 코드에서 에러가 발생하는 이유와 해결 방법은 다음과 같습니다:
public static void main(String[] args)   {

		Path file = Paths.get("C:\\Simple.txt");
		BufferedWriter writer= null;

			writer = Files.newBufferedWriter(file);

	        writer.write('A');     // IOException 발생 가능
	        writer.write('Z');     // IOException 발생 가능

	        if(writer != null)
	            writer.close();     // IOException 발생 가능


}- 에러 원인:
BufferedWriter객체를 생성하고 사용하는 코드가try블록 안에 없습니다. 이로 인해IOException이 발생하면 프로그램이 비정상적으로 종료됩니다. - 해결 방법 1:
BufferedWriter객체를 생성하고 사용하는 코드를try블록 안에 넣고,catch블록에서IOException을 처리합니다. - 해결 방법 2:
main메소드에throws IOException을 추가하여 예외를 메소드 호출자에게 전달합니다. 이 경우, JVM이 예외를 처리합니다.
public static void main(String[] args) {
    Path file = Paths.get("C:\\Simple.txt");
    BufferedWriter writer = null;

    try {
        writer = Files.newBufferedWriter(file);
        writer.write('A');     // IOException 발생 가능
        writer.write('Z');     // IOException 발생 가능
    } catch (IOException e) {
        e.printStackTrace();
    } finally {
        if(writer != null) {
            try {
                writer.close();     // IOException 발생 가능
            } catch (IOException e) {
                e.printStackTrace();
            }
        }
    }
}
이 코드는 BufferedWriter 객체를 안전하게 사용하고 닫습니다. try 블록에서 IOException이 발생하면 catch 블록에서 이를 처리하고, finally 블록에서 BufferedWriter를 닫습니다. 이렇게 하면 BufferedWriter가 항상 닫히므로 자원 누수를 방지할 수 있습니다.

개발일지