개념
서비스
서비스(service)란 컨트롤러와 리파지터리 사이에 위치하는 계층으로, 서버의 핵심 기능(비즈니스 로직)을 처리하는 순서를 총괄한다.
식당을 예로 들면, 웨이터에게 주문이 들어오면 이를 전달받은 주방장이 요리를 총괄한다. 재료가 필요하면 보조 요리사가 이를 가져오고. 여기서 웨이터는 컨트롤러, 주방장은 서비스, 보조 요리사는 리파지터리로 볼 수 있다. 손님(클라이언트)이 음식을 주문하면 웨이터(컨트롤러)가 이를 받아 주방장(서비스)에게 전달하고, 주방장(서비스)은 정해진 레시피에 따라 요리한다. 요리에 필요한 재료(데이터)는 보조 요리사(리파지터리)가 창고(DB)에서 가져온다.
트랜잭션
트랜잭션(transaction)이란 모두 성공해야 하는 일련의 과정을 뜻한다. 쪼갤 수 없는 업무 처리의 최소 단위이다.
똑같이 식당 예약을 예로 들면, 1. 시간 예약 -> 2. 테이블 지정 -> 3. 메뉴 선택 -> 4. 결제 -> 5. 영수증 발행 -> 6. 예약 완료 이 순서로 식당을 예약한다고 하자. 어떤 고객이 메뉴 선택까지 마친 상태, 즉 3번 상태에서 결제에 실패했다면 앞서 진행한 기록은 모두 취소돼야 한다. 실패한 정보가 계속 남으면 또 다른 예약을 받을 수 없기 때문이다. 이렇게 모두 성공해야 하는 일련의 과정을 트랜잭션이라고 한다. 그리고 트랜잭션이 실패로 돌아갈 경우 진행 초기 단계로 돌리는 것을 롤백(rollback)이라고 한다.
이전에 만들었던 REST 컨트롤러 코드는 1인 2역을 하고 있었다. 컨트롤러 내에 서비스와 컨트롤러 역할을 동시에 하고 있었단 말이다. 지금까지는 복잡한 처리 과정이 아니라서 컨트롤러 혼자 2역을 수행해도 충분하긴 하다. 하지만 일반적으로 웹 서비스는 컨트롤러와 리파지터리 사이에 서비스 계층을 두어 역할을 분업한다.
리팩토링
서비스 계층 만들기
이전에 만든 REST 컨트롤러(api/ArticleApiController.java)의 코드를 수정하겠다.
    @Autowired
    private ArticleService articleService;      // 서비스 객체 주입
아직 ArticleService 클래스를 정의하지 않았기에, 만들도록 하겠다.
com.example.firstproject.service 패키지를 만들고, 안에 ArticleService 클래스를 만든다.
@Slf4j		// 로깅을 위한 어노테이션
@Service        // 서비스 객체 생성
public class ArticleService {
    @Autowired
    private ArticleRepository articleRepository;        // 게시글 리파지터리 객체 주입
}
게시글 리파지터리 객체 주입을 서비스 계층에서 하도록 한다.
게시글 조회 요청 개선
모든 게시글 조회
우선 ArticleApiController 클래스의 index() 메서드를 다음과 같이 수정한다.
    @GetMapping("/api/articles")
    public List<Article> index() {
        return articleService.index();
    }
그리고 ArticleService 클래스에 index() 메서드를 추가한다.
    public List<Article> index() {
        return articleRepository.findAll();
    }
단일 게시글 조회
이번에도 ArticleApiController 클래스의 show() 메서드를 다음과 같이 수정한다.
    @GetMapping("/api/articles/{id}")
    public Article show(@PathVariable Long id) {
        return articleService.show(id);
    }
다시 ArticleService 클래스에 show() 메서드를 추가한다.
    public Article show(Long id) {
        return articleRepository.findById(id).orElse(null);
    }
게시글 생성 요청 개선
ArticleApiController 클래스의 create() 메서드를 수정한다.
    @PostMapping("/api/articles")
    public ResponseEntity<Article> create(@RequestBody ArticleForm dto) {
        Article created = articleService.create(dto);       // 서비스로 게시글 생성
        return (created != null) ?      // 생성하면 정상, 실패하면 오류 응답
                ResponseEntity.status(HttpStatus.OK).body(created) :
                ResponseEntity.status(HttpStatus.BAD_REQUEST).build();
    }
ArticleService 클래스에 create() 메서드를 추가한다.
    public Article create(ArticleForm dto) {
        Article created = dto.toEntity();       // dto -> 엔티티로 변환한 후 article에 저장
        return articleRepository.save(created); // article을 DB에 저장
    }
게시글 수정 요청 개선
ArticleApiController 클래스의 update() 메서드를 수정한다.
    @PatchMapping("/api/articles/{id}")
    public ResponseEntity<Article> update(@PathVariable Long id,
                                          @RequestBody ArticleForm dto) {
        Article updated = articleService.update(id, dto);       // 서비스를 통해 게시글 수정
        return (updated != null) ?              // 수정되면 정상, 안 되면 오류 응답
                ResponseEntity.status(HttpStatus.OK).body(updated) :
                ResponseEntity.status(HttpStatus.BAD_REQUEST).build();
    }
ArticleService 클래스에 update() 메서드를 추가한다.
    public Article update(Long id, ArticleForm dto) {
        // 1. DTO -> 엔티티 변환
        Article article = dto.toEntity();
        log.info("id : {}, article : {}", id, article.toString());      // 로그 찍기
        // 2. 타깃 조회
        Article target = articleRepository.findById(id).orElse(null);
        // 3. 잘못된 요청 처리
        if (target == null || id != article.getId()) {
            // 400, 잘못된 요청 응답!
            log.info("잘못된 요청! id: {}, article : {}", id, article.toString());       // 로그 찍기
            return null;        // 응답은 컨트롤러가 하므로, 여기서는 null 반환
        }
        // 4. 업데이트하기
        target.patch(article);
        Article updated = articleRepository.save(target);
        return updated;         // 응답은 컨트롤러가 하므로, 여기서는 수정 데이터만 반환
    }
게시글 삭제 요청 개선
ArticleController 클래스의 delete() 메서드를 수정한다.
    @DeleteMapping("/api/articles/{id}")
    public ResponseEntity<Article> delete(@PathVariable Long id) {
        Article deleted = articleService.delete(id);        // 서비스를 통해 게시글 삭제
        return (deleted != null) ?          // 삭제 결과에 따라 응답 처리
                ResponseEntity.status(HttpStatus.NO_CONTENT).body(deleted) :
                ResponseEntity.status(HttpStatus.BAD_REQUEST).build();
    }
ArticleService 클래스에 delete() 메서드를 추가한다.
    public Article delete(Long id) {
        // 1. 대상 찾기
        Article target = articleRepository.findById(id).orElse(null);
        // 2. 잘못된 요청 처리하기
        if (target == null) {
            return null;        // 응답은 컨트롤러가 하므로 여기서는 null 반환
        }
        // 3. 대상 삭제하기
        articleRepository.delete(target);
        return target;      // DB에서 삭제한 대상을 컨트롤러에 반환
    }
이렇게 컨트롤러와 서비스 영역을 분리시킬 수 있다.
트랜잭션 생성
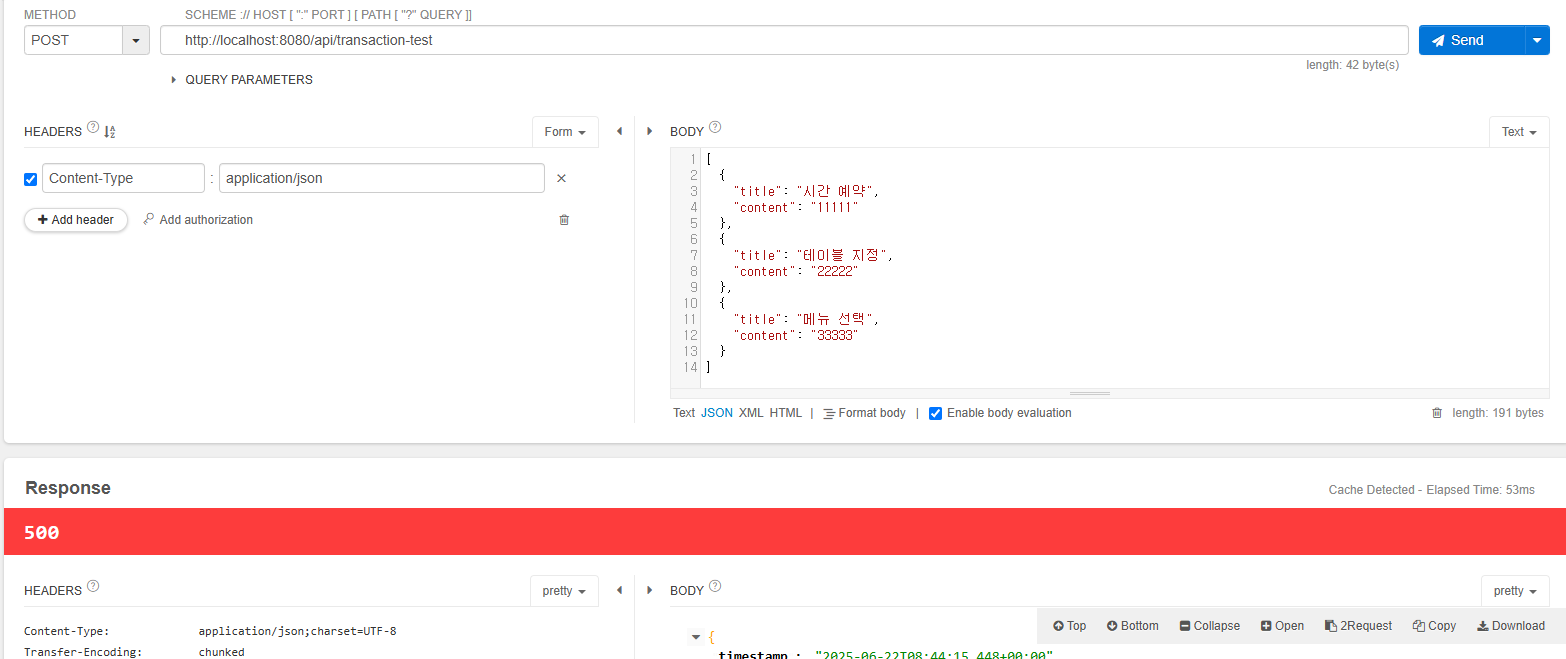
ArticleApiController에 데이터 여러개의 생성 요청을 받아 결과를 응답하도록 하는 transactionTest() 메서드를 추가한다.
    @PostMapping("/api/transaction-test")       // 여러 게시글 생성 요청 접수
    public ResponseEntity<List<Article>> trannsactionTest       // transactionTest() 메서드 정의
            (@RequestBody List<ArticleForm> dtos) {
        List<Article> createdList = articleService.createArticles(dtos);        // 서비스 호출
        return (createdList != null) ?
            ResponseEntity.status(HttpStatus.OK).body(createdList) :
            ResponseEntity.status(HttpStatus.BAD_REQUEST).build();
}- @PostMapping으로 요청 URL "/api/transaction-test"의 데이터 생성 요청을 받는다.
- transactionTest()라는 메서드를 만든다. 이 메서드로 데이터 여러개를 받는다. 매개변수로는 ArticleForm 데이터를 List로 묶은 dtos를 선언한다. REST API 방식으로 POST 요청을 받고 있으므로 @RequestBody도 붙여준다. 그리고 서버에서 응답할 때 데이터 생성 결과뿐만 아니라 상태 코드도 함께 보내므로 메서드의 반환형은 ResponseEntity<List<Artic|e>>로 한다.
- 여러 게시글의 생성 요청을 받은 컨트롤러는 articleService의 createArticles() 메서드를 호출한다. 이때 매개변수로 받은 dtos도 함께 전달한다. createArticles() 메서드가 게시글을 잘 생성한다는 가정하에 생성 게시글 정보가 담긴 반환값을 createdList라는 리스트에 저장한다.
- createList에 내용이 있다면(null이 아니라면) 생성이 잘 되었다는 뜻이므로 ResponseEntity의 상태에는 OK, 본문에는 createdList를 실어 보낸다. 반면 내용이 없다면 ResponseEntity의 상태에는 BAD_REQUEST, 본문은 없으므로 빌드만 해서 보낸다.
컨트롤러를 작성했으니, 이제 서비스의 createArticles() 메서드를 작성한다.
    @Transactional
    public List<Article> createArticles(List<ArticleForm> dtos) {
        // 1. dto 묶음을 엔티티 묶음으로 변환하기
        List<Article> articleList = dtos.stream()
                .map(dto -> dto.toEntity())
                .collect(Collectors.toList());
        // 2. 엔티티 묶음을 DB에 저장하기
        articleList.stream()
                .forEach(article -> articleRepository.save(article));
        // 3. 강제 예외 발생시키기
        articleRepository.findById(-1L)     // id가 -1인 데이터 찾기
                .orElseThrow(() -> new IllegalArgumentException("결제 실패!"));     // 찾는 데이터가 없으면 예외 발생
        // 4. 결과 값 반환하기
        return articleList;
}- dto 묶음(리스트)을 엔티티 묶음(리스트)으로 변환하기
1-1. dtos를 스트림화한다.
1-2. map()으로 dto가 하나하나 올 때마다 dto.toEntity()를 수행해 매핑한다.
1-3. 이렇게 매핑한 것을 리스트로 묶는다.
1-4. 최종 결과를 articleList에 저장한다. - 엔티티 묶음(리스트)을 DB에 저장하기
2-1. articleList를 스트림화한다.
2-2. article이 하나씩 올 때마다 articleRepository를 통해 DB에 저장한다. - 강제로 에러를 발생시키기
3-1. ArticleRepository를 통해 findById()로 id가 -1인 데이터를 찾는다. 물론 JPA로 자동 생성된 id는 양수이므로 음수가 될 수 없다. 이런 경우, 예외를 발생시킨다.
3-2. orElseThrow() 메서드로 IllegalArgumentExeption을 발생시키는데 "결제 실패!"라는 메시지를 함께 남긴다. orElseThrow() 메서드는 값이 존재하면 그 값을 반환하고 값이 존재하지 않으면 전달값으로 보낸 예외를 발생시킨다. 코드에 사용한 예외 클래스 IllegalArgumentExeption은 전달값이 없거나 유효하지 않은 경우를 뜻한다. - 강제로 예외가 발생하도록 작성했지만 그래도 형식상 articleList를 반환해준다.
서버를 재실행하고 API 테스터로 POST 요청을 보내보면, 상태코드 500이 나온다.
그리고 로그를 살펴보면
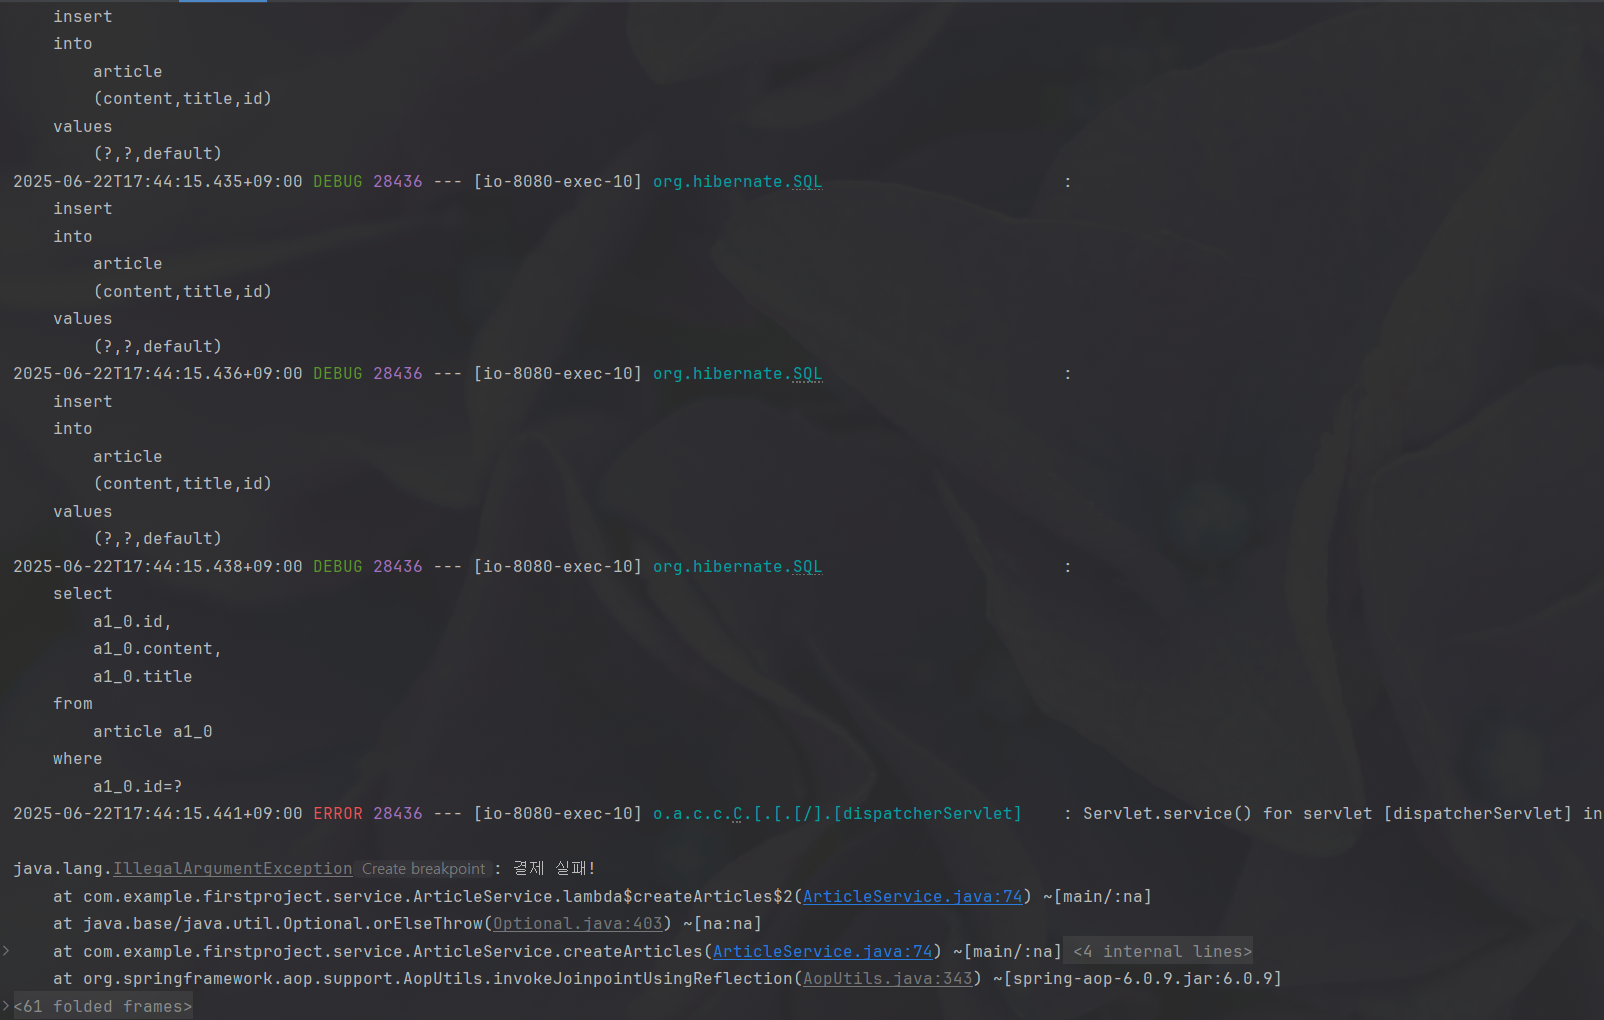
insert문이 3개 실행되고 오류가 나온다.
만약 서비스의 메서드에 @Transactional을 붙이지 않았다면, insert가 먼저 실행되었기 때문에, 데이터가 저장이 될 것이다. 하지만 트랜잭션으로 인해 롤백되어 데이터가 추가되지 않음을 확인할 수 있다.
스트림 문법 1
스트림(stream) 문법은 리스트와 같은 자료구조에 저장된 요소를 하나씩 순회하면서 처리하는 코드 패턴이다. 1번 코드를 for() 문으로 작성하면 다음과 같이 총 6행에 걸쳐 작성된다. 이를 스트림 문법으로 작성하면 3행으로 줄일 수 있다.
List<article> articleList = new ArrayList<>();
for (int i = 0; i < dtos.size(); i++) {
	ArticleForm dto = dtos.get(i);
    Article entity = dto.toEntity();
    articleList.add(entity);
}
스트림 문법 2
2번 코드를 for() 문으로 작성하면 다음과 같다.
for (int i = 0; i < articleList.size(); i++) {
	Article article = articleList.get(i);
    articleRepository.save(article);
}