이 포스트는 정수원님의 스프링 시큐리티 강의 수강 후 정리한 글입니다.
Login Form 인증 절차
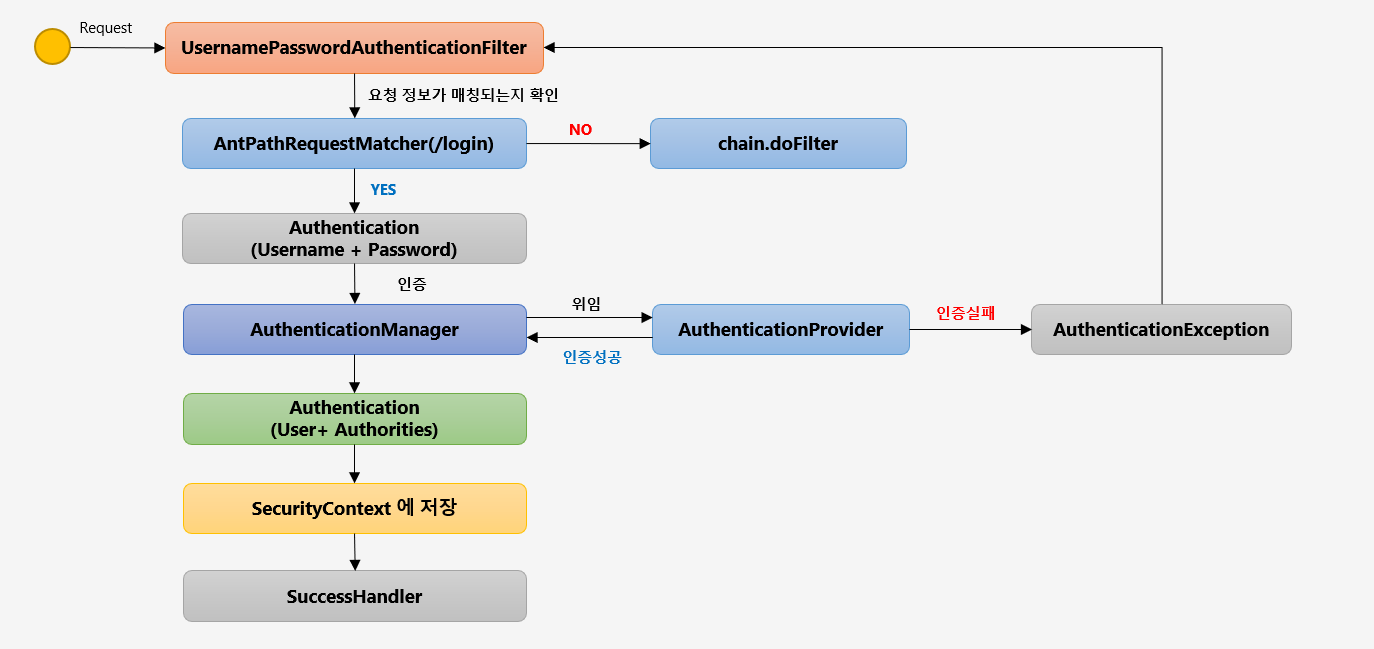
- UsernamePasswordAuthenticationFilter는 Login Form의 실질적 인증 처리 하는 Filter
- AntPathRequestMatcher(/login) 즉 Matcher를 이용해 요청 정보가 매칭되는지 확인해 매칭되지 않다면 chain.doFitler를 이용해 다음 필터로 넘어가고, 만약 매칭된다면 User의 정보(Username + Password)를 조합한 Authentication 객체를 생성한다.
- Matcher의 defaule는 "/login"이며, 커스텀 할 수 있다.
- 만들어진 Authentication의 인증은 AuthenticationManager가 진행하는데 이 때 AuthenticationProvider가 인증을 위임받아 실질적 인증은 AuthenticationProvider에서 이뤄진다.
- 인증 실패시 AuthenticationException이 발생해 UsernamePasswordAuthenticationFilter로 이동한다.
- 인증 성공시 User(Username + Password)와 Authorities를 조합한 Authentication 객체를 만들고 이를 SecurityContext에 저장한다.
- SecurityContext 저장 이후 SuccessHandler에 의해 다음 행동이 결정된다.
http.formLogin()        // formLogin 형태로
    .loginPage("/loginPage")        // "/login"을 다음 url로 연결하고
    .defaultSuccessUrl("/")     // 인증 성공 시 root page로 이동
    .failureUrl("/login")       // 인증 실패 시 다시 login 페이지로 이동
    .usernameParameter("userId")        // usernameParameter를 userId로
    .passwordParameter("passwd")        // passwordParameter를 passwd로
    .loginProcessingUrl("/login_proc")      // loginprocessingUrl를 login_proc로 커스텀  * AntPathRquestMatcher의 매칭을 바꾸는거임
    .successHandler(new AuthenticationSuccessHandler() {        // 성공시 authenticationSuccessHandler를 작동시켜서
        @Override
        public void onAuthenticationSuccess(HttpServletRequest request, HttpServletResponse response, Authentication authentication) throws IOException, ServletException {
            System.out.println("authentication : " + authentication.getName());        // authentication의 이름을 출력
            response.sendRedirect("/");     // root url로 응답
        }
    })
    .failureHandler(new AuthenticationFailureHandler() {        // 실패 시 authenticationFailurehandler를 작동시켜서
        @Override
        public void onAuthenticationFailure(HttpServletRequest request, HttpServletResponse response, AuthenticationException exception) throws IOException, ServletException {
            System.out.println("exception" + exception.getMessage());       // 에러 문구와 함께
            response.sendRedirect("/login");        // 다시 로그인페이지로 응답
        }
    })
    .permitAll()        // 모든 사용자가 인증 없이 이용 가능
SecurityContext에 Authentication이 저장되기 때문에 다음 코드를 작성하면 인증 객체를 꺼내 쓸 수 있다.
SecurityContextHolder.getContext.getAuthentication();

GitHub : https://github.com/dudxo
정리가 잘 된 글이네요. 도움이 됐습니다.