
웹 개발에 있어서 명확한 API 명세서 작성은 필수적입니다. API 명세서를 잘 작성해두면 이후 프로젝트에서 효율적인 협업이 가능하며, 시간을 절약할 수 있고, 더 좋은 서비스를 만들 수 있습니다.
이번 포스트에서는 API 명세서를 작성하는 도구 중 하나인 Swagger를 소개합니다. Swagger는 OpenAPI specification을 기반으로 RESTful API를 디자인하고, 문서화하기 위한 도구입니다.
What is OpenAPI?
The OpenAPI Specification provides a formal standard for describing HTTP APIs.
This allows people to understand how an API works, generate client code, create tests, apply design standards, and much, much more.
OpenAPI specification은 HTTP API를 설명하기 위한 공식 표준을 제공합니다.
이를 통해 사람들은 API의 작동 방식을 이해하고, 클라이언트 코드를 생성하고, 테스트를 만들고, 디자인 표준을 적용하는 등 다양한 작업을 수행할 수 있습니다.
- OpenAPI 소개
이제부터 Swagger가 무엇인지, 어떻게 사용하는지 알아보도록 하겠습니다.
Swagger란?
Swagger는 RESTful 웹 서비스를 설계, 구축, 문서화할 수 있도록 설계된 오픈소스 프레임워크입니다. Swagger는 RESTful API에 대해 언어 독립적이고, 표준화된 인터페이스를 제공하므로 Swagger로 작성된 API 명세서는 API의 기능을 쉽게 이해하는데 도움을 줄 수 있습니다.
Swagger는 API 명세서 작성을 위해 다음과 같은 여러가지 도구를 제공합니다:
-
Swagger UI: API 명세서를 정적 컨텐츠로 브라우저에서 열람할 수 있도록 하는 툴입니다. API 테스트도 가능합니다.
-
Swagger Editor: 웹 기반 API 명세서 작성 에디터입니다. JSON, YAML 포맷으로 간편하게 API 명세서를 작성할 수 있습니다.
-
Swagger Codegen: 서버 스텁, 클라이언트 라이브러리 및 API 문서를 자동으로 생성하는 도구입니다.
-
Swagger Inspector: 개발자가 API를 테스트하여 기능을 검증하고, 기존 API에 대한 명세서 작성을 돕는 툴입니다.
이번 포스트에서는 가장 간단하게 API 명세서를 작성할 수 있는 Swagger Editor를 이용해 API 명세서를 작성하겠습니다.
Swagger Editor를 사용해 API 명세서 작성하기
Swagger Editor 접속하기
Swagger Editor에 접속하면 다음과 같은 화면을 볼 수 있습니다.
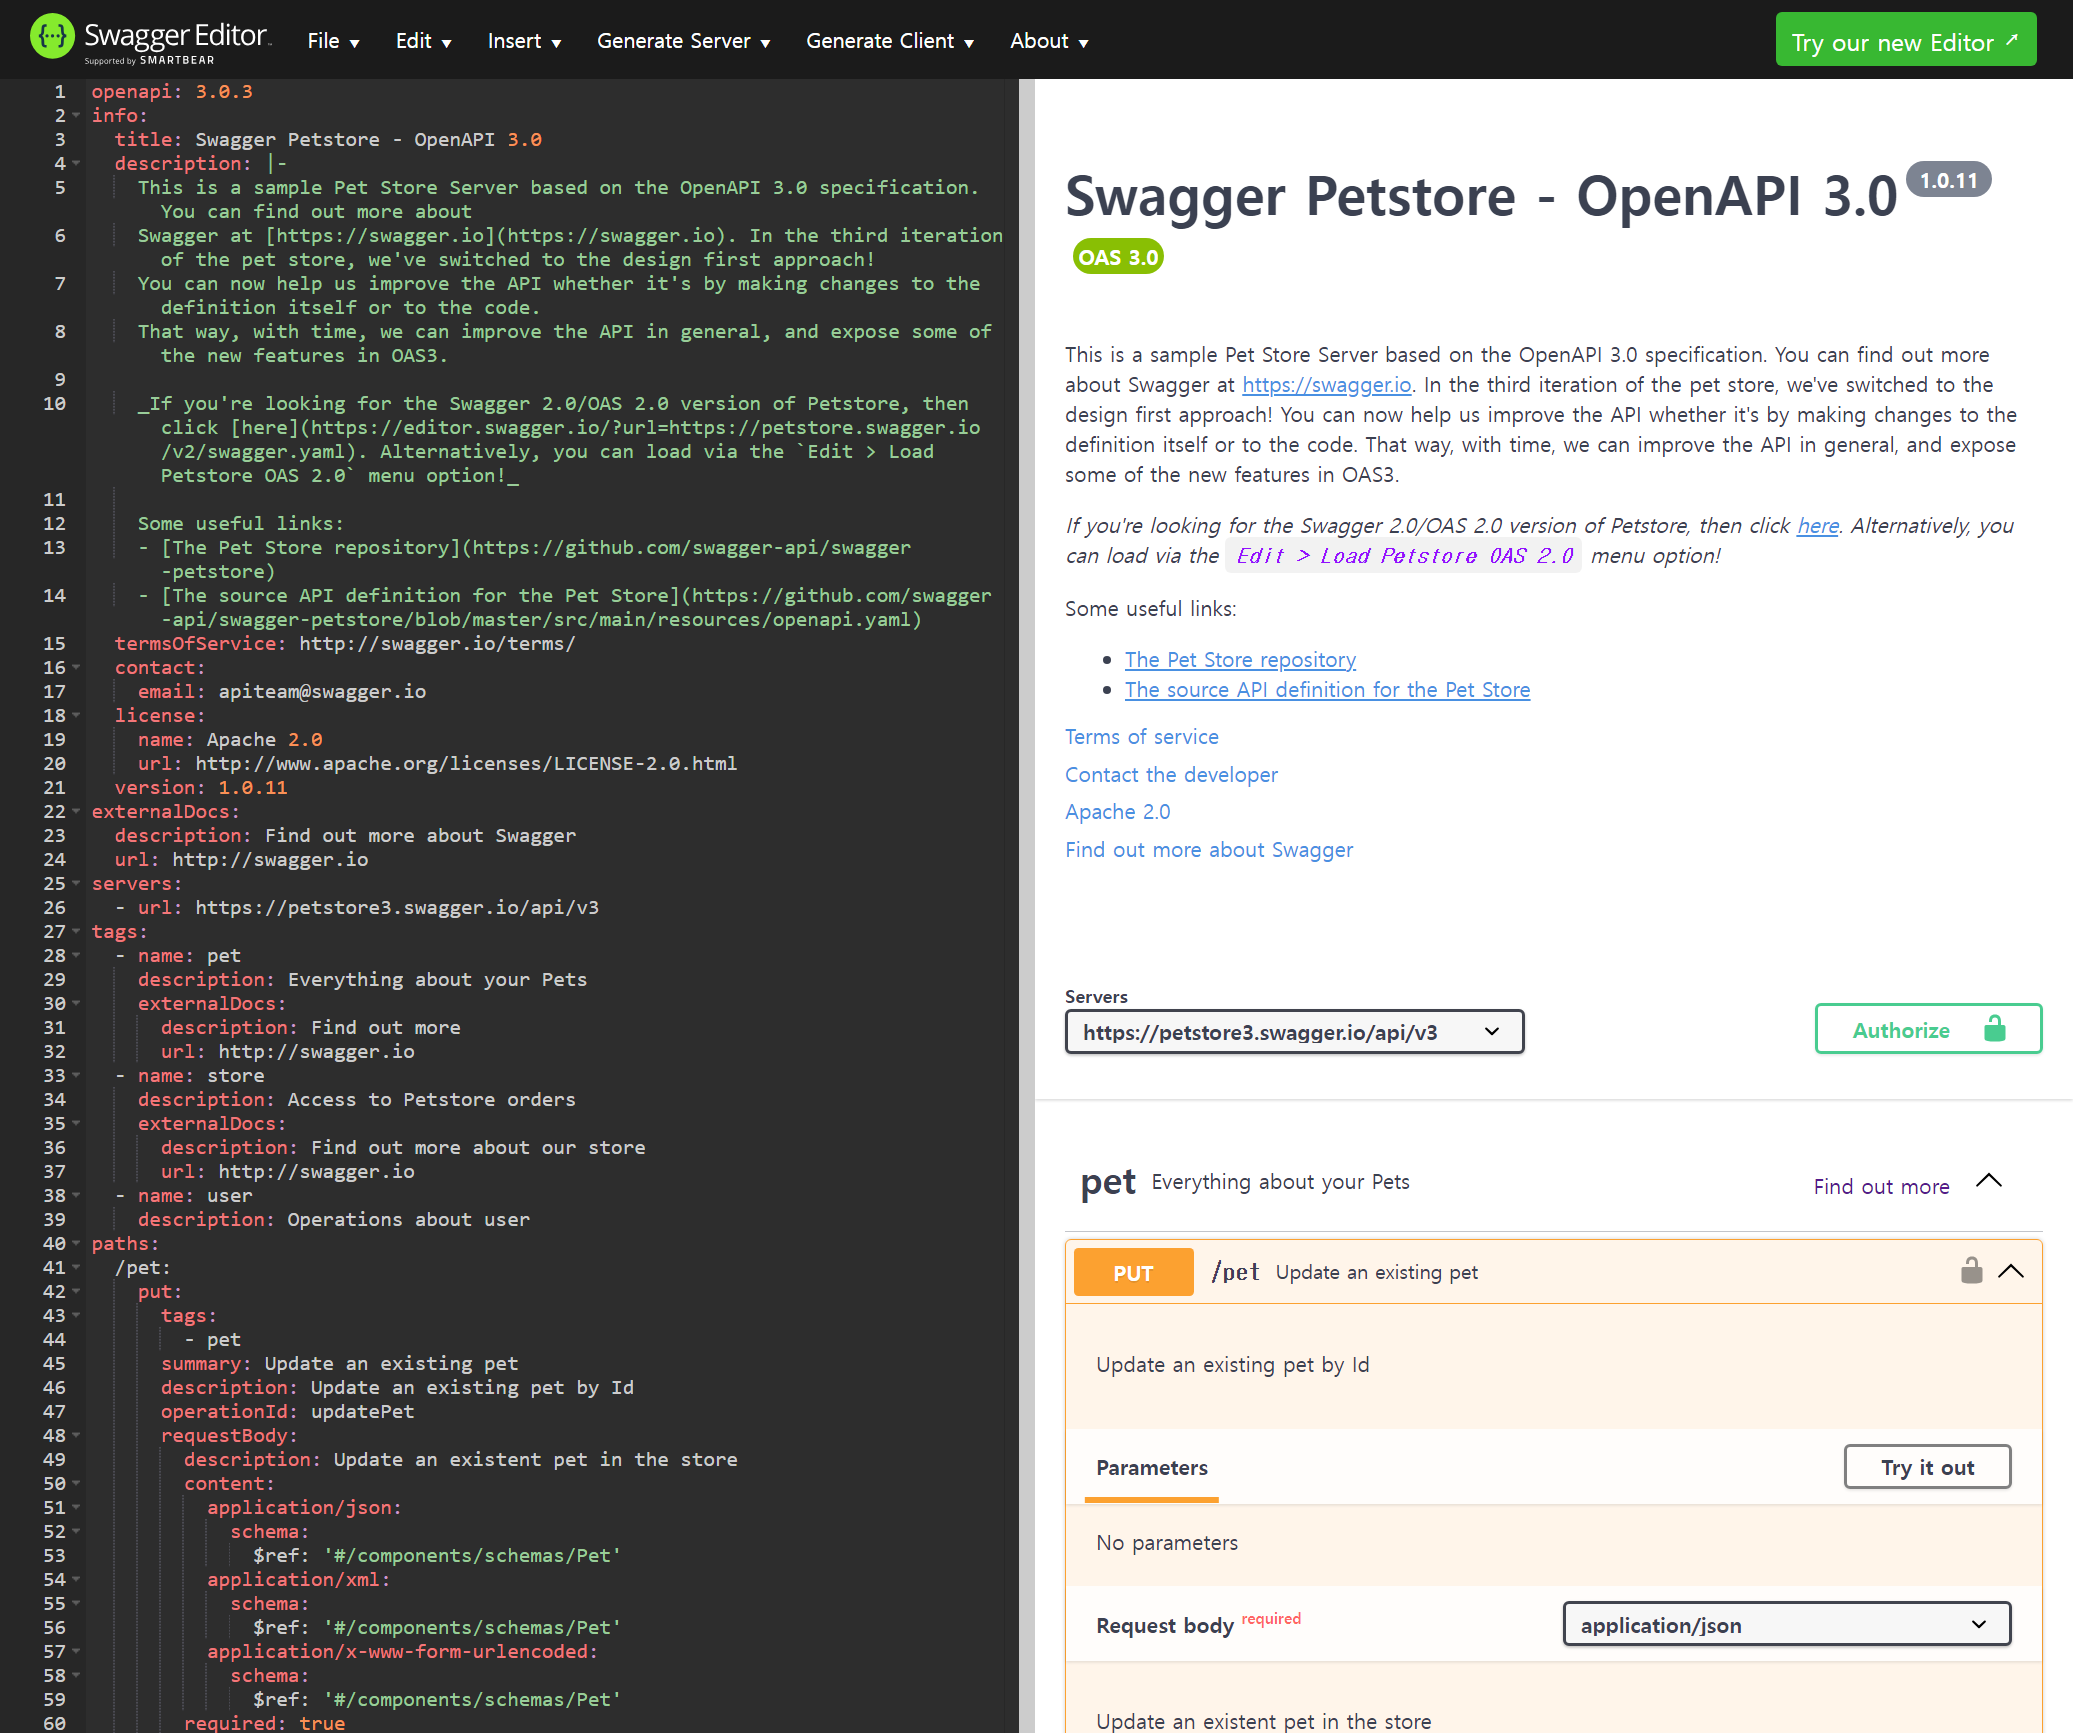
화면의 왼쪽에서 JSON 또는 YAML을 사용해서 코드를 작성하면 오른쪽에서 결과를 실시간으로 확인할 수 있습니다.
이제 Swagger Editor에서 기본으로 제공되는 샘플 코드를 뜯어보며 API 명세서 작성법을 알아보겠습니다.
기본 정보 정의하기
openapi: 3.0.3
info:
  title: Swagger Petstore - OpenAPI 3.0
  description: |-
    This is a sample Pet Store Server based on the OpenAPI 3.0 specification.
    You can find out more about Swagger ...
  termsOfService: http://swagger.io/terms/
  contact:
    email: apiteam@swagger.io
  license:
    name: Apache 2.0
    url: http://www.apache.org/licenses/LICENSE-2.0.html
  version: 1.0.11
externalDocs:
  description: Find out more about Swagger
  url: http://swagger.io
servers:
  - url: https://petstore3.swagger.io/api/v3
tags:
  - name: pet
    description: Everything about your Pets
    externalDocs:
      description: Find out more
      url: http://swagger.io
  - name: store
    description: Access to Petstore orders
    externalDocs:
      description: Find out more about our store
      url: http://swagger.io
  - name: user
description: Operations about useropenapi: OpenAPI specification 버전을 명시합니다.info:title,description등 해당 API 명세서의 각종 정보들을 명시하는 부분입니다.servers: API에 접근 가능한 URL을 나열합니다.tags: 여러 개의 태그 개체가 포함된 목록입니다. 각 태그 객체에는 일반적으로name,description등이 포함됩니다.
API 엔드포인트, HTTP 메서드 정의하기
paths:
  /pet:
    put:
      tags:
        - pet
      summary: Update an existing pet
      description: Update an existing pet by Id
      operationId: updatePet
      requestBody:
        description: Update an existent pet in the store
        content:
          application/json:
            schema:
              $ref: '#/components/schemas/Pet'
          application/xml:
            schema:
              $ref: '#/components/schemas/Pet'
          application/x-www-form-urlencoded:
            schema:
              $ref: '#/components/schemas/Pet'
        required: true
      responses:
        '200':
          description: Successful operation
          content:
            application/json:
              schema:
                $ref: '#/components/schemas/Pet'
            application/xml:
              schema:
                $ref: '#/components/schemas/Pet'
        '400':
          description: Invalid ID supplied
        '404':
          description: Pet not found
        '422':
          description: Validation exception
      security:
        - petstore_auth:
            - write:pets
- read:petspaths: API 엔드포인트, HTTP 메소드를 명시합니다. 위의 코드 스니펫에서는 엔드포인트로 /pet, HTTP 메서드로 PUT을 사용했습니다.requestBody: requestBody를 정의합니다.description,content등이 정의되며,schema를 따로 정의하여 참조하는 방식으로 사용할 수 있습니다.responses: HTTP 응답 코드와 설명을 명시합니다.
컴포넌트 및 스키마 추가하기
재사용 가능한 컴포넌트, 스키마를 추가하여 API 명세서를 작성할때 유용하게 사용할 수 있습니다.
components:
  schemas:
    Pet:
      required:
        - name
        - photoUrls
      type: object
      properties:
        id:
          type: integer
          format: int64
          example: 10
        name:
          type: string
          example: doggie
        category:
          $ref: '#/components/schemas/Category'
        photoUrls:
          type: array
          xml:
            wrapped: true
          items:
            type: string
            xml:
              name: photoUrl
        tags:
          type: array
          xml:
            wrapped: true
          items:
            $ref: '#/components/schemas/Tag'
        status:
          type: string
          description: pet status in the store
          enum:
            - available
            - pending
            - sold
      xml:
        name: pet
위의 코드 스니펫은 Pet 객체를 스키마의 형태로 정의합니다.
샘플 API 명세서에서는 여기에 정의된 스키마를 참조해서 requestBody, responses 부분의 예시를 제공합니다.
properties: 해당 객체가 어떤 속성을 갖는지 명시합니다. 여기에서는id,name,category,photoUrls등이 포함됩니다.
지금까지 살펴본 샘플 YAML 코드로 생성되는 API 명세서는 다음과 같습니다.
결론
지금까지 Swagger Editor를 사용한 API 명세서 작성에 대해 알아보았습니다.
Swagger Editor를 사용하면 간편하게 API 명세서를 작성할 수 있고, JSON이나 YAML 파일로 저장할 수 있어서 버전관리가 용이하다는 장점이 있습니다.
References