프래그먼트란
- 뷰다. 텍스트 뷰나 버튼처럼 액티비티 화면을 구성하는 뷰.인데
- 그 자체만으로는 아무것도 아닌.. ,, 뷰다.
- 다른 뷰와 다르게 액티비티처럼 작동함!! 액티비티에 작성 가능한 뷰는 프래그먼트에서도 가능
- 탭처럼 하나의 액티비티에서 두개의 프래그먼트 클래스를 사용
특징
- 독립적으로 사용 불가!! 액티비티나 부모 프래그먼트에 종속적
- 자체적인 생명주기를 가짐
- 재사용 가능
- 여러 액티비티에서 사용 중 수정, 삭제 등이 가능
사용하기
- 레이아웃 xml 파일을 작성 (액티비티처럼)
방법 1) 액티비티 레이아웃 xml에 등록하여 출력
<fragmanet/>태그 사용
	<fragment
    	android:name="com.example.test11.OneFragment"
        android:id="@+id/fragmentView"
        android:layout_width="match_parent"
        android:layout_height="match_parent"/>
방법 2) 액티비티 코드에서 프래그먼트 출력
- 액티비티 레이아웃 파일에 프래그먼트가 출력될 빈 뷰 준비
- 코드에서 프래그먼트를 동적으로 제어하려면(추가, 제거)
FragmentManger로 만든FragmentTransaction클래스 필요
🍩 FragmentManager
- 액티비티, 부모 프래그먼트가 각각 하나씩 가지고 있는, 자식 프래그먼트를 관리하는 클래스. 얘로 액티비티-프래그먼트, 프래그먼트-자식 프래그먼트가 상호작용할 수 있다.
supportFragmentManager등의 객체임

🍰 FragmentTranscation
- 프래그먼트 추가, 삭제, 관리하는 클래스
- 위의 매니저로 만든 객체.
FragmentTransaction = fragmentManager.beginTransaction()의 형태add(int containerViewId, Fragment fragment): 새로운 프래그먼트 추가replace(int containerViewId, Fragment fragment): 추가된 프래그먼트 대체remove(Fragment fragment): 추가된 프래그먼트 제거commit(): 화면에 적용 (이걸 해야 적용됨!!)
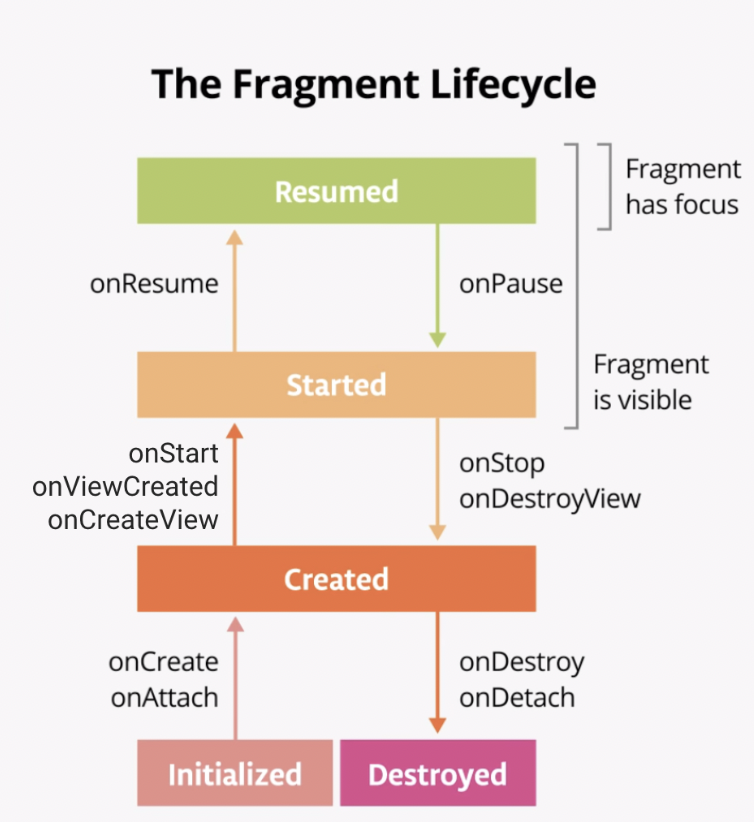
프래그먼트 생명주기
- 크게 5가지로 나뉨
- 초기화 (initialized)
- 프래그먼트 구성할 뷰가 준비되어있지 않은 상태
onAttach: 프래그먼트가 액티비티에 종속된 시점에 호출onCreate: 프래그먼트가 만들어졌지만 뷰 세팅은 안된 상태
- 생성 (created)
onCreateViewonViewCreated: 프래그먼트의 화면 구성할 뷰 객체 준비. 이 단계에서 View 의 초기 세팅을 하면 안정성을 보장받을 수 있다.onStart
- 시작 (started)
- 프래그먼트 화면이 사용자에게 보임
onResume: 프래그먼트와 사용자 상호작용 가능한 상태
- 이후 다른 프래그먼트로 교체될 때는 백스택을 사용하는지 여부에 따라 생명주기 다르게 동작!
- 재개 (resumed)
- 소멸 (destroyed)
-
백스택 사용 시: onResume 이후 프래그먼트 제거되지 않고, onDestroyView함수까지만 호출됨. (onResume->onPause->onStop->onDestroyView) 프래그먼트가 교체될 때 onDestroyView까지만 호출되어 저장됐다가 사용자가 뒤로가기 눌러서 되돌아오면 다시 onCreateView->onViewCreated->onStart->onResume 함수 차례로 호출되어 다시 보이게 됨!! -
백스택 미사용 시: 프래그먼트가 교체될 때 기존의 프래그먼트는 onDestroy까지 호출되어 제거됨
실습
- 위의 방법2로 만들어보자.
- 메인 엑티비티의 레이아웃에 프레그먼트가 들어갈 뷰를 준비
1-1) 메인 액티비티 레이아웃.xml
- FrameLayout에 'fragmentFrame'이란 아이디로 프래그먼트 뷰 만듦
- 밑에 버튼 두개로 프래그먼트 교체할 수 있게 준비
	<?xml version="1.0" encoding="utf-8"?>
<androidx.constraintlayout.widget.ConstraintLayout xmlns:android="http://schemas.android.com/apk/res/android"
    xmlns:app="http://schemas.android.com/apk/res-auto"
    xmlns:tools="http://schemas.android.com/tools"
    android:layout_width="match_parent"
    android:layout_height="match_parent"
    tools:context=".TwoColorActivity">

    <FrameLayout
        android:id="@+id/fragmentFrame"
        android:layout_width="match_parent"
        android:layout_height="300dp"
        android:background="#FFEB3B"
        app:layout_constraintTop_toTopOf="parent"   />

    <Button
        android:id="@+id/button_red_fragment"
        android:layout_width="match_parent"
        android:layout_height="wrap_content"
        app:layout_constraintBottom_toBottomOf="parent"
        android:layout_margin="10dp"
        android:text="Red Fragment" />

    <Button
        android:id="@+id/button_blue_fragment"
        android:layout_width="match_parent"
        android:layout_height="wrap_content"
        app:layout_constraintBottom_toTopOf="@id/button_red_fragment"
        android:layout_margin="10dp"
        android:text="Blue Fragment"    />

</androidx.constraintlayout.widget.ConstraintLayout>
1-2) 메인 액티비티.kt
- 위에서 만든 두 개 버튼 클릭리스너를 달아서 클릭될 때 프래그먼트 교체
supportFragmentManger.beginTransaction()으로 트랜젝션 생성- 트랜젝션으로 프래그먼트 상태 바꾼 후 저장 (
commit으로)
class TwoColorActivity : AppCompatActivity() {
override fun onCreate(savedInstanceState: Bundle?) {
super.onCreate(savedInstanceState)
setContentView(R.layout.activity_two_colors)
settingButtons()
}
private fun settingButtons() {
val redButton = findViewById<Button>(R.id.button_red_fragment) // 빨간 버튼 초기화
val blueButton = findViewById<Button>(R.id.button_blue_fragment) // 파란 버튼 초기화
redButton.setOnClickListener{
val fragmentTransaction = // FragmentTransaction 클래스 객체 생성
supportFragmentManager.beginTransaction() // Fragment 추가, 삭제, 교체 등 가능
fragmentTransaction.replace(R.id.fragmentFrame, RedFragment()) // replace = 교체
fragmentTransaction.commit() // Transaction 이후 반드시 commit() 함수 호출
}
blueButton.setOnClickListener{
val fragmentTransaction = // FragmentTransaction 클래스 객체 생성
supportFragmentManager.beginTransaction() // Fragment 추가, 삭제, 교체 등 가능
fragmentTransaction.replace(R.id.fragmentFrame, BlueFragment()) // replace = 교체
fragmentTransaction.commit() // Transaction 이후 반드시 commit() 함수 호출
}
}
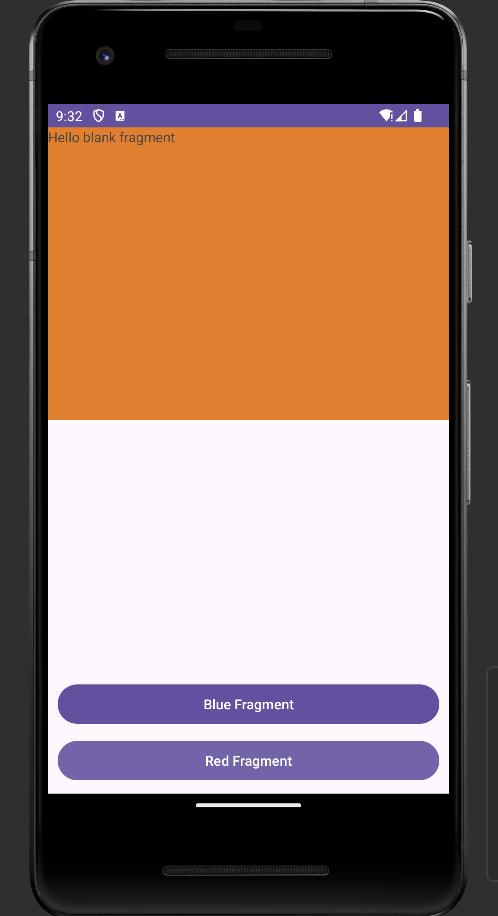
}2-1) 프래그먼트 레이아웃.xml 생성
<?xml version="1.0" encoding="utf-8"?>
<FrameLayout xmlns:android="http://schemas.android.com/apk/res/android"
    xmlns:tools="http://schemas.android.com/tools"
    android:layout_width="match_parent"
    android:layout_height="match_parent"
    tools:context=".BlueFragment">

    <!-- TODO: Update blank fragment layout -->
    <TextView
        android:layout_width="match_parent"
        android:layout_height="match_parent"
        android:background="#F07901"
        android:text="@string/hello_blank_fragment" />

</FrameLayout>
2-2) 프래그먼트.kt 생성
- 만들 때 프래그먼트 생성으로 만듦
- 만들어둔 프래그먼트를 inflate해옴
class RedFragment : Fragment() {
    override fun onCreateView(      // Fragment 의 layout 을 연결할 때 쓰는 callback
        inflater: LayoutInflater,   // 뷰를 생성하는 객체
        container: ViewGroup?,      // 생성할 뷰(자식 뷰)가 들어갈 부모 뷰
        saveInstanceState: Bundle?  // 이전 Fragment 객체에서 전달된 데이터(Bundle)
    ): View? {
        return inflater.inflate(R.layout.fragment_red, container, false);
    }
}
- 버튼을 누를 때마다 프래그먼트가 교체된다.

- 바인딩과 인플레이트

야금야금 앱 개발자